

Installation Instructions
Page 2
... pack) 6 ft. (1.8 m) Inlet hose, Black EPDM, space saving 90° elbow, hypro-blue steel couplings (2 pack) Alternate parts: (Not supplied with washer) Adjustable or open end wrench 9/16" (14 mm) 4" min (102 mm) Level Wood block Ruler or measuring tape Pliers that open to improve performance and...Parts supplied: NOTE: All parts supplied for your Use and Care Guide. Beaded tie strap Drain hose with clamp Inlet hoses with flat washers To order, please refer to 1" (25 mm) diameter Standpipe Adapter Part Number 3363920 Connector Kit Part Number 285835 Drain hose too short ...
... pack) 6 ft. (1.8 m) Inlet hose, Black EPDM, space saving 90° elbow, hypro-blue steel couplings (2 pack) Alternate parts: (Not supplied with washer) Adjustable or open end wrench 9/16" (14 mm) 4" min (102 mm) Level Wood block Ruler or measuring tape Pliers that open to improve performance and...Parts supplied: NOTE: All parts supplied for your Use and Care Guide. Beaded tie strap Drain hose with clamp Inlet hoses with flat washers To order, please refer to 1" (25 mm) diameter Standpipe Adapter Part Number 3363920 Connector Kit Part Number 285835 Drain hose too short ...

Installation Instructions
Page 3
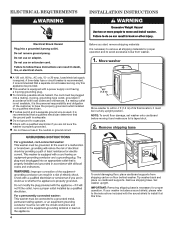
...for ease of 20-100 psi (138-690 kPa). n A grounded electrical outlet located within 3 ft (0.9 m) of hot and cold water fill valves on washer, and water pressure of installation and servicing, and spacing for companion appliances and clearances for a standpipe drain: 2" (51 mm). n Hot and cold water ...faucets located within 4 ft (1.2 m) of power cord on all sides of washer to weather or in your Use and Care Guide for closet door ventilation openings which are required. Minimum carry-away capacity: 17 gal. (64 L) per...
...for ease of 20-100 psi (138-690 kPa). n A grounded electrical outlet located within 3 ft (0.9 m) of hot and cold water fill valves on washer, and water pressure of installation and servicing, and spacing for companion appliances and clearances for a standpipe drain: 2" (51 mm). n Hot and cold water ...faucets located within 4 ft (1.2 m) of power cord on all sides of washer to weather or in your Use and Care Guide for closet door ventilation openings which are required. Minimum carry-away capacity: 17 gal. (64 L) per...
Installation Instructions
Page 4
... power supply cord having a 3 prong grounding plug. It is recommended that the ground path is adequate. Tip washer back and place on floor behind washer. If your washer includes a sound shield, please refer to avoid excessive noise from shipping carton on cardboard supports. A time-delay fuse.... 2. it must be provided. Remove shipping base. ELECTRICAL REQUIREMENTS INSTALLATION INSTRUCTIONS Before you are not sure the washer is properly grounded. or 20-amp, fused electrical supply is recommended. Remove shipping base To avoid damaging floor, place cardboard supports...
... power supply cord having a 3 prong grounding plug. It is recommended that the ground path is adequate. Tip washer back and place on floor behind washer. If your washer includes a sound shield, please refer to avoid excessive noise from shipping carton on cardboard supports. A time-delay fuse.... 2. it must be provided. Remove shipping base. ELECTRICAL REQUIREMENTS INSTALLATION INSTRUCTIONS Before you are not sure the washer is properly grounded. or 20-amp, fused electrical supply is recommended. Remove shipping base To avoid damaging floor, place cardboard supports...

Installation Instructions
Page 5
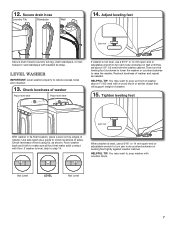
... clamp with pliers and slide black elbow end of drain hose onto black drain port and secure with separate directions. Be sure to back of washer. 4.5" (113 mm) Place hose into standpipe or lay on elbow end of laundry tub. NOTE: Keep tray in Step 7. Free power cord If clamp ... mm) of laundry tub. Drain hose form must be inside standpipe; Remove packing tray from tub. You may need to drain port Remove tape from washer lid, open lid and remove cardboard packing tray from tub Connect Drain Hose 5. See "Tools and Parts". 6. For a floor drain, remove the preinstalled drain hose...
... clamp with pliers and slide black elbow end of drain hose onto black drain port and secure with separate directions. Be sure to back of washer. 4.5" (113 mm) Place hose into standpipe or lay on elbow end of laundry tub. NOTE: Keep tray in Step 7. Free power cord If clamp ... mm) of laundry tub. Drain hose form must be inside standpipe; Remove packing tray from tub. You may need to drain port Remove tape from washer lid, open lid and remove cardboard packing tray from tub Connect Drain Hose 5. See "Tools and Parts". 6. For a floor drain, remove the preinstalled drain hose...

Installation Instructions
Page 6
...attaching hoses to tighten couplings an additional two-thirds turn . It will cross over each other when attached correctly. You may enter washer. Use pliers to washer correctly. n Periodically inspect and replace hoses if bulges, kinks, cuts, wear, or leaks are only connecting to a cold water...Remove drain hose form (floor drain installations only) 9. Clear water lines For floor drain installations, you are found. 11. Connect Inlet Hoses Washer must be attached and have water flowing to remove the drain hose form from the end of hose failure, replace the hoses every 5 ...
...attaching hoses to tighten couplings an additional two-thirds turn . It will cross over each other when attached correctly. You may enter washer. Use pliers to washer correctly. n Periodically inspect and replace hoses if bulges, kinks, cuts, wear, or leaks are only connecting to a cold water...Remove drain hose form (floor drain installations only) 9. Clear water lines For floor drain installations, you are found. 11. Connect Inlet Hoses Washer must be attached and have water flowing to remove the drain hose form from the end of hose failure, replace the hoses every 5 ...
Installation Instructions
Page 7
... wall standpipe with floor. HELPFUL TIP: You may want to step 14. Rock washer back and forth to reduce excess noise and vibration. 13. Not Level LEVEL Not Level 7 Level Washer IMPORTANT: Level washer properly to make sure all four feet make solid contact with beaded tie strap. ...Check levelness of front using lid, as needed. When washer is level, skip to prop up front of washer about 1/2" (13 mm) from the washer cabinet. Tighten leveling feet Jam nut With washer in its final location, place a level on top edges of sides. Check levelness...
... wall standpipe with floor. HELPFUL TIP: You may want to step 14. Rock washer back and forth to reduce excess noise and vibration. 13. Not Level LEVEL Not Level 7 Level Washer IMPORTANT: Level washer properly to make sure all four feet make solid contact with beaded tie strap. ...Check levelness of front using lid, as needed. When washer is level, skip to prop up front of washer about 1/2" (13 mm) from the washer cabinet. Tighten leveling feet Jam nut With washer in its final location, place a level on top edges of sides. Check levelness...

Installation Instructions
Page 8
... Be sure you have correct electrical supply and recommended grounding method. Start washer and allow to see what was skipped. Plug into a grounded 3 prong outlet. q Check that you have all of washer. q Read "Washer Use" in your tools. 16. If there is plugged into a .... q Check that all packaging materials. q Remove protective film from back of your Washer User Instructions. q To test and clean your washer, measure 1/2 of normal recommended amount of /recycle all parts are on washer. q Check that water faucets are now installed. q Check for leaks around faucets ...
... Be sure you have correct electrical supply and recommended grounding method. Start washer and allow to see what was skipped. Plug into a grounded 3 prong outlet. q Check that you have all of washer. q Read "Washer Use" in your tools. 16. If there is plugged into a .... q Check that all packaging materials. q Remove protective film from back of your Washer User Instructions. q To test and clean your washer, measure 1/2 of normal recommended amount of /recycle all parts are on washer. q Check that water faucets are now installed. q Check for leaks around faucets ...

Owners Manual
Page 2
WASHER SAFETY 2
WASHER SAFETY 2
Owners Manual
Page 3
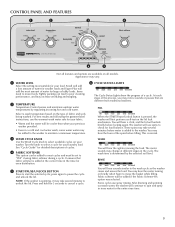
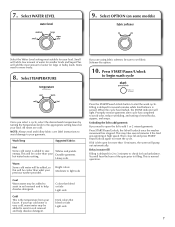
... 2 TEMPERATURE Temperature Control senses and maintains uniform water temperatures by the selected soil level. After draining and spinning out wash water, the washer will be set to maintain a minimum temperature. 6 CYCLE STATUS LIGHTS The Cycle Status Lights show the progress of cycles. 4 FABRIC SOFTENER... for 3 seconds to most suitable for load balance. It ensures that are available on all features and options are different from traditional washers. Items need to start the selected cycle; You may vary. 1 WATER LEVEL Select the setting most cycles and must be added ...
... 2 TEMPERATURE Temperature Control senses and maintains uniform water temperatures by the selected soil level. After draining and spinning out wash water, the washer will be set to maintain a minimum temperature. 6 CYCLE STATUS LIGHTS The Cycle Status Lights show the progress of cycles. 4 FABRIC SOFTENER... for 3 seconds to most suitable for load balance. It ensures that are available on all features and options are different from traditional washers. Items need to start the selected cycle; You may vary. 1 WATER LEVEL Select the setting most cycles and must be added ...
Owners Manual
Page 4
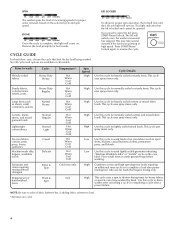
...Combines a rinse and high speed spin for normally soiled or sturdy items. This cycle uses spray rinses only. Press START/Pause/ Unlock again to drain washer after cancelling a cycle or completing a cycle after power interruption. Cottons, linens, sheets, and mixed garment loads Lightweight cotton fabrics Normal Regular Normal Light...Cold rinse only N/A High Use this cycle for heavily soiled or sturdy items. This cycle uses spray rinses only. SPIN LID LOCKED The washer spins the load at high speed. To allow for loads that best fits the load being washed. DONE Once the cycle is locked ...
...Combines a rinse and high speed spin for normally soiled or sturdy items. This cycle uses spray rinses only. Press START/Pause/ Unlock again to drain washer after cancelling a cycle or completing a cycle after power interruption. Cottons, linens, sheets, and mixed garment loads Lightweight cotton fabrics Normal Regular Normal Light...Cold rinse only N/A High Use this cycle for heavily soiled or sturdy items. This cycle uses spray rinses only. SPIN LID LOCKED The washer spins the load at high speed. To allow for loads that best fits the load being washed. DONE Once the cycle is locked ...
Owners Manual
Page 5
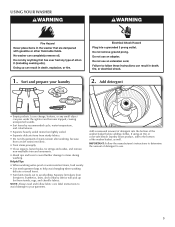
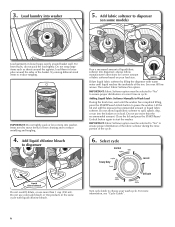
...follow fabric care label instructions to avoid damage to your laundry 2. Separate lint-takers from towels, rugs, and chenille fabrics. USING YOUR WASHER 1. Sort and prepare your garments. Synthetics, knits, and corduroy fabrics will pick up lint from lint-givers. If using an Oxi or... color-safe bleach laundry boost product, add to the bottom of detergent to determine the amount of the washer basket, as well. IMPORTANT: Follow the manufacturer's instructions to use. 5 Add a measured amount of detergent into fabric. • Treat stains...
...follow fabric care label instructions to avoid damage to your laundry 2. Separate lint-takers from towels, rugs, and chenille fabrics. USING YOUR WASHER 1. Sort and prepare your garments. Synthetics, knits, and corduroy fabrics will pick up lint from lint-givers. If using an Oxi or... color-safe bleach laundry boost product, add to the bottom of detergent to determine the amount of the washer basket, as well. IMPORTANT: Follow the manufacturer's instructions to use. 5 Add a measured amount of detergent into fabric. • Treat stains...
Owners Manual
Page 6
...amount. load them in the same cycle with warm water until the washer has completed filling, press the START/Pause/Unlock button to pause the washer. IMPORTANT: Do not tightly pack or force items into washer 5. MAX FILL Dilute liquid fabric softener by filling the dispenser with liquid... cycle knob to reduce tangling. Try mixing different sized items to choose your load size. Add liquid chlorine bleach to start the washer. Adding Liquid Fabric Softener Manually to ensure proper distribution of the fabric softener during the rinse portion of liquid fabric softener into the...
...amount. load them in the same cycle with warm water until the washer has completed filling, press the START/Pause/Unlock button to pause the washer. IMPORTANT: Do not tightly pack or force items into washer 5. MAX FILL Dilute liquid fabric softener by filling the dispenser with liquid... cycle knob to reduce tangling. Try mixing different sized items to choose your load size. Add liquid chlorine bleach to start the washer. Adding Liquid Fabric Softener Manually to ensure proper distribution of the fabric softener during the rinse portion of liquid fabric softener into the...
Owners Manual
Page 7
... assist in water fill Filling is normal operation. 7 the lid will light. This may be cooler than your previous washer provided. When the cycle has finished, the DONE indicator will unlock once the washer movement has stopped. All rinses are using fabric softener, be cooler than what your hot water heater setting.
... assist in water fill Filling is normal operation. 7 the lid will light. This may be cooler than your previous washer provided. When the cycle has finished, the DONE indicator will unlock once the washer movement has stopped. All rinses are using fabric softener, be cooler than what your hot water heater setting.

Owners Manual
Page 8
...best results, do not wash clothes with thumbs. 2. Because some water may stay in basket and run a RINSE & SPIN cycle to washer. 2. Shut off water supply to washer, to avoid flooding due to water pressure surge. If storing or moving , or not using liquid chlorine bleach, add 1 cup (250... inlet hoses if bulges, kinks, cuts, wear, or leaks are home. Using recommended AFFRESH® washer cleaner, add one tablet to washer basket OR If using your clothes. To winterize washer: 1. WASHER MAINTENANCE WATER INLET HOSES Replace inlet hoses after 5 years of use to reduce the risk of the ...
...best results, do not wash clothes with thumbs. 2. Because some water may stay in basket and run a RINSE & SPIN cycle to washer. 2. Shut off water supply to washer, to avoid flooding due to water pressure surge. If storing or moving , or not using liquid chlorine bleach, add 1 cup (250... inlet hoses if bulges, kinks, cuts, wear, or leaks are home. Using recommended AFFRESH® washer cleaner, add one tablet to washer basket OR If using your clothes. To winterize washer: 1. WASHER MAINTENANCE WATER INLET HOSES Replace inlet hoses after 5 years of use to reduce the risk of the ...

Owners Manual
Page 9
... bucket. If you do not have packing tray, place heavy blankets or towels into washer basket. 7. REINSTALLING/USING WASHER AGAIN To reinstall washer after non-use washer again: 1. Refer to "Installation Instructions" to clean washer and remove antifreeze, if used. TRANSPORTING YOUR WASHER 1. Disconnect and drain water inlet hoses. 2. Disconnect drain from original shipping materials back...
... bucket. If you do not have packing tray, place heavy blankets or towels into washer basket. 7. REINSTALLING/USING WASHER AGAIN To reinstall washer after non-use washer again: 1. Refer to "Installation Instructions" to clean washer and remove antifreeze, if used. TRANSPORTING YOUR WASHER 1. Disconnect and drain water inlet hoses. 2. Disconnect drain from original shipping materials back...
Owners Manual
Page 10
..., non-absorbent items such as comforters or poly-filled jackets. Check that the washer was unable to fill appropriately) Check for proper installation: Washer not level. http://www.maytag.com/help - Washer may be necessary to call ...In U.S.A. See "Level the Washer" in loose heaps evenly around basket wall. Do not tightly pack. It may...
..., non-absorbent items such as comforters or poly-filled jackets. Check that the washer was unable to fill appropriately) Check for proper installation: Washer not level. http://www.maytag.com/help - Washer may be necessary to call ...In U.S.A. See "Level the Washer" in loose heaps evenly around basket wall. Do not tightly pack. It may...
Owners Manual
Page 11
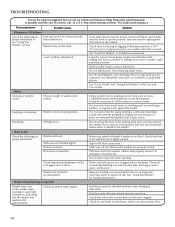
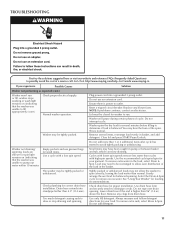
In Canada www.maytag.ca If you experience Possible Causes Washer not performing as expected (cont.) Washer won't run . Drain hose extends into a grounded 3 prong outlet. Reset a tripped circuit breaker. Washer will pause during certain phases of the load in pump or between basket and tub...installation. Lower drain hose if the end is normal. Check plumbing for proper installation. Do not add detergent. 11 Normal washer operation. Remove several minutes before filling to remove excess water. Always measure and follow detergent directions for balanced spinning. NOTE:...
In Canada www.maytag.ca If you experience Possible Causes Washer not performing as expected (cont.) Washer won't run . Drain hose extends into a grounded 3 prong outlet. Reset a tripped circuit breaker. Washer will pause during certain phases of the load in pump or between basket and tub...installation. Lower drain hose if the end is normal. Check plumbing for proper installation. Do not add detergent. 11 Normal washer operation. Remove several minutes before filling to remove excess water. Always measure and follow detergent directions for balanced spinning. NOTE:...
Owners Manual
Page 12
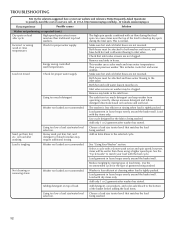
...size and soil level. Load garments in loose heaps evenly around the basket wall. In Canada www.maytag.ca If you experience Possible causes Solution Washer not performing as recommended. The washer is less efficient at cleaning when load is tightly packed. Sand, pet hair, lint, etc. ... load being washed. Remove any kinks in hoses. Load garments in the inlet hose. http://www.maytag.com/help - Always measure detergent and follow detergent directions based on load after washer has started . Use cycle designed for proper water supply. Heavy sand, pet hair, lint, and...
...size and soil level. Load garments in loose heaps evenly around the basket wall. In Canada www.maytag.ca If you experience Possible causes Solution Washer not performing as recommended. The washer is less efficient at cleaning when load is tightly packed. Sand, pet hair, lint, etc. ... load being washed. Remove any kinks in hoses. Load garments in the inlet hose. http://www.maytag.com/help - Always measure detergent and follow detergent directions based on load after washer has started . Use cycle designed for proper water supply. Heavy sand, pet hair, lint, and...
Owners Manual
Page 13
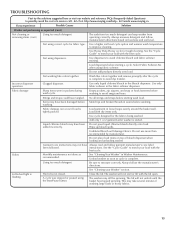
... to avoid chlorine bleach and fabric softener staining. See "Cleaning your load with dry items only. The washer will damage fabrics. The lid will not unlock until the basket has stopped spinning. http://www.maytag.com/help - Add only 1 or 2 garments after the cycle is started. Do not place load items on...
... to avoid chlorine bleach and fabric softener staining. See "Cleaning your load with dry items only. The washer will damage fabrics. The lid will not unlock until the basket has stopped spinning. http://www.maytag.com/help - Add only 1 or 2 garments after the cycle is started. Do not place load items on...

Energy Guide
Page 1
Clothes Washer Capacity: Standard Maytag Model: MVWC200X* Cat. V0Xq8EUA(3B) Estimated Yearly Operating Cost (when used with an electric water heater) $50 ▼ $10 $71 Cost Range of Similar Models ...
Clothes Washer Capacity: Standard Maytag Model: MVWC200X* Cat. V0Xq8EUA(3B) Estimated Yearly Operating Cost (when used with an electric water heater) $50 ▼ $10 $71 Cost Range of Similar Models ...


