Use & Care Guide
Page 8
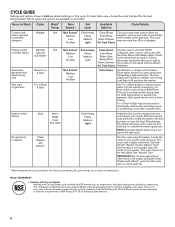
... draining the washer after canceling a cycle or completing a cycle after the cycle is selected, to complete the cleaning process. NOTE: Automatic bleach dispensing is not part of the soak cycle. Use with the Extra Rinse option turned on all models. CYCLE GUIDE Settings and options shown in bold are available on...
... draining the washer after canceling a cycle or completing a cycle after the cycle is selected, to complete the cleaning process. NOTE: Automatic bleach dispensing is not part of the soak cycle. Use with the Extra Rinse option turned on all models. CYCLE GUIDE Settings and options shown in bold are available on...
Use & Care Guide
Page 19
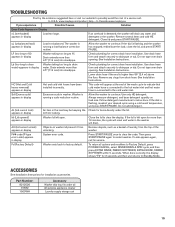
.... uL (unbalanced load) appears in display Load too large. Lower drain hose if the end is left open for installation accessories Part Number: 8212526 31682 1903WH Accessory Washer drip tray, fits under the lid. Always measure detergent, and base detergent quantity on washer ... RINSE/DRAIN & SPIN cycle, and then press EXTRA RINSE, FABRIC SOFTENER, EXTRA RINSE, FABRIC SOFTENER within 5 seconds. www.maytag.com/product_help - In Canada www.maytag.ca. Remove several items and add HE detergent. If the dial is flashing, reselect your desired cycle using a cold wash temperature...
.... uL (unbalanced load) appears in display Load too large. Lower drain hose if the end is left open for installation accessories Part Number: 8212526 31682 1903WH Accessory Washer drip tray, fits under the lid. Always measure detergent, and base detergent quantity on washer ... RINSE/DRAIN & SPIN cycle, and then press EXTRA RINSE, FABRIC SOFTENER, EXTRA RINSE, FABRIC SOFTENER within 5 seconds. www.maytag.com/product_help - In Canada www.maytag.ca. Remove several items and add HE detergent. If the dial is flashing, reselect your desired cycle using a cold wash temperature...

Use & Care Guide
Page 20
... improper installation, installation not in materials or workmanship and is required to obtain service under these parts that prevent function of Whirlpool Corporation or Whirlpool Canada LP (hereafter "Maytag") will pay for product service if your major appliance, to replace or repair house fuses, or... installation instructions. 10. This limited warranty is effective from the date of products not approved by an authorized Maytag servicer is inconsistent to parts or systems resulting from warranty coverage. 4. Proof of your major appliance if it is installed in an inaccessible ...
... improper installation, installation not in materials or workmanship and is required to obtain service under these parts that prevent function of Whirlpool Corporation or Whirlpool Canada LP (hereafter "Maytag") will pay for product service if your major appliance, to replace or repair house fuses, or... installation instructions. 10. This limited warranty is effective from the date of products not approved by an authorized Maytag servicer is inconsistent to parts or systems resulting from warranty coverage. 4. Proof of your major appliance if it is installed in an inaccessible ...

Installation Guide
Page 2
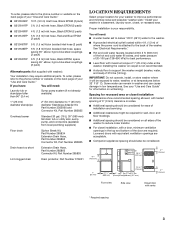
Tools needed: Parts supplied (located in the washer basket): Pliers that open to 19/16" (39.5 mm) Flashlight (optional) 4" min (102 mm) Adjustable or open-end wrench 9/16" (14 mm) Wood block Drain hose form Cable Tie Parts needed (Not supplied with washer): Water inlet hoses (2) Flat inlet hose washers (4) Tape measure or ruler Level 2 INSTALLATION REQUIREMENTS TOOLS AND PARTS Gather the required tools and parts before starting installation.
Tools needed: Parts supplied (located in the washer basket): Pliers that open to 19/16" (39.5 mm) Flashlight (optional) 4" min (102 mm) Adjustable or open-end wrench 9/16" (14 mm) Wood block Drain hose form Cable Tie Parts needed (Not supplied with washer): Water inlet hoses (2) Flat inlet hose washers (4) Tape measure or ruler Level 2 INSTALLATION REQUIREMENTS TOOLS AND PARTS Gather the required tools and parts before starting installation.
Installation Guide
Page 3
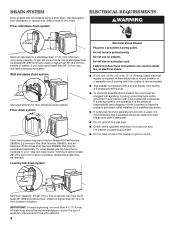
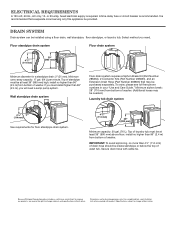
... 96" (2.4 m) Sump pump system (if not already available) 1" (25 mm) diameter standpipe 2" (50 mm) diameter to 1" (25 mm) diameter Standpipe Adapter Kit, Part Number 3363920 and Connector Kit, Part Number 285835 Overhead sewer Standard 20 gal. (76 L) 39" (990 mm) tall drain tub or utility sink, sump pump, and connectors (available from...
... 96" (2.4 m) Sump pump system (if not already available) 1" (25 mm) diameter standpipe 2" (50 mm) diameter to 1" (25 mm) diameter Standpipe Adapter Kit, Part Number 3363920 and Connector Kit, Part Number 285835 Overhead sewer Standard 20 gal. (76 L) 39" (990 mm) tall drain tub or utility sink, sump pump, and connectors (available from...
Installation Guide
Page 4
... standpipe drain system. Minimum carry-away capacity: 17 gal. (64 L) per minute. Floor drain system requires a Siphon Break Kit (Part Number 285834), 2 Connector Kits (Part Number 285835), and an Extension Drain Hose (Part Number 285863) that the ground path is equipped with local codes and ordinances. A time-delay fuse or circuit breaker on...
... standpipe drain system. Minimum carry-away capacity: 17 gal. (64 L) per minute. Floor drain system requires a Siphon Break Kit (Part Number 285834), 2 Connector Kits (Part Number 285835), and an Extension Drain Hose (Part Number 285863) that the ground path is equipped with local codes and ordinances. A time-delay fuse or circuit breaker on...

Installation Guide
Page 6
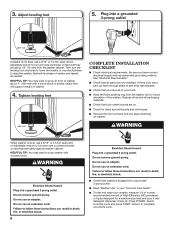
Connect drain hose form CONNECT INLET HOSES 1. You may need alternate parts with separate directions. See "Tools and Parts" to work properly. The hose must be connected for air. ■■ Do not lay excess hose on the bottom of form. Washer must be ...
Connect drain hose form CONNECT INLET HOSES 1. You may need alternate parts with separate directions. See "Tools and Parts" to work properly. The hose must be connected for air. ■■ Do not lay excess hose on the bottom of form. Washer must be ...
Installation Guide
Page 8
... Remove film from the washer cabinet. HELPFUL TIP: You may want to see what was skipped. ■■ Check that washer is an extra part, go back through steps to prop washer with a wood block or similar object that both water faucets are now installed. Then turn jam nuts counterclockwise... CHECKLIST ■■ Check electrical requirements. Plug into detergent dispenser. HELPFUL TIP: You may want to raise the washer. Dispose of/recycle all parts are on washer. Press POWER. Close lid. Select a normal cycle and press START. Adjust leveling feet 5.
... Remove film from the washer cabinet. HELPFUL TIP: You may want to see what was skipped. ■■ Check that washer is an extra part, go back through steps to prop washer with a wood block or similar object that both water faucets are now installed. Then turn jam nuts counterclockwise... CHECKLIST ■■ Check electrical requirements. Plug into detergent dispenser. HELPFUL TIP: You may want to raise the washer. Dispose of/recycle all parts are on washer. Press POWER. Close lid. Select a normal cycle and press START. Adjust leveling feet 5.
Warranty Information
Page 1
... not in accordance with this major appliance, you on how to use of products not approved by an authorized Maytag servicer is required to obtain service under these parts that prevent function of the washer and that have been removed, altered, or cannot be easily determined. Repairs ...to instructions attached to or furnished with original model/serial numbers that existed when this major appliance was purchased. MAYTAG ® LAUNDRY LIMITED WARRANTY FIRST YEAR LIMITED WARRANTY (PARTS AND LABOR) For one year from the date of purchase, when this major appliance is intended to be ...
... not in accordance with this major appliance, you on how to use of products not approved by an authorized Maytag servicer is required to obtain service under these parts that prevent function of the washer and that have been removed, altered, or cannot be easily determined. Repairs ...to instructions attached to or furnished with original model/serial numbers that existed when this major appliance was purchased. MAYTAG ® LAUNDRY LIMITED WARRANTY FIRST YEAR LIMITED WARRANTY (PARTS AND LABOR) For one year from the date of purchase, when this major appliance is intended to be ...
Dimension Guide
Page 2
... bottom of washer. Secure drain hose with product. Wall standpipe drain system Floor drain system requires a Siphon Break Kit (Part Number 285834), 2 Connector Kits (Part Number 285835), and an Extension Drain Hose (Part Number 285863) that a separate circuit serving only this appliance be purchased separately. Floor standpipe drain system Floor drain system 41...
... bottom of washer. Secure drain hose with product. Wall standpipe drain system Floor drain system requires a Siphon Break Kit (Part Number 285834), 2 Connector Kits (Part Number 285835), and an Extension Drain Hose (Part Number 285863) that a separate circuit serving only this appliance be purchased separately. Floor standpipe drain system Floor drain system 41...


