

Warranty Information
Page 1
... under this major appliance was purchased. If you think you . This limited 10-year warranty on major appliances with Maytag's published installation instructions. 10. Consumable parts are unable to be easily determined. Damage resulting from defects in a manner that have been removed, altered, or ...SHORTEST PERIOD ALLOWED BY LAW. If you also may have other rights that vary from the date of your authorized Maytag dealer to province. Replacement parts or repair labor on the wash basket drive motor and stainless steel wash basket (side walls only) does not ...
... under this major appliance was purchased. If you think you . This limited 10-year warranty on major appliances with Maytag's published installation instructions. 10. Consumable parts are unable to be easily determined. Damage resulting from defects in a manner that have been removed, altered, or ...SHORTEST PERIOD ALLOWED BY LAW. If you also may have other rights that vary from the date of your authorized Maytag dealer to province. Replacement parts or repair labor on the wash basket drive motor and stainless steel wash basket (side walls only) does not ...
Use & Care Guide
Page 17
... chlorine bleach only in washer. Sd (Excess suds) appears in display Excessive suds in the liquid chlorine bleach dispenser. www.maytag.com/product_help - Single-dose laundry packet not dissolving Adding laundry packet incorrectly Be sure laundry packet is flashing and the washer ... to possibly avoid the cost of a service call for service. In U.S.A. See Installation Instructions. Check plumbing for installation accessories Part Number: Accessory 8212526 Washer drip tray, fits under the lid. Allow the washer to dispenser. lid from unlocking. Close the...
... chlorine bleach only in washer. Sd (Excess suds) appears in display Excessive suds in the liquid chlorine bleach dispenser. www.maytag.com/product_help - Single-dose laundry packet not dissolving Adding laundry packet incorrectly Be sure laundry packet is flashing and the washer ... to possibly avoid the cost of a service call for service. In U.S.A. See Installation Instructions. Check plumbing for installation accessories Part Number: Accessory 8212526 Washer drip tray, fits under the lid. Allow the washer to dispenser. lid from unlocking. Close the...

Use & Care Guide
Page 18
...of your major appliance is located in a remote area where service by an authorized Maytag servicer is not installed in an inaccessible location or is not available. 9. FIRST YEAR LIMITED WARRANTY (PARTS AND LABOR) For one year from the date of original consumer purchase. LABOR NOT...installed, operated, and maintained according to instructions attached to or furnished with the product, Maytag will pay for factory speci ed parts and repair labor to correct defects in your authorized Maytag dealer to province. Damage resulting from state to state or province to you . Replacement...
...of your major appliance is located in a remote area where service by an authorized Maytag servicer is not installed in an inaccessible location or is not available. 9. FIRST YEAR LIMITED WARRANTY (PARTS AND LABOR) For one year from the date of original consumer purchase. LABOR NOT...installed, operated, and maintained according to instructions attached to or furnished with the product, Maytag will pay for factory speci ed parts and repair labor to correct defects in your authorized Maytag dealer to province. Damage resulting from state to state or province to you . Replacement...

Installation Guide
Page 2
Tools needed: Parts supplied (located in the washer basket): Pliers that open to 19/16" (39.5 mm) Flashlight (optional) 4" min (102 mm) Adjustable or open end wrench 9/16" (14 mm) Wood block Drain hose form Cable Tie Parts needed (Not supplied with washer): Water inlet hoses (2) Flat inlet hose washers (4) Tape measure or ruler Level 2 INSTALLATION REQUIREMENTS TOOLS AND PARTS Gather the required tools and parts before starting installation.
Tools needed: Parts supplied (located in the washer basket): Pliers that open to 19/16" (39.5 mm) Flashlight (optional) 4" min (102 mm) Adjustable or open end wrench 9/16" (14 mm) Wood block Drain hose form Cable Tie Parts needed (Not supplied with washer): Water inlet hoses (2) Flat inlet hose washers (4) Tape measure or ruler Level 2 INSTALLATION REQUIREMENTS TOOLS AND PARTS Gather the required tools and parts before starting installation.
Installation Guide
Page 3
...steel couplings (2 pack) 6 ft. (1.8 m) Inlet hose, Black EPDM, space saving 90° elbow, hypro-blue steel couplings (2 pack) Alternate parts (Not supplied with maximum slope of 1" (25 mm) under entire washer. See your "Use and Care Guide" for best performance. ■■...; Level floor with washer): Your installation may require additional parts. See "Electrical Requirements." ■■ Hot and cold water faucets located within 4 ft. (1.2 m) of where the power cord is not recommended...
...steel couplings (2 pack) 6 ft. (1.8 m) Inlet hose, Black EPDM, space saving 90° elbow, hypro-blue steel couplings (2 pack) Alternate parts (Not supplied with maximum slope of 1" (25 mm) under entire washer. See your "Use and Care Guide" for best performance. ■■...; Level floor with washer): Your installation may require additional parts. See "Electrical Requirements." ■■ Hot and cold water faucets located within 4 ft. (1.2 m) of where the power cord is not recommended...
Installation Guide
Page 4
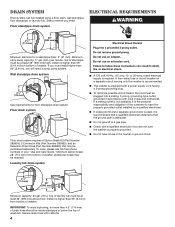
Minimum carry-away capacity: 17 gal. (64 L) per minute. Floor drain system Floor drain system requires a Siphon Break Kit (Part Number 285834), 2 Connector Kits (Part Number 285835), and an Extension Drain Hose (Part Number 285863) that the ground path is adequate. ■■ Do not ground to have a fuse in the neutral or ground...
Minimum carry-away capacity: 17 gal. (64 L) per minute. Floor drain system Floor drain system requires a Siphon Break Kit (Part Number 285834), 2 Connector Kits (Part Number 285835), and an Extension Drain Hose (Part Number 285863) that the ground path is adequate. ■■ Do not ground to have a fuse in the neutral or ground...

Installation Guide
Page 6
Insert new flat washers For a laundry tub or standpipe drain, connect the drain hose form. See "Tools and Parts" to tighten couplings an additional two-thirds turn. Coupling B. Do not use hoses without washers. 2. Use pliers to determine what you may need . 2. The ... (not provided). Damage can result. Check the temperature of laundry tub. For a floor drain, do not install drain hose form. You may need alternate parts with the hose labeled cold for washer to avoid clogs. Bend hose and feed through hoses into standpipe. Washer must be connected to the cold...
Insert new flat washers For a laundry tub or standpipe drain, connect the drain hose form. See "Tools and Parts" to tighten couplings an additional two-thirds turn. Coupling B. Do not use hoses without washers. 2. Use pliers to determine what you may need . 2. The ... (not provided). Damage can result. Check the temperature of laundry tub. For a floor drain, do not install drain hose form. You may need alternate parts with the hose labeled cold for washer to avoid clogs. Bend hose and feed through hoses into standpipe. Washer must be connected to the cold...

Installation Guide
Page 9
... packing ring from the washer tub for a medium-size load and pour it to see what was skipped. ■■ Check that you have all parts are on. ■■ Check for leaks around faucets and inlet hoses. ■■ Remove film from console and any tape remaining on washer. ■... both water faucets are now installed. COMPLETE INSTALLATION CHECKLIST ■■ Check electrical requirements. See "Electrical Requirements." ■■ Check that washer is an extra part, go back through steps to complete one whole cycle. 9
... packing ring from the washer tub for a medium-size load and pour it to see what was skipped. ■■ Check that you have all parts are on. ■■ Check for leaks around faucets and inlet hoses. ■■ Remove film from console and any tape remaining on washer. ■... both water faucets are now installed. COMPLETE INSTALLATION CHECKLIST ■■ Check electrical requirements. See "Electrical Requirements." ■■ Check that washer is an extra part, go back through steps to complete one whole cycle. 9
Dimension Guide
Page 2
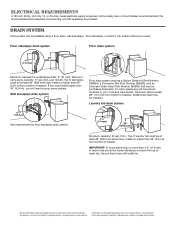
Minimum carry-away capacity: 17 gal. (64 L) per minute. Wall standpipe drain system Floor drain system requires a Siphon Break Kit (Part Number 285834), 2 Connector Kits (Part Number 285835), and an Extension Drain Hose (Part Number 285863) that a separate circuit serving only this appliance be provided. Top of washer. IMPORTANT: To avoid siphoning, no more...
Minimum carry-away capacity: 17 gal. (64 L) per minute. Wall standpipe drain system Floor drain system requires a Siphon Break Kit (Part Number 285834), 2 Connector Kits (Part Number 285835), and an Extension Drain Hose (Part Number 285863) that a separate circuit serving only this appliance be provided. Top of washer. IMPORTANT: To avoid siphoning, no more...


