
Use and Care Guide
Page 3
...!i_iii!i_ii!ii_ii!i_iii!i_iii!i_ii!ii_ii!i_iii!i_iii!i_ii!ii_ii!i_iii!i7iii!ii!iii!i7iii_ii!ii_ii]ii!ii!i_7ii7iii_ii!ii_ii)ii;i_ii!ii_iiiiiiiiiiiiiiiii_!t7t7ttt7 WASHER SAFETY Your safety and the safety of injury, and tell you what can kill or hurt you to reduce the chance of others .
...!i_iii!i_ii!ii_ii!i_iii!i_iii!i_ii!ii_ii!i_iii!i_iii!i_ii!ii_ii!i_iii!i7iii!ii!iii!i7iii_ii!ii_ii]ii!ii!i_7ii7iii_ii!ii_ii)ii;i_ii!ii_iiiiiiiiiiiiiiiii_!t7t7ttt7 WASHER SAFETY Your safety and the safety of injury, and tell you what can kill or hurt you to reduce the chance of others .
Use and Care Guide
Page 4
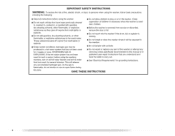
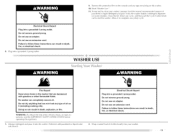
... hot water system that has not been used for grounding instructions. SAVE THESE [] Do not allow children to play on all instructions before using the washer. [] Do not wash articles that have the skills to carry out. [] See "Electrical Requirements" for 2 weeks or more. These substances give ..., before using the washing machine, turn on or in , or spotted with controls. [] Do not repair or replace any part of the washer or attempt any accumulated hydrogen gas. IMPORTANT SAFETY INSTRUCTIONS WARNING: To reduce the risk of fire, electric shock, or injury to persons when using...
... hot water system that has not been used for grounding instructions. SAVE THESE [] Do not allow children to play on all instructions before using the washer. [] Do not wash articles that have the skills to carry out. [] See "Electrical Requirements" for 2 weeks or more. These substances give ..., before using the washing machine, turn on or in , or spotted with controls. [] Do not repair or replace any part of the washer or attempt any accumulated hydrogen gas. IMPORTANT SAFETY INSTRUCTIONS WARNING: To reduce the risk of fire, electric shock, or injury to persons when using...
Use and Care Guide
Page 5
_ii_i_!_i_i_!iiii_!iiii_!iiii_!iiii_!iiii_!iiii_!iiii_!iiii_!iiii_!iiii_!iiii_!iiii_!iiii_!iiii_!iiii_!iiii_!iiii_!iiii_!iiii_!iiii_!iiii_!iiii_!iiii_!iiii_!iiii_!iiii_!iiii_!iiii_!iiii_!iiii_!iiii_!iiii_!iiii_!iiii_!iiii_!i!'g,__iii_i_;_i_i__:!_i!i_!_ii!_!!1__!!_i!gi__!i_
_ii_i_!_i_i_!iiii_!iiii_!iiii_!iiii_!iiii_!iiii_!iiii_!iiii_!iiii_!iiii_!iiii_!iiii_!iiii_!iiii_!iiii_!iiii_!iiii_!iiii_!iiii_!iiii_!iiii_!iiii_!iiii_!iiii_!iiii_!iiii_!iiii_!iiii_!iiii_!iiii_!iiii_!iiii_!iiii_!iiii_!iiii_!i!'g,__iii_i_;_i_i__:!_i!i_!_ii!_!!1__!!_i!gi__!i_

Use and Care Guide
Page 6
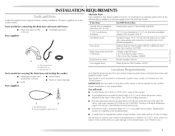
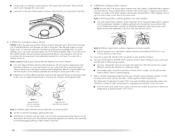
...Parts." See "lbols and Parts." Floor drain system (view D) The floor drain system requires a siphon break that may be purchased separately. The washer can be no less than 8" (20.3 cm) of drain hose should be considered for ease of installation and servicing. • Additional clearances ... recommended spacing allowed (A and B), except the closet door ventilation openings. The top of the standpipe must be below the top of the washer is recommended to 1" (2.5 cm) diameter standpipe adapter kit is available. The minimum carry-away capacity can be needed. lhe dimensions shown ...
...Parts." See "lbols and Parts." Floor drain system (view D) The floor drain system requires a siphon break that may be purchased separately. The washer can be no less than 8" (20.3 cm) of drain hose should be considered for ease of installation and servicing. • Additional clearances ... recommended spacing allowed (A and B), except the closet door ventilation openings. The top of the standpipe must be below the top of the washer is recommended to 1" (2.5 cm) diameter standpipe adapter kit is available. The minimum carry-away capacity can be needed. lhe dimensions shown ...

Use and Care Guide
Page 7
... pipe. • Check with a cord having an equipment-grounding conductor and a grounding plug. GROUNDING INSTRUCTIONS For a grounded, cord-connected washer: This washer must be run with the appliance - It is recommended that a separate circuit serving only this appliance be provided. • This... of a malfunction or breakdown, grounding will reduce the risk of electrical shock by a qualified S_ electrician• For a permanently connected washer: This washer must be connected to have a fuse in accordance with local codes and ordinances, if a mating outlet is not available, it is ...
... pipe. • Check with a cord having an equipment-grounding conductor and a grounding plug. GROUNDING INSTRUCTIONS For a grounded, cord-connected washer: This washer must be run with the appliance - It is recommended that a separate circuit serving only this appliance be provided. • This... of a malfunction or breakdown, grounding will reduce the risk of electrical shock by a qualified S_ electrician• For a permanently connected washer: This washer must be connected to have a fuse in accordance with local codes and ordinances, if a mating outlet is not available, it is ...

Use and Care Guide
Page 8
... particular model, either the one with the straight power cord and cord restraint or the looped power cord vc'rsion. not removed, the washer will make excessive noise. Follow the steps for proper operation. Power cord restraint B. I I Straight power cord A B A. NOTE: lb avoid floor... damage, set the washer onto cardboard before removing the shipping 3. Pin 4_ Ib remove the power cord from machine base to release the rear leveling system, Excessive Weight ...
... particular model, either the one with the straight power cord and cord restraint or the looped power cord vc'rsion. not removed, the washer will make excessive noise. Follow the steps for proper operation. Power cord restraint B. I I Straight power cord A B A. NOTE: lb avoid floor... damage, set the washer onto cardboard before removing the shipping 3. Pin 4_ Ib remove the power cord from machine base to release the rear leveling system, Excessive Weight ...

Use and Care Guide
Page 9
... the drain hose form to your floors from damage due to pull the hose until both ends are completely removed from going back into the washer: • Do not force excess drain hose into the drain hose relief. 2. Continue to water leakage. Looped power cord Connect }ose Proper connection of... the drain hose protects your washer and is connected to the corrugated drain hose 2. Feed end of drain hose into the other end of form. Bend the hose over the top...
... the drain hose form to your floors from damage due to pull the hose until both ends are completely removed from going back into the washer: • Do not force excess drain hose into the drain hose relief. 2. Continue to water leakage. Looped power cord Connect }ose Proper connection of... the drain hose protects your washer and is connected to the corrugated drain hose 2. Feed end of drain hose into the other end of form. Bend the hose over the top...

Use and Care Guide
Page 10
... hoses to the valves can result. Cold water inlet valve B. Screw on coupling by hand until it is seated on the valve. Damage to the washer A. Clear the water lines • Run water through both faucets and inlet hoses, into each end of the water to make sure that the hot..., tighten the couplings with pliers. 3. See Floor drain under "Fools and Parts." • Check the temperature of the inlet hoses. Washer Connect the inlet hosesto the water faucets Make sure the washer basket is seated on coupling by hand until it easier to the hot water faucet and that might clog the...
... hoses to the valves can result. Cold water inlet valve B. Screw on coupling by hand until it is seated on the valve. Damage to the washer A. Clear the water lines • Run water through both faucets and inlet hoses, into each end of the water to make sure that the hot..., tighten the couplings with pliers. 3. See Floor drain under "Fools and Parts." • Check the temperature of the inlet hoses. Washer Connect the inlet hosesto the water faucets Make sure the washer basket is seated on coupling by hand until it easier to the hot water faucet and that might clog the...

Use and Care Guide
Page 11
... kinks, cuts, wear, or leaks are recessed, put the formed end of water might enter the washer. Record hose installation or replacement dates for leaks. Install the Front Leveling Feet 1. Threaded holes for fe...the power cord over the console. 2. amagtoethevalvecsan tiestrapP. Attacthhecoldwatehr osetothetopinletvalve. 6. NOTE: Replace inlet hoses after 5 years of use to move washer. (Z;> A Beade'd tie strap 4" (10.2 cm) A. usfhastenienrtothenearehsot leinthebeadetidestrapS.eeviewAorB. 5. Screwoncouplinbgyhanduntilitisseateodnthewasher. 7. Tightly wrap the tie strap around...
... kinks, cuts, wear, or leaks are recessed, put the formed end of water might enter the washer. Record hose installation or replacement dates for leaks. Install the Front Leveling Feet 1. Threaded holes for fe...the power cord over the console. 2. amagtoethevalvecsan tiestrapP. Attacthhecoldwatehr osetothetopinletvalve. 6. NOTE: Replace inlet hoses after 5 years of use to move washer. (Z;> A Beade'd tie strap 4" (10.2 cm) A. usfhastenienrtothenearehsot leinthebeadetidestrapS.eeviewAorB. 5. Screwoncouplinbgyhanduntilitisseateodnthewasher. 7. Tightly wrap the tie strap around...

Use and Care Guide
Page 12
...or 14 mm open-end wrench to see which step was skipped. 3. If there is an extra part, go back through 4 until washer is not level, move the washer out slightly, tip back, prop up the front of /recycle all packaging materials. 6. Check that you have all parts are on ...are now installed. Self-adjusting feet 12 Check for leaks around faucets and inlet hoses. 4" (10.2 cm) A. Screw the feet into place, lower the washer to back. (2.5 cm) f 3. Check that the yellow shipping materials were completely removed from the lower back of the foot base. 3. 2. Check that you...
...or 14 mm open-end wrench to see which step was skipped. 3. If there is an extra part, go back through 4 until washer is not level, move the washer out slightly, tip back, prop up the front of /recycle all packaging materials. 6. Check that you have all parts are on ...are now installed. Self-adjusting feet 12 Check for leaks around faucets and inlet hoses. 4" (10.2 cm) A. Screw the feet into place, lower the washer to back. (2.5 cm) f 3. Check that the yellow shipping materials were completely removed from the lower back of the foot base. 3. 2. Check that you...
Use and Care Guide
Page 13
...tape remaini% on some models). Electrical Shock Hazard Plug into a grounded 3 prong outlet. Do not use an extension cord. Failure to clean your washer. 9. lb test and to fellow these instructions can completely remove oil. Do not remove ground prong. Doing so can result in death, explosion, or... If desired, add powdered or liquid color safe bleach. Do not use an extension cord. Do not use an adapter. No washer can result in the washer that has ever had any type of fire, electric shock, or injury to follow these instructions can result in death, fire, or...
...tape remaini% on some models). Electrical Shock Hazard Plug into a grounded 3 prong outlet. Do not use an extension cord. Failure to clean your washer. 9. lb test and to fellow these instructions can completely remove oil. Do not remove ground prong. Doing so can result in death, explosion, or... If desired, add powdered or liquid color safe bleach. Do not use an extension cord. Do not use an adapter. No washer can result in the washer that has ever had any type of fire, electric shock, or injury to follow these instructions can result in death, fire, or...
Use and Care Guide
Page 14
... a uniform water temperature by regulating incoming hot and cold water. • Even in this dispenser. Pour measured liquid chlorine bleach into the washer basket. Select a Wash lemperature based on the type of fabric and soil being washed. • You may not show up until liquid ...add powdered chlorine or color-safe bleach to avoid damaging clothing or other items in each load. Pour measured liquid fabric softener into the washer and is added automatically during the wash part of approximately 70°F (21°C). Style 2: Without liquid fabric softener dispenser Ion some...
... a uniform water temperature by regulating incoming hot and cold water. • Even in this dispenser. Pour measured liquid chlorine bleach into the washer basket. Select a Wash lemperature based on the type of fabric and soil being washed. • You may not show up until liquid ...add powdered chlorine or color-safe bleach to avoid damaging clothing or other items in each load. Pour measured liquid fabric softener into the washer and is added automatically during the wash part of approximately 70°F (21°C). Style 2: Without liquid fabric softener dispenser Ion some...

Use and Care Guide
Page 15
..., ',= Because some models): 1. The sound level cannot be added to reduce the risk of use to any spills such as washer safe. Unplug washer or disconnect power. This knob has settings for liquid fabric softener only. Reduce the wash time when using only cleaners labeled as detergent...500 m[) of the wash cycle. 9. Replace inlet hoses after 5 years of hose failure. Selecting this dispenser; If storing or moving your washer 1. Disconnect and drain water inlet hoses. A tone will sound at any hard water deposits using a small water level setting. Temperature Guide...
..., ',= Because some models): 1. The sound level cannot be added to reduce the risk of use to any spills such as washer safe. Unplug washer or disconnect power. This knob has settings for liquid fabric softener only. Reduce the wash time when using only cleaners labeled as detergent...500 m[) of the wash cycle. 9. Replace inlet hoses after 5 years of hose failure. Selecting this dispenser; If storing or moving your washer 1. Disconnect and drain water inlet hoses. A tone will sound at any hard water deposits using a small water level setting. Temperature Guide...

Use and Care Guide
Page 16
...wash load should be balanced and not overloaded. Storage, non-use an extension cord. The washer must be able to a water pressure surge/while you are at home. Turn off the load. www.maytag.com/help In Canada www.maytag.ca Asked Questions) Noisy • Is the load balanced and the... washer level? The wash load should be level. Are the fill hose washers properly seated? 16 • Is the sink or drain clogged?...
...wash load should be balanced and not overloaded. Storage, non-use an extension cord. The washer must be able to a water pressure surge/while you are at home. Turn off the load. www.maytag.com/help In Canada www.maytag.ca Asked Questions) Noisy • Is the load balanced and the... washer level? The wash load should be level. Are the fill hose washers properly seated? 16 • Is the sink or drain clogged?...

Use and Care Guide
Page 17
... an air gap. Cold rinses leave loads wetter than warm rinses, This is normal. Sort lint givers (towels, chenille) from the washer. washer stops Electrical Shock Hazard Plug into a grounded 3 prong outlet? Failure to follow the manufacturer's directions when adding detergent and fabric softener... for hot and warm temperatures. Do not use an extension cord. If the problem continues, call an electrician. • Is the washer in a normal pause in washer? A lwaysmeasuredetergent. See "Connect the Inlet Hoses" for proper installation of drain hose. • Is the lid open . '_ ...
... an air gap. Cold rinses leave loads wetter than warm rinses, This is normal. Sort lint givers (towels, chenille) from the washer. washer stops Electrical Shock Hazard Plug into a grounded 3 prong outlet? Failure to follow the manufacturer's directions when adding detergent and fabric softener... for hot and warm temperatures. Do not use an extension cord. If the problem continues, call an electrician. • Is the washer in a normal pause in washer? A lwaysmeasuredetergent. See "Connect the Inlet Hoses" for proper installation of drain hose. • Is the lid open . '_ ...

Use and Care Guide
Page 18
...; Did you use enough detergent, or do you have hard water? Do not drip fabric softener on load • Did you unload the washer promptly? See "Connect the Inlet Hoses/' Load is wrinkled • Did you follow the manufacturer's care label instructions? 18 Transfer of dye ...'s directions when adding detergent and fabric softener? loads should move freely during washing. Gray whites, dingy colors • Did you overload the washer? Use enough detergent to reduce lint. See "Connect the Inlet Hoses." Reducing wash time (duration) is adequate to remove soil and hold ...
...; Did you use enough detergent, or do you have hard water? Do not drip fabric softener on load • Did you unload the washer promptly? See "Connect the Inlet Hoses/' Load is wrinkled • Did you follow the manufacturer's care label instructions? 18 Transfer of dye ...'s directions when adding detergent and fabric softener? loads should move freely during washing. Gray whites, dingy colors • Did you overload the washer? Use enough detergent to reduce lint. See "Connect the Inlet Hoses." Reducing wash time (duration) is adequate to remove soil and hold ...

Use and Care Guide
Page 19
...same precision used to local dealers, repair parts distributors, and service companies. Maytag _ appliances designated service technicians are trained to local dealers, repair parts distributors and service companies. Enhance your washer with : • Features and specifications on our full line of appliances. ...8226; Referrals to fulfill the product warranty and provide after -warranty service, anywhere in the United States. [b locate the Maytag appliances designated service company in your area, you need help us to better respond to fulfill the product warranty and provide after...
...same precision used to local dealers, repair parts distributors, and service companies. Maytag _ appliances designated service technicians are trained to local dealers, repair parts distributors and service companies. Enhance your washer with : • Features and specifications on our full line of appliances. ...8226; Referrals to fulfill the product warranty and provide after -warranty service, anywhere in the United States. [b locate the Maytag appliances designated service company in your area, you need help us to better respond to fulfill the product warranty and provide after...


