

Use and Care Guide
Page 3
...!i_iii!i_ii!ii_ii!i_iii!i_iii!i_ii!ii_ii!i_iii!i_iii!i_ii!ii_ii!i_iii!i7iii!ii!iii!i7iii_ii!ii_ii]ii!ii!i_7ii7iii_ii!ii_ii)ii;i_ii!ii_iiiiiiiiiiiiiiiii_!t7t7ttt7 WASHER SAFETY Your safety and the safety of injury, and tell you and others are not followed. You can be killed or seriously injured if you...
...!i_iii!i_ii!ii_ii!i_iii!i_iii!i_ii!ii_ii!i_iii!i_iii!i_ii!ii_ii!i_iii!i7iii!ii!iii!i7iii_ii!ii_ii]ii!ii!i_7ii7iii_ii!ii_ii)ii;i_ii!ii_iiiiiiiiiiiiiiiii_!t7t7ttt7 WASHER SAFETY Your safety and the safety of injury, and tell you and others are not followed. You can be killed or seriously injured if you...
Use and Care Guide
Page 4
... is used for several minutes. IMPORTANT SAFETY INSTRUCTIONS WARNING: To reduce the risk of fire, electric shock, or injury to persons when using the washer follow basic precautions, including the following: [] Read all hot water faucets and let the water flow from service or discarded, remove the door or... lid. [] Do not reach into the washer if the drum, tub or agitator is moving. [] Do not install or store the washer where it will be exposed to the weather. [] Do not tamper with gasoline, dry-cleaning solvents, other...
... is used for several minutes. IMPORTANT SAFETY INSTRUCTIONS WARNING: To reduce the risk of fire, electric shock, or injury to persons when using the washer follow basic precautions, including the following: [] Read all hot water faucets and let the water flow from service or discarded, remove the door or... lid. [] Do not reach into the washer if the drum, tub or agitator is moving. [] Do not install or store the washer where it will be exposed to the weather. [] Do not tamper with gasoline, dry-cleaning solvents, other...
Use and Care Guide
Page 5
_ii_i_!_i_i_!iiii_!iiii_!iiii_!iiii_!iiii_!iiii_!iiii_!iiii_!iiii_!iiii_!iiii_!iiii_!iiii_!iiii_!iiii_!iiii_!iiii_!iiii_!iiii_!iiii_!iiii_!iiii_!iiii_!iiii_!iiii_!iiii_!iiii_!iiii_!iiii_!iiii_!iiii_!iiii_!iiii_!iiii_!iiii_!i!'g,__iii_i_;_i_i__:!_i!i_!_ii!_!!1__!!_i!gi__!i_
_ii_i_!_i_i_!iiii_!iiii_!iiii_!iiii_!iiii_!iiii_!iiii_!iiii_!iiii_!iiii_!iiii_!iiii_!iiii_!iiii_!iiii_!iiii_!iiii_!iiii_!iiii_!iiii_!iiii_!iiii_!iiii_!iiii_!iiii_!iiii_!iiii_!iiii_!iiii_!iiii_!iiii_!iiii_!iiii_!iiii_!iiii_!i!'g,__iii_i_;_i_i__:!_i!i_!_ii!_!!1__!!_i!gi__!i_

Use and Care Guide
Page 6
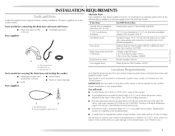
... inside the standpipe. See "Fools and Parts." lhe dimensions shown for tile recommended spacing allowed (A and B), except the closet door ventilation openings. The washer can be no higher than 17 gal. (64 I.) per minute. n olo 19,,51_ (48.3cm) 1_ max. JL I_:_::_:_ (15c5m2Ill _ ...?t V[t'W B.Side view C. Select the drain hose installation method you need. The minimum carry-away capacity can be needed. The top of the washer is recommended to 1" (2.5 cm) diameter standpipe adapter kit is installed, the minimum air openings in the top and bottom are acceptable. •...
... inside the standpipe. See "Fools and Parts." lhe dimensions shown for tile recommended spacing allowed (A and B), except the closet door ventilation openings. The washer can be no higher than 17 gal. (64 I.) per minute. n olo 19,,51_ (48.3cm) 1_ max. JL I_:_::_:_ (15c5m2Ill _ ...?t V[t'W B.Side view C. Select the drain hose installation method you need. The minimum carry-away capacity can be needed. The top of the washer is recommended to 1" (2.5 cm) diameter standpipe adapter kit is installed, the minimum air openings in the top and bottom are acceptable. •...

Use and Care Guide
Page 7
... appropriate outlet that is used, it will reduce the risk of electrical shock by a qualified S_ electrician• For a permanently connected washer: This washer must be connected to a grounded metal, permanent wiring system, or an equipment grounding conductor must be run with a cord having a ... with a qualified electrician or serviceman if you are in the neutral or ground circuit. GROUNDING INSTRUCTIONS For a grounded, cord-connected washer: This washer must be grounded• In the event of a malfunction or breakdown, grounding will not fit the outlet, have a fuse in...
... appropriate outlet that is used, it will reduce the risk of electrical shock by a qualified S_ electrician• For a permanently connected washer: This washer must be connected to a grounded metal, permanent wiring system, or an equipment grounding conductor must be run with a cord having a ... with a qualified electrician or serviceman if you are in the neutral or ground circuit. GROUNDING INSTRUCTIONS For a grounded, cord-connected washer: This washer must be grounded• In the event of a malfunction or breakdown, grounding will not fit the outlet, have a fuse in...

Use and Care Guide
Page 8
... looped power cord vc'rsion. and not tilted before moving across floor. Locate the yellow shipping materials on the rear of its final location. 2. [he washer must be in , press TAB, and 8 Pin 4_ Ib remove the power cord from the rear paneh 3_ Confirm that the power cord restraint (A), and... 2_ Firmly grasp the power cord and pull to within approximately 3 ft (90 cm) of the machine, near the bottom. Failure to move and install washer. Follow the steps for proper operation. i__i_i_!ii!ii_[ii!_iii!i!_!!!_iiiii_ii!ii}iiiii}__!!ii!ii__i!_ii!i_i_¸i_!ii¸i_i_!!_ii...
... looped power cord vc'rsion. and not tilted before moving across floor. Locate the yellow shipping materials on the rear of its final location. 2. [he washer must be in , press TAB, and 8 Pin 4_ Ib remove the power cord from the rear paneh 3_ Confirm that the power cord restraint (A), and... 2_ Firmly grasp the power cord and pull to within approximately 3 ft (90 cm) of the machine, near the bottom. Failure to move and install washer. Follow the steps for proper operation. i__i_i_!ii!ii_[ii!_iii!i!_!!!_iiiii_ii!ii}iiiii}__!!ii!ii__i!_ii!i_i_¸i_!ii¸i_i_!!_ii...

Use and Care Guide
Page 9
...of the form and feed into the drain hose relief. 2. The drain hose is stored inside the washer cabinet. l Laundry tub drain or standpipe drain Connecting the drain hose form to your floors from washer. Dl"ain hose reliefs 1. Continue to provide a gap for air. • Do not lay excess... leakage. Check that two (2) shipping pins were removed with the shipping strap. Remove drain hose from washer cabinet Gently pull the corrugated drain hose out of the washer from going back into the washer: • Do not force excess drain hose into standpipe. Place end of drain hose form into ...
...of the form and feed into the drain hose relief. 2. The drain hose is stored inside the washer cabinet. l Laundry tub drain or standpipe drain Connecting the drain hose form to your floors from washer. Dl"ain hose reliefs 1. Continue to provide a gap for air. • Do not lay excess... leakage. Check that two (2) shipping pins were removed with the shipping strap. Remove drain hose from washer cabinet Gently pull the corrugated drain hose out of the washer from going back into the washer: • Do not force excess drain hose into standpipe. Place end of drain hose form into ...

Use and Care Guide
Page 10
... with pliers. 3. Hot wate'r h_let valve 1. Screw on coupling by hand until it easier to get rid of the inlet hoses. Insert new fiat washers (supplied) into a laundry tub, drainpipe or bucket, to tighten connection with an additional two-thirds turn. Attach the hose labeled cold to the water ...valve. by hand until it is empty. 1. Sclew on coupling by hand until it is seated on the washer. Damage to the washer A. Floor drain Do not install the drain hose form on the washer. 3. Attach the hose labeled hot to the bottom inlet valve. 2. Attach the hot water hose to ...
... with pliers. 3. Hot wate'r h_let valve 1. Screw on coupling by hand until it easier to get rid of the inlet hoses. Insert new fiat washers (supplied) into a laundry tub, drainpipe or bucket, to tighten connection with an additional two-thirds turn. Attach the hose labeled cold to the water ...valve. by hand until it is empty. 1. Sclew on coupling by hand until it is seated on the washer. Damage to the washer A. Floor drain Do not install the drain hose form on the washer. 3. Attach the hose labeled hot to the bottom inlet valve. 2. Attach the hot water hose to ...

Use and Care Guide
Page 11
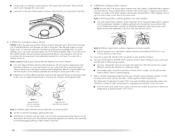
...shipping material from the power cord. Screwoncouplinbgyhanduntilitisseateodnthewasher. 7. Install the Front Leveling Feet 1. Prop up the front of the washer about 4" (10.2 cm) with a wood block or similar object [he D "a H }se 1. Usingpliersti,... of hose failure. Wrapthedrainhosetothelaundrtyublegd, rainstandpipoerinlethosews,iththebeaded NreOsuTlEtD.:onotoverfightoernusetapeorsealanotsnthevalveD. NOTE: Replace inlet hoses after 5 years of use to move washer. (Z;> A Beade'd tie strap 4" (10.2 cm) A. Drape the power cord over the console. 2. Record ...
...shipping material from the power cord. Screwoncouplinbgyhanduntilitisseateodnthewasher. 7. Install the Front Leveling Feet 1. Prop up the front of the washer about 4" (10.2 cm) with a wood block or similar object [he D "a H }se 1. Usingpliersti,... of hose failure. Wrapthedrainhosetothelaundrtyublegd, rainstandpipoerinlethosews,iththebeaded NreOsuTlEtD.:onotoverfightoernusetapeorsealanotsnthevalveD. NOTE: Replace inlet hoses after 5 years of use to move washer. (Z;> A Beade'd tie strap 4" (10.2 cm) A. Drape the power cord over the console. 2. Record ...

Use and Care Guide
Page 12
... that you have the correct electrical supply and the recommended grounding method. Check that you have all of the washer by twisting the feet. Check the levelness of your tools. 4. Gently lower the washer to back. (2.5 cm) f 3. Steps in its final location and level, use a %6" or 14 ... hear the self adjusting rear feet click into the threaded holes at least 4" (I 0.2 cm) off the floor. Tilt the washer forward until the washer is level. 5. Check the electrical requirements. Check that the yellow shipping materials were completely removed from the lower back of /recycle...
... that you have the correct electrical supply and the recommended grounding method. Check that you have all of the washer by twisting the feet. Check the levelness of your tools. 4. Gently lower the washer to back. (2.5 cm) f 3. Steps in its final location and level, use a %6" or 14 ... hear the self adjusting rear feet click into the threaded holes at least 4" (I 0.2 cm) off the floor. Tilt the washer forward until the washer is level. 5. Check the electrical requirements. Check that the yellow shipping materials were completely removed from the lower back of /recycle...
Use and Care Guide
Page 13
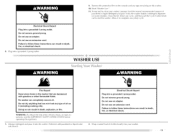
Electrical Shock Hazard Plug into a grounded 3 prong outlet. Failure to persons, read the IMPORTANT SAFETY INSTRUCTIONS before operating this appliance. 1. No washer can result in death, fire, or electrical shock. 8, Plug into a grounded 3 prong outlet. Doing so can completely remove oil. Electrical ... the lid. Select any type of fire, electric shock, or injury to follow these instructions can result in death, explosion, or fire. WASHER USE Fire Hazard Never place items in death, fire, or electrical shock. 2. 9. Remove the protective film on the console and any tape...
Electrical Shock Hazard Plug into a grounded 3 prong outlet. Failure to persons, read the IMPORTANT SAFETY INSTRUCTIONS before operating this appliance. 1. No washer can result in death, fire, or electrical shock. 8, Plug into a grounded 3 prong outlet. Doing so can completely remove oil. Electrical ... the lid. Select any type of fire, electric shock, or injury to follow these instructions can result in death, explosion, or fire. WASHER USE Fire Hazard Never place items in death, fire, or electrical shock. 2. 9. Remove the protective film on the console and any tape...
Use and Care Guide
Page 14
... and soil being washed. • You may not show up until liquid reaches the underside of approximately 70°F (21°C). Close the washer lid. Select a Wash lemperature based on the type of it in the load. 14. Undiluted fabric softener warm water. NOTE: Follow the garment...some models) • In the final rinse only, add fabric softener that bleach can cause poor cleaning. 4, (OPTIONAl.) Add liquid fabric softener. Washer will damage any fabric softener onto can make some models) • Use only liquid fabric softener in the cycle for proper use it in each...
... and soil being washed. • You may not show up until liquid reaches the underside of approximately 70°F (21°C). Close the washer lid. Select a Wash lemperature based on the type of it in the load. 14. Undiluted fabric softener warm water. NOTE: Follow the garment...some models) • In the final rinse only, add fabric softener that bleach can cause poor cleaning. 4, (OPTIONAl.) Add liquid fabric softener. Washer will damage any fabric softener onto can make some models) • Use only liquid fabric softener in the cycle for proper use it in each...

Use and Care Guide
Page 15
...176;F 115.6°C), detergents do not wash clothes with a liquid fabric softener dispenser. An Extra Rinse can be difficult to the washer or clothing, do not dissolve well. Pour this dispenser; Repeat this option provides a second rinse. Periodically inspect and replace inlet ... liquid fabric softener dispenser removed or add detergent or [)leach to the wash cycle you want. Disconnect and drain water inlet hoses. Unplug washer or disconnect power. You can customize your wash by grasping top with both hands and squeezing, while pushing upward with a permanent marker....
...176;F 115.6°C), detergents do not wash clothes with a liquid fabric softener dispenser. An Extra Rinse can be difficult to the washer or clothing, do not dissolve well. Pour this dispenser; Repeat this option provides a second rinse. Periodically inspect and replace inlet ... liquid fabric softener dispenser removed or add detergent or [)leach to the wash cycle you want. Disconnect and drain water inlet hoses. Unplug washer or disconnect power. You can customize your wash by grasping top with both hands and squeezing, while pushing upward with a permanent marker....

Use and Care Guide
Page 16
...leveling legs (if needed). Do not use washer again 1. If you completely remove the yellow shipping strap with I cup 1250 m[) of time, you should be balanced and not overloaded. Unplug washer or disconnect power. 2. www.maytag.com/help In Canada www.maytag.ca Asked Questions) Noisy • Is ...the load balanced and the washer level? To use an extension cord. Do not remove ground prong. Run the...
...leveling legs (if needed). Do not use washer again 1. If you completely remove the yellow shipping strap with I cup 1250 m[) of time, you should be balanced and not overloaded. Unplug washer or disconnect power. 2. www.maytag.com/help In Canada www.maytag.ca Asked Questions) Noisy • Is ...the load balanced and the washer level? To use an extension cord. Do not remove ground prong. Run the...

Use and Care Guide
Page 17
... you use the chlorine bleach dispenser for hot and warm temperatures. The top of the agitator is much higher than the water level in the washer for the load being washed? This is normal. A lwaysmeasuredetergent. The hose needs an air gap. As your frequency of loads washed increases, the ... hose clogged, or the end of the drain hose more information. Do not use an extension cord. Sort lint givers (towels, chenille) from the washer. Agitator operation • The top of the agitator is normal. Cold rinses leave loads wetter than warm rinses, This is loose, or moves in...
... you use the chlorine bleach dispenser for hot and warm temperatures. The top of the agitator is much higher than the water level in the washer for the load being washed? This is normal. A lwaysmeasuredetergent. The hose needs an air gap. As your frequency of loads washed increases, the ... hose clogged, or the end of the drain hose more information. Do not use an extension cord. Sort lint givers (towels, chenille) from the washer. Agitator operation • The top of the agitator is normal. Cold rinses leave loads wetter than warm rinses, This is loose, or moves in...

Use and Care Guide
Page 18
... detergent for the load size. You may not completely dissolve the detergent. lb reduce wrinkling of the bleach dispenser when loading and unloading the washer/on the clothing. • Check the following : Were sharp items removed from whites and lights. • Was the wash temperature too ... move freely during washing. • Did you have hard water? Do not drip fabric softener on load • Did you unload the washer promptly? Load is another cycle with low spin speeds (if available) to hold it stops. loads should move freely in seams before washing....
... detergent for the load size. You may not completely dissolve the detergent. lb reduce wrinkling of the bleach dispenser when loading and unloading the washer/on the clothing. • Check the following : Were sharp items removed from whites and lights. • Was the wash temperature too ... move freely during washing. • Did you have hard water? Do not drip fabric softener on load • Did you unload the washer promptly? Load is another cycle with low spin speeds (if available) to hold it stops. loads should move freely in seams before washing....

Use and Care Guide
Page 19
... a daytime phone number in your request. For more high-quality items or to order, call 1-800-901-2042, or visit us at : Maytag Services, LI.C AiTN: CAIR Center P.O. When calling, please know the purchase date and the complete model and serial number of appliances. •...8226; Accessory and repair parts sales. • Referrals to build every new Maytag _ appliance. ]b locate factory specified parts in your nearest designated service center. It may save you can also look in your washer with the same precision used to local dealers, repair parts distributors, and service ...
... a daytime phone number in your request. For more high-quality items or to order, call 1-800-901-2042, or visit us at : Maytag Services, LI.C AiTN: CAIR Center P.O. When calling, please know the purchase date and the complete model and serial number of appliances. •...8226; Accessory and repair parts sales. • Referrals to build every new Maytag _ appliance. ]b locate factory specified parts in your nearest designated service center. It may save you can also look in your washer with the same precision used to local dealers, repair parts distributors, and service ...


