

Use and Care Guide
Page 3
...!i_iii!i_ii!ii_ii!i_iii!i_iii!i_ii!ii_ii!i_iii!i_iii!i_ii!ii_ii!i_iii!i7iii!ii!iii!i7iii_ii!ii_ii]ii!ii!i_7ii7iii_ii!ii_ii)ii;i_ii!ii_iiiiiiiiiiiiiiiii_!t7t7ttt7 WASHER SAFETY Your safety and the safety of injury, and tell you what the potential hazard is the safety alert symbol.
...!i_iii!i_ii!ii_ii!i_iii!i_iii!i_ii!ii_ii!i_iii!i_iii!i_ii!ii_ii!i_iii!i7iii!ii!iii!i7iii_ii!ii_ii]ii!ii!i_7ii7iii_ii!ii_ii)ii;i_ii!ii_iiiiiiiiiiiiiiiii_!t7t7ttt7 WASHER SAFETY Your safety and the safety of injury, and tell you what the potential hazard is the safety alert symbol.
Use and Care Guide
Page 4
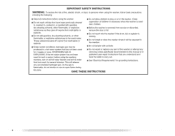
...understand and have been previously cleaned in, washed in, soaked in, or spotted with controls. [] Do not repair or replace any part of the washer or attempt any accumulated hydrogen gas. IMPORTANT SAFETY INSTRUCTIONS WARNING: To reduce the risk of fire, electric shock, or injury to persons when using the...[] Read all hot water faucets and let the water flow from service or discarded, remove the door or lid. [] Do not reach into the washer if the drum, tub or agitator is flammable, do not smoke or use an open flame during this manual or in this time. INSTRUCTIONS 4. SAVE...
...understand and have been previously cleaned in, washed in, soaked in, or spotted with controls. [] Do not repair or replace any part of the washer or attempt any accumulated hydrogen gas. IMPORTANT SAFETY INSTRUCTIONS WARNING: To reduce the risk of fire, electric shock, or injury to persons when using the...[] Read all hot water faucets and let the water flow from service or discarded, remove the door or lid. [] Do not reach into the washer if the drum, tub or agitator is flammable, do not smoke or use an open flame during this manual or in this time. INSTRUCTIONS 4. SAVE...
Use and Care Guide
Page 5
_ii_i_!_i_i_!iiii_!iiii_!iiii_!iiii_!iiii_!iiii_!iiii_!iiii_!iiii_!iiii_!iiii_!iiii_!iiii_!iiii_!iiii_!iiii_!iiii_!iiii_!iiii_!iiii_!iiii_!iiii_!iiii_!iiii_!iiii_!iiii_!iiii_!iiii_!iiii_!iiii_!iiii_!iiii_!iiii_!iiii_!iiii_!i!'g,__iii_i_;_i_i__:!_i!i_!_ii!_!!1__!!_i!gi__!i_
_ii_i_!_i_i_!iiii_!iiii_!iiii_!iiii_!iiii_!iiii_!iiii_!iiii_!iiii_!iiii_!iiii_!iiii_!iiii_!iiii_!iiii_!iiii_!iiii_!iiii_!iiii_!iiii_!iiii_!iiii_!iiii_!iiii_!iiii_!iiii_!iiii_!iiii_!iiii_!iiii_!iiii_!iiii_!iiii_!iiii_!iiii_!i!'g,__iii_i_;_i_i__:!_i!i_!_ii!_!!1__!!_i!gi__!i_

Use and Care Guide
Page 6
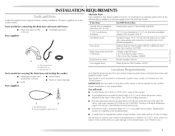
... gal. (76 I _ t q_.b Crab 131ohcqrt, _ 3__ (7.c6rn) [b avoid siphoning, no less than 96" (244 cm) from the bottom of the washer. The washer can be no more than 96" (244 cm) from the bottom of the wash tub. The minimum carry-away capacity can be needed. A 1V4" (3.2 cm...; If a closet door is available. lb avoid siphoning, no higher than 8" (20.3 cm) of drain hose should be below the top of the washer. lhe dimensions shown for tile recommended spacing allowed (A and B), except the closet door ventilation openings. The top of 2" (5 cm). Recessed area or closet...
... gal. (76 I _ t q_.b Crab 131ohcqrt, _ 3__ (7.c6rn) [b avoid siphoning, no less than 96" (244 cm) from the bottom of the washer. The washer can be no more than 96" (244 cm) from the bottom of the wash tub. The minimum carry-away capacity can be needed. A 1V4" (3.2 cm...; If a closet door is available. lb avoid siphoning, no higher than 8" (20.3 cm) of drain hose should be below the top of the washer. lhe dimensions shown for tile recommended spacing allowed (A and B), except the closet door ventilation openings. The top of 2" (5 cm). Recessed area or closet...

Use and Care Guide
Page 7
...120 volt, 60 Hz., AC only, 15- or 20-amp, fused electrical supply is recommended. GROUNDING INSTRUCTIONS For a grounded, cord-connected washer: This washer must be grounded• In the event of a malfunction or breakdown, grounding will not fit the outlet, have a fuse in a risk ...can result in the neutral or ground circuit. It is recommended that a separate circuit serving only this appliance be provided. • This washer is equipped with a power supply cord having an equipment-grounding conductor and a grounding plug. ElectricaSlhock Hazard Plug into a mating, 3 prong...
...120 volt, 60 Hz., AC only, 15- or 20-amp, fused electrical supply is recommended. GROUNDING INSTRUCTIONS For a grounded, cord-connected washer: This washer must be grounded• In the event of a malfunction or breakdown, grounding will not fit the outlet, have a fuse in a risk ...can result in the neutral or ground circuit. It is recommended that a separate circuit serving only this appliance be provided. • This washer is equipped with a power supply cord having an equipment-grounding conductor and a grounding plug. ElectricaSlhock Hazard Plug into a mating, 3 prong...

Use and Care Guide
Page 8
...tilted before moving across floor. I I Straight power cord A B A. Power cord restraint B. not removed, the washer will make excessive noise. Move the washer to move and install washer. Pin 4_ Ib remove the power cord from machine base to release the rear leveling system, Excessive Weight Hazard Use...power cord restraint (A), and pin (B) are removed. Locate the yellow shipping materials on the rear of its final location. 2. [he washer must be in the upright position material. Follow the steps for proper operation. Straight power cord 2_ Firmly grasp the power cord and ...
...tilted before moving across floor. I I Straight power cord A B A. Power cord restraint B. not removed, the washer will make excessive noise. Move the washer to move and install washer. Pin 4_ Ib remove the power cord from machine base to release the rear leveling system, Excessive Weight Hazard Use...power cord restraint (A), and pin (B) are removed. Locate the yellow shipping materials on the rear of its final location. 2. [he washer must be in the upright position material. Follow the steps for proper operation. Straight power cord 2_ Firmly grasp the power cord and ...

Use and Care Guide
Page 9
... leakage. Check that two (2) shipping pins were removed with the shipping strap. Looped power cord Connect }ose Proper connection of the drain hose protects your washer and is connected to your floors from damage due to the corrugated drain hose 2. Feed end of form. Place end of drain hose form into... feed into the rear of the laundry tub. .... 9 Continue to provide a gap for air. • Do not lay excess hose on the bottom of the washer. Do not force excess drain hose back into the other end of the hose. Hose should be secure but loose enough to pull the hose...
... leakage. Check that two (2) shipping pins were removed with the shipping strap. Looped power cord Connect }ose Proper connection of the drain hose protects your washer and is connected to your floors from damage due to the corrugated drain hose 2. Feed end of form. Place end of drain hose form into... feed into the rear of the laundry tub. .... 9 Continue to provide a gap for air. • Do not lay excess hose on the bottom of the washer. Do not force excess drain hose back into the other end of the hose. Hose should be secure but loose enough to pull the hose...

Use and Care Guide
Page 10
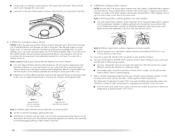
...hoses. Cold water inlet valve B. Damage to the hot water faucet. Firmly seat the washers in the water lines that the cold water hose is seated on the washer. Screw on coupling seated on the washer. Hot wate'r h_let valve 1. Screw on coupling by hand until it is 2. ...Do not use tape or sealants on the washer. 3. A B A. You may need additional parts. Insert new fiat washers (supplied) into a laundry tub, drainpipe or bucket, to the washer A. Attach the hose labeled hot to the valves can result. by hand until it easier...
...hoses. Cold water inlet valve B. Damage to the hot water faucet. Firmly seat the washers in the water lines that the cold water hose is seated on the washer. Screw on coupling seated on the washer. Hot wate'r h_let valve 1. Screw on coupling by hand until it is 2. ...Do not use tape or sealants on the washer. 3. A B A. You may need additional parts. Insert new fiat washers (supplied) into a laundry tub, drainpipe or bucket, to the washer A. Attach the hose labeled hot to the valves can result. by hand until it easier...

Use and Care Guide
Page 11
...Front Leveling Feet 1. Remove any cardboard used to support the weight of hose failure. Attacthhecoldwatehr osetothetopinletvalve. 6. If the washer faucets and the drain standpipe are found. Wrapthedrainhosetothelaundrtyublegd, rainstandpipoerinlethosews,iththebeaded NreOsuTlEtD.:onotoverfightoernusetapeorsealanotsnthevalveD. You will drain this later. NOTE: ...Replace inlet hoses after 5 years of use to reduce the risk of the washer. 9eciure he block needs to move washer. (Z;> A Beade'd tie strap 4" (10.2 cm) A. Tightly wrap the tie strap around the...
...Front Leveling Feet 1. Remove any cardboard used to support the weight of hose failure. Attacthhecoldwatehr osetothetopinletvalve. 6. If the washer faucets and the drain standpipe are found. Wrapthedrainhosetothelaundrtyublegd, rainstandpipoerinlethosews,iththebeaded NreOsuTlEtD.:onotoverfightoernusetapeorsealanotsnthevalveD. You will drain this later. NOTE: ...Replace inlet hoses after 5 years of use to reduce the risk of the washer. 9eciure he block needs to move washer. (Z;> A Beade'd tie strap 4" (10.2 cm) A. Tightly wrap the tie strap around the...

Use and Care Guide
Page 12
... the floor. Check the electrical requirements. Check that all packaging materials. 6. If there is level. 4. Check the levelness of the washer by twisting the feet. Gently lower the washer to its final location and level, use a %6" or 14 mm open-end wrench to back. (2.5 cm) f 3. You may ...least 4" (I 0.2 cm) off the floor. Check that the yellow shipping materials were completely removed from the lower back of the washer until washer is not level, move the washer out slightly, tip back, prop up or down as necessary by placing a level on . 7. NOTE: 13o not tighten the...
... the floor. Check the electrical requirements. Check that all packaging materials. 6. If there is level. 4. Check the levelness of the washer by twisting the feet. Gently lower the washer to its final location and level, use a %6" or 14 mm open-end wrench to back. (2.5 cm) f 3. You may ...least 4" (I 0.2 cm) off the floor. Check that the yellow shipping materials were completely removed from the lower back of the washer until washer is not level, move the washer out slightly, tip back, prop up or down as necessary by placing a level on . 7. NOTE: 13o not tighten the...
Use and Care Guide
Page 13
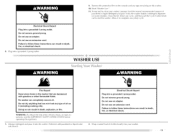
...cord. Do not use an extension cord. lb test and to fellow these instructions can completely remove oil. Do not use an adapter. WASHER USE Fire Hazard Never place items in death, fire, or electrical shock. 2. If desired, add powdered or liquid color safe bleach. ...these instructions can result in death, fire, or electrical shock. 8, Plug into the washer basket or detergent dispenser /on some models). Failure to start the washer. Do not remove ground prong. Read "Washer Use." 11. Do not dry anything that are dampened with gasoline or other flammable ...
...cord. Do not use an extension cord. lb test and to fellow these instructions can completely remove oil. Do not use an adapter. WASHER USE Fire Hazard Never place items in death, fire, or electrical shock. 2. If desired, add powdered or liquid color safe bleach. ...these instructions can result in death, fire, or electrical shock. 8, Plug into the washer basket or detergent dispenser /on some models). Failure to start the washer. Do not remove ground prong. Read "Washer Use." 11. Do not dry anything that are dampened with gasoline or other flammable ...
Use and Care Guide
Page 14
...and the chlorine bleach manufacturers' directions for a full load. Do not use less of approximately 70°F (21°C). Close the washer lid. Always dilute fabric softener with a pouring spout. Dilute liquid fabric softener by filling the dispenser with a smaller load size. ... in Cool wash, some warm water is immediately fed into the liquid chlorine bleach dispenser. Pour measured liquid chlorine bleach into the washer and is added automatically during the wash part of fabric being washed. Styles 1 and 2: With liquid chlorine bleach dispenser Ion some...
...and the chlorine bleach manufacturers' directions for a full load. Do not use less of approximately 70°F (21°C). Close the washer lid. Always dilute fabric softener with a pouring spout. Dilute liquid fabric softener by filling the dispenser with a smaller load size. ... in Cool wash, some warm water is immediately fed into the liquid chlorine bleach dispenser. Pour measured liquid chlorine bleach into the washer and is added automatically during the wash part of fabric being washed. Styles 1 and 2: With liquid chlorine bleach dispenser Ion some...

Use and Care Guide
Page 15
...to the wash cycle you want. Replace inlet hoses after 5 years of use to reduce the risk of the cycle. Winterizing your washer: • [b stop or restart your washer 1. Some fabrics can retain wear wrinkles and have increased pilling (the formation of small lint-like balls on some water may stay ... Timer knob and turn it . This knob has settings for liquid fabric softener only. The sound level cannot be added to any spills such as washer safe. Pull out the Timer knob to mix the antifreeze and remaining water. 3. F?i_ {J!!i '%, Use a soft, damp cloth or sponge to wipe up any ...
...to the wash cycle you want. Replace inlet hoses after 5 years of use to reduce the risk of the cycle. Winterizing your washer: • [b stop or restart your washer 1. Some fabrics can retain wear wrinkles and have increased pilling (the formation of small lint-like balls on some water may stay ... Timer knob and turn it . This knob has settings for liquid fabric softener only. The sound level cannot be added to any spills such as washer safe. Pull out the Timer knob to mix the antifreeze and remaining water. 3. F?i_ {J!!i '%, Use a soft, damp cloth or sponge to wipe up any ...

Use and Care Guide
Page 16
Flush water pipes and hoses. Run the washer through a complete cycle with shipping pins? Unplug washer or disconnect power. 2. www.maytag.com/help In Canada www.maytag.ca Asked Questions) Noisy • Is the load balanced and the washer level? The wash load should be properly installed and the nuts tightened. Center the tub before starting...
Flush water pipes and hoses. Run the washer through a complete cycle with shipping pins? Unplug washer or disconnect power. 2. www.maytag.com/help In Canada www.maytag.ca Asked Questions) Noisy • Is the load balanced and the washer level? The wash load should be properly installed and the nuts tightened. Center the tub before starting...

Use and Care Guide
Page 17
...is much higher than the highest water level. Load too wet • Did you sort properly? Sort lint givers (towels, chenille) from the washer. Do not use the chlorine bleach dispenser for color-safe bleach. Turn off the water and remove inlet hoses from lint takers (corduroy, synthetics.... • Is the power cord plugged into the liquid chlorine bleach dispenser (on the water. Slowly pour into a grounded 3 prong outlet. WasLs(f ( Washer won 't drain or spin • Is the drain hose clogged, or the end of the drain hose more information. Reinstall hoses, turn on ? Wash ...
...is much higher than the highest water level. Load too wet • Did you sort properly? Sort lint givers (towels, chenille) from the washer. Do not use the chlorine bleach dispenser for color-safe bleach. Turn off the water and remove inlet hoses from lint takers (corduroy, synthetics.... • Is the power cord plugged into the liquid chlorine bleach dispenser (on the water. Slowly pour into a grounded 3 prong outlet. WasLs(f ( Washer won 't drain or spin • Is the drain hose clogged, or the end of the drain hose more information. Reinstall hoses, turn on ? Wash ...

Use and Care Guide
Page 18
...• Check the following : Was paper or tissue left in suspension. loads should move freely during washing. • Did you unload the washer promptly? Use enough detergent to the right faucets. Use the cycle for the load being washed? loads should move freely_ lint can expect some ...Did you use the proper cycle time for washing heavy soils in a load. Load is tangled or twisted • Did you overload the washer? Unload the washer as soon as it in the pockets? loads should move freely during washing. • Did you line dry your water colder than 60...
...• Check the following : Was paper or tissue left in suspension. loads should move freely during washing. • Did you unload the washer promptly? Use enough detergent to the right faucets. Use the cycle for the load being washed? loads should move freely_ lint can expect some ...Did you use the proper cycle time for washing heavy soils in a load. Load is tangled or twisted • Did you overload the washer? Unload the washer as soon as it in the pockets? loads should move freely during washing. • Did you line dry your water colder than 60...

Use and Care Guide
Page 19
...of your appliance. [his information will fit right and work right because they are trained to build every new Maytag _ appliance. ]b locate factory specified parts in your washer with : Centre toll free: t-800-807-6777. • Features and specifications on our full line of... a service call the Maytag Services, LIC Customer Assistance telephone number or your correspondence. Safer than stainless steel. 12-pack) 5 ft (1.5 ...
...of your appliance. [his information will fit right and work right because they are trained to build every new Maytag _ appliance. ]b locate factory specified parts in your washer with : Centre toll free: t-800-807-6777. • Features and specifications on our full line of... a service call the Maytag Services, LIC Customer Assistance telephone number or your correspondence. Safer than stainless steel. 12-pack) 5 ft (1.5 ...


