Use and Care Manual
Page 2
... appearing in severe personal injury or death. Recognize Safety Symbols, Words, Labels DANGER DANGER - CAUTION CAUTION - Junked or abandoned refrigerators are not meant to cover all possible conditions and situations that may occur. even if they sit out for easy access. This... help prevent accidents. If you are not problems of your refrigerator. Before you do not understand. Call: 1-800-688-9900 USA 1-800-688-2002 Canada Have complete model and serial number identification of your old refrigerator, please follow basic precautions, including the following: Important: Child...
... appearing in severe personal injury or death. Recognize Safety Symbols, Words, Labels DANGER DANGER - CAUTION CAUTION - Junked or abandoned refrigerators are not meant to cover all possible conditions and situations that may occur. even if they sit out for easy access. This... help prevent accidents. If you are not problems of your refrigerator. Before you do not understand. Call: 1-800-688-9900 USA 1-800-688-2002 Canada Have complete model and serial number identification of your old refrigerator, please follow basic precautions, including the following: Important: Child...

Use and Care Manual
Page 4
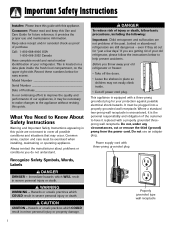
...with the door hinge side against a wall, you may damage underside components. 1. Allow refrigerator to top hinge while performing door removal and replacement. • Tape decorative panels (select models) securely into place before removing water line from power source. 2. Do not over-tighten....Push in the rear) for approximately 30 minutes before plugging it in operation, shut off 5⁄8" before removing doors. If the refrigerator is damaged, cut off water before removing door handles. Subflooring or floor coverings (i.e. Unplug power cord from the door. Doing so ...
...with the door hinge side against a wall, you may damage underside components. 1. Allow refrigerator to top hinge while performing door removal and replacement. • Tape decorative panels (select models) securely into place before removing water line from power source. 2. Do not over-tighten....Push in the rear) for approximately 30 minutes before plugging it in operation, shut off 5⁄8" before removing doors. If the refrigerator is damaged, cut off water before removing door handles. Subflooring or floor coverings (i.e. Unplug power cord from the door. Doing so ...
Use and Care Manual
Page 5
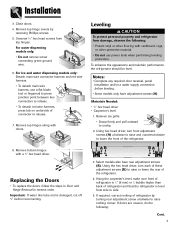
...press junction point between two connectors to release. • To detach red wire harness, press tab on underside of the refrigerator. For water dispensing models only: • Do not remove screw connecting green ground wire. 6. Remove top hinges along with cardboard, rugs, or... Cont. 4 Using the carpenter's level, make sure front of refrigerator is 1⁄4" (6 mm) or 1⁄2 bubble higher than back of refrigerator and that the refrigerator is damaged, cut off 5⁄8" before leveling. • Some models only have rear adjustment screws (B). Notes: • Complete any ...
...press junction point between two connectors to release. • To detach red wire harness, press tab on underside of the refrigerator. For water dispensing models only: • Do not remove screw connecting green ground wire. 6. Remove top hinges along with cardboard, rugs, or... Cont. 4 Using the carpenter's level, make sure front of refrigerator is 1⁄4" (6 mm) or 1⁄2 bubble higher than back of refrigerator and that the refrigerator is damaged, cut off 5⁄8" before leveling. • Some models only have rear adjustment screws (B). Notes: • Complete any ...
Use and Care Manual
Page 6
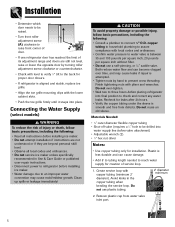
Connecting the Water Supply (select models) WARNING To reduce the risk of injury or death, follow basic precautions,...• Check with level to verify 1⁄4" tilt to the back for proper door closure. • If refrigerator is aligned and stable, replace toe grille. • Align the toe grille mounting clips with local codes and ...be raised. • Turn front roller adjustment screw (A) clockwise to raise front corner of door. • If one refrigerator door has reached the limit of service loop. 1. copper tubing to household plumbing to assure compliance with the lower cabinet...
Connecting the Water Supply (select models) WARNING To reduce the risk of injury or death, follow basic precautions,...• Check with level to verify 1⁄4" tilt to the back for proper door closure. • If refrigerator is aligned and stable, replace toe grille. • Align the toe grille mounting clips with local codes and ...be raised. • Turn front roller adjustment screw (A) clockwise to raise front corner of door. • If one refrigerator door has reached the limit of service loop. 1. copper tubing to household plumbing to assure compliance with the lower cabinet...
Use and Care Manual
Page 7
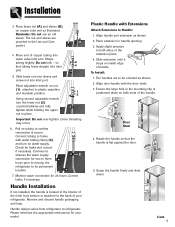
... screw nut into inlet port. Please reference the appropriate instructions for two to three hours prior to moving the refrigerator to the back of your model. Rotate the handle so that tubing feeds straight into water valve inlet port. Reminder: Do not use an old... (C) and turn the lower nut (2) counterclockwise and fully tighten while holding the upper nut in handle opening. 3. Apply slight pressure to refrigerator. Align handle and extension as shown. 2. Shape tubing slightly. Place extension in place. Slide extension until it stops on water supply. ...
... screw nut into inlet port. Please reference the appropriate instructions for two to three hours prior to moving the refrigerator to the back of your model. Rotate the handle so that tubing feeds straight into water valve inlet port. Reminder: Do not use an old... (C) and turn the lower nut (2) counterclockwise and fully tighten while holding the upper nut in handle opening. 3. Apply slight pressure to refrigerator. Align handle and extension as shown. 2. Shape tubing slightly. Place extension in place. Slide extension until it stops on water supply. ...
Use and Care Manual
Page 9
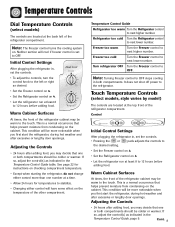
...This condition will be colder or warmer. Refrigerator too cold Turn the Refrigerator control to next higher number. Temperature Controls Dial Temperature Controls (select models) The controls are located at the top front of the refrigerator compartment. Note: The Freezer control turns...moisture from condensing on . Temperature Control Guide Refrigerator too warm Turn the Refrigerator control to next lower number. Turn refrigerator OFF Turn the Freezer control to the touch. Touch Temperature Controls (select models, style varies by model) The controls are located at least 8...
...This condition will be colder or warmer. Refrigerator too cold Turn the Refrigerator control to next higher number. Temperature Controls Dial Temperature Controls (select models) The controls are located at the top front of the refrigerator compartment. Note: The Freezer control turns...moisture from condensing on . Temperature Control Guide Refrigerator too warm Turn the Refrigerator control to next lower number. Turn refrigerator OFF Turn the Freezer control to the touch. Touch Temperature Controls (select models, style varies by model) The controls are located at least 8...

Use and Care Manual
Page 10
... too warm Set the Freezer control to next higher number by pressing the pad. Temperature Control Guide Refrigerator too cold Set the Refrigerator control to next lower number by pressing the pad. Reset Filter (select models) When a water filter has been installed in the freezer compartment. Freezer too cold Set the Freezer control...
... too warm Set the Freezer control to next higher number by pressing the pad. Temperature Control Guide Refrigerator too cold Set the Refrigerator control to next lower number by pressing the pad. Reset Filter (select models) When a water filter has been installed in the freezer compartment. Freezer too cold Set the Freezer control...
Use and Care Manual
Page 11
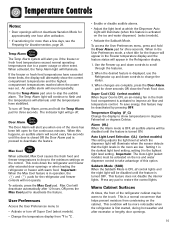
... to flash and the temperatures will illuminate. This condition will alternately show temperatures in operation, the and pads for the refrigerator and freezer controls will not operate. The Temp Alarm light will continue to improve air flow and temperature control. Max ...Important: The Auto Light (select models) must be warm to deactivate the feature. An audible alarm will deactivate automatically after activation. • If vacationing for more noticeable when the refrigerator is displayed, use the Refrigerator up and down the refrigerator and freezer after excessive or ...
... to flash and the temperatures will illuminate. This condition will alternately show temperatures in operation, the and pads for the refrigerator and freezer controls will not operate. The Temp Alarm light will continue to improve air flow and temperature control. Max ...Important: The Auto Light (select models) must be warm to deactivate the feature. An audible alarm will deactivate automatically after activation. • If vacationing for more noticeable when the refrigerator is displayed, use the Refrigerator up and down the refrigerator and freezer after excessive or ...
Use and Care Manual
Page 12
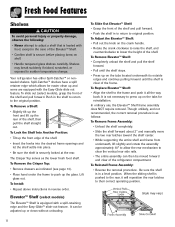
... to allow the rear mechanism to clear the vertical rear side rails. • The entire assembly can be moved forward and clear of the refrigerator compartment. Shelves may vary) 11 To Remove a Shelf: • Slightly tilt up the front and lift up or down without unloading. Though... are equipped with the Easy-Glide slide out feature. To Install: • Repeat above instructions in reverse order. Elevator™ Shelf (select models) The Elevator™ Shelf is not necessary to press up on shelf. • Handle tempered glass shelves carefully. In ordinary use, the Elevator...
... to allow the rear mechanism to clear the vertical rear side rails. • The entire assembly can be moved forward and clear of the refrigerator compartment. Shelves may vary) 11 To Remove a Shelf: • Slightly tilt up the front and lift up or down without unloading. Though... are equipped with the Easy-Glide slide out feature. To Install: • Repeat above instructions in reverse order. Elevator™ Shelf (select models) The Elevator™ Shelf is not necessary to press up on shelf. • Handle tempered glass shelves carefully. In ordinary use, the Elevator...
Use and Care Manual
Page 13
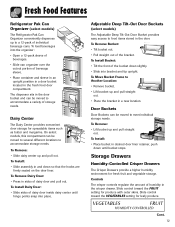
...Place bucket in the door. Controls The crisper controls regulate the amount of humidity in the fresh food door compartment. On select models, this compartment can be moved to food items stored in desired door liner retainer, push down until hinge points snap into ... the VEGETABLES setting for produce with outer skins. Slide control toward the FRUIT setting for leafy produce. Fresh Food Features Refrigerator Pak Can Organizer (select models) The Refrigerator Pak Can Organizer conveniently dispenses up to Another Location: • Remove bucket. • Lift bracket up and pull ...
...Place bucket in the door. Controls The crisper controls regulate the amount of humidity in the fresh food door compartment. On select models, this compartment can be moved to food items stored in desired door liner retainer, push down until hinge points snap into ... the VEGETABLES setting for produce with outer skins. Slide control toward the FRUIT setting for leafy produce. Fresh Food Features Refrigerator Pak Can Organizer (select models) The Refrigerator Pak Can Organizer conveniently dispenses up to Another Location: • Remove bucket. • Lift bracket up and pull ...
Use and Care Manual
Page 14
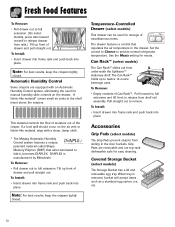
...frame rails and push back into place. Set the control to Cheese to remove. Pull straight out to provide normal refrigerator temperature. Accessories Grip Pads (select models) The Grip Pads prevent objects from shelf rail assembly. To Install: • Insert drawer into frame rails and ... The Can Rack™ holds up to full extension. Grip Pads are removable and are equipped with a clean, damp cloth. * The Maytag Automatic Humidity Control system features a unique, patented material called Shape Memory Polymer (SMP) that regulates the air temperature in the door buckets. ...
...frame rails and push back into place. Set the control to Cheese to remove. Pull straight out to provide normal refrigerator temperature. Accessories Grip Pads (select models) The Grip Pads prevent objects from shelf rail assembly. To Install: • Insert drawer into frame rails and ... The Can Rack™ holds up to full extension. Grip Pads are removable and are equipped with a clean, damp cloth. * The Maytag Automatic Humidity Control system features a unique, patented material called Shape Memory Polymer (SMP) that regulates the air temperature in the door buckets. ...
Use and Care Manual
Page 15
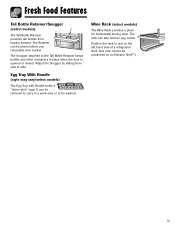
... from tipping forward. Egg Tray With Handle (style may vary/select models) The Egg Tray with Handle holds a "dozen-plus" eggs. The Snugger attached to side. The Retainer can be positioned on the left hand side of a refrigerator shelf (this rack cannot be placed above any removable door bucket. ...The rack can be removed to carry to a work area or to rest on an Elevator Shelf™). 14 Position the rack to be washed. Fresh Food Features Tall Bottle Retainer/Snugger (select models) The Tall...
... from tipping forward. Egg Tray With Handle (style may vary/select models) The Egg Tray with Handle holds a "dozen-plus" eggs. The Snugger attached to side. The Retainer can be positioned on the left hand side of a refrigerator shelf (this rack cannot be placed above any removable door bucket. ...The rack can be removed to carry to a work area or to rest on an Elevator Shelf™). 14 Position the rack to be washed. Fresh Food Features Tall Bottle Retainer/Snugger (select models) The Tall...
Use and Care Manual
Page 16
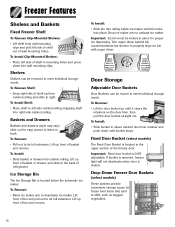
... back of wall mounting holes. Lift up front of basket or drawer, and slide to items in left side of shelf out of refrigerator. Drop ice maker arm to meet individual storage needs. Door Storage Adjustable Door Buckets Door Buckets can be removed to its full extension.... Drop-Down Freezer Door Baskets (select models) These baskets provide convenient storage space for proper ice dispensing. To Remove: • Lift the door bucket up front of bin and remove...
... back of wall mounting holes. Lift up front of basket or drawer, and slide to items in left side of shelf out of refrigerator. Drop ice maker arm to meet individual storage needs. Door Storage Adjustable Door Buckets Door Buckets can be removed to its full extension.... Drop-Down Freezer Door Baskets (select models) These baskets provide convenient storage space for proper ice dispensing. To Remove: • Lift the door bucket up front of bin and remove...
Use and Care Manual
Page 17
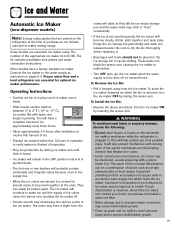
...accompany the various cycles of copper salts in lukewarm water. Ice and Water Automatic Ice Maker (non-dispenser models) Note: Energy rating guides that are posted on the refrigerator at the ends. Other models have a slight hum, the cubes will remain in the supply line. • When the ice ...the following: • Do not place fingers or hands on the automatic ice making mechanism while the refrigerator is removed, turn the ice maker OFF by lowering the sensor arm. Some models are essential for several hours. Operating Instructions • Confirm ice bin is in the ice storage bin...
...accompany the various cycles of copper salts in lukewarm water. Ice and Water Automatic Ice Maker (non-dispenser models) Note: Energy rating guides that are posted on the refrigerator at the ends. Other models have a slight hum, the cubes will remain in the supply line. • When the ice ...the following: • Do not place fingers or hands on the automatic ice making mechanism while the refrigerator is removed, turn the ice maker OFF by lowering the sensor arm. Some models are essential for several hours. Operating Instructions • Confirm ice bin is in the ice storage bin...
Use and Care Manual
Page 18
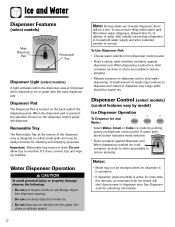
...allow tray to two-minute delay while water tank fills before water dispenses. Discard first 10-14 glasses of water after initially connecting refrigerator to reduce spraying. When dispensing crushed ice, hold container as close to chute as possible to household water supply and after extended... of the dispenser area is designed to collect small spills and may continue to dispense and collect in operation. • If dispenser (select models) is pressed, the selection chosen on dispenser pad to dispenser area. A small amount of nonuse. Important: Removable tray does not drain. ...
...allow tray to two-minute delay while water tank fills before water dispenses. Discard first 10-14 glasses of water after initially connecting refrigerator to reduce spraying. When dispensing crushed ice, hold container as close to chute as possible to household water supply and after extended... of the dispenser area is designed to collect small spills and may continue to dispense and collect in operation. • If dispenser (select models) is pressed, the selection chosen on dispenser pad to dispenser area. A small amount of nonuse. Important: Removable tray does not drain. ...
Use and Care Manual
Page 20
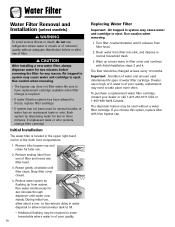
... dealer or call 1-877-232-6771 USA or 1-800-688-8408 Canada. Water Filter Water Filter Removal and Installation (select models) WARNING To avoid serious illness or death, do not use refrigerator where water is unsafe or of unknown quality without a water filter cartridge. Initial Installation The water filter is located in...
... dealer or call 1-877-232-6771 USA or 1-800-688-8408 Canada. Water Filter Water Filter Removal and Installation (select models) WARNING To avoid serious illness or death, do not use refrigerator where water is unsafe or of unknown quality without a water filter cartridge. Initial Installation The water filter is located in...
Use and Care Manual
Page 21
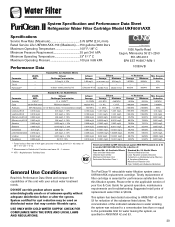
... mg/L 0.015 mg/L Effluent Average Maximum 0.31 NTU .049 NTU Water Filter System Specification and Performance Data Sheet TM Refrigerator Water Filter Cartridge Model UKF8001AXX Specifications Service Flow Rate (Maximum 0.78 GPM (2.9 L/min) Rated Service Life UKF8001AXX-750 (Maximum) ......750 gallons ...pH 6.5 0.002 mg/L .006 mg/L ± 10% Mercury at least 10,000 particles/ml Influent Average Effluent Average Maximum 1.88 mg / L 97.26% 96.84% - - 99.52% 98.94% Min. Standard No. 42: Aesthetic Effects Influent Challenge Concentration 2.0 mg/L ± 10% - Required...
... mg/L 0.015 mg/L Effluent Average Maximum 0.31 NTU .049 NTU Water Filter System Specification and Performance Data Sheet TM Refrigerator Water Filter Cartridge Model UKF8001AXX Specifications Service Flow Rate (Maximum 0.78 GPM (2.9 L/min) Rated Service Life UKF8001AXX-750 (Maximum) ......750 gallons ...pH 6.5 0.002 mg/L .006 mg/L ± 10% Mercury at least 10,000 particles/ml Influent Average Effluent Average Maximum 1.88 mg / L 97.26% 96.84% - - 99.52% 98.94% Min. Standard No. 42: Aesthetic Effects Influent Challenge Concentration 2.0 mg/L ± 10% - Required...
Use and Care Manual
Page 26
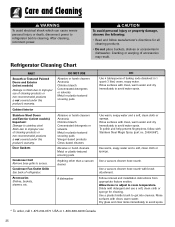
... and dry immediately to access. Use a vacuum cleaner hose nozzle with clean, warm water. Refrigerator Cleaning Chart PART Smooth or Textured Painted Doors and Exterior (select models) Damage to finish due to improper use of cleaning products or non-recommended products is not ... help prevent fingerprints, follow manufacturer's directions for cleaning. Use a vacuum cleaner hose nozzle. Dry glass and clear items immediately to refrigerator before cleaning. Care and Cleaning WARNING To avoid electrical shock which can cause severe personal injury or death, disconnect power to avoid...
... and dry immediately to access. Use a vacuum cleaner hose nozzle with clean, warm water. Refrigerator Cleaning Chart PART Smooth or Textured Painted Doors and Exterior (select models) Damage to finish due to improper use of cleaning products or non-recommended products is not ... help prevent fingerprints, follow manufacturer's directions for cleaning. Use a vacuum cleaner hose nozzle. Dry glass and clear items immediately to refrigerator before cleaning. Care and Cleaning WARNING To avoid electrical shock which can cause severe personal injury or death, disconnect power to avoid...
Use and Care Manual
Page 29
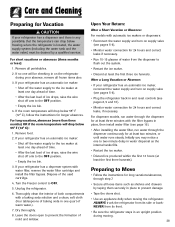
... absence, remove all frozen items also. 3. Upon Your Return: After a Short Vacation or Absence: For models with water filter, remove the water filter cartridge and install the filter bypass. If your refrigerator has an automatic ice maker: • Shut off arm to the OFF position. • Empty the... water supply system (including the water tank and the water valve) must be checking in on supply valve (see pages 5-6). • Plug the refrigerator back in and reset controls (see pages 5-6). • Monitor water connection for 24 hours and correct leaks if necessary. • Run 10-15...
... absence, remove all frozen items also. 3. Upon Your Return: After a Short Vacation or Absence: For models with water filter, remove the water filter cartridge and install the filter bypass. If your refrigerator has an automatic ice maker: • Shut off arm to the OFF position. • Empty the... water supply system (including the water tank and the water valve) must be checking in on supply valve (see pages 5-6). • Plug the refrigerator back in and reset controls (see pages 5-6). • Monitor water connection for 24 hours and correct leaks if necessary. • Run 10-15...
Use and Care Manual
Page 30
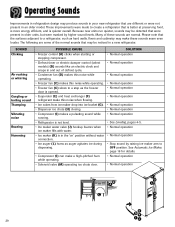
... • Dispenser ice chute (H) closing. • Normal operation • Compressor (I) makes a pulsating sound while running. • Normal operation • Refrigerator is not level. • See Leveling, pages 4-5. • Ice maker water valve (J) hookup buzzes when ice maker fills with water. • Normal... following are different or were not present in an older model. These improvements were made to OFF position. Operating Sounds Improvements in refrigeration design may produce sounds in your new refrigerator that are some of the normal sounds that may be detected...
... • Dispenser ice chute (H) closing. • Normal operation • Compressor (I) makes a pulsating sound while running. • Normal operation • Refrigerator is not level. • See Leveling, pages 4-5. • Ice maker water valve (J) hookup buzzes when ice maker fills with water. • Normal... following are different or were not present in an older model. These improvements were made to OFF position. Operating Sounds Improvements in refrigeration design may produce sounds in your new refrigerator that are some of the normal sounds that may be detected...


