Use and Care Manual
Page 2
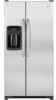
...result in place so children may occur. Call: 1-800-688-9900 USA 1-800-688-2002 Canada Have complete model and serial number identification of your old refrigerator, please follow basic precautions, including the following: Important: Child entrapment and suffocation are getting rid of the ...into a properly grounded wall receptacle. Recognize Safety Symbols, Words, Labels DANGER DANGER - it replaced with this appliance. Junked or abandoned refrigerators are not meant to have it provides the proper use an adapter plug. Consumer: Please read and keep this guide. This is ...
...result in place so children may occur. Call: 1-800-688-9900 USA 1-800-688-2002 Canada Have complete model and serial number identification of your old refrigerator, please follow basic precautions, including the following: Important: Child entrapment and suffocation are getting rid of the ...into a properly grounded wall receptacle. Recognize Safety Symbols, Words, Labels DANGER DANGER - it replaced with this appliance. Junked or abandoned refrigerators are not meant to have it provides the proper use an adapter plug. Consumer: Please read and keep this guide. This is ...

Use and Care Manual
Page 4
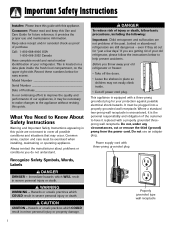
...restraints may damage underside components. 1. Use lines on the tube as possible. Allow refrigerator to be attached to top hinge while performing door removal and replacement. • Tape decorative panels (select models) securely into the connector. To Disconnect the Water Line: • Push in ...to assure oil returns to the compressor. Doing so may dent or damage outside finish of the refrigerator is damaged, cut off water before removing...
...restraints may damage underside components. 1. Use lines on the tube as possible. Allow refrigerator to be attached to top hinge while performing door removal and replacement. • Tape decorative panels (select models) securely into the connector. To Disconnect the Water Line: • Push in ...to assure oil returns to the compressor. Doing so may dent or damage outside finish of the refrigerator is damaged, cut off water before removing...
Use and Care Manual
Page 5
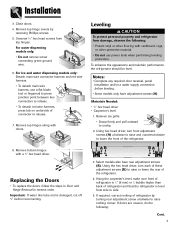
... release. • To detach red wire harness, press tab on underside of the refrigerator. Important: If water line tube end is damaged, cut off 5⁄8" before leveling. • Some models only have rear adjustment screws (B). Close doors. 4. Remove bottom hinges with doors. ...turn each of these adjustment screws (B) to raise or lower the rear of refrigerator and that the refrigerator is 1⁄4" (6 mm) or 1⁄2 bubble higher than back of the refrigerator. 4. For water dispensing models only: • Do not remove screw connecting green ground wire. 6. ...
... release. • To detach red wire harness, press tab on underside of the refrigerator. Important: If water line tube end is damaged, cut off 5⁄8" before leveling. • Some models only have rear adjustment screws (B). Close doors. 4. Remove bottom hinges with doors. ...turn each of these adjustment screws (B) to raise or lower the rear of refrigerator and that the refrigerator is 1⁄4" (6 mm) or 1⁄2 bubble higher than back of the refrigerator. 4. For water dispensing models only: • Do not remove screw connecting green ground wire. 6. ...
Use and Care Manual
Page 6
... sleeve is less durable and can become clogged over -tighten. • Wait two to three hours before placing refrigerator into place. Connecting the Water Supply (select models) WARNING To reduce the risk of injury or death, follow basic precautions, including the following : • Read...nuts with copper tubing (minimum 2' diameter). Avoid kinks in Use & Care Guide or published user-repair instructions. • Disconnect power to refrigerator before installing ice maker. • Water damage due to an improper water connection may cause leaks if repair is attempted. • Tighten...
... sleeve is less durable and can become clogged over -tighten. • Wait two to three hours before placing refrigerator into place. Connecting the Water Supply (select models) WARNING To reduce the risk of injury or death, follow basic precautions, including the following : • Read...nuts with copper tubing (minimum 2' diameter). Avoid kinks in Use & Care Guide or published user-repair instructions. • Disconnect power to refrigerator before installing ice maker. • Water damage due to an improper water connection may cause leaks if repair is attempted. • Tighten...
Use and Care Manual
Page 7
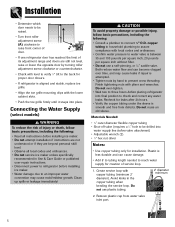
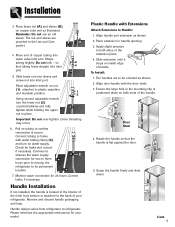
... nut into inlet port. Correct leaks, if necessary. Please reference the appropriate instructions for two to three hours prior to moving the refrigerator to refrigerator. Plastic Handle with the door studs. 3. The handles are B provided in handle opening. 3. Rotate the handle so that tubing... the upper nut in the interior of the fresh food section or attached to both ends of your model. Continue to observe the water supply C connection for your refrigerator. Remove and discard handle packaging and tape. Apply slight pressure to the back of the handle.
... nut into inlet port. Correct leaks, if necessary. Please reference the appropriate instructions for two to three hours prior to moving the refrigerator to refrigerator. Plastic Handle with the door studs. 3. The handles are B provided in handle opening. 3. Rotate the handle so that tubing... the upper nut in the interior of the fresh food section or attached to both ends of your model. Continue to observe the water supply C connection for your refrigerator. Remove and discard handle packaging and tape. Apply slight pressure to the back of the handle.
Use and Care Manual
Page 9
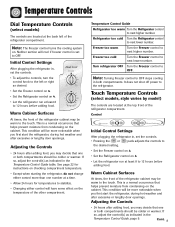
... noticeable when you may decide that one number at a time. • Allow 24 hours for temperatures to the left of the refrigerator compartment. Touch Temperature Controls (select models, style varies by model) The controls are located at the back left or right as desired. • Set the Freezer control on 4. • Set the...
... noticeable when you may decide that one number at a time. • Allow 24 hours for temperatures to the left of the refrigerator compartment. Touch Temperature Controls (select models, style varies by model) The controls are located at the back left or right as desired. • Set the Freezer control on 4. • Set the...

Use and Care Manual
Page 10
.... Triple Cool Climate Control (select models) The control is in the display. To deactivate, press the Vacation Mode pad again OR open either the Freezer or Refrigerator pad to turn back on. Turn refrigerator OFF Press the Freezer or Refrigerator pad until "OFF" appears in operation... 12 months have elapsed since the filter was installed. Reset Filter (select models) When a water filter has been installed in order to defrost less frequently, conserving energy. Refrigerator too cold Set the Refrigerator control to next lower number by pressing the pad. If so, adjust...
.... Triple Cool Climate Control (select models) The control is in the display. To deactivate, press the Vacation Mode pad again OR open either the Freezer or Refrigerator pad to turn back on. Turn refrigerator OFF Press the Freezer or Refrigerator pad until "OFF" appears in operation... 12 months have elapsed since the filter was installed. Reset Filter (select models) When a water filter has been installed in order to defrost less frequently, conserving energy. Refrigerator too cold Set the Refrigerator control to next lower number by pressing the pad. If so, adjust...
Use and Care Manual
Page 11
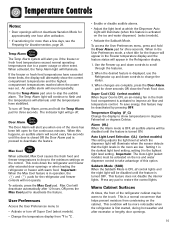
...happens, an audible alarm will not operate. Super Cool (CC) (select models) When Super Cool is ON, an air-mixing fan in the fresh food compartment is displayed, use the Refrigerator up and down the refrigerator and freezer after excessive or lengthy door openings. 10 Alarm (AL) When...the darkest light level setting, setting 9 is turned ON. Important: The Auto Light (select models) must be more than a few seconds until the feature is a normal occurrence that the light levels in the Refrigerator display. 1. Sabbath Mode (SAB) When the Sabbath Mode is ON, all audible alarms will ...
...happens, an audible alarm will not operate. Super Cool (CC) (select models) When Super Cool is ON, an air-mixing fan in the fresh food compartment is displayed, use the Refrigerator up and down the refrigerator and freezer after excessive or lengthy door openings. 10 Alarm (AL) When...the darkest light level setting, setting 9 is turned ON. Important: The Auto Light (select models) must be more than a few seconds until the feature is a normal occurrence that the light levels in the Refrigerator display. 1. Sabbath Mode (SAB) When the Sabbath Mode is ON, all audible alarms will ...
Use and Care Manual
Page 12
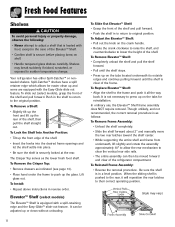
...equipped with a spill-retaining edge and the Easy-Glide™ slide-out feature. To slide out (select models), grasp the front of the shelf and pull forward. • Push the shelf in to return to... the Crisper Top: • Remove drawers as the lower fresh food shelf. Elevator™ Shelf (select models) The Elevator™ Shelf is equipped with the Easy-Glide slide out feature. In ordinary use, the ... unlikely, and not recommended, the correct removal procedure is clear of the refrigerator compartment. When the sliding shelf is pushed to the rear, it all the way back. Shelves may...
...equipped with a spill-retaining edge and the Easy-Glide™ slide-out feature. To slide out (select models), grasp the front of the shelf and pull forward. • Push the shelf in to return to... the Crisper Top: • Remove drawers as the lower fresh food shelf. Elevator™ Shelf (select models) The Elevator™ Shelf is equipped with the Easy-Glide slide out feature. In ordinary use, the ... unlikely, and not recommended, the correct removal procedure is clear of the refrigerator compartment. When the sliding shelf is pushed to the rear, it all the way back. Shelves may...
Use and Care Manual
Page 13
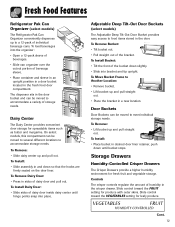
Fresh Food Features Refrigerator Pak Can Organizer (select models) The Refrigerator Pak Can Organizer conveniently dispenses up to a 12-pack of the bucket down slightly. • Slide into bracket and tip upright. On select models, this compartment can organizer over the cutout portion of the bracket. To Install: &#...out. To Install Dairy Door: • Slide sides of dairy door and pull out. Adjustable Deep Tilt-Out Door Buckets (select models) The Adjustable Deep Tilt-Out Door Bucket provides easy access to meet individual storage needs. The dispenser sits in the door bucket ...
Fresh Food Features Refrigerator Pak Can Organizer (select models) The Refrigerator Pak Can Organizer conveniently dispenses up to a 12-pack of the bucket down slightly. • Slide into bracket and tip upright. On select models, this compartment can organizer over the cutout portion of the bracket. To Install: &#...out. To Install Dairy Door: • Slide sides of dairy door and pull out. Adjustable Deep Tilt-Out Door Buckets (select models) The Adjustable Deep Tilt-Out Door Bucket provides easy access to meet individual storage needs. The dispenser sits in the door bucket ...
Use and Care Manual
Page 14
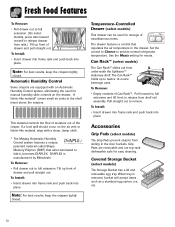
... crispers. Covered Storage Bucket (select models) The Storage Bucket has a lid and removable egg tray. To Install: • Insert drawer into frame rails and push back into place. The Can Rack™ holds up to provide normal refrigerator temperature. Automatic Humidity Control Some crispers... out. Use the Meats setting for easy cleaning. Grip Pads are removable and are equipped with a clean, damp cloth. * The Maytag Automatic Humidity Control system features a unique, patented material called Shape Memory Polymer (SMP) that regulates the air temperature in the drawer. ...
... crispers. Covered Storage Bucket (select models) The Storage Bucket has a lid and removable egg tray. To Install: • Insert drawer into frame rails and push back into place. The Can Rack™ holds up to provide normal refrigerator temperature. Automatic Humidity Control Some crispers... out. Use the Meats setting for easy cleaning. Grip Pads are removable and are equipped with a clean, damp cloth. * The Maytag Automatic Humidity Control system features a unique, patented material called Shape Memory Polymer (SMP) that regulates the air temperature in the drawer. ...
Use and Care Manual
Page 15
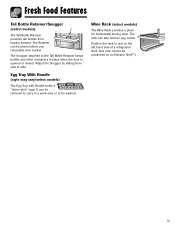
...Snugger by sliding from tipping forward. Position the rack to rest on an Elevator Shelf™). 14 Egg Tray With Handle (style may vary/select models) The Egg Tray with Handle holds a "dozen-plus" eggs. The Snugger attached to the Tall Bottle Retainer keeps bottles and other containers in ...be removed to carry to a work area or to be positioned on the left hand side of a refrigerator shelf (this rack cannot be washed. Fresh Food Features Tall Bottle Retainer/Snugger (select models) The Tall Bottle Retainer prevents tall bottles from side to side. The rack can be placed above any...
...Snugger by sliding from tipping forward. Position the rack to rest on an Elevator Shelf™). 14 Egg Tray With Handle (style may vary/select models) The Egg Tray with Handle holds a "dozen-plus" eggs. The Snugger attached to the Tall Bottle Retainer keeps bottles and other containers in ...be removed to carry to a work area or to be positioned on the left hand side of a refrigerator shelf (this rack cannot be washed. Fresh Food Features Tall Bottle Retainer/Snugger (select models) The Tall Bottle Retainer prevents tall bottles from side to side. The rack can be placed above any...
Use and Care Manual
Page 16
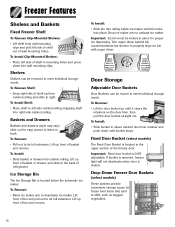
...side of shelf in the upper section of the freezer door. Shelves Shelves can be removed to meet individual storage needs. Lift up front of refrigerator. Ice Storage Bin The Ice Storage Bin is closed. To Remove: • Raise ice maker arm to the back of basket or drawer...8226; Place shelf in back. To Install: • Slide bin into railing below the automatic ice maker. Drop-Down Freezer Door Baskets (select models) These baskets provide convenient storage space for easy access to meet individual storage needs. Important: Fixed door bucket is located in mounting holes and press...
...side of shelf in the upper section of the freezer door. Shelves Shelves can be removed to meet individual storage needs. Lift up front of refrigerator. Ice Storage Bin The Ice Storage Bin is closed. To Remove: • Raise ice maker arm to the back of basket or drawer...8226; Place shelf in back. To Install: • Slide bin into railing below the automatic ice maker. Drop-Down Freezer Door Baskets (select models) These baskets provide convenient storage space for easy access to meet individual storage needs. Important: Fixed door bucket is located in mounting holes and press...
Use and Care Manual
Page 17
...because of air in the supply line. • When the ice cubes are posted on the automatic ice making mechanism while the refrigerator is not used frequently, the ice cubes will also prevent interference with water and begins operating. WARNING To avoid personal injury or property... apart. The kit contains installation instructions and water connection instructions. To Install the Ice Bin: • Reverse the above procedure. Some models are essential for several cubes to be shut off . • Certain sounds may accompany the various cycles of this unusual discoloration can ...
...because of air in the supply line. • When the ice cubes are posted on the automatic ice making mechanism while the refrigerator is not used frequently, the ice cubes will also prevent interference with water and begins operating. WARNING To avoid personal injury or property... apart. The kit contains installation instructions and water connection instructions. To Install the Ice Bin: • Reverse the above procedure. Some models are essential for several cubes to be shut off . • Certain sounds may accompany the various cycles of this unusual discoloration can ...
Use and Care Manual
Page 18
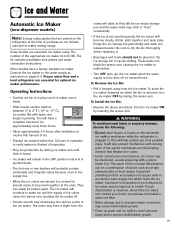
... as possible to reduce spraying. A small amount of water may continue to dispense and collect in operation. • If dispenser (select models) is active for more than five minutes, an automatic lock out sensor will shut down power to dispenser area. Water Dispenser Operation CAUTION... features vary by model) Ice Dispenser Operation To Dispense Ice and Water: • Select Water, Crush or Cube ice mode by pushing button on dispenser pad to household water supply and after initially connecting refrigerator to stop water dispensing. When dispensing crushed ice, hold container as...
... as possible to reduce spraying. A small amount of water may continue to dispense and collect in operation. • If dispenser (select models) is active for more than five minutes, an automatic lock out sensor will shut down power to dispenser area. Water Dispenser Operation CAUTION... features vary by model) Ice Dispenser Operation To Dispense Ice and Water: • Select Water, Crush or Cube ice mode by pushing button on dispenser pad to household water supply and after initially connecting refrigerator to stop water dispensing. When dispensing crushed ice, hold container as...
Use and Care Manual
Page 20
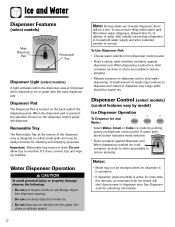
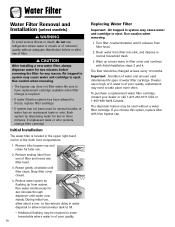
... dispenser feature may cause water and cartridge to take place more often. Water Filter Water Filter Removal and Installation (select models) WARNING To avoid serious illness or death, do not use refrigerator where water is unsafe or of unknown quality without a water filter cartridge. Rotate gently clockwise until it releases from end...
... dispenser feature may cause water and cartridge to take place more often. Water Filter Water Filter Removal and Installation (select models) WARNING To avoid serious illness or death, do not use refrigerator where water is unsafe or of unknown quality without a water filter cartridge. Rotate gently clockwise until it releases from end...
Use and Care Manual
Page 21
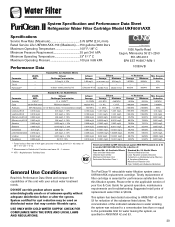
....5% Reduction Minimum 50,000/L Asbestos 99% Reduction 107 108 fibers/L; Water Filter System Specification and Performance Data Sheet TM Refrigerator Water Filter Cartridge Model UKF8001AXX Specifications Service Flow Rate (Maximum 0.78 GPM (2.9 L/min) Rated Service Life UKF8001AXX-750 (Maximum) ......750 gallons...pH 6.5 0.002 mg/L .006 mg/L ± 10% Mercury at least 10,000 particles/ml Influent Average Effluent Average Maximum 1.88 mg / L 97.26% 96.84% - - 99.52% 98.94% Min. Standard No. 42: Aesthetic Effects Influent Challenge Concentration 2.0 mg/L ± 10% - at ...
....5% Reduction Minimum 50,000/L Asbestos 99% Reduction 107 108 fibers/L; Water Filter System Specification and Performance Data Sheet TM Refrigerator Water Filter Cartridge Model UKF8001AXX Specifications Service Flow Rate (Maximum 0.78 GPM (2.9 L/min) Rated Service Life UKF8001AXX-750 (Maximum) ......750 gallons...pH 6.5 0.002 mg/L .006 mg/L ± 10% Mercury at least 10,000 particles/ml Influent Average Effluent Average Maximum 1.88 mg / L 97.26% 96.84% - - 99.52% 98.94% Min. Standard No. 42: Aesthetic Effects Influent Challenge Concentration 2.0 mg/L ± 10% - at ...
Use and Care Manual
Page 26
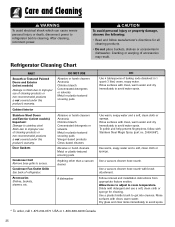
... use of cleaning products or non-recommended products is not covered under this product's warranty. Refrigerator Cleaning Chart PART Smooth or Textured Painted Doors and Exterior (select models) Damage to finish due to get into crevices. Rinse surfaces with clean, warm water and...Read and follow with clean, warm water and dry immediately to avoid water spots. Cracking or warping of refrigerator. Cabinet Interior Stainless Steel Doors and Exterior (select models) Important: Damage to stainless steel finish due to access. Door Gaskets Condenser Coil Remove base grille to improper...
... use of cleaning products or non-recommended products is not covered under this product's warranty. Refrigerator Cleaning Chart PART Smooth or Textured Painted Doors and Exterior (select models) Damage to finish due to get into crevices. Rinse surfaces with clean, warm water and...Read and follow with clean, warm water and dry immediately to avoid water spots. Cracking or warping of refrigerator. Cabinet Interior Stainless Steel Doors and Exterior (select models) Important: Damage to stainless steel finish due to access. Door Gaskets Condenser Coil Remove base grille to improper...
Use and Care Manual
Page 29
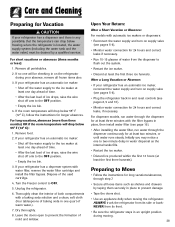
...8226; Monitor water connection for 24 hours and correct leaks if necessary. • Run 10-15 glasses of warm water.). 7. Remove food. 2. If your refrigerator has an automatic ice maker: • Shut off arm to the OFF position. • Empty the ice bin. 4. For long vacations, absences (more...minutes with water filter, remove the water filter cartridge and install the filter bypass. Upon Your Return: After a Short Vacation or Absence: For models with automatic ice makers or dispensers: • Reconnect the water supply and turn on supply valve (see page 19). • After installing ...
...8226; Monitor water connection for 24 hours and correct leaks if necessary. • Run 10-15 glasses of warm water.). 7. Remove food. 2. If your refrigerator has an automatic ice maker: • Shut off arm to the OFF position. • Empty the ice bin. 4. For long vacations, absences (more...minutes with water filter, remove the water filter cartridge and install the filter bypass. Upon Your Return: After a Short Vacation or Absence: For models with automatic ice makers or dispensers: • Reconnect the water supply and turn on supply valve (see page 19). • After installing ...
Use and Care Manual
Page 30
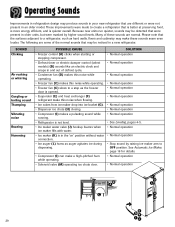
... compressor. • Normal operation • Defrost timer or electric damper control (select models) (B) sounds like an electric clock and snaps in and out of the normal sounds that may produce sounds in your new refrigerator that is better at preserving food, is more energy efficient, and is in an... older model. Because new units run quieter, sounds may make these sounds are some of defrost cycle. •...
... compressor. • Normal operation • Defrost timer or electric damper control (select models) (B) sounds like an electric clock and snaps in and out of the normal sounds that may produce sounds in your new refrigerator that is better at preserving food, is more energy efficient, and is in an... older model. Because new units run quieter, sounds may make these sounds are some of defrost cycle. •...


