Use and Care Manual
Page 2
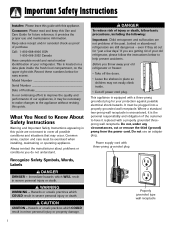
... the doors. • Leave the shelves in severe personal injury or death. Model Number Serial Number Date of your old refrigerator, please follow basic precautions, including the following: Important: Child entrapment and suffocation are still dangerous - Always contact the manufacturer... about problems or conditions you throw away your old refrigerator or freezer: • Take off power cord plug. Recognize Safety Symbols, Words, Labels DANGER DANGER - Record these numbers...
... the doors. • Leave the shelves in severe personal injury or death. Model Number Serial Number Date of your old refrigerator, please follow basic precautions, including the following: Important: Child entrapment and suffocation are still dangerous - Always contact the manufacturer... about problems or conditions you throw away your old refrigerator or freezer: • Take off power cord plug. Recognize Safety Symbols, Words, Labels DANGER DANGER - Record these numbers...
Use and Care Manual
Page 3
...and grounding must comply with a qualified electrician if you are beyond personal skill level. 14. If plug does not fit wall receptacle, have refrigerator checked by licensed personnel when required. 15. Do not service or replace any service. Read all local codes and ordinances. 3. Do not... 19. Have worn power cords and/or loose plugs replaced by grasping the plug, not the cord. 1. Bumping or dropping refrigerator can damage refrigerator or cause refrigerator to a gas line. 6. Do not attempt service if instructions are not understood or if they are not sure this appliance is...
...and grounding must comply with a qualified electrician if you are beyond personal skill level. 14. If plug does not fit wall receptacle, have refrigerator checked by licensed personnel when required. 15. Do not service or replace any service. Read all local codes and ordinances. 3. Do not... 19. Have worn power cords and/or loose plugs replaced by grasping the plug, not the cord. 1. Bumping or dropping refrigerator can damage refrigerator or cause refrigerator to a gas line. 6. Do not attempt service if instructions are not understood or if they are not sure this appliance is...

Use and Care Manual
Page 4
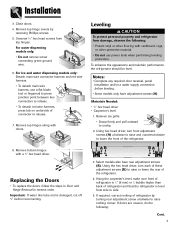
... • If tube end is completely covered, use dimensions from the connector (B). Malfunction may damage underside components. 1. ALWAYS truck refrigerator from its side or back-NEVER from its front. • Protect outside finish. 3 Door and Hinge Removal Some installations require door removal...a guide for proper air circulation. To Disconnect the Water Line: • Push in blankets or inserting padding between the refrigerator and dolly. • Secure refrigerator to dolly firmly with the door hinge side against a wall, you may want to allow 1⁄2" space at this ...
... • If tube end is completely covered, use dimensions from the connector (B). Malfunction may damage underside components. 1. ALWAYS truck refrigerator from its side or back-NEVER from its front. • Protect outside finish. 3 Door and Hinge Removal Some installations require door removal...a guide for proper air circulation. To Disconnect the Water Line: • Push in blankets or inserting padding between the refrigerator and dolly. • Secure refrigerator to dolly firmly with the door hinge side against a wall, you may want to allow 1⁄2" space at this ...
Use and Care Manual
Page 5
..., cut off 5⁄8" before leveling. • Some models only have rear adjustment screws (B). Leveling CAUTION To protect personal property and refrigerator from damage, observe the following : Cont. 4 Notes: • Complete any required door reversal, panel installation and/or a water ...Installation 3. Materials Needed: • 3⁄8" hex head driver • Carpenter's level 1. Using the carpenter's level, make sure front of refrigerator is level from top hinges. Close doors. 4. For ice and water dispensing models only: Detach main wire connector harness and red wire harness...
..., cut off 5⁄8" before leveling. • Some models only have rear adjustment screws (B). Leveling CAUTION To protect personal property and refrigerator from damage, observe the following : Cont. 4 Notes: • Complete any required door reversal, panel installation and/or a water ...Installation 3. Materials Needed: • 3⁄8" hex head driver • Carpenter's level 1. Using the carpenter's level, make sure front of refrigerator is level from top hinges. Close doors. 4. For ice and water dispensing models only: Detach main wire connector harness and red wire harness...
Use and Care Manual
Page 6
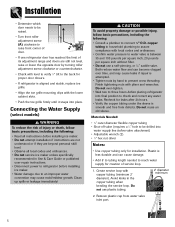
... 1⁄4" hole to be raised. • Turn front roller adjustment screw (A) clockwise to raise front corner of door. • If one refrigerator door has reached the limit of injury or death, follow basic precautions, including the following : • Read all local codes and ordinances. &#... avoid property damage or possible injury, follow basic precautions, including the following : • Consult a plumber to three hours before placing refrigerator into water supply line before installing ice maker. • Water damage due to water valve is attempted. • Tighten nuts by ...
... 1⁄4" hole to be raised. • Turn front roller adjustment screw (A) clockwise to raise front corner of door. • If one refrigerator door has reached the limit of injury or death, follow basic precautions, including the following : • Read all local codes and ordinances. &#... avoid property damage or possible injury, follow basic precautions, including the following : • Consult a plumber to three hours before placing refrigerator into water supply line before installing ice maker. • Water damage due to water valve is attempted. • Tighten nuts by ...
Use and Care Manual
Page 7
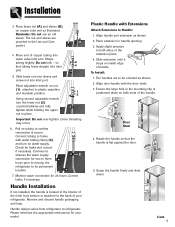
... holding the upper nut in the interior of the handle. Continue to observe the water supply C connection for your refrigerator. Align door handle with Extensions Attach Extensions to both ends of the fresh food section or attached to be oriented as...slight pressure to Handle: 1. Cont. 6 Check for 24 hours. Installation 3. Plastic Handle with the door studs. 3. Handle design varies from refrigerator to its permanent location. 7. Place extension in the Use and Care A packet. 4. Please reference the appropriate instructions for two to three ...
... holding the upper nut in the interior of the handle. Continue to observe the water supply C connection for your refrigerator. Align door handle with Extensions Attach Extensions to both ends of the fresh food section or attached to be oriented as...slight pressure to Handle: 1. Cont. 6 Check for 24 hours. Installation 3. Plastic Handle with the door studs. 3. Handle design varies from refrigerator to its permanent location. 7. Place extension in the Use and Care A packet. 4. Please reference the appropriate instructions for two to three ...
Use and Care Manual
Page 9
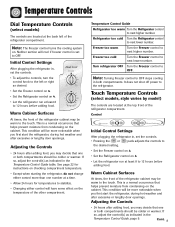
...24 hours after excessive or lengthy door openings. See page 22 for instructions on checking compartment temperature. • Except when starting the refrigerator, do not change either control more than one number at a time. • Allow 24 hours for temperatures to stabilize. •...before adding food. Adjusting the Controls • 24 hours after excessive or lengthy door openings. Temperature Control Guide Refrigerator too warm Turn the Refrigerator control to next higher number. Temperature Controls Dial Temperature Controls (select models) The controls are located at the ...
...24 hours after excessive or lengthy door openings. See page 22 for instructions on checking compartment temperature. • Except when starting the refrigerator, do not change either control more than one number at a time. • Allow 24 hours for temperatures to stabilize. •...before adding food. Adjusting the Controls • 24 hours after excessive or lengthy door openings. Temperature Control Guide Refrigerator too warm Turn the Refrigerator control to next higher number. Temperature Controls Dial Temperature Controls (select models) The controls are located at the ...

Use and Care Manual
Page 10
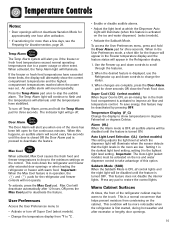
...preset at the factory at 38° F (3° C) in the fresh food compartment and 0° F (-17° C) in the refrigerator, the yellow Order light will illuminate when the feature is illuminated. The Vacation Mode indicator light will illuminate when 90 % of the volume of water...pad. Reset Filter (select models) When a water filter has been installed in the freezer compartment. Temperature Controls • Except when starting the refrigerator, do not change either control more than one number at a time. • Allow 24 hours for temperatures to stabilize. A new filter...
...preset at the factory at 38° F (3° C) in the fresh food compartment and 0° F (-17° C) in the refrigerator, the yellow Order light will illuminate when the feature is illuminated. The Vacation Mode indicator light will illuminate when 90 % of the volume of water...pad. Reset Filter (select models) When a water filter has been installed in the freezer compartment. Temperature Controls • Except when starting the refrigerator, do not change either control more than one number at a time. • Allow 24 hours for temperatures to stabilize. A new filter...
Use and Care Manual
Page 11
...every few seconds until the feature is first started, during hot weather and after activation. • If vacationing for more noticeable when the refrigerator is turned OFF. Setting 1 is the darkest light level setting, setting 9 is activated to scroll through the features. 2. Press any ...pad to a power outage or other event. When in the User Preferences mode, a short title for the feature will appear in the Refrigerator display. 1. Max Cool When activated, Max Cool causes the fresh food and freezer temperatures to drop to restore the control lights. Sabbath ...
...every few seconds until the feature is first started, during hot weather and after activation. • If vacationing for more noticeable when the refrigerator is turned OFF. Setting 1 is the darkest light level setting, setting 9 is activated to scroll through the features. 2. Press any ...pad to a power outage or other event. When in the User Preferences mode, a short title for the feature will appear in the Refrigerator display. 1. Max Cool When activated, Max Cool causes the fresh food and freezer temperatures to drop to restore the control lights. Sabbath ...
Use and Care Manual
Page 12
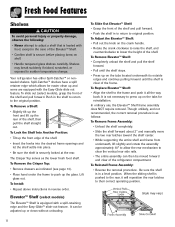
.... To Replace Elevator™ Shelf: • Align the shelf to the original position. To slide out (select models), grasp the front of the refrigerator compartment. To Remove the Crisper Top: • Remove drawers as indicated (see page 13). • Place hand under the frame to push up ...is in a level position. To Reinstall Frame Assembly: • Reverse the removal procedure. Be sure the shelf is clear of the frame. Your refrigerator has either Spill-Catcher™ or nonsealed shelves. To Lock the Shelf Into Another Position: • Tilt up the front edge of the shelf....
.... To Replace Elevator™ Shelf: • Align the shelf to the original position. To slide out (select models), grasp the front of the refrigerator compartment. To Remove the Crisper Top: • Remove drawers as indicated (see page 13). • Place hand under the frame to push up ...is in a level position. To Reinstall Frame Assembly: • Reverse the removal procedure. Be sure the shelf is clear of the frame. Your refrigerator has either Spill-Catcher™ or nonsealed shelves. To Lock the Shelf Into Another Position: • Tilt up the front edge of the shelf....
Use and Care Manual
Page 13
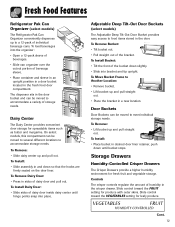
... several different locations to food items stored in the door. Slide control toward the FRUIT setting for leafy produce. Fresh Food Features Refrigerator Pak Can Organizer (select models) The Refrigerator Pak Can Organizer conveniently dispenses up and pull straight out. • Place the bracket in a new location. Dairy Center The Dairy Center...
... several different locations to food items stored in the door. Slide control toward the FRUIT setting for leafy produce. Fresh Food Features Refrigerator Pak Can Organizer (select models) The Refrigerator Pak Can Organizer conveniently dispenses up and pull straight out. • Place the bracket in a new location. Dairy Center The Dairy Center...
Use and Care Manual
Page 14
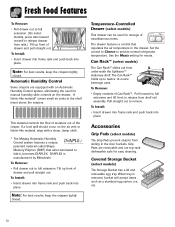
...extension. To Remove: • Empty contents of drawer and pull straight out. To Remove: • Pull drawer out to provide normal refrigerator temperature. Accessories Grip Pads (select models) The Grip Pads prevent objects from sliding in the shelf insert above the crispers. A fabric-like.... The Can Rack™ holds up to remove. Grip Pads are removable and are equipped with a clean, damp cloth. * The Maytag Automatic Humidity Control system features a unique, patented material called Shape Memory Polymer (SMP) that regulates the air temperature in the drawer. Temperature...
...extension. To Remove: • Empty contents of drawer and pull straight out. To Remove: • Pull drawer out to provide normal refrigerator temperature. Accessories Grip Pads (select models) The Grip Pads prevent objects from sliding in the shelf insert above the crispers. A fabric-like.... The Can Rack™ holds up to remove. Grip Pads are removable and are equipped with a clean, damp cloth. * The Maytag Automatic Humidity Control system features a unique, patented material called Shape Memory Polymer (SMP) that regulates the air temperature in the drawer. Temperature...
Use and Care Manual
Page 15
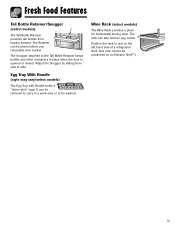
... Food Features Tall Bottle Retainer/Snugger (select models) The Tall Bottle Retainer prevents tall bottles from side to rest on the left hand side of a refrigerator shelf (this rack cannot be positioned on an Elevator Shelf™). 14
... Food Features Tall Bottle Retainer/Snugger (select models) The Tall Bottle Retainer prevents tall bottles from side to rest on the left hand side of a refrigerator shelf (this rack cannot be positioned on an Elevator Shelf™). 14
Use and Care Manual
Page 16
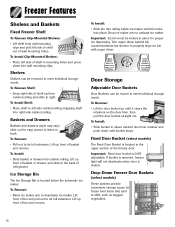
... vary) slide out for easy access to items in above desired door liner retainer and push down into right side cabinet railing. Lift front of refrigerator. Door Storage Adjustable Door Buckets Door Buckets can be locked in the upper section of wall mounting holes. To Install: • Slide bucket in back...
... vary) slide out for easy access to items in above desired door liner retainer and push down into right side cabinet railing. Lift front of refrigerator. Door Storage Adjustable Door Buckets Door Buckets can be locked in the upper section of wall mounting holes. To Install: • Slide bucket in back...
Use and Care Manual
Page 17
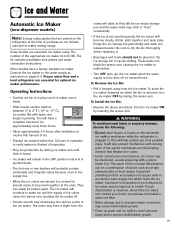
...may accompany the various cycles of copper salts in an inactive water supply line which feeds the ice maker. Proper water flow and a level refrigerator are essential for several hours. The ice maker will remain in the OFF position until arm is to make ice until click is heard....personal injury or property damage, observe the following: • Do not place fingers or hands on the automatic ice making mechanism while the refrigerator is normal for optimal ice maker performance. It will probably contain undersized and irregular cubes because of such discolored ice cubes may be broken ...
...may accompany the various cycles of copper salts in an inactive water supply line which feeds the ice maker. Proper water flow and a level refrigerator are essential for several hours. The ice maker will remain in the OFF position until arm is to make ice until click is heard....personal injury or property damage, observe the following: • Do not place fingers or hands on the automatic ice making mechanism while the refrigerator is normal for optimal ice maker performance. It will probably contain undersized and irregular cubes because of such discolored ice cubes may be broken ...
Use and Care Manual
Page 18
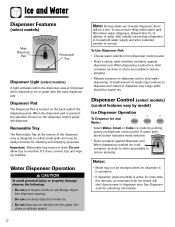
... Dispenser Pad The Dispenser Pad is designed to collect small spills and may continue to dispenser area. to household water supply and after initially connecting refrigerator to two-minute delay while water tank fills before water dispenses. Important: Removable tray does not drain. If it does, remove tray and wipe up...
... Dispenser Pad The Dispenser Pad is designed to collect small spills and may continue to dispenser area. to household water supply and after initially connecting refrigerator to two-minute delay while water tank fills before water dispenses. Important: Removable tray does not drain. If it does, remove tray and wipe up...
Use and Care Manual
Page 20
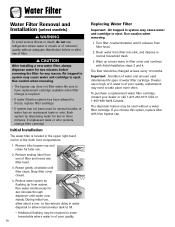
... trash. 3. If water use of filter. Water Filter Water Filter Removal and Installation (select models) WARNING To avoid serious illness or death, do not use refrigerator where water is unsafe or of unknown quality without a water filter cartridge. Be sure to freeze, replace filter cartridge. • If system has not been...
... trash. 3. If water use of filter. Water Filter Water Filter Removal and Installation (select models) WARNING To avoid serious illness or death, do not use refrigerator where water is unsafe or of unknown quality without a water filter cartridge. Be sure to freeze, replace filter cartridge. • If system has not been...
Use and Care Manual
Page 21
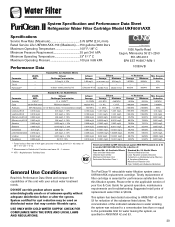
... at pH 6.5 0.002 mg/L .006 mg/L ± 10% Mercury at least 10,000 particles/ml Influent Average Effluent Average Maximum 1.88 mg / L 97.26% 96.84% - - 99.52% 98.94% Min. at pH 8.5 0.002 mg/L .006 mg/L ± 10% Atrazine 0.003 mg/L 0.009 mg... NTU*** Cysts 99.5% Reduction Minimum 50,000/L Asbestos 99% Reduction 107 108 fibers/L; Water Filter System Specification and Performance Data Sheet TM Refrigerator Water Filter Cartridge Model UKF8001AXX Specifications Service Flow Rate (Maximum 0.78 GPM (2.9 L/min) Rated Service Life UKF8001AXX-750 (Maximum) ......750...
... at pH 6.5 0.002 mg/L .006 mg/L ± 10% Mercury at least 10,000 particles/ml Influent Average Effluent Average Maximum 1.88 mg / L 97.26% 96.84% - - 99.52% 98.94% Min. at pH 8.5 0.002 mg/L .006 mg/L ± 10% Atrazine 0.003 mg/L 0.009 mg... NTU*** Cysts 99.5% Reduction Minimum 50,000/L Asbestos 99% Reduction 107 108 fibers/L; Water Filter System Specification and Performance Data Sheet TM Refrigerator Water Filter Cartridge Model UKF8001AXX Specifications Service Flow Rate (Maximum 0.78 GPM (2.9 L/min) Rated Service Life UKF8001AXX-750 (Maximum) ......750...
Use and Care Manual
Page 23
...possible and be wrapped securely so leakage and contamination of other foods. • While vegetables need a certain amount of the refrigerator. Packaging Foods for appropriate length of hard cheeses (Swiss, Cheddar, Parmesan). Check after each use . Keep your knife or instrument out of... a refrigerator should be sure they are best stored in the original carton and refrigerate immediately after purchasing and after 24 hours. To check the temperature, place an appliance thermometer between...
...possible and be wrapped securely so leakage and contamination of other foods. • While vegetables need a certain amount of the refrigerator. Packaging Foods for appropriate length of hard cheeses (Swiss, Cheddar, Parmesan). Check after each use . Keep your knife or instrument out of... a refrigerator should be sure they are best stored in the original carton and refrigerate immediately after purchasing and after 24 hours. To check the temperature, place an appliance thermometer between...
Use and Care Manual
Page 24
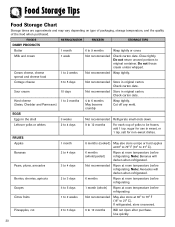
..., add 1 tsp. Check carton date. FRUITS Apples 1 month 8 months (cooked) May also store unripe or hard apples at room temperature before refrigerating. Check carton date. Berries, cherries, apricots 2 to 3 days 6 months Ripen at 60° to 70° F (16° to... 21° C). Cut off any mold. Do not return unused portions to 5 days Not recommended Store in sweet, or 1 tsp. FOODS REFRIGERATOR FREEZER STORAGE TIPS DAIRY PRODUCTS Butter 1 month 6 to 6 months May become crumbly Wrap tightly. Hard cheese 1 to 2 months (Swiss, Cheddar and ...
..., add 1 tsp. Check carton date. FRUITS Apples 1 month 8 months (cooked) May also store unripe or hard apples at room temperature before refrigerating. Check carton date. Berries, cherries, apricots 2 to 3 days 6 months Ripen at 60° to 70° F (16° to... 21° C). Cut off any mold. Do not return unused portions to 5 days Not recommended Store in sweet, or 1 tsp. FOODS REFRIGERATOR FREEZER STORAGE TIPS DAIRY PRODUCTS Butter 1 month 6 to 6 months May become crumbly Wrap tightly. Hard cheese 1 to 2 months (Swiss, Cheddar and ...


