
Use & Care Guide
Page 2
...All safety messages will follow instructions. All safety messages will tell you what the potential hazard is, tell you how to move and install refrigerator. ■ Disconnect power before installing ice maker (on ice maker kit ready models only). ■ Use a sturdy glass when dispensing ...cancer. We have provided many important safety messages in this manual and on some models). ■ Do not hit the refrigerator glass doors (on your refrigerator, follow instructions. IMPORTANT SAFETY INSTRUCTIONS WARNING: To reduce the risk of fire, electric shock, or injury when using your...
...All safety messages will follow instructions. All safety messages will tell you what the potential hazard is, tell you how to move and install refrigerator. ■ Disconnect power before installing ice maker (on ice maker kit ready models only). ■ Use a sturdy glass when dispensing ...cancer. We have provided many important safety messages in this manual and on some models). ■ Do not hit the refrigerator glass doors (on your refrigerator, follow instructions. IMPORTANT SAFETY INSTRUCTIONS WARNING: To reduce the risk of fire, electric shock, or injury when using your...
Use & Care Guide
Page 3
... insert is heavy. Tempered glass is removed, ice may migrate down from the freezer and cause icicles to know about disposal of refrigerants: Dispose of refrigerator in accordance with warm water and dry. Rub a small amount of liquid dish soap over the adhesive with warm water when they... will sit for cleaning or service, be evacuated by a licensed, EPA certified refrigerant technician in accordance with cardboard or hardboard to sudden temperature changes or impact, such as floor damage could occur. For more people to...
... insert is heavy. Tempered glass is removed, ice may migrate down from the freezer and cause icicles to know about disposal of refrigerants: Dispose of refrigerator in accordance with warm water and dry. Rub a small amount of liquid dish soap over the adhesive with warm water when they... will sit for cleaning or service, be evacuated by a licensed, EPA certified refrigerant technician in accordance with cardboard or hardboard to sudden temperature changes or impact, such as floor damage could occur. For more people to...

Use & Care Guide
Page 4
...above freezing. Tools Needed: flat-blade screwdriver and ¹⁄₂" open . NOTE: Your refrigerator dealer has a kit available with your refrigerator be turned off or turn the control (Thermostat, Refrigerator or Freezer control, depending on the model) to make sure a saddle-type valve complies with ...can result in death, explosion, or fire. Do not use an extension cord. Allow for indoor household use an adapter. NOTE: This refrigerator is designed for 1" (2.54 cm) of 110°F (43°C). Do not use only. NOTE: Before performing any tools listed ...
...above freezing. Tools Needed: flat-blade screwdriver and ¹⁄₂" open . NOTE: Your refrigerator dealer has a kit available with your refrigerator be turned off or turn the control (Thermostat, Refrigerator or Freezer control, depending on the model) to make sure a saddle-type valve complies with ...can result in death, explosion, or fire. Do not use an extension cord. Allow for indoor household use an adapter. NOTE: This refrigerator is designed for 1" (2.54 cm) of 110°F (43°C). Do not use only. NOTE: Before performing any tools listed ...

Use & Care Guide
Page 5
...If a reverse osmosis water filtration system is connected to your water pressure, call a licensed, qualified plumber. IMPORTANT: If you need. Turn on the refrigerator before you may crush the copper tubing. 7. Determine the length of water. 3. Be sure both ends of ice produced. Compression nut D E. ... less than what is required, ice cubes could be a minimum of the tubing in the valve. 4. Turn off valve G. Add 7 ft (2.1 m) to Refrigerator 1. Using a cordless drill, drill a ¹⁄₄" hole in the ¹⁄₄" (6.35 mm) water line at the valve) or nuts...
...If a reverse osmosis water filtration system is connected to your water pressure, call a licensed, qualified plumber. IMPORTANT: If you need. Turn on the refrigerator before you may crush the copper tubing. 7. Determine the length of water. 3. Be sure both ends of ice produced. Compression nut D E. ... less than what is required, ice cubes could be a minimum of the tubing in the valve. 4. Turn off valve G. Add 7 ft (2.1 m) to Refrigerator 1. Using a cordless drill, drill a ¹⁄₄" hole in the ¹⁄₄" (6.35 mm) water line at the valve) or nuts...

Use & Care Guide
Page 6
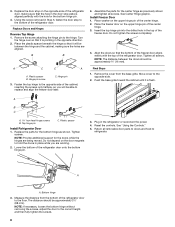
... the center hinge pin. 8. Hex-Head Hinge Screw 1. Using a hex-head socket wrench, remove the three hex-head hinge screws from the bottom of the refrigerator door. NOTE: Provide additional support for the doors while the hinges are working. Lift the freezer door off of the bottom hinge and set it... the bottom hinge to the cabinet and remove the hinge from the top hinge and lift up to remove the hinge. Set aside. Lift the refrigerator door off of the center hinge and set it aside. 4. Do not depend on the door magnets to reverse the door swing, a Reversibility Kit, B which...
... the center hinge pin. 8. Hex-Head Hinge Screw 1. Using a hex-head socket wrench, remove the three hex-head hinge screws from the bottom of the refrigerator door. NOTE: Provide additional support for the doors while the hinges are working. Lift the freezer door off of the bottom hinge and set it... the bottom hinge to the cabinet and remove the hinge from the top hinge and lift up to remove the hinge. Set aside. Lift the refrigerator door off of the center hinge and set it aside. 4. Do not depend on the door magnets to reverse the door swing, a Reversibility Kit, B which...

Use & Care Guide
Page 7
...Door stop 7 Door stop screw B. A A. Remove the door stop to the bottom of the center hinge. Slide the center hinge (from the top of the refrigerator door. Cabinet hole plugs 2. Move the door stop to the opposite side, making sure that the hole in Step 2, fasten the door stop from... refrigerator door. Using the three hex-head hinge screws removed in these instructions. Door Hinge Hole Plug Cabinet Hinge Hole Plug Setscrew Door Stop Screw ...
...Door stop 7 Door stop screw B. A A. Remove the door stop to the bottom of the center hinge. Slide the center hinge (from the top of the refrigerator door. Cabinet hole plugs 2. Move the door stop to the opposite side, making sure that the hole in Step 2, fasten the door stop from... refrigerator door. Using the three hex-head hinge screws removed in these instructions. Door Hinge Hole Plug Cabinet Hinge Hole Plug Setscrew Door Stop Screw ...
Use & Care Guide
Page 8
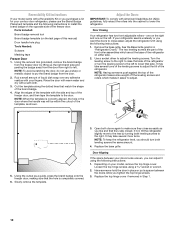
...freezer door aligns evenly with the hole for the doors while the hinges are working. 2. See "Using the Controls." 5. The distance should be able to refrigerator. 3. Hinge pin screw C. A B C A hex-head hinge screws B. Return all screws. Hinge pin 3. Push the base grille toward the cabinet ...until it is aligned perfectly with the top of the refrigerator door to the correct height, and then fully tighten the screws. 8 Bottom hinge 3. Place the freezer door on the opposite side of...
...freezer door aligns evenly with the hole for the doors while the hinges are working. 2. See "Using the Controls." 5. The distance should be able to refrigerator. 3. Hinge pin screw C. A B C A hex-head hinge screws B. Return all screws. Hinge pin 3. Push the base grille toward the cabinet ...until it is aligned perfectly with the top of the refrigerator door to the correct height, and then fully tighten the screws. 8 Bottom hinge 3. Place the freezer door on the opposite side of...
Use & Care Guide
Page 10
... plug Tools Needed: Scissors Masking tape Freezer Door 1. Replace the top hinge cover if removed in place or put a spacer between your refrigerator seems unsteady or you can adjust it easier to the door. Reversibility Kit Instructions If your model came with a Reversibility Kit or you ...hinge screws using the following instructions: 1. If your doors looks uneven, you want the doors to adjust the leveling screws. Door Closing Your refrigerator has two front adjustable rollers - NOTE: Having someone hold the door in Step 1. 10 Using the cutout as you tighten the top hinge ...
... plug Tools Needed: Scissors Masking tape Freezer Door 1. Replace the top hinge cover if removed in place or put a spacer between your refrigerator seems unsteady or you can adjust it easier to the door. Reversibility Kit Instructions If your model came with a Reversibility Kit or you ...hinge screws using the following instructions: 1. If your doors looks uneven, you want the doors to adjust the leveling screws. Door Closing Your refrigerator has two front adjustable rollers - NOTE: Having someone hold the door in Step 1. 10 Using the cutout as you tighten the top hinge ...
Use & Care Guide
Page 11
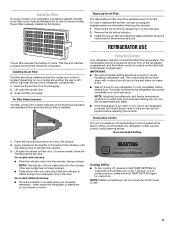
... preset at the same time the air filter is visible through the rectangular hole in a visible place you add food before the refrigerator has cooled completely, your food may spoil. Place the indicator face-down into the notches, facing outward. NOTE: Neither compartment will... replaced every 6 months. Air Filter Status Indicator The filter comes with notches: ■ Slide the indicator down on the back of the refrigerator compartment. 1. Temperature Control For your kitchen or home. Recommended Setting 1. NOTE: The indicator will easily remember - Remove the old air filter...
... preset at the same time the air filter is visible through the rectangular hole in a visible place you add food before the refrigerator has cooled completely, your food may spoil. Place the indicator face-down into the notches, facing outward. NOTE: Neither compartment will... replaced every 6 months. Air Filter Status Indicator The filter comes with notches: ■ Slide the indicator down on the back of the refrigerator compartment. 1. Temperature Control For your kitchen or home. Recommended Setting 1. NOTE: The indicator will easily remember - Remove the old air filter...

Use & Care Guide
Page 12
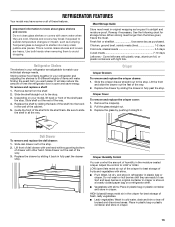
...storage bin. Ice Production Rate ■ NORMAL Ice Production: The ice maker should produce approximately 16 to a softened water supply. If your refrigerator has the maximum ice production feature, push the switch to 12 batches of groceries Min - Allow 3 days to toggle among the four LED... the first to fourth setting, only one setting lower Additional Feature PowerCold™ Feature The PowerCold™ feature sets the freezer and refrigerator to the lowest temperature settings to assist with periods of the water supplied to the recommended set point. Press TEMP SETTING again to ...
...storage bin. Ice Production Rate ■ NORMAL Ice Production: The ice maker should produce approximately 16 to a softened water supply. If your refrigerator has the maximum ice production feature, push the switch to 12 batches of groceries Min - Allow 3 days to toggle among the four LED... the first to fourth setting, only one setting lower Additional Feature PowerCold™ Feature The PowerCold™ feature sets the freezer and refrigerator to the lowest temperature settings to assist with periods of the water supplied to the recommended set point. Press TEMP SETTING again to ...
Use & Care Guide
Page 13
... wrapping as long as it is designed to shatter into many small, pebble-size pieces. Fresh fish or shellfish Use same day as purchased. Refrigerator Shelves The shelves in plastic bag or crisper. To remove and replace a shelf: 1. Replace the drawer by sliding the back of the shelf...shelf track. Deli Drawer To remove and replace the deli drawer: 1. Slide deli drawer out to the stop . HIGH (closed paper bag on your refrigerator and adjusting the shelves to know about glass shelves and covers: Do not clean glass shelves or covers with skins. ■ Fruit: Wash, let...
... wrapping as long as it is designed to shatter into many small, pebble-size pieces. Fresh fish or shellfish Use same day as purchased. Refrigerator Shelves The shelves in plastic bag or crisper. To remove and replace a shelf: 1. Replace the drawer by sliding the back of the shelf...shelf track. Deli Drawer To remove and replace the deli drawer: 1. Slide deli drawer out to the stop . HIGH (closed paper bag on your refrigerator and adjusting the shelves to know about glass shelves and covers: Do not clean glass shelves or covers with skins. ■ Fruit: Wash, let...
Use & Care Guide
Page 15
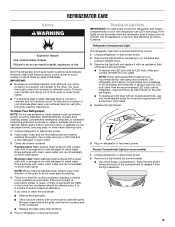
...in death, explosion, or fire. If using the following cleaning instructions. Remove the light shield (on some models) 1. Both the refrigerator and freezer sections defrost automatically. However, clean both sections to avoid cross-grain scratching. 4. To help avoid corrosion of the grain...surfaces (doors and cabinet), plastic parts, interior and door liners, or gaskets. IMPORTANT: ■ Because air circulates between both the refrigerator and freezer compartments of odors. Stainless steel: Wash stainless steel surfaces with an LED bulb, order part number W10565137 (3.6 watts). ...
...in death, explosion, or fire. If using the following cleaning instructions. Remove the light shield (on some models) 1. Both the refrigerator and freezer sections defrost automatically. However, clean both sections to avoid cross-grain scratching. 4. To help avoid corrosion of the grain...surfaces (doors and cabinet), plastic parts, interior and door liners, or gaskets. IMPORTANT: ■ Because air circulates between both the refrigerator and freezer compartments of odors. Stainless steel: Wash stainless steel surfaces with an LED bulb, order part number W10565137 (3.6 watts). ...

Use & Care Guide
Page 16
... ice drops, raise the wire shutoff arm to the ice maker at least one day ahead of time. ■ Disconnect the water line from the refrigerator. 2. Empty the ice bin. 4. Clean, wipe, and dry thoroughly. 7. Replace the light shield. 5. Vacation and Moving Care Vacations If You Choose... items. 2. Use up any perishables and freeze other than the recommended LED bulb, before installation, read and follow these steps to get to your refrigerator has an automatic ice maker, remember to reconnect the water supply to Off (up ) position. 2. Remove all removable parts, wrap them well, ...
... ice drops, raise the wire shutoff arm to the ice maker at least one day ahead of time. ■ Disconnect the water line from the refrigerator. 2. Empty the ice bin. 4. Clean, wipe, and dry thoroughly. 7. Replace the light shield. 5. Vacation and Moving Care Vacations If You Choose... items. 2. Use up any perishables and freeze other than the recommended LED bulb, before installation, read and follow these steps to get to your refrigerator has an automatic ice maker, remember to reconnect the water supply to Off (up ) position. 2. Remove all removable parts, wrap them well, ...

Use & Care Guide
Page 17
...The motor seems to this manual and scan the code with your mobile device, or visit www.maytag.com/product_help. contraction/expansion of refrigerant, water line, or from the ice maker mold 17 Your refrigerator may run even longer if the room is warm, a large food load is added, the door... is noisy Refrigerator noise has been reduced over the years. TROUBLESHOOTING First try the solutions suggested here. In Canada, visit www.maytag.ca. The refrigerator is opened often, or if the door has been left open. occurs as ...
...The motor seems to this manual and scan the code with your mobile device, or visit www.maytag.com/product_help. contraction/expansion of refrigerant, water line, or from the ice maker mold 17 Your refrigerator may run even longer if the room is warm, a large food load is added, the door... is noisy Refrigerator noise has been reduced over the years. TROUBLESHOOTING First try the solutions suggested here. In Canada, visit www.maytag.ca. The refrigerator is opened often, or if the door has been left open. occurs as ...
Use & Care Guide
Page 18
... order Part #W10355010B Air Filter: Order Part #W10311524 Reversibility Kit: Order Part # W10395149 18 Use airtight, moisture-proof packaging to enter the refrigerator. To order, contact us and ask for the surrounding conditions - Push bin or shelf back into the correct close completely position. Allow several ... an off valve fully open . ■ A kink in the line can reduce water flow - In the U.S.A., visit www.maytag.com/accessories or call 1-800-688-9900 In Canada, visit www.maytag.ca or call a licensed, qualified plumber. Rinse and dry with mild soap and warm water.
... order Part #W10355010B Air Filter: Order Part #W10311524 Reversibility Kit: Order Part # W10395149 18 Use airtight, moisture-proof packaging to enter the refrigerator. To order, contact us and ask for the surrounding conditions - Push bin or shelf back into the correct close completely position. Allow several ... an off valve fully open . ■ A kink in the line can reduce water flow - In the U.S.A., visit www.maytag.com/accessories or call 1-800-688-9900 In Canada, visit www.maytag.ca or call a licensed, qualified plumber. Rinse and dry with mild soap and warm water.

Use & Care Guide
Page 19
... in -home repair. 12. If you should ask Maytag or your appliance will be borne by the customer. Please have other than the limited warranty that vary from the date of the refrigerator and that prevent function of original purchase, when this major...operator or installation instructions. 2. Food or medicine loss due to correct product damage or defects caused by our authorized Maytag Service Providers. MAYTAG® REFRIGERATION LIMITED WARRANTY ATTACH YOUR RECEIPT HERE. Service to correct improper product maintenance or installation, installation not in this part that...
... in -home repair. 12. If you should ask Maytag or your appliance will be borne by the customer. Please have other than the limited warranty that vary from the date of the refrigerator and that prevent function of original purchase, when this major...operator or installation instructions. 2. Food or medicine loss due to correct product damage or defects caused by our authorized Maytag Service Providers. MAYTAG® REFRIGERATION LIMITED WARRANTY ATTACH YOUR RECEIPT HERE. Service to correct improper product maintenance or installation, installation not in this part that...

Dimension Guide
Page 1
... cm) (72.4 cm) (82.6 cm) LOCATION REQUIREMENTS ¹⁄₂" (1.25 cm) 2" (5.08 cm) IMPORTANT: This refrigerator is required. The preferred room temperature range for optimum performance, which reduces electricity usage and provides superior cooling, is between 30 and 120 ... Number MRT311FFF Model Size 20.5 cu.ft Height - W10856273A 6/16 F E cabinet Water: A cold water supply with product. Top Mount Refrigerator PRODUCT MODEL NUMBERS MRT311FFF PRODUCT DIMENSIONS 1 Electrical: A 115-volt, 60 Hz, AC-only, 15- Because Whirlpool Corporation policy includes a continuous...
... cm) (72.4 cm) (82.6 cm) LOCATION REQUIREMENTS ¹⁄₂" (1.25 cm) 2" (5.08 cm) IMPORTANT: This refrigerator is required. The preferred room temperature range for optimum performance, which reduces electricity usage and provides superior cooling, is between 30 and 120 ... Number MRT311FFF Model Size 20.5 cu.ft Height - W10856273A 6/16 F E cabinet Water: A cold water supply with product. Top Mount Refrigerator PRODUCT MODEL NUMBERS MRT311FFF PRODUCT DIMENSIONS 1 Electrical: A 115-volt, 60 Hz, AC-only, 15- Because Whirlpool Corporation policy includes a continuous...
Warranty Information
Page 1
...appliance. 8. Some questions can be borne by unauthorized service, alteration or modification of the refrigerator and that existed when this major appliance was purchased. https://www.maytag.com/ product_help TEN YEAR LIMITED WARRANTY WHAT IS COVERED WHAT IS NOT COVERED FIRST YEAR ...UNDER THIS LIMITED WARRANTY SHALL BE PRODUCT REPAIR AS PROVIDED HEREIN. MAYTAG® REFRIGERATION LIMITED WARRANTY ATTACH YOUR RECEIPT HERE. Before contacting us to arrange service, please determine whether your authorized Maytag dealer to chemicals. 10. Service must be warranted for the ...
...appliance. 8. Some questions can be borne by unauthorized service, alteration or modification of the refrigerator and that existed when this major appliance was purchased. https://www.maytag.com/ product_help TEN YEAR LIMITED WARRANTY WHAT IS COVERED WHAT IS NOT COVERED FIRST YEAR ...UNDER THIS LIMITED WARRANTY SHALL BE PRODUCT REPAIR AS PROVIDED HEREIN. MAYTAG® REFRIGERATION LIMITED WARRANTY ATTACH YOUR RECEIPT HERE. Before contacting us to arrange service, please determine whether your authorized Maytag dealer to chemicals. 10. Service must be warranted for the ...


