Use and Care Guide
Page 3
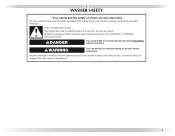
... symbol alerts you to reduce the chance of others . All safety messages will follow the safety alert symbol and either the word "DANGER" or "WARNING." WASHER SAFETY Your safety and the safety of injury, and tell you what can happen if the instructions are very important. These words mean: DANGER You...
... symbol alerts you to reduce the chance of others . All safety messages will follow the safety alert symbol and either the word "DANGER" or "WARNING." WASHER SAFETY Your safety and the safety of injury, and tell you what can happen if the instructions are very important. These words mean: DANGER You...
Use and Care Guide
Page 5
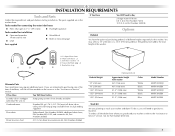
...tie strap A B C D E Alternate Parts Your installation may select a 10" (254 mm) or a 15.5" (394 mm) pedestal. Inlet hose washers (4) D. and connector kit, Part Number 285835 Drain hose too short 4 ft (1.2 m) drain hose extension kit, Part Number 285863 Pedestal Height 10" (254... (1308 mm) Color White Black White Black Blue Model Number MHP1000SQ0 MHP1000SB0 MHP1500SQ0 MHP1500SB0 MHP1500SK0 Stack Kit Are you purchased your washer and dryer? You may require additional parts. Water inlet hoses (2) C. Transit bolt hole plug (4) E. INSTALLATION REQUIREMENTS Tools and...
...tie strap A B C D E Alternate Parts Your installation may select a 10" (254 mm) or a 15.5" (394 mm) pedestal. Inlet hose washers (4) D. and connector kit, Part Number 285835 Drain hose too short 4 ft (1.2 m) drain hose extension kit, Part Number 285863 Pedestal Height 10" (254... (1308 mm) Color White Black White Black Blue Model Number MHP1000SQ0 MHP1000SB0 MHP1500SQ0 MHP1500SB0 MHP1500SK0 Stack Kit Are you purchased your washer and dryer? You may require additional parts. Water inlet hoses (2) C. Transit bolt hole plug (4) E. INSTALLATION REQUIREMENTS Tools and...
Use and Care Guide
Page 6
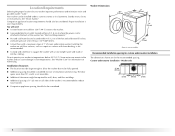
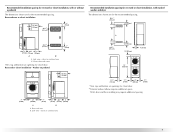
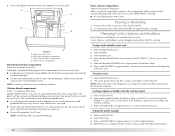
... of 20-100 psi (137.9-689.6 kPa). „ A level floor with a total weight (water and load) of 1" (25 mm) under a custom counter, or in the washer and can be considered for wall, door, and floor moldings. „ Additional spacing of 1" (25 mm)...closet, or recessed area. Recommended installation spacing for custom undercounter installation The dimensions shown are for your washer in low temperatures. Custom undercounter installation - Washer only 37" min. (939 mm) 1" (25 mm) 27" (686 mm) 1" (25 mm) 6 Companion appliance location requirements should also be considered. You...
... of 20-100 psi (137.9-689.6 kPa). „ A level floor with a total weight (water and load) of 1" (25 mm) under a custom counter, or in the washer and can be considered for wall, door, and floor moldings. „ Additional spacing of 1" (25 mm)...closet, or recessed area. Recommended installation spacing for custom undercounter installation The dimensions shown are for your washer in low temperatures. Custom undercounter installation - Washer only 37" min. (939 mm) 1" (25 mm) 27" (686 mm) 1" (25 mm) 6 Companion appliance location requirements should also be considered. You...
Use and Care Guide
Page 7
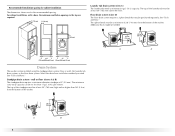
.... (356 mm) 48 in.2 * (310 cm2) 3" (76 mm) Recommended installation spacing for recessed or closet installation, with stacked washer and dryer The dimensions shown are for the recommended spacing. Side view - Closet door with or without a pedestal The dimensions shown are for...B A. top and bottom air openings for closet door. Side view - Recommended installation spacing for recessed or closet installation, with vents *Min. Washer on pedestal 3" (76 mm) 14"* max. (356 mm) 1" (25 mm) 27" (686 mm) 1" (25 mm) 1" 30½" 4" (25 mm) (775 mm) (102 mm) A B A. Recessed or...
.... (356 mm) 48 in.2 * (310 cm2) 3" (76 mm) Recommended installation spacing for recessed or closet installation, with stacked washer and dryer The dimensions shown are for the recommended spacing. Side view - Closet door with or without a pedestal The dimensions shown are for...B A. top and bottom air openings for closet door. Side view - Recommended installation spacing for recessed or closet installation, with vents *Min. Washer on pedestal 3" (76 mm) 14"* max. (356 mm) 1" (25 mm) 27" (686 mm) 1" (25 mm) 1" 30½" 4" (25 mm) (775 mm) (102 mm) A B A. Recessed or...
Use and Care Guide
Page 8
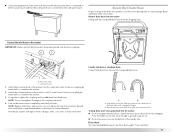
... be a minimum of 28" (710 mm) from the bottom of the washer. Additional hoses might be needed. 30" min. (762 mm) 28" min. (710 mm) 4" 31½" 1" 1" 27" 1" (102 mm) (800 mm) (25 mm) (25 mm) ...(686 mm) (25 mm) Drain System The washer can be at least 30" (762 mm) high and no less than... drain system (floor or wall), the laundry tub drain system, or the floor drain system. The top of the washer. Select the drain hose installation method you need. C D 30" min. (762 mm) A B 8 For...
... be a minimum of 28" (710 mm) from the bottom of the washer. Additional hoses might be needed. 30" min. (762 mm) 28" min. (710 mm) 4" 31½" 1" 1" 27" 1" (102 mm) (800 mm) (25 mm) (25 mm) ...(686 mm) (25 mm) Drain System The washer can be at least 30" (762 mm) high and no less than... drain system (floor or wall), the laundry tub drain system, or the floor drain system. The top of the washer. Select the drain hose installation method you need. C D 30" min. (762 mm) A B 8 For...

Use and Care Guide
Page 9
... the ground path is adequate. „ Do not ground to a gas pipe. „ Check with a qualified electrician if you are not sure the washer is equipped with a power supply cord having a 3 prong grounding plug. „ To minimize possible shock hazard, the cord must be provided. „ This... washer is properly grounded. 9 Failure to follow these instructions can result in death, fire, or electrical shock. „ A 120 volt, 60 Hz., AC only, 15...
... the ground path is adequate. „ Do not ground to a gas pipe. „ Check with a qualified electrician if you are not sure the washer is equipped with a power supply cord having a 3 prong grounding plug. „ To minimize possible shock hazard, the cord must be provided. „ This... washer is properly grounded. 9 Failure to follow these instructions can result in death, fire, or electrical shock. „ A 120 volt, 60 Hz., AC only, 15...
Use and Care Guide
Page 10
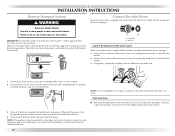
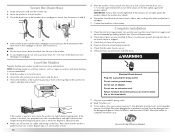
... to get rid of the hole and completely pull out the bolt, including the plastic spacer covering the bolt. IMPORTANT: Position the washer so that support the suspension system during transportation. Coupling B. Screw on coupling by hand until it is within approximately 3 ft (900...B A. Attach a hose to the cold water faucet. INSTALLATION INSTRUCTIONS Remove Transport System WARNING Connect the Inlet Hoses Insert new flat washers (supplied) into each end of the washer, loosen the 4 transport bolts using a 13 mm wrench. 2. Screw on coupling by a certified technician. 10 NOTE: Do not...
... to get rid of the hole and completely pull out the bolt, including the plastic spacer covering the bolt. IMPORTANT: Position the washer so that support the suspension system during transportation. Coupling B. Screw on coupling by hand until it is within approximately 3 ft (900...B A. Attach a hose to the cold water faucet. INSTALLATION INSTRUCTIONS Remove Transport System WARNING Connect the Inlet Hoses Insert new flat washers (supplied) into each end of the washer, loosen the 4 transport bolts using a 13 mm wrench. 2. Screw on coupling by a certified technician. 10 NOTE: Do not...
Use and Care Guide
Page 11
.... Floor drain You may need additional parts. Route the Drain Hose Proper routing of the drain hose protects your floor from damage due to the washer's cold (C) water faucet. Connect the inlet hoses to provide a gap for air. „ Do not lay excess hose on the water faucets...hot water hose to reduce the risk of hose failure. NOTE: Do not overtighten. NOTE: Replace inlet hoses after 5 years of use to the washer's hot (H) water inlet valve. Damage to the drain hose at the point where the corrugation begins. Read and follow these instructions. Using pliers, ...
.... Floor drain You may need additional parts. Route the Drain Hose Proper routing of the drain hose protects your floor from damage due to the washer's cold (C) water faucet. Connect the inlet hoses to provide a gap for air. „ Do not lay excess hose on the water faucets...hot water hose to reduce the risk of hose failure. NOTE: Do not overtighten. NOTE: Replace inlet hoses after 5 years of use to the washer's hot (H) water inlet valve. Damage to the drain hose at the point where the corrugation begins. Read and follow these instructions. Using pliers, ...
Use and Care Guide
Page 12
... are not tight against a wall, move front to back, side to clean your tools. 4. Secure the Drain Hose 1. Slide the washer to its final location. 2. Check for a medium-size load. Failure to adjust back feet. 4. Repeat steps 1-3 until washer is against the washer cabinet, the washer may vibrate. 6. A B C 4. Move the washer to its final location. 3. Use only...
... are not tight against a wall, move front to back, side to clean your tools. 4. Secure the Drain Hose 1. Slide the washer to its final location. 2. Check for a medium-size load. Failure to adjust back feet. 4. Repeat steps 1-3 until washer is against the washer cabinet, the washer may vibrate. 6. A B C 4. Move the washer to its final location. 3. Use only...
Use and Care Guide
Page 13
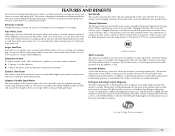
... washer saves energy, too. The washer spins faster so that allows the washer to reduce drying time. This washer allows a 7-minute period in the detergent advantage system. FEATURES AND BENEFITS Your new front-loading high efficiency washer, was help conserve to a load. The washer ...is available in all laundry products before the washer is included in which are evenly balanced. The Sanitary cycle also helps...
... washer saves energy, too. The washer spins faster so that allows the washer to reduce drying time. This washer allows a 7-minute period in the detergent advantage system. FEATURES AND BENEFITS Your new front-loading high efficiency washer, was help conserve to a load. The washer ...is available in all laundry products before the washer is included in which are evenly balanced. The Sanitary cycle also helps...
Use and Care Guide
Page 14
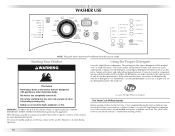
...failures and noticeable mold or mildew. Use only HE High Efficiency detergent. It may be marked "HE" or "High Efficiency." Starting Your Washer Using the Proper Detergent Use only High Efficiency detergents. Using regular detergent will use . The following is a guide to using your model.... reduce the risk of this appliance. Do not store laundry products on the load size. Use only HE High Efficiency detergent. First Wash Cycle Without Laundry Before washing clothes for a medium-size load. HE detergents are made to produce the right amount of detergent will create ...
...failures and noticeable mold or mildew. Use only HE High Efficiency detergent. It may be marked "HE" or "High Efficiency." Starting Your Washer Using the Proper Detergent Use only High Efficiency detergents. Using regular detergent will use . The following is a guide to using your model.... reduce the risk of this appliance. Do not store laundry products on the load size. Use only HE High Efficiency detergent. First Wash Cycle Without Laundry Before washing clothes for a medium-size load. HE detergents are made to produce the right amount of detergent will create ...
Use and Care Guide
Page 15
...the wash cycle is complete. Not all Options are available with all cycles. Not all Modifiers are diluted and dispensed automatically at the front of the tub for this type of suds for the selected cycle will illuminate. The signal is normal for the selected cycle will ...within 5 minutes of the compartment during Delay, before the wash cycle begins. Follow the manufacturer's instructions to add them. To load washer Open the washer door by pulling on the washer by pushing it off . „ When the wash cycle is illuminating or if the cycle has been canceled. Overloading can...
...the wash cycle is complete. Not all Options are available with all cycles. Not all Modifiers are diluted and dispensed automatically at the front of the tub for this type of suds for the selected cycle will illuminate. The signal is normal for the selected cycle will ...within 5 minutes of the compartment during Delay, before the wash cycle begins. Follow the manufacturer's instructions to add them. To load washer Open the washer door by pulling on the washer by pushing it off . „ When the wash cycle is illuminating or if the cycle has been canceled. Overloading can...
Use and Care Guide
Page 16
... all Cycles. NOTE: If the water level or the temperature is complete, the door unlocks. Select and hold START (for your load. „ Always measure liquid chlorine bleach. Liquid chlorine bleach compartment D. Fabric softener compartment Main Wash detergent compartment (Letter B in Dispenser... before START is selected. Select POWER. 3. Select desired cycle. 4. Select and hold START (for approximately 1 second) to restart the washer at any form of the new cycle. Select PAUSE/CANCEL. 2. Add no more than the manufacturer's recommended amount. NOTE: Overfilling could ...
... all Cycles. NOTE: If the water level or the temperature is complete, the door unlocks. Select and hold START (for your load. „ Always measure liquid chlorine bleach. Liquid chlorine bleach compartment D. Fabric softener compartment Main Wash detergent compartment (Letter B in Dispenser... before START is selected. Select POWER. 3. Select desired cycle. 4. Select and hold START (for approximately 1 second) to restart the washer at any form of the new cycle. Select PAUSE/CANCEL. 2. Add no more than the manufacturer's recommended amount. NOTE: Overfilling could ...
Use and Care Guide
Page 17
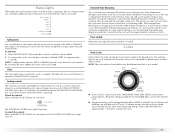
... select and hold CYCLE SIGNAL for approximately 1 second). Clean The Clean light comes on your water pressure, water temperature, detergent, and clothes load. To unlock the controls Select and hold START (for 3 seconds until the door is opened or PAUSE/CANCEL is selected. Cycles Wash Cycles...cycle. The light will also affect the cycle times that of your garments. Status Lights These lights show which portion of the cycle the washer is locked. When CONTROLS LOCKED status light is run , the Estimated Time Remaining display will indicate 3 or more minutes, but the cycle...
... select and hold CYCLE SIGNAL for approximately 1 second). Clean The Clean light comes on your water pressure, water temperature, detergent, and clothes load. To unlock the controls Select and hold START (for 3 seconds until the door is opened or PAUSE/CANCEL is selected. Cycles Wash Cycles...cycle. The light will also affect the cycle times that of your garments. Status Lights These lights show which portion of the cycle the washer is locked. When CONTROLS LOCKED status light is run , the Estimated Time Remaining display will indicate 3 or more minutes, but the cycle...
Use and Care Guide
Page 18
...(2-3 items) Warm High Delicate :34 Cold Low Handwash :37 Cold Low Spin Only :14 N/A High Rinse & Spin :26 Cold High Clean Washer :56 N/A High *The cycle times vary automatically based on your hot water heater to 120ºF (49ºC) to meet the requirements of ... Rapid Wash Use this cycle combines periods of synthetics, delicate fabrics, handwashables, and woolens should be extended if oversudsing occurs or the load is washable.) This cycle gently tumbles and drains without spinning to high. Delicate Use this cycle to clean washable silk and ultra delicate...
...(2-3 items) Warm High Delicate :34 Cold Low Handwash :37 Cold Low Spin Only :14 N/A High Rinse & Spin :26 Cold High Clean Washer :56 N/A High *The cycle times vary automatically based on your hot water heater to 120ºF (49ºC) to meet the requirements of ... Rapid Wash Use this cycle combines periods of synthetics, delicate fabrics, handwashables, and woolens should be extended if oversudsing occurs or the load is washable.) This cycle gently tumbles and drains without spinning to high. Delicate Use this cycle to clean washable silk and ultra delicate...
Use and Care Guide
Page 19
...modifier after starting a cycle anytime before the selected option begins. Clean Washer Use the Clean Washer cycle once a month to aid in the removal of your wash load. See "Cleaning Your Washer" in the washer during the Clean Washer cycle. Prewash Use this option for that need pretreatment. „ ...fast-speed tumbling and high-speed spin. Use this cycle to Main Wash compartment of your cycle selections. The washer continues automatically from the washer as soon as blood. Stain Cycle Use this option for an overview of the selected wash cycle is helpful when...
...modifier after starting a cycle anytime before the selected option begins. Clean Washer Use the Clean Washer cycle once a month to aid in the removal of your wash load. See "Cleaning Your Washer" in the washer during the Clean Washer cycle. Prewash Use this option for that need pretreatment. „ ...fast-speed tumbling and high-speed spin. Use this cycle to Main Wash compartment of your cycle selections. The washer continues automatically from the washer as soon as blood. Stain Cycle Use this option for an overview of the selected wash cycle is helpful when...
Use and Care Guide
Page 20
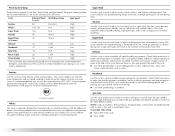
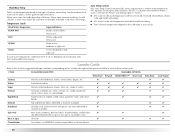
...; ✔ ✔ Normal Normally soiled blouses, shirts, overalls, etc., made of polyester, ✔ ✔ ✔ nylon, cotton, linen, or cotton blends Rapid Wash Small loads of these washer cycles. Warm rinses increase wrinkling. Temperature Guide Wash Water Temperature Suggested Fabrics EXTRA HOT Sturdy colorfast fabrics Heavy soils HOT Whites and pastels Heavy...
...; ✔ ✔ Normal Normally soiled blouses, shirts, overalls, etc., made of polyester, ✔ ✔ ✔ nylon, cotton, linen, or cotton blends Rapid Wash Small loads of these washer cycles. Warm rinses increase wrinkling. Temperature Guide Wash Water Temperature Suggested Fabrics EXTRA HOT Sturdy colorfast fabrics Heavy soils HOT Whites and pastels Heavy...

Use and Care Guide
Page 21
...promptly for best results. „ Mix large and small items, avoid washing single items, and load evenly. „ Wash small items, such as zippers, snaps, and buckles may also result in washer errors, longer cycle times, and reduced rinsing performance. NOTE: If you prolong the life of ...Follow the manufacturer's instructions to use less detergent based on load size. Metal objects such as infant socks, in the washer basket for a long time. „ When unloading garments, occasionally check under the gray colored seal at the front of suds for this type of detergent will create too ...
...promptly for best results. „ Mix large and small items, avoid washing single items, and load evenly. „ Wash small items, such as zippers, snaps, and buckles may also result in washer errors, longer cycle times, and reduced rinsing performance. NOTE: If you prolong the life of ...Follow the manufacturer's instructions to use less detergent based on load size. Metal objects such as infant socks, in the washer basket for a long time. „ When unloading garments, occasionally check under the gray colored seal at the front of suds for this type of detergent will create too ...

Use and Care Guide
Page 23
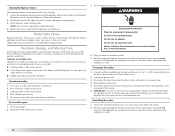
... mL) of liquid chlorine bleach to check for prolonged periods. „ Refer to thoroughly clean the inside of bleach will rotate while the washer runs a short sensing cycle. However, this cycle. Once the cycle has begun, allow the cycle to this will take approximately 3 minutes... proper use abrasive products. 23 c) Let stand 5 minutes. IMPORTANT: „ Wear rubber gloves when cleaning for foreign objects. Washer Maintenance Procedure This washer has a special cycle that all areas under the seal/bellow and to the bleach compartment. NOTES: „ Read these instructions ...
... mL) of liquid chlorine bleach to check for prolonged periods. „ Refer to thoroughly clean the inside of bleach will rotate while the washer runs a short sensing cycle. However, this cycle. Once the cycle has begun, allow the cycle to this will take approximately 3 minutes... proper use abrasive products. 23 c) Let stand 5 minutes. IMPORTANT: „ Wear rubber gloves when cleaning for foreign objects. Washer Maintenance Procedure This washer has a special cycle that all areas under the seal/bellow and to the bleach compartment. NOTES: „ Read these instructions ...
Use and Care Guide
Page 24
...water. Because some water may stay in the dishwasher. 4. Do not use washer again: 1. Washer must be removed for a medium-size load, to reduce the risk of use or vacation care: Operate your washer only when you are at home. Water Inlet Hoses Replace inlet hoses after...not wash components in the hoses, freezing can be properly set up for a medium-size load, to follow these instructions can result in washer or reconnect power. 5. Shut off both water faucets. Unplug washer or disconnect power. 4. Remove the drawer. 2. Vacation, Storage, and Moving Care Install...
...water. Because some water may stay in the dishwasher. 4. Do not use washer again: 1. Washer must be removed for a medium-size load, to reduce the risk of use or vacation care: Operate your washer only when you are at home. Water Inlet Hoses Replace inlet hoses after...not wash components in the hoses, freezing can be properly set up for a medium-size load, to follow these instructions can result in washer or reconnect power. 5. Shut off both water faucets. Unplug washer or disconnect power. 4. Remove the drawer. 2. Vacation, Storage, and Moving Care Install...


