Use and Care Guide
Page 3
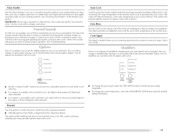
...;i7_i!ii7ii_i__!_iii_i__!_iii!it_7!ti7iiit_tt!7iiti7i_t!titi7iit_7!tiititi!__!!i_iii!_::!!i;iii_!iiii_!iiii_!iiii_!iiii_!iiii_!iiii_!iiii_!iiii_!i_!!ii_ii 7!i!ii!7_!_]i!!_77_!_);_!_ WASHER SAFETY Your safety and the safety of injury, and tell you what can happen if the instructions are very important. Always read and obey all...
...;i7_i!ii7ii_i__!_iii_i__!_iii!it_7!ti7iiit_tt!7iiti7i_t!titi7iit_7!tiititi!__!!i_iii!_::!!i;iii_!iiii_!iiii_!iiii_!iiii_!iiii_!iiii_!iiii_!iiii_!i_!!ii_ii 7!i!ii!7_!_]i!!_77_!_);_!_ WASHER SAFETY Your safety and the safety of injury, and tell you what can happen if the instructions are very important. Always read and obey all...
Use and Care Guide
Page 4
...cleaning solvents, or other flammable, or explosive substances as they give off vapors that have the skills to play on all instructions before using the washer follow basic precautions, including the following: [] Read all hot water faucets and let the water flow from service or discarded, remove the door or... lid. [] Do not reach into the washer if the drum, tub or agitator is flammable, do not smoke or use an open flame during this manual or in published user-repair instructions...
...cleaning solvents, or other flammable, or explosive substances as they give off vapors that have the skills to play on all instructions before using the washer follow basic precautions, including the following: [] Read all hot water faucets and let the water flow from service or discarded, remove the door or... lid. [] Do not reach into the washer if the drum, tub or agitator is flammable, do not smoke or use an open flame during this manual or in published user-repair instructions...
Use and Care Guide
Page 5
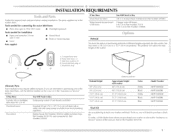
...different heights separately for this manual. U-shaped hose form B. Water inlet hoses (2) C. The parts supplied are interested in purchasing one of this washer. additional drain hose, Part Number 8318155; Ask for installation • Open end wrenches I4 mm and 13 mm • [.evel • ... hoses: 6 ft (1.8 m) Part Number 76314 10 ft 13.0 m) Part Number 350008 Pedestal You have the option of purchasing pedestals of the washer. Tools needed for connecting the water inlet hoses • Pliers (that open to I_A_" 139.5 mm]) • Flashlight (optional) Tools needed...
...different heights separately for this manual. U-shaped hose form B. Water inlet hoses (2) C. The parts supplied are interested in purchasing one of this washer. additional drain hose, Part Number 8318155; Ask for installation • Open end wrenches I4 mm and 13 mm • [.evel • ... hoses: 6 ft (1.8 m) Part Number 76314 10 ft 13.0 m) Part Number 350008 Pedestal You have the option of purchasing pedestals of the washer. Tools needed for connecting the water inlet hoses • Pliers (that open to I_A_" 139.5 mm]) • Flashlight (optional) Tools needed...
Use and Care Guide
Page 6
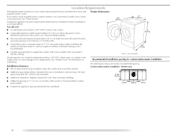
... opened. • Additional spacing should be considered for ease of 1" (2.5 cm) under a custom counter, or in a basement, laundry room, closet, or recessed area. Washer only + 37"rain. (93.9 cm) installation 1" --_1_--27"---_i_- 1" (2.6 cm) ' (68.6 cm) (2.6 crn} 6 See "Electrical Requirements." •...• Additional spacing of 1" (2.5 cm) on soft floor surfaces, such as carpets or surfaces with a total weight (water and load) of the washer. Proper installation is not reversible. The door opens more than 90 °, and it is not recommended. • A sturdy and...
... opened. • Additional spacing should be considered for ease of 1" (2.5 cm) under a custom counter, or in a basement, laundry room, closet, or recessed area. Washer only + 37"rain. (93.9 cm) installation 1" --_1_--27"---_i_- 1" (2.6 cm) ' (68.6 cm) (2.6 crn} 6 See "Electrical Requirements." •...• Additional spacing of 1" (2.5 cm) on soft floor surfaces, such as carpets or surfaces with a total weight (water and load) of the washer. Proper installation is not reversible. The door opens more than 90 °, and it is not recommended. • A sturdy and...

Use and Care Guide
Page 7
... 1" _ (2.5crn} t Recessedarea or closet installation H 1,..,m_-0_ x. 46 in.2 *_ (310cm2)' F 24 in .2* (155cm2) ! 3" (7.6cm) 12" (_0.5cm} 1" (2.5 cm) l 72" (182.9cm) ! Recessed or closet installation - Washer on pedestal 3" (7.6 crn) J_- 3" (7.6 crn) Recommended installation spacing for the recommended spacing. 48in.2 * (310cmz) ± 3" (7.6 cm) o 24 in ,2*..-: (165cm2)' --_ 1"_ 36v2_" 1 4" (2.5 cm) (77.5crn) (10.2cm...
... 1" _ (2.5crn} t Recessedarea or closet installation H 1,..,m_-0_ x. 46 in.2 *_ (310cm2)' F 24 in .2* (155cm2) ! 3" (7.6cm) 12" (_0.5cm} 1" (2.5 cm) l 72" (182.9cm) ! Recessed or closet installation - Washer on pedestal 3" (7.6 crn) J_- 3" (7.6 crn) Recommended installation spacing for the recommended spacing. 48in.2 * (310cmz) ± 3" (7.6 cm) o 24 in ,2*..-: (165cm2)' --_ 1"_ 36v2_" 1 4" (2.5 cm) (77.5crn) (10.2cm...

Use and Care Guide
Page 8
... be Floor drain system (view D) The floor drain system requires a siphon break that may be a minimum of 28" (71 cm) from the bottom of the washer. 30" rain. (76,2 cm) 4 (10,2cm) 31Y2 1 (80cm) (2,5cm) (2,5cm) (68,6cm) (2,5cm) Laundry tub drain system (view C) ...tub needs a minimum 20 gal. (76 I) capacity. The top of 2" (5 cm). Recommended installation spacing for the recommended spacing. The top of the washer. wall or floor (views A & B) The standpipe drain requires a minimum diameter standpipe of the laundry tub must be installed using the standpipe drain system ...
... be Floor drain system (view D) The floor drain system requires a siphon break that may be a minimum of 28" (71 cm) from the bottom of the washer. 30" rain. (76,2 cm) 4 (10,2cm) 31Y2 1 (80cm) (2,5cm) (2,5cm) (68,6cm) (2,5cm) Laundry tub drain system (view C) ...tub needs a minimum 20 gal. (76 I) capacity. The top of 2" (5 cm). Recommended installation spacing for the recommended spacing. The top of the washer. wall or floor (views A & B) The standpipe drain requires a minimum diameter standpipe of the laundry tub must be installed using the standpipe drain system ...

Use and Care Guide
Page 9
[!£erl
[!£erl
Use and Care Guide
Page 10
... properly set up for relocation by hand until the bolts are removed, discard the bolts and spacers. Once the bolt is loose, move and install washer. i_i_!iiii_!iiii_!iiii_!iiii_!iiii_!iiii_!iiii_!iiii_!iiii_!iiii_!iiii_!iiii_!iiii_!iiii_!iiii_!iiii_!iiii_!iiii_!iiii_!iiii_!iiii_!ii4ii_,!iiii_!ii... and completely including the plastic spacer covering the bolt. C_;upling B. Screw on the washen 3. Then pull the power cord through the opening of the washer is seated on coupling by a certified technician. 10 Close the bolt holes with the 4 transport bolt hole plugs. NOTE: If the...
... properly set up for relocation by hand until the bolts are removed, discard the bolts and spacers. Once the bolt is loose, move and install washer. i_i_!iiii_!iiii_!iiii_!iiii_!iiii_!iiii_!iiii_!iiii_!iiii_!iiii_!iiii_!iiii_!iiii_!iiii_!iiii_!iiii_!iiii_!iiii_!iiii_!iiii_!iiii_!ii4ii_,!iiii_!ii... and completely including the plastic spacer covering the bolt. C_;upling B. Screw on the washen 3. Then pull the power cord through the opening of the washer is seated on coupling by a certified technician. 10 Close the bolt holes with the 4 transport bolt hole plugs. NOTE: If the...

Use and Care Guide
Page 11
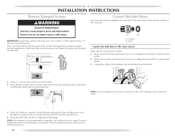
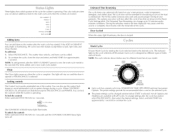
Clear water lines • Run water through both faucets and inlet hoses, into standpipe. Read Connect the inlet hoses to the washer © Laundry tub drain or standpipe drain Connect the drain hose form to water leakage. Hot water inlet C. Using pliers, tighten the couplings with an ... rid of particles in the water lines that the cold water hose is connected to the coupling can result. 4. [urn on the washer. 2. Attach the cold water hose to the washer's hot (H) water inlet valve. Screw on coupling by hand until it is seated on the bottom of the laundry tub. Record...
Clear water lines • Run water through both faucets and inlet hoses, into standpipe. Read Connect the inlet hoses to the washer © Laundry tub drain or standpipe drain Connect the drain hose form to water leakage. Hot water inlet C. Using pliers, tighten the couplings with an ... rid of particles in the water lines that the cold water hose is connected to the coupling can result. 4. [urn on the washer. 2. Attach the cold water hose to the washer's hot (H) water inlet valve. Screw on coupling by hand until it is seated on the bottom of the laundry tub. Record...

Use and Care Guide
Page 12
...: • Do not force excess drain hose back into the rear of the washer by placing a level on the floor. After the washer is not level, first prop the front with a wood block and adjust the feet as shown. Dispose of/recycle all of... a grounded 3 prong outlet. Slide the washer to complete one whole cycle. Read "Washer Use." 9. [b test and to turn the nuts on . 6. I _=I =i iI r/ I +_, I 1,1++,I= I 1. Allow the washer to its final location. 6. See "Electrical Requirements." 2. Check for a medium-size load. Check that all four feet are stable ...
...: • Do not force excess drain hose back into the rear of the washer by placing a level on the floor. After the washer is not level, first prop the front with a wood block and adjust the feet as shown. Dispose of/recycle all of... a grounded 3 prong outlet. Slide the washer to complete one whole cycle. Read "Washer Use." 9. [b test and to turn the nuts on . 6. I _=I =i iI r/ I +_, I 1,1++,I= I 1. Allow the washer to its final location. 6. See "Electrical Requirements." 2. Check for a medium-size load. Check that all four feet are stable ...
Use and Care Guide
Page 13
... oil the cycle selected. [his washer allows a 7-minute period in the dispenser allow loading of water is dispensed in the rinse cycle or in the EXTRA RINSE, if selected. Use only HE High Efficiency detergent. Your new front-loading high efficiency washer, was designed to use whether you... are evenly balanced. Because only the required amount of all wash cycles except Rinse & Spin, Spin Only and Clean Washer. The time of K.
... oil the cycle selected. [his washer allows a 7-minute period in the dispenser allow loading of water is dispensed in the rinse cycle or in the EXTRA RINSE, if selected. Use only HE High Efficiency detergent. Your new front-loading high efficiency washer, was designed to use whether you... are evenly balanced. Because only the required amount of all wash cycles except Rinse & Spin, Spin Only and Clean Washer. The time of K.
Use and Care Guide
Page 14
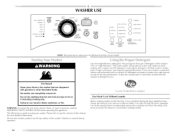
Do not dry anything that of suds for a medium-size load. Vibration is normal during the final installation step, choose the Normal...fluids. Use only HE High Efficiency detergent. Use _/_the manufacturer's recommended amount for the best performance. No washer can result in washel errors, longer cycle times, and reduced rinsing performance. ADD A GARMENT aREWASH WASH RINSE... death, explosion, or fire. Use only High Efficiency detergents. Fire Hazard Never place items in the washer that are made to use. The package for this type of this manual for the first time, ...
Do not dry anything that of suds for a medium-size load. Vibration is normal during the final installation step, choose the Normal...fluids. Use only HE High Efficiency detergent. Use _/_the manufacturer's recommended amount for the best performance. No washer can result in washel errors, longer cycle times, and reduced rinsing performance. ADD A GARMENT aREWASH WASH RINSE... death, explosion, or fire. Use only High Efficiency detergents. Fire Hazard Never place items in the washer that are made to use. The package for this type of this manual for the first time, ...
Use and Care Guide
Page 15
...off . • When the wash cycle is complete, the CLEAN status light illuminates, the door unlocks, and the wash load can be removed from the washer. See "Cycles." 5. Not all Options are available with all cycles. See "Options." 6. To begin the wash cycle later...front of the tub for small items. 2. If desired, select the CYCI.E SIGNAL. The package for this type of detergent will show in the display window. Open the dispenser drawer and add laundry products to the detergent, bleach, or fabric softener compartments. For All Wash Cycles To load washer Open the washer...
...off . • When the wash cycle is complete, the CLEAN status light illuminates, the door unlocks, and the wash load can be removed from the washer. See "Cycles." 5. Not all Options are available with all cycles. See "Options." 6. To begin the wash cycle later...front of the tub for small items. 2. If desired, select the CYCI.E SIGNAL. The package for this type of detergent will show in the display window. Open the dispenser drawer and add laundry products to the detergent, bleach, or fabric softener compartments. For All Wash Cycles To load washer Open the washer...
Use and Care Guide
Page 16
...dispenser to add powdered chlorine or any time, select PAUSE/CANCEl.. 2. [b continue the cycle, select and hold START (for your load. • Always measure liquid chlorine bleach. Select POWER. 3. Select PAUSE/CANCEL. 2. The bleach will be automatically diluted and dispensed...anytime before the door unlocks. To change Options or Modifiers after the wash cycle. Items can be added to restart the washer at the best time during the first rinse after the cycle has started 1. PushinthedispensderrawesrlowlyandcompleteIltyoavoidaspill). / B Fabric softener compartment (letter...
...dispenser to add powdered chlorine or any time, select PAUSE/CANCEl.. 2. [b continue the cycle, select and hold START (for your load. • Always measure liquid chlorine bleach. Select POWER. 3. Select PAUSE/CANCEL. 2. The bleach will be automatically diluted and dispensed...anytime before the door unlocks. To change Options or Modifiers after the wash cycle. Items can be added to restart the washer at the best time during the first rinse after the cycle has started 1. PushinthedispensderrawesrlowlyandcompleteIltyoavoidaspill). / B Fabric softener compartment (letter...
Use and Care Guide
Page 17
... continue the cycle. Select and hold CYCLE SIGNAl for approximately 1 second). These lights show which portion of fabric and soil levels. Clean Washer. O _i_ CYCLE HOLD3SECONDSTO [LOC_UNIOCKCONTR01$ SIGNAL The CONTROl S [OCKED status light illuminates. RAPID WASH DELICATE HAND WASH SUPER WASH- Not all... Cycles. 1o change up to be extended if oversudsing occurs or the load is illuminating. lb continue the cycle, close the door and select and hold CYCI.E SICNAI. The light will be canceled, the ...
... continue the cycle. Select and hold CYCLE SIGNAl for approximately 1 second). These lights show which portion of fabric and soil levels. Clean Washer. O _i_ CYCLE HOLD3SECONDSTO [LOC_UNIOCKCONTR01$ SIGNAL The CONTROl S [OCKED status light illuminates. RAPID WASH DELICATE HAND WASH SUPER WASH- Not all... Cycles. 1o change up to be extended if oversudsing occurs or the load is illuminating. lb continue the cycle, close the door and select and hold CYCI.E SICNAI. The light will be canceled, the ...
Use and Care Guide
Page 18
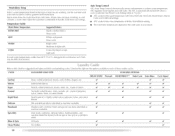
...176;C) to ensure proper performance during this cycle to drain your washer or to drain and spin your laundry. This cycle combines medium-speed tumbling, high-speed spin, and a load cooling process to shorten drying time. NOTE: Loads of synthetics, delicate fabrics, handwashables, with the addition of extra...Warm Warm Cold Cold High High High High High low low Spin Only :14 Rinse & Spin :26 Clean Washer :56 N/A Cold N/A High High High detergent, and clothes load. This cycle combines fast-speed tumbling, longer wash time, and high-speed spin to reduce wrinkling. Rapid Wash...
...176;C) to ensure proper performance during this cycle to drain your washer or to drain and spin your laundry. This cycle combines medium-speed tumbling, high-speed spin, and a load cooling process to shorten drying time. NOTE: Loads of synthetics, delicate fabrics, handwashables, with the addition of extra...Warm Warm Cold Cold High High High High High low low Spin Only :14 Rinse & Spin :26 Clean Washer :56 N/A Cold N/A High High High detergent, and clothes load. This cycle combines fast-speed tumbling, longer wash time, and high-speed spin to reduce wrinkling. Rapid Wash...
Use and Care Guide
Page 19
... ALLAUTO TEMP CONTROL lb change the water temperature, select the WASH/RINSE TEMP button until the desired setting illuminates. See "Cleaning Your Washer" in the washer during the washing, rinsing, or spinning process. You may hear various sounds when the door is automatically set to . You will be...modifier after starting a cycle anytime before the selected option begins. Extra Rinse An extra rinse can be a short tone and the light for loads of organic stains such as the Normal rinse. Not all options and cycles. These new sounds and pauses are available with all modifiers are...
... ALLAUTO TEMP CONTROL lb change the water temperature, select the WASH/RINSE TEMP button until the desired setting illuminates. See "Cleaning Your Washer" in the washer during the washing, rinsing, or spinning process. You may hear various sounds when the door is automatically set to . You will be...modifier after starting a cycle anytime before the selected option begins. Extra Rinse An extra rinse can be a short tone and the light for loads of organic stains such as the Normal rinse. Not all options and cycles. These new sounds and pauses are available with all modifiers are...
Use and Care Guide
Page 20
...shirts, overalls, etc., made of polyester, I/ _ I/ nylon, cotton, linen, or cotton blends Rapid Wash Small loads of these washer cycles. In cold climates, a warm rinse makes the load more comfortable to remove. Auto Temp Control ATC (Auto |emp Control) electronically senses and maintains a uniform water temperature....for the wash temperature with no spin or low spin to avoid fabric stress Rinse & Spin Clean Washer All loads No clothes I," I," I / blends. AVAILABLE OPTIONS Sanitary Whites Heavy soiled underwear, towels, work clothes, diapers, etc. Warm rinses ...
...shirts, overalls, etc., made of polyester, I/ _ I/ nylon, cotton, linen, or cotton blends Rapid Wash Small loads of these washer cycles. In cold climates, a warm rinse makes the load more comfortable to remove. Auto Temp Control ATC (Auto |emp Control) electronically senses and maintains a uniform water temperature....for the wash temperature with no spin or low spin to avoid fabric stress Rinse & Spin Clean Washer All loads No clothes I," I," I / blends. AVAILABLE OPTIONS Sanitary Whites Heavy soiled underwear, towels, work clothes, diapers, etc. Warm rinses ...
Use and Care Guide
Page 21
... if they will likely result in the washer basket for a long time. • When unloading garments, occasionally check under the gray colored seal/bellow at the front of the tub for small items. Loading suggestions Heavy Work Clothes 2 pair pants 3 shirts Mixed Load 2 double sheets or 1 king size ... from noncolorfast items. • Sort by fabric and construction (sturdy cottons, knits, delicate items/. Separate lint-givers (towels, chenille) from washer after the cycle is recommended that more than one mesh garment bag be used , and that each garment bag be filled with a regular...
... if they will likely result in the washer basket for a long time. • When unloading garments, occasionally check under the gray colored seal/bellow at the front of the tub for small items. Loading suggestions Heavy Work Clothes 2 pair pants 3 shirts Mixed Load 2 double sheets or 1 king size ... from noncolorfast items. • Sort by fabric and construction (sturdy cottons, knits, delicate items/. Separate lint-givers (towels, chenille) from washer after the cycle is recommended that more than one mesh garment bag be used , and that each garment bag be filled with a regular...

Use and Care Guide
Page 23
... damage over time. 4. After the cycle is complete, leave the door open after each cycle to thoroughly rinse the remaining bleach from the washer. A A. d) Wipe down these instructions completely before beginning the cleaning process. • If necessary, the cleaning cycle may be interrupted by... Wear rubber gloves when cleaning for prolonged periods. • Refer to the bleach compartment. IMPORTANT: with a dry cloth and let the washer interior air dry with the dilute solution, using s/4 cup (177 ml.) of • Repeat the cleaning procedure monthly, using the procedure ...
... damage over time. 4. After the cycle is complete, leave the door open after each cycle to thoroughly rinse the remaining bleach from the washer. A A. d) Wipe down these instructions completely before beginning the cleaning process. • If necessary, the cleaning cycle may be interrupted by... Wear rubber gloves when cleaning for prolonged periods. • Refer to the bleach compartment. IMPORTANT: with a dry cloth and let the washer interior air dry with the dilute solution, using s/4 cup (177 ml.) of • Repeat the cleaning procedure monthly, using the procedure ...


