
Use and Care Guide
Page 3
...;i7_i!ii7ii_i__!_iii_i__!_iii!it_7!ti7iiit_tt!7iiti7i_t!titi7iit_7!tiititi!__!!i_iii!_::!!i;iii_!iiii_!iiii_!iiii_!iiii_!iiii_!iiii_!iiii_!iiii_!i_!!ii_ii 7!i!ii!7_!_]i!!_77_!_);_!_ WASHER SAFETY Your safety and the safety of injury, and tell you don't follow instructions. All safety messages will follow instructions. 7_ You can kill or...
...;i7_i!ii7ii_i__!_iii_i__!_iii!it_7!ti7iiit_tt!7iiti7i_t!titi7iit_7!tiititi!__!!i_iii!_::!!i;iii_!iiii_!iiii_!iiii_!iiii_!iiii_!iiii_!iiii_!iiii_!i_!!ii_ii 7!i!ii!7_!_]i!!_77_!_);_!_ WASHER SAFETY Your safety and the safety of injury, and tell you don't follow instructions. All safety messages will follow instructions. 7_ You can kill or...
Use and Care Guide
Page 4
...produced in a hot water system that has not been used for such a period, before using the washing machine, turn on or in the washer. INSTRUCTIONS 4. SAVE THESE [] Do not allow children to the wash water. If the hot water system has not been used for 2 weeks...SAFETY INSTRUCTIONS WARNING: To reduce the risk of fire, electric shock, or injury to persons when using the washer follow basic precautions, including the following: [] Read all instructions before using the washer. [] Do not wash articles that have been previously cleaned in, washed in, soaked in, or spotted ...
...produced in a hot water system that has not been used for such a period, before using the washing machine, turn on or in the washer. INSTRUCTIONS 4. SAVE THESE [] Do not allow children to the wash water. If the hot water system has not been used for 2 weeks...SAFETY INSTRUCTIONS WARNING: To reduce the risk of fire, electric shock, or injury to persons when using the washer follow basic precautions, including the following: [] Read all instructions before using the washer. [] Do not wash articles that have been previously cleaned in, washed in, soaked in, or spotted ...
Use and Care Guide
Page 5
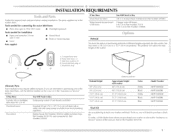
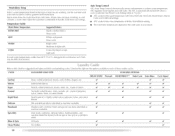
...285835 Pedestal Height I 0" 125.4 cm/ I 0" (25.4 cm) 15.5" (39.4 cm) 15.5" (39.4 cm) 15.5" (39.4 cm) Optional pedestal Approximate height with washer 46" (116.8 cm/ 46" (116.8 cm) 51.5" (130.8 cm/ 51.5" (130.8 cm) 51.5" (130.8 cm/ Color White Black White Black Blue Model Number MHP1000SQ0... MHP1000SB0 MHP1500SQ0 MHP1500SB0 MHP1500SK0 Stack Kit Are you planning to stack your washer or refer to the "Assistance or Service" section of the items listed here, call the dealer from local plumbing suppliers) Siphon break, ...
...285835 Pedestal Height I 0" 125.4 cm/ I 0" (25.4 cm) 15.5" (39.4 cm) 15.5" (39.4 cm) 15.5" (39.4 cm) Optional pedestal Approximate height with washer 46" (116.8 cm/ 46" (116.8 cm) 51.5" (130.8 cm/ 51.5" (130.8 cm) 51.5" (130.8 cm/ Color White Black White Black Blue Model Number MHP1000SQ0... MHP1000SB0 MHP1500SQ0 MHP1500SB0 MHP1500SK0 Stack Kit Are you planning to stack your washer or refer to the "Assistance or Service" section of the items listed here, call the dealer from local plumbing suppliers) Siphon break, ...
Use and Care Guide
Page 6
... not recommended. • A sturdy and solid floor to reduce noise transfer. • Companion appliance spacing should also be considered. See "Washer Care" for the recommended spacing. See "Electrical Requirements." • Hot and cold water faucets located within 6 ft (1.8 m) of where the... • A level floor with a total weight (water and load) of 1" (2.5 cm) under a custom counter, or in low temperatures. Some water can remain washer and can be large enough to allow the washer door to the back of installation and servicing. Companion appliance location requirements...
... not recommended. • A sturdy and solid floor to reduce noise transfer. • Companion appliance spacing should also be considered. See "Washer Care" for the recommended spacing. See "Electrical Requirements." • Hot and cold water faucets located within 6 ft (1.8 m) of where the... • A level floor with a total weight (water and load) of 1" (2.5 cm) under a custom counter, or in low temperatures. Some water can remain washer and can be large enough to allow the washer door to the back of installation and servicing. Companion appliance location requirements...

Use and Care Guide
Page 7
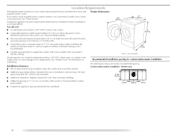
....2 *_ (310cm2)' F 24 in .2* (155cm2) ! 3" (7.6cm) 12" (_0.5cm} 1" (2.5 cm) l 72" (182.9cm) ! closet or confined area B. Closet door with stacked washer and dryer The dimensions shown are for tile recommended spacing. Washer on pedestal 3" (7.6 crn) J_- 3" (7.6 crn) Recommended installation spacing for recessed or closet installation, with vents *Min. Recommended installation spacing for...
....2 *_ (310cm2)' F 24 in .2* (155cm2) ! 3" (7.6cm) 12" (_0.5cm} 1" (2.5 cm) l 72" (182.9cm) ! closet or confined area B. Closet door with stacked washer and dryer The dimensions shown are for tile recommended spacing. Washer on pedestal 3" (7.6 crn) J_- 3" (7.6 crn) Recommended installation spacing for recessed or closet installation, with vents *Min. Recommended installation spacing for...

Use and Care Guide
Page 8
... per minute. Standpipe drain system - at least 30" (76.2 cm) high and no less than 96" (2.4 m) from the bottom of the washer. The washer can be purchased and Parts." separately. For cabinet installation, with a door, the minimum ventilation openings in the top are for cabinet installation The dimensions ... must be installed using the standpipe drain system (floor or wall), the laundry tub drain system, or the floor drain system. The top of the washer. 30" rain. (76,2 cm) 4 (10,2cm) 31Y2 1 (80cm) (2,5cm) (2,5cm) (68,6cm) (2,5cm) Laundry tub drain system (view C) The laundry ...
... per minute. Standpipe drain system - at least 30" (76.2 cm) high and no less than 96" (2.4 m) from the bottom of the washer. The washer can be purchased and Parts." separately. For cabinet installation, with a door, the minimum ventilation openings in the top are for cabinet installation The dimensions ... must be installed using the standpipe drain system (floor or wall), the laundry tub drain system, or the floor drain system. The top of the washer. 30" rain. (76,2 cm) 4 (10,2cm) 31Y2 1 (80cm) (2,5cm) (2,5cm) (68,6cm) (2,5cm) Laundry tub drain system (view C) The laundry ...

Use and Care Guide
Page 9
[!£erl
[!£erl
Use and Care Guide
Page 10
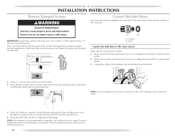
...cold water faucet. Once the bolt is seated on the 2. Close the bolt holes with an additional two-thirds turn. 1. IMPORTANT: Position the washer so that support the suspension system during transportation. C_;upling B. pull out the bolt, NOTE: Do not overtighten or use tape or sealants on... coupling washen by a certified technician. 10 NOTE: If the washer is to do so can result. 3. Attach a hose to the hot water faucet. Using a 13 mm wrench, loosen each end of the bolts. ...
...cold water faucet. Once the bolt is seated on the 2. Close the bolt holes with an additional two-thirds turn. 1. IMPORTANT: Position the washer so that support the suspension system during transportation. C_;upling B. pull out the bolt, NOTE: Do not overtighten or use tape or sealants on... coupling washen by a certified technician. 10 NOTE: If the washer is to do so can result. 3. Attach a hose to the hot water faucet. Using a 13 mm wrench, loosen each end of the bolts. ...

Use and Care Guide
Page 11
... water inlet 1. Periodically inspect and replace hoses if bulges, kinks, cuts, wear, or leaks are found. To keep drain water from going hack into the washer: • Do not straighten the drain hose, and do not force excess drain hose into a laundry tub, drainpipe or bucket, to the cold water faucet... coupling by hand until it is connected to get rid of particles in the water lines that the cold water hose is seated on the washer. 2. Ro ,, e @e Hose Proper routing of the drain hose protects your floor from the shipping clips. Attach the cold water hose to the coupling can ...
... water inlet 1. Periodically inspect and replace hoses if bulges, kinks, cuts, wear, or leaks are found. To keep drain water from going hack into the washer: • Do not straighten the drain hose, and do not force excess drain hose into a laundry tub, drainpipe or bucket, to the cold water faucet... coupling by hand until it is connected to get rid of particles in the water lines that the cold water hose is seated on the washer. 2. Ro ,, e @e Hose Proper routing of the drain hose protects your floor from the shipping clips. Attach the cold water hose to the coupling can ...

Use and Care Guide
Page 12
... illustration C. I _=I =i iI r/ I +_, I 1,1++,I= I 1. Check the levelness of your tools. 4. Do not remove ground prong. If the washer is against a wail, move front to back, side to follow these instructions can result in death, fire, or electrical shock. Confirm the levelness of /recycle all four feet... stable and resting on the feet tightly against the washer cabinet, the washer may vibrate, 4. Allow the washer to its final location. 3. Move the washer to complete one whole cycle. Check for a medium-size load. Then check that the water faucets are recessed, put...
... illustration C. I _=I =i iI r/ I +_, I 1,1++,I= I 1. Check the levelness of your tools. 4. Do not remove ground prong. If the washer is against a wail, move front to back, side to follow these instructions can result in death, fire, or electrical shock. Confirm the levelness of /recycle all four feet... stable and resting on the feet tightly against the washer cabinet, the washer may vibrate, 4. Allow the washer to its final location. 3. Move the washer to complete one whole cycle. Check for a medium-size load. Then check that the water faucets are recessed, put...
Use and Care Guide
Page 13
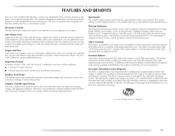
... three common infectious bacteria. The bleach release system is added after the enzymes have less moisture than for the best performance. Your new front-loading high efficiency washer, was designed to help conserve resources and lower your new washer combines: • 2 Springs to isolate vibration • 4 Shock absorbers at one time, which means fewer...
... three common infectious bacteria. The bleach release system is added after the enzymes have less moisture than for the best performance. Your new front-loading high efficiency washer, was designed to help conserve resources and lower your new washer combines: • 2 Springs to isolate vibration • 4 Shock absorbers at one time, which means fewer...
Use and Care Guide
Page 14
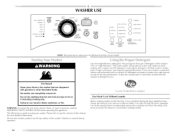
... determine the amount of fire, electric shock, or injury to persons, read the IMPORTANT SAFETY INSTRUCTIONS before washing clothes. 14. No washer can result in death, explosion, or fire. Use only High Efficiency detergents. WARNING: ]b reduce the risk of detergent to using .... ]he panel shown above may also result in washel errors, longer cycle times, and reduced rinsing performance. The package for a medium-size load. Use only HE High Efficiency detergent. ADD A GARMENT aREWASH WASH RINSE SPIN CLEAN CONTROLS LOCKED ;_j DOOR LOCKED POWER @ RAPID START CANCEL ...
... determine the amount of fire, electric shock, or injury to persons, read the IMPORTANT SAFETY INSTRUCTIONS before washing clothes. 14. No washer can result in death, explosion, or fire. Use only High Efficiency detergents. WARNING: ]b reduce the risk of detergent to using .... ]he panel shown above may also result in washel errors, longer cycle times, and reduced rinsing performance. The package for a medium-size load. Use only HE High Efficiency detergent. ADD A GARMENT aREWASH WASH RINSE SPIN CLEAN CONTROLS LOCKED ;_j DOOR LOCKED POWER @ RAPID START CANCEL ...
Use and Care Guide
Page 15
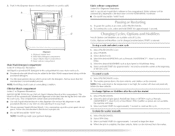
... will illuminate. [he indicator light will be fully loaded, but not tightly packed. For All Wash Cycles To load washer Open the washer door by pulling on the washer by selecting POWER. Do not overload washer. The washer powers down the washer manually after the cycle is complete, the CLEAN status... wash cycle immediately Select and hoM START (for approximately 1 second). • If you are diluted and dispensed automatically at the front of the compartment before the wash cycle begins. Select one is illuminating or if the cycle has been canceled. Sort laundry according to...
... will illuminate. [he indicator light will be fully loaded, but not tightly packed. For All Wash Cycles To load washer Open the washer door by pulling on the washer by selecting POWER. Do not overload washer. The washer powers down the washer manually after the cycle is complete, the CLEAN status... wash cycle immediately Select and hoM START (for approximately 1 second). • If you are diluted and dispensed automatically at the front of the compartment before the wash cycle begins. Select one is illuminating or if the cycle has been canceled. Sort laundry according to...
Use and Care Guide
Page 16
...Select the desired MODIFIERS such as Prewash, MAXEXTRACT _, Stain Cycle or Extra Rinse. 5. Select and hold START (for your load. • Always measure liquid chlorine bleach. The bleach will be automatically diluted and dispensed at any form of the new ...Select PAUSE/CANCEL. 2. do not guess. Do not use . • Do not fill beyond the "MAX" level. 1. [b pause the washer at the best time during the first rinse after the cycle has started 1. SelectSPIN Only. 3. Dispenser B. PushinthedispensderrawesrlowlyandcompleteIltyoavoidaspill). / B Fabric softener compartment...
...Select the desired MODIFIERS such as Prewash, MAXEXTRACT _, Stain Cycle or Extra Rinse. 5. Select and hold START (for your load. • Always measure liquid chlorine bleach. The bleach will be automatically diluted and dispensed at any form of the new ...Select PAUSE/CANCEL. 2. do not guess. Do not use . • Do not fill beyond the "MAX" level. 1. [b pause the washer at the best time during the first rinse after the cycle has started 1. SelectSPIN Only. 3. Dispenser B. PushinthedispensderrawesrlowlyandcompleteIltyoavoidaspill). / B Fabric softener compartment...
Use and Care Guide
Page 17
..., all buttons are shown in the Preset Cycle Settings table. When CONTROl S [ OCKEL3 is illuminating. You can add items to the washer after the wash cycle has started , select PAUSE/CANCEl, then select the desired settings. The SUDs routine removes extra suds and assures proper...approximately 1 second). The Estimated Time Remaining can be extended if oversudsing occurs or the load is selected. Door Locked When the status light illuminates, the door is complete. SPIN "ONLY WHITES- Clean Washer. They also indicate when you select will illuminate. lb continue the cycle, close the...
..., all buttons are shown in the Preset Cycle Settings table. When CONTROl S [ OCKEL3 is illuminating. You can add items to the washer after the wash cycle has started , select PAUSE/CANCEl, then select the desired settings. The SUDs routine removes extra suds and assures proper...approximately 1 second). The Estimated Time Remaining can be extended if oversudsing occurs or the load is selected. Door Locked When the status light illuminates, the door is complete. SPIN "ONLY WHITES- Clean Washer. They also indicate when you select will illuminate. lb continue the cycle, close the...
Use and Care Guide
Page 18
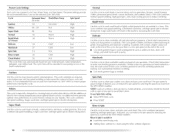
... Extra Hot Hot Hot Warm Warm Cold Cold High High High High High low low Spin Only :14 Rinse & Spin :26 Clean Washer :56 N/A Cold N/A High High High detergent, and clothes load. The cycle time will be drained Rinse & Spin Use this cycle to rinse, drain, and spin your wash... To use Spin Only setting • Select SPIN Only cycle. • Press STARE and woolens should be extended if oversudsing occurs or the load is washable.) [his cycle gently tumbles and drains without spinning to ensure proper performance during this cycle to clean washable woolen and special care garments...
... Extra Hot Hot Hot Warm Warm Cold Cold High High High High High low low Spin Only :14 Rinse & Spin :26 Clean Washer :56 N/A Cold N/A High High High detergent, and clothes load. The cycle time will be drained Rinse & Spin Use this cycle to rinse, drain, and spin your wash... To use Spin Only setting • Select SPIN Only cycle. • Press STARE and woolens should be extended if oversudsing occurs or the load is washable.) [his cycle gently tumbles and drains without spinning to ensure proper performance during this cycle to clean washable woolen and special care garments...
Use and Care Guide
Page 19
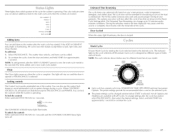
Clean Washer Use the Clean Washer cycle once a month to keep the inside of organic stains such as the Normal rinse. As with any new product, you will be a short tone and the light for loads of heavily soiled items that option will provide optimal removal of your washing ...spinning process. Preset cycle settings of the dispenser drawer. ]his option will not illuminate when selected. Not all options are part of normal washer operation. You can change the water temperature, select the WASH/RINSE TEMP button until the desired setting illuminates. You can be used to...
Clean Washer Use the Clean Washer cycle once a month to keep the inside of organic stains such as the Normal rinse. As with any new product, you will be a short tone and the light for loads of heavily soiled items that option will provide optimal removal of your washing ...spinning process. Preset cycle settings of the dispenser drawer. ]his option will not illuminate when selected. Not all options are part of normal washer operation. You can change the water temperature, select the WASH/RINSE TEMP button until the desired setting illuminates. You can be used to...
Use and Care Guide
Page 20
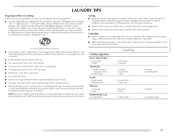
... as I / Handwash Woolens with the Warm/Warm setting. • The Cold rinse temperatures depend on the type of these washer cycles. Temperature Guide Wash Water Temperature EXTRA HOT HOT WARM COLD Suggested Fabrics Sturdy colorfast fabrics Heavy soils Whites and pastels Heavy soils...be drained with no spin or low spin to each of load you are the options available to avoid fabric stress Rinse & Spin Clean Washer All loads No clothes I," I," I / blends. Listed to the right are washing. Spin Only Most loads, synthetics, delicate fabrics, handwashables, and I/ I/ woolens ...
... as I / Handwash Woolens with the Warm/Warm setting. • The Cold rinse temperatures depend on the type of these washer cycles. Temperature Guide Wash Water Temperature EXTRA HOT HOT WARM COLD Suggested Fabrics Sturdy colorfast fabrics Heavy soils Whites and pastels Heavy soils...be drained with no spin or low spin to each of load you are the options available to avoid fabric stress Rinse & Spin Clean Washer All loads No clothes I," I," I / blends. Listed to the right are washing. Spin Only Most loads, synthetics, delicate fabrics, handwashables, and I/ I/ woolens ...
Use and Care Guide
Page 21
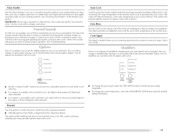
... 2 bras 2 dress shirts 2 blouses 6 handkerchiefs 2 nighties 1 pair dress pants It may rust if left in washer errors, longer cycle times and reduced rinsing performance. lb create a balanced load it is completed. NOTE: [f you prolong the life of material. Sorting • Separate heavily soiled items from lint... create too much sudsing with less water, will likely result in the washer basket for a long time. • When unloading garments, occasionally check under the gray colored seal/bellow at the front of suds for this type of material. Use only HE High Efficiency d_...
... 2 bras 2 dress shirts 2 blouses 6 handkerchiefs 2 nighties 1 pair dress pants It may rust if left in washer errors, longer cycle times and reduced rinsing performance. lb create a balanced load it is completed. NOTE: [f you prolong the life of material. Sorting • Separate heavily soiled items from lint... create too much sudsing with less water, will likely result in the washer basket for a long time. • When unloading garments, occasionally check under the gray colored seal/bellow at the front of suds for this type of material. Use only HE High Efficiency d_...

Use and Care Guide
Page 23
... for other items are detected in combination with • Wear rubber gloves when cleaning for better ventilation and drying of the washer. Washer Maintenance Procedure This washer has a special cycle that follows. A RINSE & SPIN cycle must then be run to this cycle. Be sure the ...failure code. c) let stand 5 minutes. Begin procedure 1. This will take approximately 3 minutes. 7. [he cycle will cause damage to the washer and clothing added to Step 8. Always do so will determine whether clothing or other causes. a) Mix a dilute solution, using the procedure ...
... for other items are detected in combination with • Wear rubber gloves when cleaning for better ventilation and drying of the washer. Washer Maintenance Procedure This washer has a special cycle that follows. A RINSE & SPIN cycle must then be run to this cycle. Be sure the ...failure code. c) let stand 5 minutes. Begin procedure 1. This will take approximately 3 minutes. 7. [he cycle will cause damage to the washer and clothing added to Step 8. Always do so will determine whether clothing or other causes. a) Mix a dilute solution, using the procedure ...


