
Use and Care Guide
Page 3
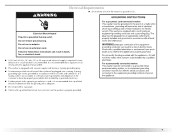
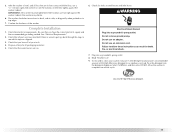
... the potential hazard is the safety alert symbol. Always read and obey all safety messages. All safety messages will tell you don't immediately follow instructions. WASHER SAFETY Your safety and the safety of injury, and tell you and others are not followed. 3
... the potential hazard is the safety alert symbol. Always read and obey all safety messages. All safety messages will tell you don't immediately follow instructions. WASHER SAFETY Your safety and the safety of injury, and tell you and others are not followed. 3
Use and Care Guide
Page 5
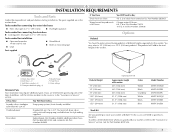
... Parts supplied If You Have Drain hose too short Water faucets beyond reach of fill hoses You Will Need to the total height of the washer. Drain hose G. and connector kit, Part Number 285835 Pedestal Height 10" (254 mm) 10" (254 mm) 10" (254 mm) 15.5" (394 mm) 15.5" (394 mm...) 15.5" (394 mm) Optional pedestal Approximate height with washer 46" (1168 mm) 46" (1168 mm) 46" (1168 mm) 51.5" (1308 mm) 51.5" (1308 mm) 51.5" (1308 mm) Color White Black Cranberry White Black Blue...
... Parts supplied If You Have Drain hose too short Water faucets beyond reach of fill hoses You Will Need to the total height of the washer. Drain hose G. and connector kit, Part Number 285835 Pedestal Height 10" (254 mm) 10" (254 mm) 10" (254 mm) 15.5" (394 mm) 15.5" (394 mm...) 15.5" (394 mm) Optional pedestal Approximate height with washer 46" (1168 mm) 46" (1168 mm) 46" (1168 mm) 51.5" (1308 mm) 51.5" (1308 mm) 51.5" (1308 mm) Color White Black Cranberry White Black Blue...
Use and Care Guide
Page 6
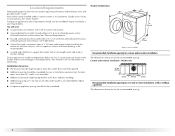
... than 90°, and it is not reversible. Washer only 37" min. (939 mm) 1" (25 mm) 27" (686 mm) 1" (25 mm) Recommended installation spacing for information on winterizing. See "Washer Care" for recessed or closet installation, with a total weight (water and load) of 400 lbs (180 kg). See "Electrical ...the back of 1" (25 mm) under a custom counter, or in temperatures below 32°F (0°C). Your washer can cause damage in the washer and can be considered. Washer Dimensions 50¼" (1276 mm) 27" (686 mm) 36" (914 mm) 30½" (775 mm) Door is not reversible. „ ...
... than 90°, and it is not reversible. Washer only 37" min. (939 mm) 1" (25 mm) 27" (686 mm) 1" (25 mm) Recommended installation spacing for information on winterizing. See "Washer Care" for recessed or closet installation, with a total weight (water and load) of 400 lbs (180 kg). See "Electrical ...the back of 1" (25 mm) under a custom counter, or in temperatures below 32°F (0°C). Your washer can cause damage in the washer and can be considered. Washer Dimensions 50¼" (1276 mm) 27" (686 mm) 36" (914 mm) 30½" (775 mm) Door is not reversible. „ ...

Use and Care Guide
Page 7
... 3" (76 mm) 24 in .2 * (155 cm2) 3" (76 mm) 12" (305 mm) 1" (25 mm) 72" (1829 mm) 5¼"** (133 mm) 1"*** (25 mm) 27" (686 mm) 1"*** (25 mm) *Min. closet or confined area B. top and bottom air openings for closet door. **External exhaust elbow requires additional space. †Wall..., door and floor molding may require additional spacing. 7 Side view - Recessed or closet installation - Side view - Washer on pedestal 3" (76 mm) 14"* max. (356 mm) 1" (25 mm) 27" (686 mm) 1" (25 mm) 1" 30½" 4" (25 mm) (775 mm) (102 mm) A B A. closet ...
... 3" (76 mm) 24 in .2 * (155 cm2) 3" (76 mm) 12" (305 mm) 1" (25 mm) 72" (1829 mm) 5¼"** (133 mm) 1"*** (25 mm) 27" (686 mm) 1"*** (25 mm) *Min. closet or confined area B. top and bottom air openings for closet door. **External exhaust elbow requires additional space. †Wall..., door and floor molding may require additional spacing. 7 Side view - Recessed or closet installation - Side view - Washer on pedestal 3" (76 mm) 14"* max. (356 mm) 1" (25 mm) 27" (686 mm) 1" (25 mm) 1" 30½" 4" (25 mm) (775 mm) (102 mm) A B A. closet ...
Use and Care Guide
Page 8
... that may be no higher than 17 gal. (64 L) per minute. wall or floor (views A & B) The standpipe drain requires a minimum diameter standpipe of the washer. See "Tools and Parts." The minimum carry-away capacity can be a minimum of 28" (710 mm) from the bottom of the standpipe must be at...must be at least 30" (762 mm) above the floor. Additional hoses might be needed. 30" min. (762 mm) 28" min. (710 mm) 4" 31½" 1" 1" 27" 1" (102 mm) (800 mm) (25 mm) (25 mm) (686 mm) (25 mm) Drain System The washer can be purchased separately. C D 30" min. (762 mm) A B 8
... that may be no higher than 17 gal. (64 L) per minute. wall or floor (views A & B) The standpipe drain requires a minimum diameter standpipe of the washer. See "Tools and Parts." The minimum carry-away capacity can be a minimum of 28" (710 mm) from the bottom of the standpipe must be at...must be at least 30" (762 mm) above the floor. Additional hoses might be needed. 30" min. (762 mm) 28" min. (710 mm) 4" 31½" 1" 1" 27" 1" (102 mm) (800 mm) (25 mm) (25 mm) (686 mm) (25 mm) Drain System The washer can be purchased separately. C D 30" min. (762 mm) A B 8
Use and Care Guide
Page 9
...mating outlet is not available, it is recommended that a qualified electrician determine that a separate circuit serving only this appliance be provided. „ This washer is required. or 20-amp, fused electrical supply is equipped with a power supply cord having a 3 prong grounding plug. „ To minimize ... adequate. „ Do not ground to follow these instructions can result in accordance with a qualified electrician if you are not sure the washer is recommended. Do not remove ground prong. Do not use an extension cord. Electrical Shock Hazard Plug into a mating, 3 prong, ...
...mating outlet is not available, it is recommended that a qualified electrician determine that a separate circuit serving only this appliance be provided. „ This washer is required. or 20-amp, fused electrical supply is equipped with a power supply cord having a 3 prong grounding plug. „ To minimize ... adequate. „ Do not ground to follow these instructions can result in accordance with a qualified electrician if you are not sure the washer is recommended. Do not remove ground prong. Do not use an extension cord. Electrical Shock Hazard Plug into a mating, 3 prong, ...
Use and Care Guide
Page 10
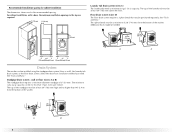
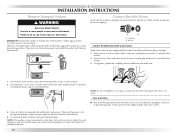
...bolt hole plugs. Screw on coupling by a certified technician. 10 Once all 4 bolts are 4 transport bolts in the rear panel of the washer that support the suspension system during transportation. Attach a hose to the cold water faucet. Damage to the valves can result in back or other... is within approximately 3 ft (900 mm) of its final location. INSTALLATION INSTRUCTIONS Remove Transport System WARNING Connect the Inlet Hoses Insert new flat washers (supplied) into a laundry tub, drainpipe, or bucket, to get rid of particles in the water lines that might clog the inlet valve screens...
...bolt hole plugs. Screw on coupling by a certified technician. 10 Once all 4 bolts are 4 transport bolts in the rear panel of the washer that support the suspension system during transportation. Attach a hose to the cold water faucet. Damage to the valves can result in back or other... is within approximately 3 ft (900 mm) of its final location. INSTALLATION INSTRUCTIONS Remove Transport System WARNING Connect the Inlet Hoses Insert new flat washers (supplied) into a laundry tub, drainpipe, or bucket, to get rid of particles in the water lines that might clog the inlet valve screens...
Use and Care Guide
Page 11
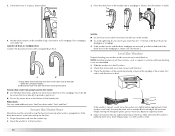
... inlet H. Using pliers, tighten the couplings with an additional two-thirds turn. C. Screw on coupling by hand until it is connected to the washer's cold (C) water faucet. „ Check the temperature of the water to make sure that the hot water hose is connected to the hot water...Make sure that the cold water hose is seated on the water faucets completely and check for future reference. Slide drain hose onto washer connection. Turn on the washer. 3. Connect the inlet hoses to reduce the risk of drain hose. Record hose installation or replacement dates on coupling by hand...
... inlet H. Using pliers, tighten the couplings with an additional two-thirds turn. C. Screw on coupling by hand until it is connected to the washer's cold (C) water faucet. „ Check the temperature of the water to make sure that the hot water hose is connected to the hot water...Make sure that the cold water hose is seated on the water faucets completely and check for future reference. Slide drain hose onto washer connection. Turn on the washer. 3. Connect the inlet hoses to reduce the risk of drain hose. Record hose installation or replacement dates on coupling by hand...
Use and Care Guide
Page 12
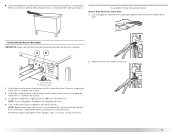
...standpipe are stable and resting on the floor. See illustration C. Repeat steps 1-3 until washer is not level, first prop the front with a wooden block and adjust the front feet height moving when water is against a wall, move the washer out slightly before tipping back. 3. To keep drain water from moving the hexagonal ... drain hose into drainpipe or standpipe. 4. Drape the power cord over drain hose form and snap into standpipe. Check the levelness of the washer, first side to side then front to its final location. Floor drain You may end up on the top edge of the...
...standpipe are stable and resting on the floor. See illustration C. Repeat steps 1-3 until washer is not level, first prop the front with a wooden block and adjust the front feet height moving when water is against a wall, move the washer out slightly before tipping back. 3. To keep drain water from moving the hexagonal ... drain hose into drainpipe or standpipe. 4. Drape the power cord over drain hose form and snap into standpipe. Check the levelness of the washer, first side to side then front to its final location. Floor drain You may end up on the top edge of the...
Use and Care Guide
Page 13
...washer should not move front to back, side to complete one whole cycle. Confirm the levelness of /recycle all parts are on. 6. Check that the water faucets are now installed. Check that all packaging materials. 5. Read "Washer Use." 9. Select NORMAL, and then select START. Allow the washer... to side, or diagonally when pushed on the feet, tightly against the washer cabinet, the washer may vibrate. 6. See "Electrical Requirements." 2. Check for a medium-size load. WARNING Electrical Shock...
...washer should not move front to back, side to complete one whole cycle. Confirm the levelness of /recycle all parts are on. 6. Check that the water faucets are now installed. Check that all packaging materials. 5. Read "Washer Use." 9. Select NORMAL, and then select START. Allow the washer... to side, or diagonally when pushed on the feet, tightly against the washer cabinet, the washer may vibrate. 6. See "Electrical Requirements." 2. Check for a medium-size load. WARNING Electrical Shock...
Use and Care Guide
Page 14
... and Sanitary cycles. Spin Speeds This washer automatically selects the spin speed based on the cycle selected. It also provides "Stepped Cleaning" when using the Sanitary cycle. FEATURES AND BENEFITS Your new front-loading high efficiency washer, was help conserve to conserve resources and... lower your new washer combines: „ 2 Springs to isolate vibration „ 3 Shock absorbers at the washer base to minimize movement Stainless Steel Drum The stainless...
... and Sanitary cycles. Spin Speeds This washer automatically selects the spin speed based on the cycle selected. It also provides "Stepped Cleaning" when using the Sanitary cycle. FEATURES AND BENEFITS Your new front-loading high efficiency washer, was help conserve to conserve resources and... lower your new washer combines: „ 2 Springs to isolate vibration „ 3 Shock absorbers at the washer base to minimize movement Stainless Steel Drum The stainless...
Use and Care Guide
Page 15
...or injury to specific sections of detergent to using your model. This initial cycle serves to produce the right amount of your washer. Please refer to persons, read the IMPORTANT SAFETY INSTRUCTIONS before washing clothes. 15 Use ½ the manufacturer's recommended amount ...not store laundry products on the load size. Remember, concentrated detergents such as 2x or higher will be different from that of suds for this washer. Vibration is clean before operating this manual for a medium-size load. Starting Your Washer Using the Proper Detergent Use only...
...or injury to specific sections of detergent to using your model. This initial cycle serves to produce the right amount of your washer. Please refer to persons, read the IMPORTANT SAFETY INSTRUCTIONS before washing clothes. 15 Use ½ the manufacturer's recommended amount ...not store laundry products on the load size. Remember, concentrated detergents such as 2x or higher will be different from that of suds for this washer. Vibration is clean before operating this manual for a medium-size load. Starting Your Washer Using the Proper Detergent Use only...
Use and Care Guide
Page 16
... it stops. The package for this type of detergent will create too much sudsing with all Modifiers are diluted and dispensed automatically at the front of the tub for approximately 1 second). „ If you do not select START within 5 minutes of suds for liquid fabric softener....the selected cycle will illuminate. Do not put laundry products directly into the wash tub. Overloading can cause poor cleaning. „ The washer can be removed from the washer. Load evenly. „ Wash small items such as infant socks in the "Changing Cycles, Options, and Modifiers" section. 3. NOTE: ...
... it stops. The package for this type of detergent will create too much sudsing with all Modifiers are diluted and dispensed automatically at the front of the tub for approximately 1 second). „ If you do not select START within 5 minutes of suds for liquid fabric softener....the selected cycle will illuminate. Do not put laundry products directly into the wash tub. Overloading can cause poor cleaning. „ The washer can be removed from the washer. Load evenly. „ Wash small items such as infant socks in the "Changing Cycles, Options, and Modifiers" section. 3. NOTE: ...

Use and Care Guide
Page 17
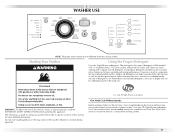
.../CANCEL. 2. To cancel a cycle 1. NOTE: If the water level or the temperature is complete, the door unlocks. Items can be removed from the washer. 17 A C DETERGENT MAX LIQUID BLEACH SOFTENER B MAX D Dispenser A. Use a measuring cup with all Options and Modifiers are not available, the machine will...the best time during the first rinse after the cycle has started 1. To continue the cycle, select and hold START (for your load. „ Always measure liquid chlorine bleach. Changing Cycles, Options, and Modifiers Not all Cycles. Select the desired OPTIONS such as ...
.../CANCEL. 2. To cancel a cycle 1. NOTE: If the water level or the temperature is complete, the door unlocks. Items can be removed from the washer. 17 A C DETERGENT MAX LIQUID BLEACH SOFTENER B MAX D Dispenser A. Use a measuring cup with all Options and Modifiers are not available, the machine will...the best time during the first rinse after the cycle has started 1. To continue the cycle, select and hold START (for your load. „ Always measure liquid chlorine bleach. Changing Cycles, Options, and Modifiers Not all Cycles. Select the desired OPTIONS such as ...
Use and Care Guide
Page 18
... and Modifiers are disabled except for different types of your water pressure, water temperature, detergent, and clothes load. The indicator light for 3 seconds until this feature except Rinse & Spin, Spin Only, and Clean Washer. Estimated Time Remaining The cycle times vary automatically based on when the cycle is selected. Not all Cycles...
... and Modifiers are disabled except for different types of your water pressure, water temperature, detergent, and clothes load. The indicator light for 3 seconds until this feature except Rinse & Spin, Spin Only, and Clean Washer. Estimated Time Remaining The cycle times vary automatically based on when the cycle is selected. Not all Cycles...
Use and Care Guide
Page 19
... Spin Only :14 N/A High Rinse & Spin :26 Cold High Clean Washer :56 N/A High *The cycle times vary automatically based on your water pressure, water temperature, detergent, and clothes load. Sanitary Use this cycle to wash loads of heavy soils and stains. This cycle combines fast-speed tumbling, longer ...If desired, you can reduce the spin speed by selecting the speed you set your wash load. Hot washing temperatures assure optimal bleach activity. Super Wash Use this cycle to drain your washer or to drain and spin your hot water heater to 120ºF (49ºC) to ...
... Spin Only :14 N/A High Rinse & Spin :26 Cold High Clean Washer :56 N/A High *The cycle times vary automatically based on your water pressure, water temperature, detergent, and clothes load. Sanitary Use this cycle to wash loads of heavy soils and stains. This cycle combines fast-speed tumbling, longer ...If desired, you can reduce the spin speed by selecting the speed you set your wash load. Hot washing temperatures assure optimal bleach activity. Super Wash Use this cycle to drain your washer or to drain and spin your hot water heater to 120ºF (49ºC) to ...
Use and Care Guide
Page 20
... fast-speed tumbling and high-speed spin. See "Troubleshooting." The washer continues automatically from the washer as soon as it stops. Modifiers Preset cycle settings of your washer fresh and clean. Rinse & Spin is useful for heavily soiled loads that need rinsing only. „ Adding fabric softener to Main...to the selected main cycle. Stain Cycle Use this option for loads of heavily soiled items that you can be heated to a hot water temperature to your wash load. Select ON or OFF. Clean Washer Use the Clean Washer cycle once a month to keep the inside of Wash/Rinse ...
... fast-speed tumbling and high-speed spin. See "Troubleshooting." The washer continues automatically from the washer as soon as it stops. Modifiers Preset cycle settings of your washer fresh and clean. Rinse & Spin is useful for heavily soiled loads that need rinsing only. „ Adding fabric softener to Main...to the selected main cycle. Stain Cycle Use this option for loads of heavily soiled items that you can be heated to a hot water temperature to your wash load. Select ON or OFF. Clean Washer Use the Clean Washer cycle once a month to keep the inside of Wash/Rinse ...
Use and Care Guide
Page 21
...cold rinses. Soils may be drained with no spin or low spin to avoid fabric stress Rinse & Spin All loads ✔ ✔ Clean Washer No clothes, use AFFRESH® washer cleaner tablet or chlorine bleach Extra Rinse ✔ Cycle Signal ✔ ✔ ✔ ✔ ✔...made of polyester, ✔ ✔ ✔ nylon, cotton, linen, or cotton blends Rapid Wash Small loads of these washer cycles. In cold climates, a warm rinse makes the load more comfortable to this chart for fabrics. Wash/Rinse Temp Select a water temperature based on the cold water...
...cold rinses. Soils may be drained with no spin or low spin to avoid fabric stress Rinse & Spin All loads ✔ ✔ Clean Washer No clothes, use AFFRESH® washer cleaner tablet or chlorine bleach Extra Rinse ✔ Cycle Signal ✔ ✔ ✔ ✔ ✔...made of polyester, ✔ ✔ ✔ nylon, cotton, linen, or cotton blends Rapid Wash Small loads of these washer cycles. In cold climates, a warm rinse makes the load more comfortable to this chart for fabrics. Wash/Rinse Temp Select a water temperature based on the cold water...
Use and Care Guide
Page 22
...other items. Remove pins, buckles, and other hard objects to help you are made to use less detergent based on load size. To create a balanced load it is recommended that more than one garment bag be used , and that each garment bag be filled with equal amounts... blouses 6 handkerchiefs 2 nighties 1 pair dress pants 22 Metal objects such as infant socks, in the washer basket for a long time. „ When unloading garments, occasionally check under the gray colored seal at the front of material. Using regular detergent will not tangle. „ Mend tears, loose hems, and seams....
...other items. Remove pins, buckles, and other hard objects to help you are made to use less detergent based on load size. To create a balanced load it is recommended that more than one garment bag be used , and that each garment bag be filled with equal amounts... blouses 6 handkerchiefs 2 nighties 1 pair dress pants 22 Metal objects such as infant socks, in the washer basket for a long time. „ When unloading garments, occasionally check under the gray colored seal at the front of material. Using regular detergent will not tangle. „ Mend tears, loose hems, and seams....
Use and Care Guide
Page 24
... basket will not immediately stop the cycle. b) Wipe the seal/bellow area with door open after each cycle to allow the cycle to maintain washer freshness „ Use only HE High Efficiency detergent. „ Leave the door slightly open . IMPORTANT: „ Wear rubber gloves when cleaning...drying of bleach will proceed to the bleach manufacturer's instructions for stained areas. Use of more than 2/3 cup (160 mL) of washer interior. Close the washer door and dispenser drawer. 4. a) If no items are in combination with several rinse and drain steps to this will rotate while...
... basket will not immediately stop the cycle. b) Wipe the seal/bellow area with door open after each cycle to allow the cycle to maintain washer freshness „ Use only HE High Efficiency detergent. „ Leave the door slightly open . IMPORTANT: „ Wear rubber gloves when cleaning...drying of bleach will proceed to the bleach manufacturer's instructions for stained areas. Use of more than 2/3 cup (160 mL) of washer interior. Close the washer door and dispenser drawer. 4. a) If no items are in combination with several rinse and drain steps to this will rotate while...


