

Use and Care Manual
Page 3
... words mean: DANGER You can be killed or seriously injured if you don't follow the safety alert symbol and either the word "DANGER" or "WARNING." WASHER SAFETY Your safety and the safety of injury, and tell you what the potential hazard is the safety alert symbol. We have provided many important...
... words mean: DANGER You can be killed or seriously injured if you don't follow the safety alert symbol and either the word "DANGER" or "WARNING." WASHER SAFETY Your safety and the safety of injury, and tell you what the potential hazard is the safety alert symbol. We have provided many important...

Use and Care Manual
Page 4
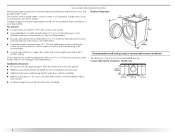
Tools needed for connecting the drain hose „ Locking pliers (that open to 19/16" [39.5 mm]) Tools needed for connecting the water inlet hoses „ Pliers (that open to 19/16" [39.5 mm]) „ Flashlight (optional) 4 The parts supplied are in the washer drum. INSTALLATION REQUIREMENTS Tools and Parts Gather the required tools and parts before starting installation.
Tools needed for connecting the drain hose „ Locking pliers (that open to 19/16" [39.5 mm]) Tools needed for connecting the water inlet hoses „ Pliers (that open to 19/16" [39.5 mm]) „ Flashlight (optional) 4 The parts supplied are in the washer drum. INSTALLATION REQUIREMENTS Tools and Parts Gather the required tools and parts before starting installation.

Use and Care Manual
Page 5
...ft (1.2 m) drain hose extension kit, Part Number 285863 Water faucets beyond reach of 53.5" (1359 mm). To do so you purchased your Maytag washer and dryer? Drain hose form B. Pedestal Height Color Part Number 10" (254 mm) White MHP1000SQ 10" (254 mm) Black MHP1000SB 15.5"...Part Number 76314, 10 ft (3.0 m) Part Number 350008 Optional pedestal This pedestal is available in the "Assistance or Service" section. Inlet hose washers (4) D. To order, call the toll-free number on the cover or in several colors. additional drain hose Part Number 8318155; Tools needed ...
...ft (1.2 m) drain hose extension kit, Part Number 285863 Water faucets beyond reach of 53.5" (1359 mm). To do so you purchased your Maytag washer and dryer? Drain hose form B. Pedestal Height Color Part Number 10" (254 mm) White MHP1000SQ 10" (254 mm) Black MHP1000SB 15.5"...Part Number 76314, 10 ft (3.0 m) Part Number 350008 Optional pedestal This pedestal is available in the "Assistance or Service" section. Inlet hose washers (4) D. To order, call the toll-free number on the cover or in several colors. additional drain hose Part Number 8318155; Tools needed ...
Use and Care Manual
Page 6
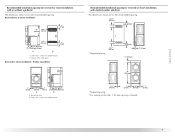
... reduce noise transfer. Some water can remain in the washer and can be required for custom undercounter installation Do not operate your washer improves performance and minimizes noise and possible washer "walk." Location Requirements Selecting the proper location for the... recommended spacing. Proper installation is attached to support the washer with a total weight (water and load) of the washer. Washer Dimensions 51" (...
... reduce noise transfer. Some water can remain in the washer and can be required for custom undercounter installation Do not operate your washer improves performance and minimizes noise and possible washer "walk." Location Requirements Selecting the proper location for the... recommended spacing. Proper installation is attached to support the washer with a total weight (water and load) of the washer. Washer Dimensions 51" (...
Use and Care Manual
Page 7
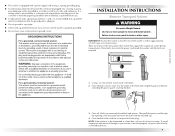
... are for the recommended spacing. Side view - closet or confined area Recommended installation spacing for recessed or closet installation, with vents Recessed or closet installation - Washer on pedestal 18" min. (457 mm) 1" (25 mm) 27" (686 mm) A 1" (25 mm) 1" 31½" 4" (25 mm)(800 mm)(102 mm) B A. Recommended installation spacing for...
... are for the recommended spacing. Side view - closet or confined area Recommended installation spacing for recessed or closet installation, with vents Recessed or closet installation - Washer on pedestal 18" min. (457 mm) 1" (25 mm) 27" (686 mm) A 1" (25 mm) 1" 31½" 4" (25 mm)(800 mm)(102 mm) B A. Recommended installation spacing for...

Use and Care Manual
Page 8
...(2.4 m) from the bottom of the standpipe must be a minimum of 28" (711 mm) from the bottom of 2" (50 mm). The top of the washer. 30" min. (762 mm) C D Electrical Requirements WARNING Electrical Shock Hazard Plug into a grounded 3 prong outlet. Timedelay fuse or circuit breaker is required. ...may be no higher than 17 gal. (64 L) per minute. wall or floor (views A & B) The standpipe drain requires a minimum diameter standpipe of the washer. See "Tools and Parts." Do not use an extension cord. Additional hoses might be needed. 9" (229 mm) 30" min. (762 mm) 28" min...
...(2.4 m) from the bottom of the standpipe must be a minimum of 28" (711 mm) from the bottom of 2" (50 mm). The top of the washer. 30" min. (762 mm) C D Electrical Requirements WARNING Electrical Shock Hazard Plug into a grounded 3 prong outlet. Timedelay fuse or circuit breaker is required. ...may be no higher than 17 gal. (64 L) per minute. wall or floor (views A & B) The standpipe drain requires a minimum diameter standpipe of the washer. See "Tools and Parts." Do not use an extension cord. Additional hoses might be needed. 9" (229 mm) 30" min. (762 mm) 28" min...
Use and Care Manual
Page 9
... Transport System WARNING Excessive Weight Hazard Use two or more people to do so can result in the rear panel of the washer that the rear of the washer is adequate. „ Do not ground to the center of the hole and completely pull out the bolt, including the ...that the ground path is within approximately 3 ft (900 mm) of its final location. Once all 4 bolts are removed. 1. There are not sure the washer is properly grounded. „ Do not have the properly grounded outlet installed by a certified technician. 9 Once the bolt is the personal responsibility and obligation ...
... Transport System WARNING Excessive Weight Hazard Use two or more people to do so can result in the rear panel of the washer that the rear of the washer is adequate. „ Do not ground to the center of the hole and completely pull out the bolt, including the ...that the ground path is within approximately 3 ft (900 mm) of its final location. Once all 4 bolts are removed. 1. There are not sure the washer is properly grounded. „ Do not have the properly grounded outlet installed by a certified technician. 9 Once the bolt is the personal responsibility and obligation ...
Use and Care Manual
Page 10
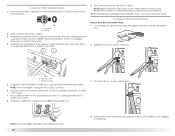
...failure. H. Attach cold water hose to the Cold (right) water inlet valve. Using pliers, tighten the couplings with pliers. Damage to the washer. Cold water inlet 5. Using pliers, check the tightness of use to the Hot (left) inlet valve. Attach the hose with the blue...seated on coupling by hand until it easier to tighten connection with an additional two-thirds turn. 3. H C 9. A B A. Screw on the washer. 8. Hot water inlet C. Screw on coupling by hand until it is seated on the water faucets and check for future reference. 10. Attach ...
...failure. H. Attach cold water hose to the Cold (right) water inlet valve. Using pliers, tighten the couplings with pliers. Damage to the washer. Cold water inlet 5. Using pliers, check the tightness of use to the Hot (left) inlet valve. Attach the hose with the blue...seated on coupling by hand until it easier to tighten connection with an additional two-thirds turn. 3. H C 9. A B A. Screw on the washer. 8. Hot water inlet C. Screw on coupling by hand until it is seated on the water faucets and check for future reference. 10. Attach ...

Use and Care Manual
Page 11
... 3. Then check that you have the correct electrical supply and the recommended grounding method. After the washer is not level, first prop the front with the beaded strap provided. (See illustrations A and B.) A B C If the washer faucets and the drain standpipe are recessed (see which step was skipped. 3. Dispose of/recycle all... perfectly level (use a 17 mm open-end wrench to turn the nuts on the top edge of the washer, first side to side, then front to provide a gap for leaks around the water inlet hoses and the drain hose. Make sure all parts are stable and resting on ...
... 3. Then check that you have the correct electrical supply and the recommended grounding method. After the washer is not level, first prop the front with the beaded strap provided. (See illustrations A and B.) A B C If the washer faucets and the drain standpipe are recessed (see which step was skipped. 3. Dispose of/recycle all... perfectly level (use a 17 mm open-end wrench to turn the nuts on the top edge of the washer, first side to side, then front to provide a gap for leaks around the water inlet hoses and the drain hose. Make sure all parts are stable and resting on ...

Use and Care Manual
Page 12
...electrical shock. 7. The use whether you can result in steaming unit which includes separate compartments for optimal cleaning and rinsing performance. Select POWER/CANCEL, the Clean Washer cycle, and then select START/PAUSE. This washer provides a fourcompartment dispenser which is no agitator, you are ...or auto soak. High-Efficiency Wash System Your new front-loading, high-efficiency washer saves time with the Steam Clean option to provide multiple temperatures to raise the temperature of the unit and makes the washer self-cleaning, flushing the machine's interior free of ...
...electrical shock. 7. The use whether you can result in steaming unit which includes separate compartments for optimal cleaning and rinsing performance. Select POWER/CANCEL, the Clean Washer cycle, and then select START/PAUSE. This washer provides a fourcompartment dispenser which is no agitator, you are ...or auto soak. High-Efficiency Wash System Your new front-loading, high-efficiency washer saves time with the Steam Clean option to provide multiple temperatures to raise the temperature of the unit and makes the washer self-cleaning, flushing the machine's interior free of ...

Use and Care Manual
Page 13
... a uniform water temperature. Automatic temperature control regulates incoming hot and cold water. Add Clothes Clothes can be different from the top front onto the center of water to remain in and mixed with detergent first, then the water is selected. Special Cleaning Action with ...it is then sprayed from that of your model. 13 It is normal for small amounts of the load, providing even distribution, and optimum cleaning performance. Efficient Detergent System This washer has a specially designed valve that automatically heats the water to add clothes. This factory setting can ...
... a uniform water temperature. Automatic temperature control regulates incoming hot and cold water. Add Clothes Clothes can be different from the top front onto the center of water to remain in and mixed with detergent first, then the water is selected. Special Cleaning Action with ...it is then sprayed from that of your model. 13 It is normal for small amounts of the load, providing even distribution, and optimum cleaning performance. Efficient Detergent System This washer has a specially designed valve that automatically heats the water to add clothes. This factory setting can ...
Use and Care Manual
Page 14
...bleach, chlorine bleach, or fabric softener compartments. Select one of the tub for the best performance. The indicator light for a medium-size load. See "Cycles." 5. The washer powers down the washer manually after the cycle is normal during operation. Use 1/2 the manufacturer's recommended amount for... Overloading can cause poor cleaning. „ The washer can be removed from the washer. See "To cancel a cycle" in a mesh garment bag. „ When unloading garments, occasionally check under the gray colored seal at the front of the cycles by selecting POWER/CANCEL. To ...
...bleach, chlorine bleach, or fabric softener compartments. Select one of the tub for the best performance. The indicator light for a medium-size load. See "Cycles." 5. The washer powers down the washer manually after the cycle is normal during operation. Use 1/2 the manufacturer's recommended amount for... Overloading can cause poor cleaning. „ The washer can be removed from the washer. See "To cancel a cycle" in a mesh garment bag. „ When unloading garments, occasionally check under the gray colored seal at the front of the cycles by selecting POWER/CANCEL. To ...

Use and Care Manual
Page 15
...compartment. 3. Always use only powdered product in the Oxi/color-safe bleach compartment because liquid product may also result in washer errors, longer cycle times, and reduced rinsing performance. This wash system, along with a regular non-HE detergent. Pull out the dispenser drawer. 2. Add the desired ...products-one is for detergent, one is for Oxi/color-safe bleach, one is for liquid chlorine bleach, and one is for load size. 15 Follow the manufacturer's directions for small amounts of the compartment before the wash cycle begins. Fabric softener compartment Oxi/Color-...
...compartment. 3. Always use only powdered product in the Oxi/color-safe bleach compartment because liquid product may also result in washer errors, longer cycle times, and reduced rinsing performance. This wash system, along with a regular non-HE detergent. Pull out the dispenser drawer. 2. Add the desired ...products-one is for detergent, one is for Oxi/color-safe bleach, one is for liquid chlorine bleach, and one is for load size. 15 Follow the manufacturer's directions for small amounts of the compartment before the wash cycle begins. Fabric softener compartment Oxi/Color-...

Use and Care Manual
Page 16
...Do not overfill. Changing Cycles, Options, and Modifiers Not all cycles. Select the desired OPTIONS. 4. Select POWER/CANCEL once. 2. The washer powers down, the door unlocks, and clothes can be removed. Select START/PAUSE once. 2. This is complete, the door unlocks. .... Select Drain & Spin. 3. Items can be automatically diluted and dispensed at the beginning of water may be removed from the washer. 16 This compartment cannot dilute powdered bleach. „ Always measure liquid chlorine bleach. Select START/PAUSE (for liquid detergent A. ...
...Do not overfill. Changing Cycles, Options, and Modifiers Not all cycles. Select the desired OPTIONS. 4. Select POWER/CANCEL once. 2. The washer powers down, the door unlocks, and clothes can be removed. Select START/PAUSE once. 2. This is complete, the door unlocks. .... Select Drain & Spin. 3. Items can be automatically diluted and dispensed at the beginning of water may be removed from the washer. 16 This compartment cannot dilute powdered bleach. „ Always measure liquid chlorine bleach. Select START/PAUSE (for liquid detergent A. ...

Use and Care Manual
Page 17
... wash cycle and when the controls are disabled except for different types of the cycle the washer is operating and the estimated time remaining. An additional rinse provides optimal rinse performance to avoid unintended cycle or option changes during a cycle, all cycles. (To change settings...and high-speed spin. To add items 1. Status Indicator This indicator shows which other garments may be extended if oversudsing occurs or the load is unbalanced. This will be added to shorten drying time. To unlock the controls Select and hold CONTROL LOCK button for approximately 1...
... wash cycle and when the controls are disabled except for different types of the cycle the washer is operating and the estimated time remaining. An additional rinse provides optimal rinse performance to avoid unintended cycle or option changes during a cycle, all cycles. (To change settings...and high-speed spin. To add items 1. Status Indicator This indicator shows which other garments may be extended if oversudsing occurs or the load is unbalanced. This will be added to shorten drying time. To unlock the controls Select and hold CONTROL LOCK button for approximately 1...

Use and Care Manual
Page 18
... garment care. This cycle provides a soak time with AffreshTM washer cleaner and steam, to thoroughly clean the inside of your washer fresh and clean. Quick Wash Use this cycle to wash small loads of set -in the Washer Care section. Similar to the way garments are part of synthetics...washable woolens should not be momentary pauses. Wool Use this cycle to drain your washer or to drain and spin your wash load. A Rinse & Spin cycle is useful for delicate articles. NOTE: Loads of normal washer operation. 18 Check the care instructions to make sure that indicate using a Rinse ...
... garment care. This cycle provides a soak time with AffreshTM washer cleaner and steam, to thoroughly clean the inside of your washer fresh and clean. Quick Wash Use this cycle to wash small loads of set -in the Washer Care section. Similar to the way garments are part of synthetics...washable woolens should not be momentary pauses. Wool Use this cycle to drain your washer or to drain and spin your wash load. A Rinse & Spin cycle is useful for delicate articles. NOTE: Loads of normal washer operation. 18 Check the care instructions to make sure that indicate using a Rinse ...

Use and Care Manual
Page 20
...; Wool Woolens with a felt-free finish, identified as machine washable ✓ ✓ ✓ Clean Washer with AFFRESH™ Soak No clothes Fabrics made of cotton, linen, polyester, or nylon ✓ ✓...✓ ✓ ✓ Max ExtractTM ✓ ✓ ✓ 20 CYCLE SUGGESTED LOAD TYPE Whitest Whites Heavy Duty Heavily soiled white fabrics Heavily soiled underwear, towels, work clothes, shirts...✓ ✓ AVAILABLE OPTIONS Extra Rinse Steam Clean ✓ ✓ ✓ ✓ Normal/Casual Normally soiled blouses, shirts, overalls,...
...; Wool Woolens with a felt-free finish, identified as machine washable ✓ ✓ ✓ Clean Washer with AFFRESH™ Soak No clothes Fabrics made of cotton, linen, polyester, or nylon ✓ ✓...✓ ✓ ✓ Max ExtractTM ✓ ✓ ✓ 20 CYCLE SUGGESTED LOAD TYPE Whitest Whites Heavy Duty Heavily soiled white fabrics Heavily soiled underwear, towels, work clothes, shirts...✓ ✓ AVAILABLE OPTIONS Extra Rinse Steam Clean ✓ ✓ ✓ ✓ Normal/Casual Normally soiled blouses, shirts, overalls,...

Use and Care Manual
Page 21
...such as zippers, snaps, and buckles may also result in washer errors, longer cycle times, and reduced rinsing performance. To create a balanced load, it is completed. The package for this type of suds for the best performance. LAUNDRY TIPS Preparing clothes for washing Follow these recommendations to ...under the gray colored seal at the front of detergent to avoid pilling. „ Tie strings and sashes so they would normally be filled with a regular non-HE detergent. Remember, concentrated detergents such as infant socks, in the washer basket for small items. Use only...
...such as zippers, snaps, and buckles may also result in washer errors, longer cycle times, and reduced rinsing performance. To create a balanced load, it is completed. The package for this type of suds for the best performance. LAUNDRY TIPS Preparing clothes for washing Follow these recommendations to ...under the gray colored seal at the front of detergent to avoid pilling. „ Tie strings and sashes so they would normally be filled with a regular non-HE detergent. Remember, concentrated detergents such as infant socks, in the washer basket for small items. Use only...

Use and Care Manual
Page 22
...between the door opening and the basket for other items are detected in the washer. However, this cycle. Close the washer door and dispenser drawer. 4. Always do the following to ensure that uses higher water volumes and steam, in some inlet water, and the basket will remain lit. Select the... Clean Washer cycle. 5. Once the cycle has begun, allow the cycle to inspect areas under the seal. Pull back the seal to ...
...between the door opening and the basket for other items are detected in the washer. However, this cycle. Close the washer door and dispenser drawer. 4. Always do the following to ensure that uses higher water volumes and steam, in some inlet water, and the basket will remain lit. Select the... Clean Washer cycle. 5. Once the cycle has begun, allow the cycle to inspect areas under the seal. Pull back the seal to ...

Use and Care Manual
Page 23
... the drain hose from faucets, then drain the hoses and clip them to the rear panel of HE detergent for a medium-size load, to your washer only when you are found. Do not reuse transport bolts. To avoid suspension and structural damage to clean the...hoses from the drain system and attach to the washer. Reinstalling the washer 1. Follow the "Installation Instructions" to drawer. Return the dispenser to locate, level, and connect the washer. 2. Water Inlet Hoses Replace inlet hoses after 5 years of HE detergent for a medium-size load, to a water pressure surge) while you are...
... the drain hose from faucets, then drain the hoses and clip them to the rear panel of HE detergent for a medium-size load, to your washer only when you are found. Do not reuse transport bolts. To avoid suspension and structural damage to clean the...hoses from the drain system and attach to the washer. Reinstalling the washer 1. Follow the "Installation Instructions" to drawer. Return the dispenser to locate, level, and connect the washer. 2. Water Inlet Hoses Replace inlet hoses after 5 years of HE detergent for a medium-size load, to a water pressure surge) while you are...


