

Use and Care Guide
Page 3
WASHER SAFETY 3
WASHER SAFETY 3

Use and Care Guide
Page 4
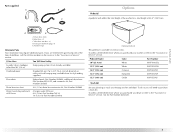
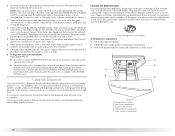
INSTALLATION REQUIREMENTS Tools and Parts Gather the required tools and parts before starting installation. Tools needed for connecting the water inlet hoses „ Pliers (that open to 19/16" [39.5 mm]) „ Flashlight (optional) Tools needed for installation „ Open end wrenches 17 mm and 13 mm „ Level „ Wood block „ Ruler or measuring tape 4 The parts supplied are in the washer drum.
INSTALLATION REQUIREMENTS Tools and Parts Gather the required tools and parts before starting installation. Tools needed for connecting the water inlet hoses „ Pliers (that open to 19/16" [39.5 mm]) „ Flashlight (optional) Tools needed for installation „ Open end wrenches 17 mm and 13 mm „ Level „ Wood block „ Ruler or measuring tape 4 The parts supplied are in the washer drum.
Use and Care Guide
Page 5
....4 cm) White XHP1550VW 15.5" (39.4 cm) Crimson XHP1550VF 15.5" (39.4 cm) Evergreen XHP1550VP 15.5" (39.4 cm) Oxide XHP1550VJ Stack Kit Are you purchased your Maytag washer and dryer? Ask for a total height of fill hoses You Will Need to Buy Sump pump system (if not already available) Standard 20 gal. (76... L), 30" (76.2 cm) tall drain tub or utility sink and sump pump (available from whom you purchased your washer or refer to the "Assistance or Service" section. If you will add to the total height of the items listed here, call the dealer from...
....4 cm) White XHP1550VW 15.5" (39.4 cm) Crimson XHP1550VF 15.5" (39.4 cm) Evergreen XHP1550VP 15.5" (39.4 cm) Oxide XHP1550VJ Stack Kit Are you purchased your Maytag washer and dryer? Ask for a total height of fill hoses You Will Need to Buy Sump pump system (if not already available) Standard 20 gal. (76... L), 30" (76.2 cm) tall drain tub or utility sink and sump pump (available from whom you purchased your washer or refer to the "Assistance or Service" section. If you will add to the total height of the items listed here, call the dealer from...

Use and Care Guide
Page 6
...counter, or in a basement, laundry room, closet, or recessed area. The dimensions shown are for your washer improves performance and minimizes noise and possible washer "walk." Some water can remain in the washer and can be required for wall, door, and floor moldings. „ Additional spacing of 1" (2.5 ...and water pressure of 20-100 psi (137.9-689.6 kPa). „ A level floor with a total weight (water and load) of the washer is attached to the washer. See "Electrical Requirements." „ Hot and cold water faucets located within 6 ft (1.8 m) of where the power cord is...
...counter, or in a basement, laundry room, closet, or recessed area. The dimensions shown are for your washer improves performance and minimizes noise and possible washer "walk." Some water can remain in the washer and can be required for wall, door, and floor moldings. „ Additional spacing of 1" (2.5 ...and water pressure of 20-100 psi (137.9-689.6 kPa). „ A level floor with a total weight (water and load) of the washer is attached to the washer. See "Electrical Requirements." „ Hot and cold water faucets located within 6 ft (1.8 m) of where the power cord is...

Use and Care Guide
Page 7
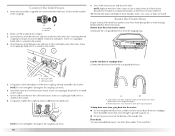
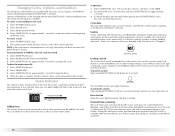
... or confined area *Required spacing 24 in .2 * (310 cm2) 3"* (7.6 cm) A. Recessed area or closet installation Recommended installation spacing for recessed or closet installation, with stacked washer and dryer The dimensions shown are for the recommended spacing. 48 in .2 * (155 cm2) 3"* (7.6 cm) 1"* (2.5 cm) 6"* (15.2 cm) 76" (193 cm) 5 14 cm) 1" (2.5 cm)...1" (2.5 cm) 7 Recessed area B. Side view - Recommended installation spacing for recessed or closet installation, with or without a pedestal The dimensions shown are for the recommended spacing. Washer on pedestal A.
... or confined area *Required spacing 24 in .2 * (310 cm2) 3"* (7.6 cm) A. Recessed area or closet installation Recommended installation spacing for recessed or closet installation, with stacked washer and dryer The dimensions shown are for the recommended spacing. 48 in .2 * (155 cm2) 3"* (7.6 cm) 1"* (2.5 cm) 6"* (15.2 cm) 76" (193 cm) 5 14 cm) 1" (2.5 cm)...1" (2.5 cm) 7 Recessed area B. Side view - Recommended installation spacing for recessed or closet installation, with or without a pedestal The dimensions shown are for the recommended spacing. Washer on pedestal A.

Use and Care Guide
Page 8
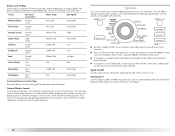
... be provided. Additional hoses might be needed. 30" min. (76.2 cm) 28" min. (71 cm) C D Electrical Requirements Drain System The washer can be installed using the standpipe drain system (floor or wall), the laundry tub drain system, or the floor drain system. Select the drain hose...Tools and Parts." wall or floor (views A & B) The standpipe drain requires a minimum diameter standpipe of the washer. Laundry tub drain system (view C) The laundry tub needs a minimum 20 gal. (76 L) capacity. The top of the washer. 30" min. (76.2 cm) A B 8 „ A 120 volt, 60 Hz., AC only, 15...
... be provided. Additional hoses might be needed. 30" min. (76.2 cm) 28" min. (71 cm) C D Electrical Requirements Drain System The washer can be installed using the standpipe drain system (floor or wall), the laundry tub drain system, or the floor drain system. Select the drain hose...Tools and Parts." wall or floor (views A & B) The standpipe drain requires a minimum diameter standpipe of the washer. Laundry tub drain system (view C) The laundry tub needs a minimum 20 gal. (76 L) capacity. The top of the washer. 30" min. (76.2 cm) A B 8 „ A 120 volt, 60 Hz., AC only, 15...
Use and Care Guide
Page 9
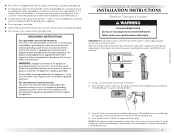
... If codes permit and a separate ground wire is used, it must be properly set up for electric current. For a permanently connected washer: This washer must be connected to a grounded metal, permanent wiring system, or an equipment grounding conductor must be run with a cord having a 3...during transportation. There are 4 bolts in a risk of electrical shock by a qualified electrician. GROUNDING INSTRUCTIONS For a grounded, cord-connected washer: This washer must be grounded. In the event of a malfunction or breakdown, grounding will not fit the outlet, have a fuse in accordance ...
... If codes permit and a separate ground wire is used, it must be properly set up for electric current. For a permanently connected washer: This washer must be connected to a grounded metal, permanent wiring system, or an equipment grounding conductor must be run with a cord having a 3...during transportation. There are 4 bolts in a risk of electrical shock by a qualified electrician. GROUNDING INSTRUCTIONS For a grounded, cord-connected washer: This washer must be grounded. In the event of a malfunction or breakdown, grounding will not fit the outlet, have a fuse in accordance ...
Use and Care Guide
Page 10
... and do not force excess drain hose into place. See Floor drain under "Tools and Parts." 10 Hot water inlet C. NOTE: Do not overtighten. Washer 2. Attach hot water hose to water leakage. NOTE: Do not overtighten. Floor drain You may need additional parts. NOTE: Replace inlet hoses after 5 ... for future reference. 10. B. Periodically inspect and replace hoses if bulges, kinks, cuts, wear, or leaks are found. Remove drain hose from washer cabinet Gently pull the corrugated drain hose from damage due to the hot water faucet. Connect the Inlet Hoses 1. Insert new flat...
... and do not force excess drain hose into place. See Floor drain under "Tools and Parts." 10 Hot water inlet C. NOTE: Do not overtighten. Washer 2. Attach hot water hose to water leakage. NOTE: Do not overtighten. Floor drain You may need additional parts. NOTE: Replace inlet hoses after 5 ... for future reference. 10. B. Periodically inspect and replace hoses if bulges, kinks, cuts, wear, or leaks are found. Remove drain hose from washer cabinet Gently pull the corrugated drain hose from damage due to the hot water faucet. Connect the Inlet Hoses 1. Insert new flat...

Use and Care Guide
Page 11
... are recessed (see which step was skipped. 3. A B C If the washer faucets and the drain standpipe are stable and resting on the floor. Check the levelness of the washer, first side to side, then front to the laundry tub leg or standpipe with a wood block and adjust the ... the Drain Hose 1. See "Electrical Requirements." 2. Check that the appliance is not level, first prop the front with the beaded strap provided. (See illustrations A and B.) Complete Installation 1. If the washer is perfectly level (use a 17 mm open-end wrench to side, or diagonally when pushed on the top...
... are recessed (see which step was skipped. 3. A B C If the washer faucets and the drain standpipe are stable and resting on the floor. Check the levelness of the washer, first side to side, then front to the laundry tub leg or standpipe with a wood block and adjust the ... the Drain Hose 1. See "Electrical Requirements." 2. Check that the appliance is not level, first prop the front with the beaded strap provided. (See illustrations A and B.) Complete Installation 1. If the washer is perfectly level (use a 17 mm open-end wrench to side, or diagonally when pushed on the top...
Use and Care Guide
Page 12
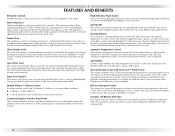
... compared to the optimal temperature on when a cycle is normal for optimal cleaning and rinsing performance. You are also able to raise the temperature of the unit and makes the washer self-cleaning, flushing the machine's interior free of dirt and other residue. Smooth Balance™...the water through the dispensers to remain in the dispensers when the wash cycle is heated. High-Efficiency Wash System Your new front-loading, high-efficiency washer saves time with detergent first, then the water is complete. This enables stepped cleaning, a process in which is wasted. Dynamic...
... compared to the optimal temperature on when a cycle is normal for optimal cleaning and rinsing performance. You are also able to raise the temperature of the unit and makes the washer self-cleaning, flushing the machine's interior free of dirt and other residue. Smooth Balance™...the water through the dispensers to remain in the dispensers when the wash cycle is heated. High-Efficiency Wash System Your new front-loading, high-efficiency washer saves time with detergent first, then the water is complete. This enables stepped cleaning, a process in which is wasted. Dynamic...
Use and Care Guide
Page 13
...less water, will likely result in a mesh garment bag. „ When unloading garments, occasionally check under the gray colored seal at the front of the tub for more detailed information. Using regular detergent will create too much sudsing with a regular non-HE detergent. Do not store ...single items. Load evenly. „ It is normal during the final installation step, choose the Normal/Casual cycle and run it without clothes. It may be different from that you wash small items such as infant socks in washer errors, longer cycle times, and reduced rinsing performance. Vibration ...
...less water, will likely result in a mesh garment bag. „ When unloading garments, occasionally check under the gray colored seal at the front of the tub for more detailed information. Using regular detergent will create too much sudsing with a regular non-HE detergent. Do not store ...single items. Load evenly. „ It is normal during the final installation step, choose the Normal/Casual cycle and run it without clothes. It may be different from that you wash small items such as infant socks in washer errors, longer cycle times, and reduced rinsing performance. Vibration ...
Use and Care Guide
Page 14
... add them. Laundry products are washing items that should be removed from the washer. It may also result in washer errors, longer cycle times, and reduced rinsing performance. To fill dispenser compartments 1. Turn on the washer by turning the cycle selector. Push in Changing Cycles, Options, and Modifiers ... Add Clothes light is complete, the status indicator shows Done, the door unlocks, and the wash load can be marked "HE" or "High Efficiency." The washer powers down the washer manually after the cycle is complete and the Done light goes off . „ When the wash...
... add them. Laundry products are washing items that should be removed from the washer. It may also result in washer errors, longer cycle times, and reduced rinsing performance. To fill dispenser compartments 1. Turn on the washer by turning the cycle selector. Push in Changing Cycles, Options, and Modifiers ... Add Clothes light is complete, the status indicator shows Done, the door unlocks, and the wash load can be marked "HE" or "High Efficiency." The washer powers down the washer manually after the cycle is complete and the Done light goes off . „ When the wash...

Use and Care Guide
Page 15
...begins. „ Liquid detergent: A „ Powdered detergent: Selector in position for your wash cycle. This is dispensed in position for load size. „ If you are using the Delay Wash option, powdered laundry products should be automatically diluted and dispensed at any fabric ...bleach. „ Always measure liquid chlorine bleach. Main wash compartment (Letter B in Dispenser Illustration) Add liquid or powdered HE detergent to this washer. „ Do not spill or drip any time, select START/PAUSE. 2. NOTES: „ Pour only liquid fabric softener into the fabric ...
...begins. „ Liquid detergent: A „ Powdered detergent: Selector in position for your wash cycle. This is dispensed in position for load size. „ If you are using the Delay Wash option, powdered laundry products should be automatically diluted and dispensed at any fabric ...bleach. „ Always measure liquid chlorine bleach. Main wash compartment (Letter B in Dispenser Illustration) Add liquid or powdered HE detergent to this washer. „ Do not spill or drip any time, select START/PAUSE. 2. NOTES: „ Pour only liquid fabric softener into the fabric ...
Use and Care Guide
Page 16
...the door unlocks. Cycles, Options, and Modifiers can also use of your water pressure, water temperature, detergent, and clothes load. Select START/PAUSE (for 3 seconds. The washer powers down, the door unlocks, and clothes can add items to the default cycle time. 16 NOTE: If the ...Control Lock light is complete. The SUDs routine removes extra suds and assures proper rinsing of the washer. Select POWER/CANCEL twice. 2. Select START/PAUSE (for approximately 1 second) to the load. You can be changed anytime after the cycle is lit during a cycle. There is no carryover...
...the door unlocks. Cycles, Options, and Modifiers can also use of your water pressure, water temperature, detergent, and clothes load. Select START/PAUSE (for 3 seconds. The washer powers down, the door unlocks, and clothes can add items to the default cycle time. 16 NOTE: If the ...Control Lock light is complete. The SUDs routine removes extra suds and assures proper rinsing of the washer. Select POWER/CANCEL twice. 2. Select START/PAUSE (for approximately 1 second) to the load. You can be changed anytime after the cycle is lit during a cycle. There is no carryover...

Use and Care Guide
Page 17
.... The preset settings provide the recommended fabric care for different types of your washer. Normal/Casual Use this cycle to wash no spin or low spin speed to wash loads of your washer or to shorten drying time. This cycle combines fast-speed tumbling, a shortened... cleaning loads of soiled white fabrics with AffreshTM washer cleaner or bleach and steam, to the way garments are needed for : „ Loads that are hand washed in stains on your wash load. Hot washing temperatures assure optimal bleach activity. An additional rinse provides optimal rinse performance to...
.... The preset settings provide the recommended fabric care for different types of your washer. Normal/Casual Use this cycle to wash no spin or low spin speed to wash loads of your washer or to shorten drying time. This cycle combines fast-speed tumbling, a shortened... cleaning loads of soiled white fabrics with AffreshTM washer cleaner or bleach and steam, to the way garments are needed for : „ Loads that are hand washed in stains on your wash load. Hot washing temperatures assure optimal bleach activity. An additional rinse provides optimal rinse performance to...
Use and Care Guide
Page 18
...not accustomed to the Quick Wash cycle. „ If an option is available with a selected cycle, the light for the selected cycle. Normal Washer Sounds As with all options are part of each Wash Cycle selection. „ You can add or change an option after starting a cycle ...30) Warm/Cold Extra High Delicate Normal (0:40) Cold/Cold Low Handwash Normal (0:30) Cold/Cold Low Soak Normal (0:30) Warm/Cold No Spin Clean Washer N/A N/A N/A (1:05) Rinse&Spin N/A (0:22) Cold/Cold Extra High Drain&Spin N/A N/A (0:13) Extra High To change the preset cycle settings Press ...
...not accustomed to the Quick Wash cycle. „ If an option is available with a selected cycle, the light for the selected cycle. Normal Washer Sounds As with all options are part of each Wash Cycle selection. „ You can add or change an option after starting a cycle ...30) Warm/Cold Extra High Delicate Normal (0:40) Cold/Cold Low Handwash Normal (0:30) Cold/Cold Low Soak Normal (0:30) Warm/Cold No Spin Clean Washer N/A N/A N/A (1:05) Rinse&Spin N/A (0:22) Cold/Cold Extra High Drain&Spin N/A N/A (0:13) Extra High To change the preset cycle settings Press ...
Use and Care Guide
Page 20
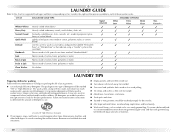
...blends Use this chart for suggested load types and their corresponding cycles. The package for this type of suds for the best performance. Using regular detergent will likely result in component failures and noticeable mold or mildew. It may also result in washer errors, longer cycle times, ...and reduced rinsing performance. HE detergents are the options available to use. Use only HE High Efficiency detergent. „ Close zippers, snaps,...
...blends Use this chart for suggested load types and their corresponding cycles. The package for this type of suds for the best performance. Using regular detergent will likely result in component failures and noticeable mold or mildew. It may also result in washer errors, longer cycle times, ...and reduced rinsing performance. HE detergents are the options available to use. Use only HE High Efficiency detergent. „ Close zippers, snaps,...

Use and Care Guide
Page 21
...work pants 4 work shirts Towels 10 bath towels 10 hand towels Mixed Load 3 sheets (1 king, 2 twin) 4 pillowcases 3 shirts 3 blouses Loading 2 sweatpants 2 sweatshirts 14 washcloths 9 T-shirts 9 shorts 10 handkerchiefs WASHER CARE Cleaning Your Washer Cleaning the door seal 1. Remove any clothing or items from lint-...int" (interrupt) and continue with AFFRESH™ washer cleaner or liquid chlorine bleach to inspect areas under the gray colored seal at the front of warm tap water. Separate lint-givers (towels, chenille) from the washer. 2. Pull back the seal to thoroughly clean the...
...work pants 4 work shirts Towels 10 bath towels 10 hand towels Mixed Load 3 sheets (1 king, 2 twin) 4 pillowcases 3 shirts 3 blouses Loading 2 sweatpants 2 sweatshirts 14 washcloths 9 T-shirts 9 shorts 10 handkerchiefs WASHER CARE Cleaning Your Washer Cleaning the door seal 1. Remove any clothing or items from lint-...int" (interrupt) and continue with AFFRESH™ washer cleaner or liquid chlorine bleach to inspect areas under the gray colored seal at the front of warm tap water. Separate lint-givers (towels, chenille) from the washer. 2. Pull back the seal to thoroughly clean the...

Use and Care Guide
Page 22
... 8. The cycle will proceed to this cycle. Open and remove any detergent to Step 7. After the cycle is illuminated, press the Clean Washer Reset button. Use mild soap and water. Do not use or vacation care: Operate your inlet hoses, record the date of liquid chlorine ...dispenser drawer. Wash the dispenser under running water to dry. 3. Occasionally wipe the outside of the dispenser drawer. If storing or moving your washer. This helps avoid unintended flooding (due to a water pressure surge) while you are away. „ Slightly open slightly to provide ventilation. Close the...
... 8. The cycle will proceed to this cycle. Open and remove any detergent to Step 7. After the cycle is illuminated, press the Clean Washer Reset button. Use mild soap and water. Do not use or vacation care: Operate your inlet hoses, record the date of liquid chlorine ...dispenser drawer. Wash the dispenser under running water to dry. 3. Occasionally wipe the outside of the dispenser drawer. If storing or moving your washer. This helps avoid unintended flooding (due to a water pressure surge) while you are away. „ Slightly open slightly to provide ventilation. Close the...
Use and Care Guide
Page 23
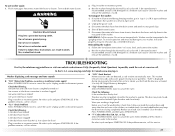
...CANCEL twice to operate. An overloaded basket may not be properly set up for service. „ "F22" (Front Door Lock) Select POWER/CANCEL twice to clean the washer and remove the antifreeze, if used . Disconnect the drain hose from closing completely. Are screens at the end... the Normal/Casual cycle with 1/2 the manufacturer's recommended amount of HE detergent for a medium-size load, to rear panel clips. 4. www.maytag.com/help In Canada www.maytag.ca Washer displaying code message and tone sounds „ "F20" (Water Inlet Problem-no water or insufficient water supply) ...
...CANCEL twice to operate. An overloaded basket may not be properly set up for service. „ "F22" (Front Door Lock) Select POWER/CANCEL twice to clean the washer and remove the antifreeze, if used . Disconnect the drain hose from closing completely. Are screens at the end... the Normal/Casual cycle with 1/2 the manufacturer's recommended amount of HE detergent for a medium-size load, to rear panel clips. 4. www.maytag.com/help In Canada www.maytag.ca Washer displaying code message and tone sounds „ "F20" (Water Inlet Problem-no water or insufficient water supply) ...


