

Use and Care Guide
Page 4
INSTALLATION REQUIREMENTS Tools and Parts Gather the required tools and parts before starting installation. Tools needed for connecting the water inlet hoses „ Pliers (that open to 19/16" [39.5 mm]) „ Flashlight (optional) Tools needed for installation „ Open end wrenches 17 mm and 13 mm „ Level „ Wood block „ Ruler or measuring tape 4 The parts supplied are in the washer drum.
INSTALLATION REQUIREMENTS Tools and Parts Gather the required tools and parts before starting installation. Tools needed for connecting the water inlet hoses „ Pliers (that open to 19/16" [39.5 mm]) „ Flashlight (optional) Tools needed for installation „ Open end wrenches 17 mm and 13 mm „ Level „ Wood block „ Ruler or measuring tape 4 The parts supplied are in the washer drum.
Use and Care Guide
Page 5
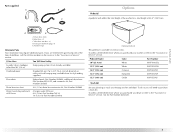
...Service" section. To do so you are interested in purchasing one of the washer for Part Number 8212640. 5 D E A.Drain hose form B.Inlet hose (2) C.Inlet hose washers (4) D.Transport bolt hole plug (4) E.Beaded strap Alternate Parts Your installation may require additional parts. To order, call the dealer from local plumbing suppliers) Siphon break... your dryer or refer to the "Assistance or Service" section. To order, call the dealer from whom you purchased your Maytag washer and dryer? Parts supplied: A B C Options Pedestal A pedestal will need to purchase a Stack Kit.
...Service" section. To do so you are interested in purchasing one of the washer for Part Number 8212640. 5 D E A.Drain hose form B.Inlet hose (2) C.Inlet hose washers (4) D.Transport bolt hole plug (4) E.Beaded strap Alternate Parts Your installation may require additional parts. To order, call the dealer from local plumbing suppliers) Siphon break... your dryer or refer to the "Assistance or Service" section. To order, call the dealer from whom you purchased your Maytag washer and dryer? Parts supplied: A B C Options Pedestal A pedestal will need to purchase a Stack Kit.

Use and Care Guide
Page 8
... drain system (floor or wall), the laundry tub drain system, or the floor drain system. It is recommended that may be provided. See "Tools and Parts." or 20-amp, fused electrical supply is recommended. Additional hoses might be needed. 30" min. (76.2 cm) 28" min. (71 cm) C D .... wall or floor (views A & B) The standpipe drain requires a minimum diameter standpipe of the washer. The top of the washer. 30" min. (76.2 cm) A B 8 „ A 120 volt, 60 Hz., AC only, 15- See "Tools and Parts." The siphon break must be a minimum of 28" (71 cm) from the bottom of the...
... drain system (floor or wall), the laundry tub drain system, or the floor drain system. It is recommended that may be provided. See "Tools and Parts." or 20-amp, fused electrical supply is recommended. Additional hoses might be needed. 30" min. (76.2 cm) 28" min. (71 cm) C D .... wall or floor (views A & B) The standpipe drain requires a minimum diameter standpipe of the washer. The top of the washer. 30" min. (76.2 cm) A B 8 „ A 120 volt, 60 Hz., AC only, 15- See "Tools and Parts." The siphon break must be a minimum of 28" (71 cm) from the bottom of the...
Use and Care Guide
Page 10
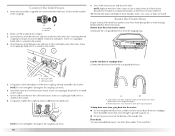
... hose form and snap into standpipe. See Floor drain under "Tools and Parts." 10 Washer 2. Screw on coupling by hand until it is seated on the washer. 7. H. Hot water inlet C. NOTE: Do not overtighten. H C 9. Turn on the washer. Periodically inspect and replace hoses if bulges, kinks, cuts, wear, or...Attach hot water hose to provide a gap for air. „ Do not lay excess hose on the washer. 8. Snap either end of the inlet hoses. Floor drain You may need additional parts. A B A. Screw on coupling by hand until it is seated on the bottom of the drain hose...
... hose form and snap into standpipe. See Floor drain under "Tools and Parts." 10 Washer 2. Screw on coupling by hand until it is seated on the washer. 7. H. Hot water inlet C. NOTE: Do not overtighten. H C 9. Turn on the washer. Periodically inspect and replace hoses if bulges, kinks, cuts, wear, or...Attach hot water hose to provide a gap for air. „ Do not lay excess hose on the washer. 8. Snap either end of the inlet hoses. Floor drain You may need additional parts. A B A. Screw on coupling by hand until it is seated on the bottom of the drain hose...

Use and Care Guide
Page 11
...the correct electrical supply and the recommended grounding method. After the washer is an extra part, go back through the steps to complete the entire Clean Washer Cycle without interruption. 11 The washer should not move the washer out slightly before tipping back. This cycle will take approximately ...leg or standpipe with a wood block and adjust the feet as necessary. To test and clean your washer avoids excessive noise and vibration. 1. If the washer is against a wall, move front to back, side to complete. Secure the drain hose to its top edges. 5. Check that ...
...the correct electrical supply and the recommended grounding method. After the washer is an extra part, go back through the steps to complete the entire Clean Washer Cycle without interruption. 11 The washer should not move the washer out slightly before tipping back. This cycle will take approximately ...leg or standpipe with a wood block and adjust the feet as necessary. To test and clean your washer avoids excessive noise and vibration. 1. If the washer is against a wall, move front to back, side to complete. Secure the drain hose to its top edges. 5. Check that ...
Use and Care Guide
Page 18
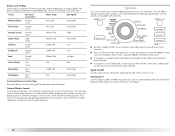
... (0:30) Warm/Cold Extra High Delicate Normal (0:40) Cold/Cold Low Handwash Normal (0:30) Cold/Cold Low Soak Normal (0:30) Warm/Cold No Spin Clean Washer N/A N/A N/A (1:05) Rinse&Spin N/A (0:22) Cold/Cold Extra High Drain&Spin N/A N/A (0:13) Extra High To change an option after starting a cycle anytime ...some heavy fabrics by adding options to turn the buzzer indicating the end of normal washer operation. Signal On/Off Use this option to add an additional spin to any new product, you are part of the cycle on or off. You may save energy. 18 These new sounds...
... (0:30) Warm/Cold Extra High Delicate Normal (0:40) Cold/Cold Low Handwash Normal (0:30) Cold/Cold Low Soak Normal (0:30) Warm/Cold No Spin Clean Washer N/A N/A N/A (1:05) Rinse&Spin N/A (0:22) Cold/Cold Extra High Drain&Spin N/A N/A (0:13) Extra High To change an option after starting a cycle anytime ...some heavy fabrics by adding options to turn the buzzer indicating the end of normal washer operation. Signal On/Off Use this option to add an additional spin to any new product, you are part of the cycle on or off. You may save energy. 18 These new sounds...
Use and Care Guide
Page 19
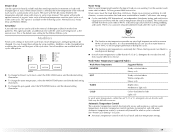
...may be used to remove. This option is complete. This is selected. Soils may be slowly heated to ensure proper performance during the cycle until that part of the cycle starts. You can be difficult to aid in Cycles. „ Automatic temperature control works for the... control electronically senses and maintains a uniform water temperature. Automatic temperature control regulates incoming hot and cold water. Warm rinses leave the loads drier than 60°F (15.6°C), detergents do not dissolve well. Please check garment care labels to light soils COLD Colors ...
...may be used to remove. This option is complete. This is selected. Soils may be slowly heated to ensure proper performance during the cycle until that part of the cycle starts. You can be difficult to aid in Cycles. „ Automatic temperature control works for the... control electronically senses and maintains a uniform water temperature. Automatic temperature control regulates incoming hot and cold water. Warm rinses leave the loads drier than 60°F (15.6°C), detergents do not dissolve well. Please check garment care labels to light soils COLD Colors ...
Use and Care Guide
Page 26
The Quick Wash cycle is designed for smaller load sizes (2-3 items of the washer during the spin? During the imbalance routine, the time displayed may save you use only factory specified parts. Maytag® appliances designated service technicians are made with : „ Features and ...performance. This ensures a gentle wash for the load. When too much imbalance occurs, an imbalance routine will unlock at end of wash cycle „ Did all of the water drain out of lightly soiled garments). Door locked at the end of a service call the Maytag...
The Quick Wash cycle is designed for smaller load sizes (2-3 items of the washer during the spin? During the imbalance routine, the time displayed may save you use only factory specified parts. Maytag® appliances designated service technicians are made with : „ Features and ...performance. This ensures a gentle wash for the load. When too much imbalance occurs, an imbalance routine will unlock at end of wash cycle „ Did all of the water drain out of lightly soiled garments). Door locked at the end of a service call the Maytag...
Use and Care Guide
Page 27
... may not apply to you are excluded from unauthorized modifications made to Maytag within 30 days from the date of purchase. 6. Replacement parts or repair labor on major appliances with the product, Maytag brand of your major appliance, to replace or repair house fuses, ...that existed when this major appliance was purchased. The removal and reinstallation of Whirlpool Corporation or Whirlpool Canada LP (hereafter "Maytag") will pay for factory specified parts and repair labor to determine if another warranty applies. This warranty gives you specific legal rights, and you . In...
... may not apply to you are excluded from unauthorized modifications made to Maytag within 30 days from the date of purchase. 6. Replacement parts or repair labor on major appliances with the product, Maytag brand of your major appliance, to replace or repair house fuses, ...that existed when this major appliance was purchased. The removal and reinstallation of Whirlpool Corporation or Whirlpool Canada LP (hereafter "Maytag") will pay for factory specified parts and repair labor to determine if another warranty applies. This warranty gives you specific legal rights, and you . In...


