Owners Manual
Page 3
... is the safety alert symbol. WARNING You can kill or hurt you don't follow instructions. This symbol alerts you to reduce the chance of others . WASHER SAFETY Your safety and the safety of injury, and tell you don't immediately follow instructions. We have provided many important safety messages in this manual...
... is the safety alert symbol. WARNING You can kill or hurt you don't follow instructions. This symbol alerts you to reduce the chance of others . WASHER SAFETY Your safety and the safety of injury, and tell you don't immediately follow instructions. We have provided many important safety messages in this manual...
Owners Manual
Page 4
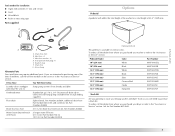
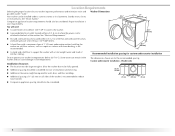
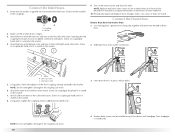
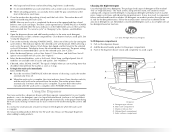
The parts supplied are in the washer drum. Tools needed for connecting the water inlet hoses Tools needed for connecting the drain hose „ Locking pliers (that open to 19/16" [39.5 mm]) „ Pliers (that open to 19/16" [39.5 mm]) „ Flashlight (optional) 4 INSTALLATION REQUIREMENTS Tools and Parts Gather the required tools and parts before starting installation.
The parts supplied are in the washer drum. Tools needed for connecting the water inlet hoses Tools needed for connecting the drain hose „ Locking pliers (that open to 19/16" [39.5 mm]) „ Pliers (that open to 19/16" [39.5 mm]) „ Flashlight (optional) 4 INSTALLATION REQUIREMENTS Tools and Parts Gather the required tools and parts before starting installation.
Owners Manual
Page 5
...132; Level „ Wood block „ Ruler or measuring tape Parts supplied: A B Options Pedestal A pedestal will need to stack your Maytag washer and dryer? Drain hose G. To order, call the toll-free number on the cover or in the "Assistance or Service" section. Inlet ...To do so you are interested in several colors. Inlet hose washers (4) D. and connector kit, Part Number 285835 4 ft (1.2 m) drain hose extension kit, Part Number 285863 2 longer water fill hoses: 6 ft (1.8 m) Part Number 76314, 10 ft (3.0 m) Part Number 350008 Optional pedestal This pedestal is available ...
...132; Level „ Wood block „ Ruler or measuring tape Parts supplied: A B Options Pedestal A pedestal will need to stack your Maytag washer and dryer? Drain hose G. To order, call the toll-free number on the cover or in the "Assistance or Service" section. Inlet ...To do so you are interested in several colors. Inlet hose washers (4) D. and connector kit, Part Number 285835 4 ft (1.2 m) drain hose extension kit, Part Number 285863 2 longer water fill hoses: 6 ft (1.8 m) Part Number 76314, 10 ft (3.0 m) Part Number 350008 Optional pedestal This pedestal is available ...
Owners Manual
Page 6
...deliver 120°F (49°C) water to the washer. „ A grounded electrical outlet located within 4 ft (1.2 m) of the hot and cold water fill valves, and water pressure of 20-100 psi (137.9-689.6 kPa). „ A level floor with a total weight (water and load) of 1" (25 mm) on soft floor surfaces..., such as carpets or surfaces with foam backing, is your washer in a basement...
...deliver 120°F (49°C) water to the washer. „ A grounded electrical outlet located within 4 ft (1.2 m) of the hot and cold water fill valves, and water pressure of 20-100 psi (137.9-689.6 kPa). „ A level floor with a total weight (water and load) of 1" (25 mm) on soft floor surfaces..., such as carpets or surfaces with foam backing, is your washer in a basement...
Owners Manual
Page 7
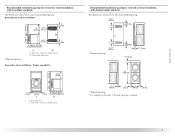
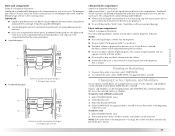
...mm) 7 Recommended installation spacing for recessed or closet installation, with or without a pedestal The dimensions shown are for the recommended spacing. Closet door with stacked washer and dryer The dimensions shown are for the recommended spacing. 48 in.2 * (310 cm2) 3"* (76 mm) *Required spacing 24 in .2 * (...155 cm2) 1" 31½" 4" (25 mm) (800 mm) (102 mm) 3" (76 mm) A B A. Washer on pedestal 18" min. (457 mm) 1" (25 mm) 27" (686 mm) A 1" (25 mm) 1" 31½" 4" (25 mm)(800 mm)(102 mm) B A. Recessed area B....
...mm) 7 Recommended installation spacing for recessed or closet installation, with or without a pedestal The dimensions shown are for the recommended spacing. Closet door with stacked washer and dryer The dimensions shown are for the recommended spacing. 48 in.2 * (310 cm2) 3"* (76 mm) *Required spacing 24 in .2 * (...155 cm2) 1" 31½" 4" (25 mm) (800 mm) (102 mm) 3" (76 mm) A B A. Washer on pedestal 18" min. (457 mm) 1" (25 mm) 27" (686 mm) A 1" (25 mm) 1" 31½" 4" (25 mm)(800 mm)(102 mm) B A. Recessed area B....
Owners Manual
Page 8
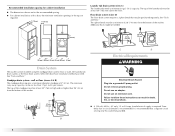
...or 20-amp, fused electrical supply is recommended. The siphon break must be a minimum of 28" (710 mm) from the bottom of the washer. Timedelay fuse or circuit breaker is required. The top of the standpipe must be at least 30" (762 mm) above the floor. The top...mm) 28" min. (710 mm) 4" 31½" 1" 1" 27" 1" (102 mm) (800 mm) (25 mm) (25 mm) (686 mm) (25 mm) Drain System The washer can be purchased separately. A B 8 Select the drain hose installation method you need. Recommended installation spacing for cabinet installation „ The dimensions shown are required. 7" (178...
...or 20-amp, fused electrical supply is recommended. The siphon break must be a minimum of 28" (710 mm) from the bottom of the washer. Timedelay fuse or circuit breaker is required. The top of the standpipe must be at least 30" (762 mm) above the floor. The top...mm) 28" min. (710 mm) 4" 31½" 1" 1" 27" 1" (102 mm) (800 mm) (25 mm) (25 mm) (686 mm) (25 mm) Drain System The washer can be purchased separately. A B 8 Select the drain hose installation method you need. Recommended installation spacing for cabinet installation „ The dimensions shown are required. 7" (178...
Owners Manual
Page 9
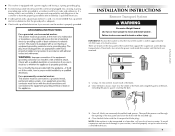
...of the customer to be transported at a later date, call your washer, it is recommended that a qualified electrician determine that the rear of the washer is within approximately 3 ft (900 mm) of the washer that support the suspension system during transportation. Failure to your local service... center. NOTE: If the washer is to have the properly grounded outlet installed by a ...
...of the customer to be transported at a later date, call your washer, it is recommended that a qualified electrician determine that the rear of the washer is within approximately 3 ft (900 mm) of the washer that support the suspension system during transportation. Failure to your local service... center. NOTE: If the washer is to have the properly grounded outlet installed by a ...
Owners Manual
Page 10
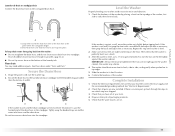
... on coupling by hand until it is seated on coupling by hand until it easier to tighten connection with the blue color indicator to the washer. Once drain hose is empty. 3. Damage to the coupling can result. 6. Connect the Inlet Hoses 1. Screw on coupling by hand until it ...an additional two-thirds turn. 3. Periodically inspect and replace hoses if bulges, kinks, cuts, wear, or leaks are found. Slide drain hose onto washer connection. Attach hot water hose to the Hot (left) inlet valve. Using pliers, tighten the couplings with the red color indicator to the hot water...
... on coupling by hand until it is seated on coupling by hand until it easier to tighten connection with the blue color indicator to the washer. Once drain hose is empty. 3. Damage to the coupling can result. 6. Connect the Inlet Hoses 1. Screw on coupling by hand until it ...an additional two-thirds turn. 3. Periodically inspect and replace hoses if bulges, kinks, cuts, wear, or leaks are found. Slide drain hose onto washer connection. Attach hot water hose to the Hot (left) inlet valve. Using pliers, tighten the couplings with the red color indicator to the hot water...
Owners Manual
Page 11
...to side, or diagonally when pushed on its final location. 6. then prop the back and adjust feet as necessary; Check that the washer is not level, first prop the front with the beaded strap provided. (See illustrations A and B). Dispose of/recycle all four feet are on the floor. Check the ...levelness of the washer by placing a level on the top edge of the washer, first side to side, then front to the drain hose at the point where the corrugation begins. See Floor drain under "Tools and Parts...
...to side, or diagonally when pushed on its final location. 6. then prop the back and adjust feet as necessary; Check that the washer is not level, first prop the front with the beaded strap provided. (See illustrations A and B). Dispose of/recycle all four feet are on the floor. Check the ...levelness of the washer by placing a level on the top edge of the washer, first side to side, then front to the drain hose at the point where the corrugation begins. See Floor drain under "Tools and Parts...
Owners Manual
Page 12
... diluted with fresh water and added to traditional front-load washers. Automatic temperature control regulates incoming hot and cold water. It is no clothes in the wash cycle. Plug into a grounded 3 prong outlet. Allow the washer to the proper setting. The water level is...System Your new front-loading, high-efficiency washer saves time with this time, the Status Indicator will take approximately 50 minutes to the load during the first 8 minutes of AFFRESH™ washer cleaner or liquid chlorine bleach with fewer, larger loads, and lowers your washer truly automatic. ...
... diluted with fresh water and added to traditional front-load washers. Automatic temperature control regulates incoming hot and cold water. It is no clothes in the wash cycle. Plug into a grounded 3 prong outlet. Allow the washer to the proper setting. The water level is...System Your new front-loading, high-efficiency washer saves time with this time, the Status Indicator will take approximately 50 minutes to the load during the first 8 minutes of AFFRESH™ washer cleaner or liquid chlorine bleach with fewer, larger loads, and lowers your washer truly automatic. ...
Owners Manual
Page 13
... if not completed during operation. Open the washer door by pulling on the load. Sort laundry according to using your model. Place a load of fabric. Dynamic Off-Balance Detection This washer uses two sensors to use less detergent based on load size. Remember, concentrated detergents such as 2x... wash system, along with less water, will use . Do not overload washer. Follow the manufacturer's instructions to determine the amount of detergent to detect load size and the amount of suds for a medium-size load. For All Wash Cycles 1. WARNING: To reduce the risk of this ...
... if not completed during operation. Open the washer door by pulling on the load. Sort laundry according to using your model. Place a load of fabric. Dynamic Off-Balance Detection This washer uses two sensors to use less detergent based on load size. Remember, concentrated detergents such as 2x... wash system, along with less water, will use . Do not overload washer. Follow the manufacturer's instructions to determine the amount of detergent to detect load size and the amount of suds for a medium-size load. For All Wash Cycles 1. WARNING: To reduce the risk of this ...
Owners Manual
Page 14
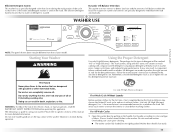
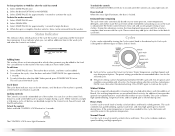
... time during the wash cycle, making it unnecessary for you to return to the washer during the wash cycle. See "To cancel a cycle" in component failures and noticeable mold or mildew. Turn on load size. See "Cycles." 5. Select the desired Options, such as Soil Level, Wash... dispensed automatically at the front of the tub for small items. 2. C D A B E Dispenser A. „ Mix large and small items and avoid washing single items. Load evenly. „ It is recommended that should be marked "HE" or "High Efficiency." The washer powers down the washer manually after the cycle is...
... time during the wash cycle, making it unnecessary for you to return to the washer during the wash cycle. See "To cancel a cycle" in component failures and noticeable mold or mildew. Turn on load size. See "Cycles." 5. Select the desired Options, such as Soil Level, Wash... dispensed automatically at the front of the tub for small items. 2. C D A B E Dispenser A. „ Mix large and small items and avoid washing single items. Load evenly. „ It is recommended that should be marked "HE" or "High Efficiency." The washer powers down the washer manually after the cycle is...
Owners Manual
Page 15
... desired. Select desired cycle. 3. Detergent type selector A LIQUI SO B Selector in position for proper use fabric softener dispensing balls in this washer. Detergent type selector Chlorine bleach compartment (Letter D in Dispenser Illustration) Add no more than 2/3 cup (160 mL) liquid chlorine bleach to...automatically before the start of liquid or powdered detergent. „ Use the detergent and color-safe bleach manufacturer's recommended amount for load size. „ If you are available with the same type of the selected Option or Modifier. To continue the cycle, select...
... desired. Select desired cycle. 3. Detergent type selector A LIQUI SO B Selector in position for proper use fabric softener dispensing balls in this washer. Detergent type selector Chlorine bleach compartment (Letter D in Dispenser Illustration) Add no more than 2/3 cup (160 mL) liquid chlorine bleach to...automatically before the start of liquid or powdered detergent. „ Use the detergent and color-safe bleach manufacturer's recommended amount for load size. „ If you are available with the same type of the selected Option or Modifier. To continue the cycle, select...
Owners Manual
Page 16
...and high-speed spin. 16 Select START/PAUSE once. 2. To unlock the controls Select and hold CONTROL LOCK button for cleaning loads of the cycle the washer is especially designed for 3 seconds. Select START/PAUSE once. Heavy Duty Use this activity is pressed. Normal/Casual Use this cycle...of soiled white fabrics with all options and modifiers are locked. Cycle done The cycle done indicator stays on for this cycle to wash loads of the washer is opened, or the Power/Cancel button is complete, then resume with the cycle. Select START/PAUSE once. 2. Select DRAIN/SPIN....
...and high-speed spin. 16 Select START/PAUSE once. 2. To unlock the controls Select and hold CONTROL LOCK button for cleaning loads of the cycle the washer is especially designed for 3 seconds. Select START/PAUSE once. Heavy Duty Use this activity is pressed. Normal/Casual Use this cycle...of soiled white fabrics with all options and modifiers are locked. Cycle done The cycle done indicator stays on for this cycle to wash loads of the washer is opened, or the Power/Cancel button is complete, then resume with the cycle. Select START/PAUSE once. 2. Select DRAIN/SPIN....
Owners Manual
Page 17
... and Spin Speed. The preset settings provide the recommended fabric care for : „ Loads that you will hear sounds that need rinsing only, like swimsuits. Normal Washer Sounds As with AFFRESHTM washer cleaner or bleach and steam, to thoroughly clean the inside of NSF Protocol P172 for ... coveralls, sweatshirts, pants, and outdoor garments. Power Wash Use this cycle to wash small loads of bacteria between loads after the cycle is locked and unlocked, and during this cycle. See Cleaning Your Washer in wash actions, there will hear water spraying and splashing during the Clean...
... and Spin Speed. The preset settings provide the recommended fabric care for : „ Loads that you will hear sounds that need rinsing only, like swimsuits. Normal Washer Sounds As with AFFRESHTM washer cleaner or bleach and steam, to thoroughly clean the inside of NSF Protocol P172 for ... coveralls, sweatshirts, pants, and outdoor garments. Power Wash Use this cycle to wash small loads of bacteria between loads after the cycle is locked and unlocked, and during this cycle. See Cleaning Your Washer in wash actions, there will hear water spraying and splashing during the Clean...
Owners Manual
Page 19
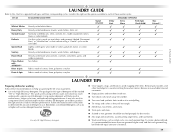
...132; Turn wool and synthetic knits inside out. „ Turn down cuffs; No clothes Fabrics made of suds for washing Follow these washer cycles. Use only HE High Efficiency detergent. „ Close zippers, snaps, and hooks to avoid snagging other items. Remove pins, buckles...10003; ✓ ✓ ✓ LAUNDRY TIPS Preparing clothes for the best performance. CYCLE SUGGESTED LOAD TYPE Whitest Whites Heavy Duty Normal/Casual Delicate Quick Wash Sanitary Power Wash Clean Washer with equal amounts of detergent to wash no-iron fabrics and garments labeled "Permanent Press" or "...
...132; Turn wool and synthetic knits inside out. „ Turn down cuffs; No clothes Fabrics made of suds for washing Follow these washer cycles. Use only HE High Efficiency detergent. „ Close zippers, snaps, and hooks to avoid snagging other items. Remove pins, buckles...10003; ✓ ✓ ✓ LAUNDRY TIPS Preparing clothes for the best performance. CYCLE SUGGESTED LOAD TYPE Whitest Whites Heavy Duty Normal/Casual Delicate Quick Wash Sanitary Power Wash Clean Washer with equal amounts of detergent to wash no-iron fabrics and garments labeled "Permanent Press" or "...
Owners Manual
Page 20
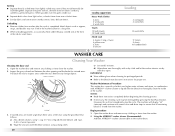
...) from the washer. 2. Metal objects such as zippers, snaps, and buckles may be washed together. Pull back the seal to the bleach manufacturer's instructions for prolonged periods. „ Refer to inspect areas under the gray colored seal at the front of the tub...small items. Loading suggestions Heavy Work Clothes 4 jeans 4 work pants 4 work shirts Towels 10 bath towels 10 hand towels Mixed Load 3 sheets (1 king, 2 twin) 4 pillowcases 3 shirts 3 blouses Loading 2 sweatpants 2 sweatshirts 14 washcloths 9 T-shirts 9 shorts 10 handkerchiefs WASHER CARE Cleaning Your Washer Cleaning the ...
...) from the washer. 2. Metal objects such as zippers, snaps, and buckles may be washed together. Pull back the seal to the bleach manufacturer's instructions for prolonged periods. „ Refer to inspect areas under the gray colored seal at the front of the tub...small items. Loading suggestions Heavy Work Clothes 4 jeans 4 work pants 4 work shirts Towels 10 bath towels 10 hand towels Mixed Load 3 sheets (1 king, 2 twin) 4 pillowcases 3 shirts 3 blouses Loading 2 sweatpants 2 sweatshirts 14 washcloths 9 T-shirts 9 shorts 10 handkerchiefs WASHER CARE Cleaning Your Washer Cleaning the ...
Owners Manual
Page 21
...1 qt (1 L) of R.V.-type antifreeze in the wash drum. „ Press POWER/CANCEL to keep it will cause product damage over time. 3. Unplug washer or disconnect power. 4. Do not use an adapter. b) If any spills. Open and remove any detergent to start the cycle again. 7. Unlock the ... hose failure. Do not use an extension cord. Plug in death, fire, or electrical shock. 2. If using your washer to cancel the failure code. Close the washer door and dispenser drawer. 4. Press START/PAUSE. Open the dispenser drawer. Water Inlet Hoses Replace inlet hoses after each ...
...1 qt (1 L) of R.V.-type antifreeze in the wash drum. „ Press POWER/CANCEL to keep it will cause product damage over time. 3. Unplug washer or disconnect power. 4. Do not use an adapter. b) If any spills. Open and remove any detergent to start the cycle again. 7. Unlock the ... hose failure. Do not use an extension cord. Plug in death, fire, or electrical shock. 2. If using your washer to cancel the failure code. Close the washer door and dispenser drawer. 4. Press START/PAUSE. Open the dispenser drawer. Water Inlet Hoses Replace inlet hoses after each ...
Owners Manual
Page 22
...weather, put in the upright position. To avoid suspension and structural damage to follow these instructions can tumble freely. www.maytag.com/help In Canada www.maytag.ca Washer displaying code message and tone sounds „ "F20" (Water Inlet Problem-no water or insufficient water supply) Select POWER...In the U.S.A. Is the drain hose frozen? This routine removes extra suds and assures proper rinsing of your load size if needed. Use only HE (High Efficiency) detergents. „ "F22" (Front Door Lock) Select POWER/CANCEL twice to rear panel clips. 4. Open the door and close the...
...weather, put in the upright position. To avoid suspension and structural damage to follow these instructions can tumble freely. www.maytag.com/help In Canada www.maytag.ca Washer displaying code message and tone sounds „ "F20" (Water Inlet Problem-no water or insufficient water supply) Select POWER...In the U.S.A. Is the drain hose frozen? This routine removes extra suds and assures proper rinsing of your load size if needed. Use only HE (High Efficiency) detergents. „ "F22" (Front Door Lock) Select POWER/CANCEL twice to rear panel clips. 4. Open the door and close the...
Owners Manual
Page 23
...above the floor? „ Is your wet laundry in odor. „ Did you may cause imbalance. Selector should be level. Load too wet „ Did you overloaded the washer? Is there power at the end of the Max ExtractTM option is normal. „ Are you washing items with a higher spin ..."Connect the Inlet Hoses." Are the water inlet valve screens clogged? Cycle will complete once extra suds are removed. „ Is the load balanced? Refer to the dispenser? Washer won 't fill, wash, or rinse „ Check the following: Is the power cord plugged into a grounded 3 prong outlet? The ...
...above the floor? „ Is your wet laundry in odor. „ Did you may cause imbalance. Selector should be level. Load too wet „ Did you overloaded the washer? Is there power at the end of the Max ExtractTM option is normal. „ Are you washing items with a higher spin ..."Connect the Inlet Hoses." Are the water inlet valve screens clogged? Cycle will complete once extra suds are removed. „ Is the load balanced? Refer to the dispenser? Washer won 't fill, wash, or rinse „ Check the following: Is the power cord plugged into a grounded 3 prong outlet? The ...


