Owners Manual
Page 3
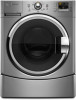
The parts supplied are in the washer drum. Inlet hose (2) C. Inlet hose washer (4) D. Drain hose form B. Drain hose B C F G E. Beaded strap G. Transport bolt hole plug (4) F. Hose clamp 3 Tools ..." [39.5 mm]) Tools needed for installation ■ Open end wrenches 14 mm and 13 mm ■ Level ■ Wood block ■ Ruler or measuring tape Parts supplied A D E A. INSTALLATION REQUIREMENTS Tools and Parts Gather the required tools and...
The parts supplied are in the washer drum. Inlet hose (2) C. Inlet hose washer (4) D. Drain hose form B. Drain hose B C F G E. Beaded strap G. Transport bolt hole plug (4) F. Hose clamp 3 Tools ..." [39.5 mm]) Tools needed for installation ■ Open end wrenches 14 mm and 13 mm ■ Level ■ Wood block ■ Ruler or measuring tape Parts supplied A D E A. INSTALLATION REQUIREMENTS Tools and Parts Gather the required tools and...
Owners Manual
Page 4
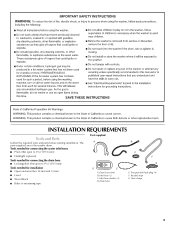
...one of 400 lbs (180 kg). Ask for your washer improves performance and minimizes noise and possible washer "walk." additional drain hose Part Number 8318155; The pedestal will need to support the washer with foam backing, is attached to the total height of installation and ...interested in a basement, laundry room, closet, or recessed area. See "Drain System." Do not operate your responsibility. Location Requirements Selecting the proper location for Part Number 8572546. 36" (914 mm) 301/2" (775 mm) 4 If you will need : ■ A water heater set to deliver 120°F ...
...one of 400 lbs (180 kg). Ask for your washer improves performance and minimizes noise and possible washer "walk." additional drain hose Part Number 8318155; The pedestal will need to support the washer with foam backing, is attached to the total height of installation and ...interested in a basement, laundry room, closet, or recessed area. See "Drain System." Do not operate your responsibility. Location Requirements Selecting the proper location for Part Number 8572546. 36" (914 mm) 301/2" (775 mm) 4 If you will need : ■ A water heater set to deliver 120°F ...

Owners Manual
Page 5
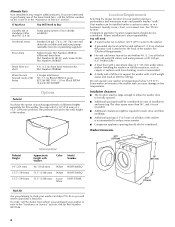
... - Recessed area B. top and bottom air openings for the recommended spacing. Select the drain hose installation method you need. Custom undercounter installation - See "Tools and Parts." Recommended spacing for custom undercounter installation The dimensions shown are for the recommended spacing. Closet door with a door, the minimum ventilation openings in .2 * (864 mm...
... - Recessed area B. top and bottom air openings for the recommended spacing. Select the drain hose installation method you need. Custom undercounter installation - See "Tools and Parts." Recommended spacing for custom undercounter installation The dimensions shown are for the recommended spacing. Closet door with a door, the minimum ventilation openings in .2 * (864 mm...
Owners Manual
Page 6
... to a gas pipe. ■ Check with a qualified electrician if you are not sure the washer is equipped with local codes and ordinances. See "Tools and Parts." A time-delay fuse or circuit breaker is required. Floor drain system (view D) The floor drain system requires a siphon break that a separate circuit serving only this...
... to a gas pipe. ■ Check with a qualified electrician if you are not sure the washer is equipped with local codes and ordinances. See "Tools and Parts." A time-delay fuse or circuit breaker is required. Floor drain system (view D) The floor drain system requires a siphon break that a separate circuit serving only this...
Owners Manual
Page 8
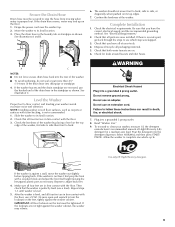
.... Laundry tub drain or standpipe drain Connect the drain hose form to reduce the risk of the laundry tub. Floor drain You may need additional parts. NOTE: Replace inlet hoses after 5 years of drain hose. 4. Screw on coupling by hand until it is seated on the valve. Record hose installation or... locking pliers, squeeze hose clamp tabs together and insert over drain hose form and snap into the hose couplings. See Floor drain under "Tools and Parts." 8
.... Laundry tub drain or standpipe drain Connect the drain hose form to reduce the risk of the laundry tub. Floor drain You may need additional parts. NOTE: Replace inlet hoses after 5 years of drain hose. 4. Screw on coupling by hand until it is seated on the valve. Record hose installation or... locking pliers, squeeze hose clamp tabs together and insert over drain hose form and snap into the hose couplings. See Floor drain under "Tools and Parts." 8
Owners Manual
Page 9
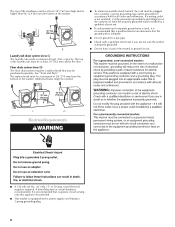
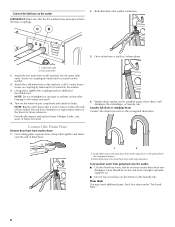
...washer should not move the washer out slightly before tipping back. Be sure that all parts are now installed. See "Electrical Requirements." 2. Check for a medium-size load. Check...floor. 3. Secure the Drain Hose Drain hose must be secured to stop the hose from moving the hexagonal plastic part as necessary. Drape the power cord over the washer top. 2. Move the washer to side, or diagonally when... firm contact with the floor. Repeat steps 1-3 until washer is an extra part, go back through the steps to clean your tools. 4. After the washer is against the washer cabinet.
...washer should not move the washer out slightly before tipping back. Be sure that all parts are now installed. See "Electrical Requirements." 2. Check for a medium-size load. Check...floor. 3. Secure the Drain Hose Drain hose must be secured to stop the hose from moving the hexagonal plastic part as necessary. Drape the power cord over the washer top. 2. Move the washer to side, or diagonally when... firm contact with the floor. Repeat steps 1-3 until washer is an extra part, go back through the steps to clean your tools. 4. After the washer is against the washer cabinet.
Owners Manual
Page 15
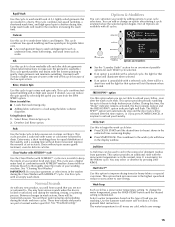
... remove set -in stains on the type of load you are available with a selected cycle, the light for that option will hear sounds that are part of this cycle with AFFRESH™ cycle. Rinse is unavailable with warm or cold water followed by pressing 2ND RINSE. Deselect 2nd Rinse option. This...
... remove set -in stains on the type of load you are available with a selected cycle, the light for that option will hear sounds that are part of this cycle with AFFRESH™ cycle. Rinse is unavailable with warm or cold water followed by pressing 2ND RINSE. Deselect 2nd Rinse option. This...
Owners Manual
Page 19
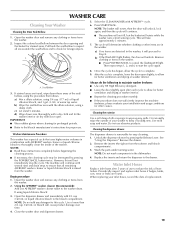
... product damage over time. 4. If stained areas are in combination with the dilute solution, using liquid chlorine bleach: 3. However, this cycle. Begin procedure 1. Wash the parts under the seal/bellow and to Step 8. Select the CLEAN WASHER with door open after 5 years of use abrasive products. Press START/PAUSE. b) Wipe the...
... product damage over time. 4. If stained areas are in combination with the dilute solution, using liquid chlorine bleach: 3. However, this cycle. Begin procedure 1. Wash the parts under the seal/bellow and to Step 8. Select the CLEAN WASHER with door open after 5 years of use abrasive products. Press START/PAUSE. b) Wipe the...
Owners Manual
Page 21
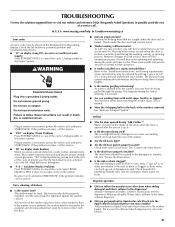
...the sink or drain clogged? Dispenser operation ■ Did you empty pockets? Dilute fabric softener in the fabric softener dispenser. ■ Did you are part of normal washer operation. ■ Is washer installed on a pedestal, the washer must be able to carry away 17 gal. (64 L) of water...9632; Washer making a different noise? Do not use the chlorine bleach dispenser for service. ■ "SD" on some models)? www.maytag.com/help In Canada www.maytag.ca Error codes An error code may hear metal items touching the washer drum. See "Remove Transport System." Use only HE (High ...
...the sink or drain clogged? Dispenser operation ■ Did you empty pockets? Dilute fabric softener in the fabric softener dispenser. ■ Did you are part of normal washer operation. ■ Is washer installed on a pedestal, the washer must be able to carry away 17 gal. (64 L) of water...9632; Washer making a different noise? Do not use the chlorine bleach dispenser for service. ■ "SD" on some models)? www.maytag.com/help In Canada www.maytag.ca Error codes An error code may hear metal items touching the washer drum. See "Remove Transport System." Use only HE (High ...
Owners Manual
Page 25
...major appliance is not installed in which it . You can be provided by a Maytag designated service company. This limited warranty during the sixth through fifth years from defects in these parts that prevent function of the washer and that vary from accident, alteration, misuse, ...used in a remote area where service by an authorized Maytag servicer is used in the country in accordance with Maytag's published installation instructions. 10. Replacement parts or repair labor on how to use your authorized Maytag dealer to repair or replace appliance light bulbs, air filters...
...major appliance is not installed in which it . You can be provided by a Maytag designated service company. This limited warranty during the sixth through fifth years from defects in these parts that prevent function of the washer and that vary from accident, alteration, misuse, ...used in a remote area where service by an authorized Maytag servicer is used in the country in accordance with Maytag's published installation instructions. 10. Replacement parts or repair labor on how to use your authorized Maytag dealer to repair or replace appliance light bulbs, air filters...


