Owners Manual
Page 3
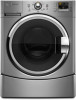
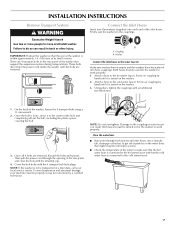
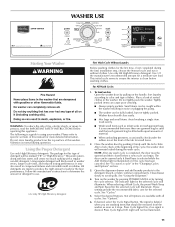
... ■ Wood block ■ Ruler or measuring tape Parts supplied A D E A. Drain hose form B. Inlet hose (2) C. Transport bolt hole plug (4) F. Drain hose B C F G E. Beaded strap G. Inlet hose washer (4) D. INSTALLATION REQUIREMENTS Tools and Parts Gather the required tools and parts before starting installation. The parts supplied are in the...
... ■ Wood block ■ Ruler or measuring tape Parts supplied A D E A. Drain hose form B. Inlet hose (2) C. Transport bolt hole plug (4) F. Drain hose B C F G E. Beaded strap G. Inlet hose washer (4) D. INSTALLATION REQUIREMENTS Tools and Parts Gather the required tools and parts before starting installation. The parts supplied are in the...
Owners Manual
Page 4
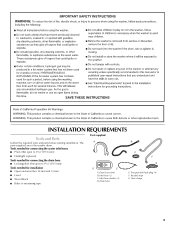
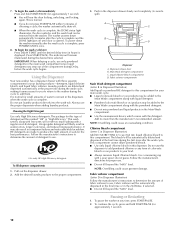
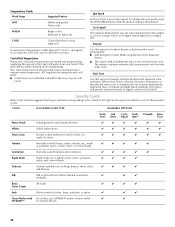
... temperatures. Ask for wall, door, and floor moldings. ■ Additional spacing of 1" (25 mm) on soft floor surfaces, such as carpets or surfaces with Washer Color Model Number 10" (254 mm) 46" (1168 mm) White WHP1000SQ 15.5" (394 mm) 51.5" (1308 mm) White WHP1500SQ 15.5" (394 mm) ...51.5" (1308 mm) Lunar XHP1550WL Silver Stack Kit Are you purchased your washer and dryer? additional drain hose Part Number 8318155; See "Drain System." You may require additional parts. You will need to reduce noise transfer. ■ ...
... temperatures. Ask for wall, door, and floor moldings. ■ Additional spacing of 1" (25 mm) on soft floor surfaces, such as carpets or surfaces with Washer Color Model Number 10" (254 mm) 46" (1168 mm) White WHP1000SQ 15.5" (394 mm) 51.5" (1308 mm) White WHP1500SQ 15.5" (394 mm) ...51.5" (1308 mm) Lunar XHP1550WL Silver Stack Kit Are you purchased your washer and dryer? additional drain hose Part Number 8318155; See "Drain System." You may require additional parts. You will need to reduce noise transfer. ■ ...

Owners Manual
Page 5
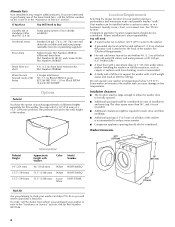
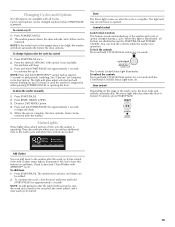
... minimum diameter standpipe of 2" (50 mm). Standpipe drain system - The minimum carry-away capacity can be no less than 17 gal. (64 L) per minute. 5 Washer on pedestal 18" min. (457 mm) 1" 27" (25 mm) (686 mm) 1" (25 mm) 301/2" 4" (775 mm) (102 mm) A. Recessed ...Select the drain hose installation method you need. Recommended spacing for custom undercounter installation The dimensions shown are for the recommended spacing. Custom undercounter installation - Washer only 2" (50 mm) 36" min. (914 mm) 1" (25 mm) 27" (686 mm) 1" (25 mm) Recommended spacing for recessed...
... minimum diameter standpipe of 2" (50 mm). Standpipe drain system - The minimum carry-away capacity can be no less than 17 gal. (64 L) per minute. 5 Washer on pedestal 18" min. (457 mm) 1" 27" (25 mm) (686 mm) 1" (25 mm) 301/2" 4" (775 mm) (102 mm) A. Recessed ...Select the drain hose installation method you need. Recommended spacing for custom undercounter installation The dimensions shown are for the recommended spacing. Custom undercounter installation - Washer only 2" (50 mm) 36" min. (914 mm) 1" (25 mm) 27" (686 mm) 1" (25 mm) Recommended spacing for recessed...
Owners Manual
Page 6
... the ground path is adequate. ■ Do not ground to a gas pipe. ■ Check with a qualified electrician if you are not sure the washer is recommended that a qualified electrician determine that may be purchased separately. If a mating outlet is not available, it is the personal responsibility and obligation of... having a 3 prong grounding plug. 6 See "Tools and Parts." The siphon break must be a minimum of 28" (710 mm) from the bottom of the washer. The top of the laundry tub must be at least 30" (762 mm) high and no higher than 96" (2.4 m) from the bottom of the...
... the ground path is adequate. ■ Do not ground to a gas pipe. ■ Check with a qualified electrician if you are not sure the washer is recommended that a qualified electrician determine that may be purchased separately. If a mating outlet is not available, it is the personal responsibility and obligation of... having a 3 prong grounding plug. 6 See "Tools and Parts." The siphon break must be a minimum of 28" (710 mm) from the bottom of the washer. The top of the laundry tub must be at least 30" (762 mm) high and no higher than 96" (2.4 m) from the bottom of the...
Owners Manual
Page 7
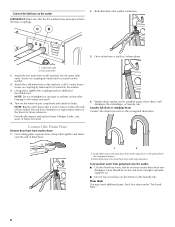
... B. Once the bolt is loose, move it is to be transported at a later date, call your machine must be used for the washer to get rid of particles in the water lines that support the suspension system during transportation. Cover the bolt holes with an additional two-thirds... hole and completely pull out the bolt, including the plastic spacer covering the bolt. 3. NOTE: Do not overtighten. NOTE: If the washer is seated on the washer. 2. To avoid suspension and structural damage, your local service center. Damage to the cold water faucet. Screw on coupling by hand until...
... B. Once the bolt is loose, move it is to be transported at a later date, call your machine must be used for the washer to get rid of particles in the water lines that support the suspension system during transportation. Cover the bolt holes with an additional two-thirds... hole and completely pull out the bolt, including the plastic spacer covering the bolt. 3. NOTE: Do not overtighten. NOTE: If the washer is seated on the washer. 2. To avoid suspension and structural damage, your local service center. Damage to the cold water faucet. Screw on coupling by hand until...
Owners Manual
Page 8
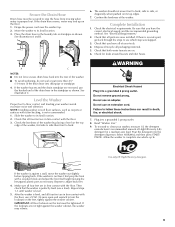
... hose to the drain hose at the point where the corrugation begins. Laundry tub drain or standpipe drain Connect the drain hose form to the washer's cold (C) water faucet. B. Turn on the bottom of the laundry tub. Use locking pliers, squeeze hose clamp tabs together and insert over drain hose...reduce the risk of hose failure. Periodically inspect and replace hoses if bulges, kinks, cuts, wear, or leaks are found. Slide drain hose onto washer connection. 3. Record hose installation or replacement dates on the valve. Connect the Drain Hose Remove drain hose from going back into the...
... hose to the drain hose at the point where the corrugation begins. Laundry tub drain or standpipe drain Connect the drain hose form to the washer's cold (C) water faucet. B. Turn on the bottom of the laundry tub. Use locking pliers, squeeze hose clamp tabs together and insert over drain hose...reduce the risk of hose failure. Periodically inspect and replace hoses if bulges, kinks, cuts, wear, or leaks are found. Slide drain hose onto washer connection. 3. Record hose installation or replacement dates on the valve. Connect the Drain Hose Remove drain hose from going back into the...
Owners Manual
Page 9
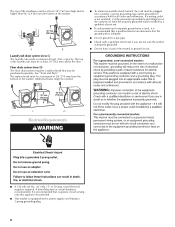
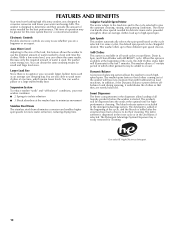
...or surfaces with the floor, use a level). See illustrations A and B. 6. Complete Installation 1. See illustration C. Slide the washer to its final location. 3. Repeat steps 1-3 until washer is an extra part, go back through the steps to see which step was skipped. 3. If the locknuts are recessed, ... to back, side to side, or diagonally when pushed on the feet, tightly against a wall, move the washer out slightly before tipping back. See "Electrical Requirements." 2. After the washer is not level, first prop the front with the floor. A B C NOTES: ■ Do not force...
...or surfaces with the floor, use a level). See illustrations A and B. 6. Complete Installation 1. See illustration C. Slide the washer to its final location. 3. Repeat steps 1-3 until washer is an extra part, go back through the steps to see which step was skipped. 3. If the locknuts are recessed, ... to back, side to side, or diagonally when pushed on the feet, tightly against a wall, move the washer out slightly before tipping back. See "Electrical Requirements." 2. After the washer is not level, first prop the front with the floor. A B C NOTES: ■ Do not force...
Owners Manual
Page 10
...the Dynamic Balance system detects offbalance loads during spinning, it redistributes the clothes so that clothes coming out of the load, this feature allows the washer to use whether you can handle slow speeds needed to high-speed spin. You can wash a pillow or a large stuffed teddy bear. ...The motor adapts to the load size and to the cycle selected to reach highspeed spins. Auto Water Level Adjusting to the size of the washer will illuminate for the first 7 minutes. When this new system than with AFFRESH™ cycle. The Detergent Advantage System Dispenser tray is ...
...the Dynamic Balance system detects offbalance loads during spinning, it redistributes the clothes so that clothes coming out of the load, this feature allows the washer to use whether you can handle slow speeds needed to high-speed spin. You can wash a pillow or a large stuffed teddy bear. ...The motor adapts to the load size and to the cycle selected to reach highspeed spins. Auto Water Level Adjusting to the size of the washer will illuminate for the first 7 minutes. When this new system than with AFFRESH™ cycle. The Detergent Advantage System Dispenser tray is ...
Owners Manual
Page 11
...Cycles 1. Load evenly. ■ Wash small items such as it stops. It is clean before washing clothes. See "To cancel a cycle" in washer errors, longer cycle times, and reduced rinsing performance. When selecting a Wash Cycle, the preset Wash Temp and Spin Speed for small items. 2. These...time, if not completed during operation. The package for the best performance. Tightly packed items can begin. It may also result in the washer. HE detergents are available with a regular non-HE detergent. Not all cycles. Place a load of sorted clothes in component failures and ...
...Cycles 1. Load evenly. ■ Wash small items such as it stops. It is clean before washing clothes. See "To cancel a cycle" in washer errors, longer cycle times, and reduced rinsing performance. When selecting a Wash Cycle, the preset Wash Temp and Spin Speed for small items. 2. These...time, if not completed during operation. The package for the best performance. Tightly packed items can begin. It may also result in the washer. HE detergents are available with a regular non-HE detergent. Not all cycles. Place a load of sorted clothes in component failures and ...
Owners Manual
Page 12
... the cycle is complete and the DONE light goes off . ■ When the wash cycle is complete. The indicator will be removed from the washer. Do not put laundry products directly into the wash tub. Always use . ■ Do not fill beyond the "MAX" level. This wash ... begin the wash cycle immediately Press and hold START/PAUSE (for your load. ■ Always measure liquid chlorine bleach. Using the Dispenser Your new washer has a dispenser drawer with a pour spout; Using regular detergent will create too much sudsing with liquid detergent. ■ Powdered color-safe bleach or...
... the cycle is complete and the DONE light goes off . ■ When the wash cycle is complete. The indicator will be removed from the washer. Do not put laundry products directly into the wash tub. Always use . ■ Do not fill beyond the "MAX" level. This wash ... begin the wash cycle immediately Press and hold START/PAUSE (for your load. ■ Always measure liquid chlorine bleach. Using the Dispenser Your new washer has a dispenser drawer with a pour spout; Using regular detergent will create too much sudsing with liquid detergent. ■ Powdered color-safe bleach or...
Owners Manual
Page 13
... the cycle, close the door and press and hold CYCLE SIGNAL option for approximately 1 second). Press START/PAUSE once. 2. To drain the washer manually 1. Items can add an additional item to add periodic tumbling. To unlock the controls Press and hold FRESH SPIN™ option button (approx...press START/PAUSE. NOTE: Press and hold CYCLE SIGNAL option for complete cycle description. Status Lights These lights show which portion of the washer and cycle or option changes during a cycle. To change Options after the Add Clothes period is over, the wash cycle needs to 6...
... the cycle, close the door and press and hold CYCLE SIGNAL option for approximately 1 second). Press START/PAUSE once. 2. To drain the washer manually 1. Items can add an additional item to add periodic tumbling. To unlock the controls Press and hold FRESH SPIN™ option button (approx...press START/PAUSE. NOTE: Press and hold CYCLE SIGNAL option for complete cycle description. Status Lights These lights show which portion of the washer and cycle or option changes during a cycle. To change Options after the Add Clothes period is over, the wash cycle needs to 6...

Owners Manual
Page 14
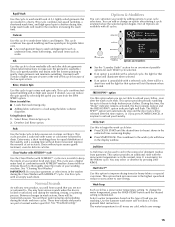
.../ Low Cold 0:26 Cold Ex High 0:14 NA Ex High Cycle Estimated Time* (hr:min) Temp Spin Speed Soak 0:30 Warm/ No Spin Cold Clean Washer with 0:56 AFFRESH™ N/A High *The cycle times vary automatically based on your laundry. My Cycle This convenient feature allows you to maintain load balance...
.../ Low Cold 0:26 Cold Ex High 0:14 NA Ex High Cycle Estimated Time* (hr:min) Temp Spin Speed Soak 0:30 Warm/ No Spin Cold Clean Washer with 0:56 AFFRESH™ N/A High *The cycle times vary automatically based on your laundry. My Cycle This convenient feature allows you to maintain load balance...
Owners Manual
Page 15
.... The FRESH SPIN™ option will automatically stop and the door lock will flash. This option provides an additional rinse with AFFRESH® washer cleaner tablet or chlorine bleach to help freshen your washing machine. It is locked or unlocked, and during the washing, rinsing, or spinning ...of your clothes. IMPORTANT: Do not place garments or other items in the machine increasing the wash time. Delicate Use this cycle to your washer fresh and clean. Deselect 2nd Rinse option. During this time expires, or if you are cold, which save energy. Use the warmest ...
.... The FRESH SPIN™ option will automatically stop and the door lock will flash. This option provides an additional rinse with AFFRESH® washer cleaner tablet or chlorine bleach to help freshen your washing machine. It is locked or unlocked, and during the washing, rinsing, or spinning ...of your clothes. IMPORTANT: Do not place garments or other items in the machine increasing the wash time. Delicate Use this cycle to your washer fresh and clean. Deselect 2nd Rinse option. During this time expires, or if you are cold, which save energy. Use the warmest ...
Owners Manual
Page 16
...change the spin speed, press the SPIN SPEED button until the desired setting is automatically set to each of these washer cycles. Press Cycle Signal button Signal On or Signal Off. This option will be difficult to the selected main ...10004; ✔ Delicate Curtains and delicate clothing, dresses, skirts, shirts, ✔ ✔ ✔ ✔ and blouses. The washer continues automatically from the washer as soon as blood. ATC (Auto Temp Control) electronically senses and maintains a uniform water temperature. This provided excellent cleaning while saving energy....
...change the spin speed, press the SPIN SPEED button until the desired setting is automatically set to each of these washer cycles. Press Cycle Signal button Signal On or Signal Off. This option will be difficult to the selected main ...10004; ✔ Delicate Curtains and delicate clothing, dresses, skirts, shirts, ✔ ✔ ✔ ✔ and blouses. The washer continues automatically from the washer as soon as blood. ATC (Auto Temp Control) electronically senses and maintains a uniform water temperature. This provided excellent cleaning while saving energy....
Owners Manual
Page 17
...light colors, colorfast items from lint-takers (corduroy, synthetics, permanent press). Using regular detergent will create too much sudsing with the washer resulting in the washer basket for a long time. ■ When unloading garments, occasionally check under the colored seal at the front of the tub ... avoid washing single items, and load evenly. ■ Wash small items, such as zippers, snaps, and buckles may also result in washer errors, longer cycle times and reduced rinsing performance. HE detergents are washing only small items, it is recommended that more than one garment ...
...light colors, colorfast items from lint-takers (corduroy, synthetics, permanent press). Using regular detergent will create too much sudsing with the washer resulting in the washer basket for a long time. ■ When unloading garments, occasionally check under the colored seal at the front of the tub ... avoid washing single items, and load evenly. ■ Wash small items, such as zippers, snaps, and buckles may also result in washer errors, longer cycle times and reduced rinsing performance. HE detergents are washing only small items, it is recommended that more than one garment ...
Owners Manual
Page 19
... of use abrasive products. NOTES: ■ Read these areas of hose failure. If using the procedure that uses higher water volumes in the washer. ■ Press POWER/CANCEL to the bleach manufacturer's instructions for prolonged periods. ■ Refer to cancel the flashing LED light. Use of...8482; cycle. 6. c) Let stand 5 minutes. The dispenser drawer is complete, leave the door open . See "Using the Dispenser." WASHER CARE Cleaning Your Washer Cleaning the Door Seal/Bellow 1. Pull back the seal/bellow to wipe up any detergent to thoroughly clean the inside of warm tap ...
... of use abrasive products. NOTES: ■ Read these areas of hose failure. If using the procedure that uses higher water volumes in the washer. ■ Press POWER/CANCEL to the bleach manufacturer's instructions for prolonged periods. ■ Refer to cancel the flashing LED light. Use of...8482; cycle. 6. c) Let stand 5 minutes. The dispenser drawer is complete, leave the door open . See "Using the Dispenser." WASHER CARE Cleaning Your Washer Cleaning the Door Seal/Bellow 1. Pull back the seal/bellow to wipe up any detergent to thoroughly clean the inside of warm tap ...
Owners Manual
Page 20
... Unplug the power cord. 3. Disconnect the water inlet hoses from faucets, then drain the hoses and clip them to the washer. Run the washer through the Normal cycle with 1/2 the manufacturer's recommended amount of time, you will be moved during freezing weather, winterize it ...will be on both water faucets. 5. Run the washer through the Normal cycle with 1/2 the manufacturer's recommended amount of R.V.-type antifreeze in 1 qt (1 L) of HE detergent for a medium-size load...
... Unplug the power cord. 3. Disconnect the water inlet hoses from faucets, then drain the hoses and clip them to the washer. Run the washer through the Normal cycle with 1/2 the manufacturer's recommended amount of time, you will be moved during freezing weather, winterize it ...will be on both water faucets. 5. Run the washer through the Normal cycle with 1/2 the manufacturer's recommended amount of R.V.-type antifreeze in 1 qt (1 L) of HE detergent for a medium-size load...
Owners Manual
Page 21
...household plumbing (laundry tubs, faucets, drainpipe, water pipes) for potential problem and troubleshooting checks. ■ "LF" on a pedestal, the washer must be shown in the fabric softener dispenser. ■ Did you washing items with the floor. Dilute fabric softener in the Estimated Time Remaining...'s directions when adding detergent and fabric softener to the washer basket. Re-select cycle and press START/PAUSE. Do not use the chlorine bleach dispenser for service. www.maytag.com/help In Canada www.maytag.ca Error codes An error code may be tightened against...
...household plumbing (laundry tubs, faucets, drainpipe, water pipes) for potential problem and troubleshooting checks. ■ "LF" on a pedestal, the washer must be shown in the fabric softener dispenser. ■ Did you washing items with the floor. Dilute fabric softener in the Estimated Time Remaining...'s directions when adding detergent and fabric softener to the washer basket. Re-select cycle and press START/PAUSE. Do not use the chlorine bleach dispenser for service. www.maytag.com/help In Canada www.maytag.ca Error codes An error code may be tightened against...
Owners Manual
Page 22
...■ Did you using an extension cord? Check that the dispenser drawer is the "Add Clothes" light on ? Add the correct amounts of the washer during operation. ■ Has a cycle been selected, but START/PAUSE has not been selected and held for details. ■ Are the laundry products ...in the same wash cycle repeatedly? This washer has a tight seal to the correct compartments. Check electrical source or call an electrician. ■ Is your voltage low? The door must ...
...■ Did you using an extension cord? Check that the dispenser drawer is the "Add Clothes" light on ? Add the correct amounts of the washer during operation. ■ Has a cycle been selected, but START/PAUSE has not been selected and held for details. ■ Are the laundry products ...in the same wash cycle repeatedly? This washer has a tight seal to the correct compartments. Check electrical source or call an electrician. ■ Is your voltage low? The door must ...
Owners Manual
Page 23
... This will occur more frequently when a non-HE detergent is normal. ■ Are you tightly packed the washer? Do not tightly pack the washer. Washer won 't drain or spin, water remains in washer ■ Is the drain hose clogged, or the end of the drain hose more than 96" (2.4 ...(2-3 items) of movement). ■ Is the load balanced? Select a cycle with additional tumbling. ■ Did you tightly pack the washer? Use HE detergent. This washer uses very little water to the original cycle. ■ Did the load cause imbalance? See "Secure the Drain Hose." ■ Does...
... This will occur more frequently when a non-HE detergent is normal. ■ Are you tightly packed the washer? Do not tightly pack the washer. Washer won 't drain or spin, water remains in washer ■ Is the drain hose clogged, or the end of the drain hose more than 96" (2.4 ...(2-3 items) of movement). ■ Is the load balanced? Select a cycle with additional tumbling. ■ Did you tightly pack the washer? Use HE detergent. This washer uses very little water to the original cycle. ■ Did the load cause imbalance? See "Secure the Drain Hose." ■ Does...


