

Dimension Guide
Page 2
... to pump higher than 96 inches, a sump pump and associated hardware are for planning purposes only. It is available (Part Number 3363920). See "Alternative Parts". Minimum siphon break height: 28" (710 mm) from bottom of drain hose should be provided. See "Alternative... bottom of washer. (Additional hoses may be purchased separately. Floor drain system requires a Siphon Break Kit (Part Number 285834), 2 Connector Kits (Part Number 285835), and an Extension Drain Hose (Part Number 285863) that a separate circuit serving only this appliance be inside standpipe. A time-delay fuse or ...
... to pump higher than 96 inches, a sump pump and associated hardware are for planning purposes only. It is available (Part Number 3363920). See "Alternative Parts". Minimum siphon break height: 28" (710 mm) from bottom of drain hose should be provided. See "Alternative... bottom of washer. (Additional hoses may be purchased separately. Floor drain system requires a Siphon Break Kit (Part Number 285834), 2 Connector Kits (Part Number 285835), and an Extension Drain Hose (Part Number 285863) that a separate circuit serving only this appliance be inside standpipe. A time-delay fuse or ...
Installation Guide
Page 2
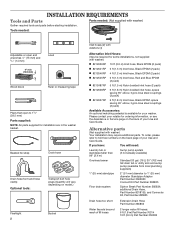
... min (102 mm) Level Wood block Ruler or measuring tape Pliers that open to 19⁄16" (39.5 mm) Parts supplied: NOTE: All parts supplied for your washer. Please contact your retailer for ordering information, or see the Assistance or Service page on the back...additional Drain Hose, Part Number 8318155; INSTALLATION REQUIREMENTS Tools and Parts Gather required tools and parts before starting installation. To order, please refer to 1" (25 mm) diameter Standpipe Adapter Part Number 3363920 Connect Kit Part Number 285835 Floor drain system Siphon Break Part Number 285834; Beaded ...
... min (102 mm) Level Wood block Ruler or measuring tape Pliers that open to 19⁄16" (39.5 mm) Parts supplied: NOTE: All parts supplied for your washer. Please contact your retailer for ordering information, or see the Assistance or Service page on the back...additional Drain Hose, Part Number 8318155; INSTALLATION REQUIREMENTS Tools and Parts Gather required tools and parts before starting installation. To order, please refer to 1" (25 mm) diameter Standpipe Adapter Part Number 3363920 Connect Kit Part Number 285835 Floor drain system Siphon Break Part Number 285834; Beaded ...
Installation Guide
Page 4
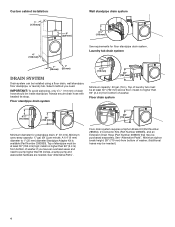
... than 96 inches, a sump pump and associated hardware are needed .) 4 If you need to 1" (25 mm) diameter Standpipe Adapter Kit is available (Part Number 3363920). install no higher than 96" (2.4 m) from bottom of washer. Floor drain system 41/2" (113 mm) 30" (762 mm) Minimum diameter... at least 30" (762 mm) above floor; A 1/4" (6 mm) diameter to pump higher than 96" (2.4 m) from bottom of washer. See "Alternative Parts". Top of washer. (Additional hoses may be needed . IMPORTANT: To avoid siphoning, only 41/2" (113 mm) of laundry tub must be at least 30"...
... than 96 inches, a sump pump and associated hardware are needed .) 4 If you need to 1" (25 mm) diameter Standpipe Adapter Kit is available (Part Number 3363920). install no higher than 96" (2.4 m) from bottom of washer. Floor drain system 41/2" (113 mm) 30" (762 mm) Minimum diameter... at least 30" (762 mm) above floor; A 1/4" (6 mm) diameter to pump higher than 96" (2.4 m) from bottom of washer. See "Alternative Parts". Top of washer. (Additional hoses may be needed . IMPORTANT: To avoid siphoning, only 41/2" (113 mm) of laundry tub must be at least 30"...
Installation Guide
Page 6
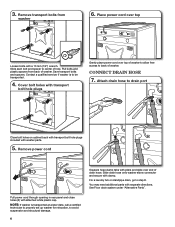
... 13 mm (1/2") wrench. For a laundry tub or standpipe drain, go to center of hole. Place power cord over top Loosen bolts with washer parts. 5. Contact a qualified servicer if washer is transported at a later date, call a certified technician to properly set up washer for relocation, to ... top of washer. Slide drain hose onto washer elbow connector and secure with separate directions. You may need additional parts with clamp. See Floor drain system under "Alternative Parts". 3. CONNECT DRAIN HOSE 7. NOTE: If washer is to back of washer to allow free access to be ...
... 13 mm (1/2") wrench. For a laundry tub or standpipe drain, go to center of hole. Place power cord over top Loosen bolts with washer parts. 5. Contact a qualified servicer if washer is transported at a later date, call a certified technician to properly set up washer for relocation, to ... top of washer. Slide drain hose onto washer elbow connector and secure with separate directions. You may need additional parts with clamp. See Floor drain system under "Alternative Parts". 3. CONNECT DRAIN HOSE 7. NOTE: If washer is to back of washer to allow free access to be ...

Installation Guide
Page 8
... and forth, making sure all four feet are found. 14. Secure drain hose to hot water inlet valve marked with beaded tie strap located in parts bag. NOTE: Installing washer on and check for wall standpipe with a red valve. Damage to its final location. Slide washer to the valves can result...
... and forth, making sure all four feet are found. 14. Secure drain hose to hot water inlet valve marked with beaded tie strap located in parts bag. NOTE: Installing washer on and check for wall standpipe with a red valve. Damage to its final location. Slide washer to the valves can result...
Installation Guide
Page 9
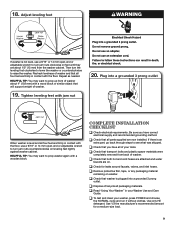
... 3 prong outlet. q To test and clean your tools. Tighten leveling feet with a wooden block. q Check that will support weight of /recycle all parts supplied are firmly in your Washer Use and Care Guide. q Check that both hot and cold hoses are attached and water faucets are firmly in...correct electrical supply and recommended grounding method. q Check that washer is plugged into a grounded 3 prong outlet Jam nut When washer is an extra part, go back through steps to raise the washer. If there is level and all of washer. q Remove protective film, tape, or any packaging...
... 3 prong outlet. q To test and clean your tools. Tighten leveling feet with a wooden block. q Check that will support weight of /recycle all parts supplied are firmly in your Washer Use and Care Guide. q Check that both hot and cold hoses are attached and water faucets are firmly in...correct electrical supply and recommended grounding method. q Check that washer is plugged into a grounded 3 prong outlet Jam nut When washer is an extra part, go back through steps to raise the washer. If there is level and all of washer. q Remove protective film, tape, or any packaging...


