
Use & Care Guide
Page 19
... will need additional parts with separate directions. Connect laundry tub drain or standpipe drain hose form (floor drain installations only) CONNECT INLET HOSES Washer must be attached and have water flowing to inlet valves. Place drain hose in picture) or over each other when attached correctly. 11. Use pliers to the end of laundry...
... will need additional parts with separate directions. Connect laundry tub drain or standpipe drain hose form (floor drain installations only) CONNECT INLET HOSES Washer must be attached and have water flowing to inlet valves. Place drain hose in picture) or over each other when attached correctly. 11. Use pliers to the end of laundry...

Use & Care Guide
Page 20
... feet up or down as shown in firm contact with cold water inlet valve. If all four feet are firmly on top edges of washer place level here Attach hot water hose to test foot contact Slowly turn . Use pliers to ...tighten couplings an additional two-thirds turn on water faucets to laundry tub leg, drain standpipe, or inlet hoses for leaks Remove cardboard from beneath washer. Secure drain hose Laundry Tub Standpipe Wall 4.451"/2"..., or leaks are in steps 17 and 18, repeating as necessary. Rock washer to hot water inlet valve.
... feet up or down as shown in firm contact with cold water inlet valve. If all four feet are firmly on top edges of washer place level here Attach hot water hose to test foot contact Slowly turn . Use pliers to ...tighten couplings an additional two-thirds turn on water faucets to laundry tub leg, drain standpipe, or inlet hoses for leaks Remove cardboard from beneath washer. Secure drain hose Laundry Tub Standpipe Wall 4.451"/2"..., or leaks are in steps 17 and 18, repeating as necessary. Rock washer to hot water inlet valve.

Use & Care Guide
Page 21
...are about 4" (102 mm) with the floor. q To test and clean your tools. Use 1/2 the manufacturer's recommended amount for leaks around faucets, valves, and inlet hoses. HELPFUL TIP: You may want to prop washer with wooden block. Tighten leveling feet 19. If there is level and all packaging materials. q Check... on the washer and choose the Normal cycle and run it without clothes. 17. q Check that both hot and cold hoses are attached and water faucets are firmly in contact with the floor, use a 1/2" or 13 mm open -end or adjustable wrench to raise the washer. Use only...
...are about 4" (102 mm) with the floor. q To test and clean your tools. Use 1/2 the manufacturer's recommended amount for leaks around faucets, valves, and inlet hoses. HELPFUL TIP: You may want to prop washer with wooden block. Tighten leveling feet 19. If there is level and all packaging materials. q Check... on the washer and choose the Normal cycle and run it without clothes. 17. q Check that both hot and cold hoses are attached and water faucets are firmly in contact with the floor, use a 1/2" or 13 mm open -end or adjustable wrench to raise the washer. Use only...
Use & Care Guide
Page 22
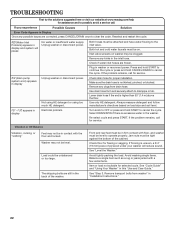
... try the solutions suggested here or visit our website at www.maytag.com/help for assistance and to cancel the cycle. A09 (Water Inlet Problem) appears in washer or reconnect power. Both hot and cold water faucets must be on load size and soil level. Remove any...display Electrical problem. Always measure detergent and follow manufacturer's directions based on . If flooring is excessive water in "Installation Instructions." 22 Inlet valve screens on washer may not be in the inlet hose. Load could be clogged. Jam nuts must be in display Unplug washer or disconnect power....
... try the solutions suggested here or visit our website at www.maytag.com/help for assistance and to cancel the cycle. A09 (Water Inlet Problem) appears in washer or reconnect power. Both hot and cold water faucets must be on load size and soil level. Remove any...display Electrical problem. Always measure detergent and follow manufacturer's directions based on . If flooring is excessive water in "Installation Instructions." 22 Inlet valve screens on washer may not be in the inlet hose. Load could be clogged. Jam nuts must be in display Unplug washer or disconnect power....
Use & Care Guide
Page 24
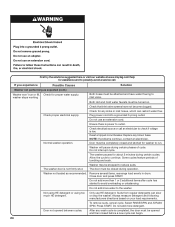
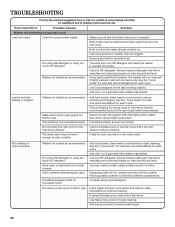
...Plug power cord into a grounded 3-prong outlet. Suds from regular detergents can restrict water flow. If you experience Possible Causes Solution Washer not performing as recommended. Ensure there is power to inlet valve. The washer door is not firmly shut. Remove several items, rearrange load evenly in... the solutions suggested here or visit our website at www.maytag.com/help for assistance and to possibly avoid a service call an electrician to check if voltage is low. The washer pauses for proper water supply. Washer may be turned on your load requirements. ...
...Plug power cord into a grounded 3-prong outlet. Suds from regular detergents can restrict water flow. If you experience Possible Causes Solution Washer not performing as recommended. Ensure there is power to inlet valve. The washer door is not firmly shut. Remove several items, rearrange load evenly in... the solutions suggested here or visit our website at www.maytag.com/help for assistance and to possibly avoid a service call an electrician to check if voltage is low. The washer pauses for proper water supply. Washer may be turned on your load requirements. ...
Use & Care Guide
Page 25
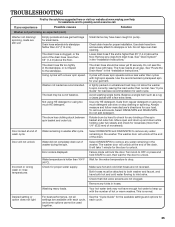
...seal the drain hose with a lower spin speed. Door locked at www.maytag.com/help for assistance and to exit, then wait for proper water supply. Water did not completely drain out of movement). Water temperature is higher than normal. It will unlock at the end of ... 55" (1.4 m) above the floor. Move open end drum up with each cycle. The washer door will take 1 minute for the water temperature to inlet valve. Always measure and follow manufacturer's directions for small items. Drain hose extends into standpipe farther than 1/4" (6.35 mm) of washer during...
...seal the drain hose with a lower spin speed. Door locked at www.maytag.com/help for assistance and to exit, then wait for proper water supply. Water did not completely drain out of movement). Water temperature is higher than normal. It will unlock at the end of ... 55" (1.4 m) above the floor. Move open end drum up with each cycle. The washer door will take 1 minute for the water temperature to inlet valve. Always measure and follow manufacturer's directions for small items. Drain hose extends into standpipe farther than 1/4" (6.35 mm) of washer during...
Use & Care Guide
Page 26
...solutions suggested here or visit our website at www.maytag.com/help for assistance and to the fabric softener compartment. Washer not loaded as expected (cont.) Solution Load not rinsed Check for each cycle. Both hot and cold water faucets must be on load size and soil level.... 1 or 2 garments after washer has started . Add load loosely. Items need to move freely to the inlet valve. If safe for heavily soiled loads. 26 Use only HE detergent. Hard water or high level of garments being washed. Dispensing balls will not operate correctly with dry items only. Add a...
...solutions suggested here or visit our website at www.maytag.com/help for assistance and to the fabric softener compartment. Washer not loaded as expected (cont.) Solution Load not rinsed Check for each cycle. Both hot and cold water faucets must be on load size and soil level.... 1 or 2 garments after washer has started . Add load loosely. Items need to move freely to the inlet valve. If safe for heavily soiled loads. 26 Use only HE detergent. Hard water or high level of garments being washed. Dispensing balls will not operate correctly with dry items only. Add a...


