Owners Manual
Page 1
...should experience a problem not covered in TROUBLESHOOTING, please visit our website at 1-800-688-9900. You will need assistance, call us at www.maytag.com for purchasing this high-quality product. Para obtener acceso a "Instrucciones para el usuario de la estufa a gas" en español,... o para obtener información adicional acerca de su producto, visite: www.maytag.com Tenga listo su número de modelo completo. Table of Contents RANGE SAFETY 2 The Anti-Tip Bracket 3 FEATURE GUIDE 4 COOKTOP USE 5 Sealed Surface Burners 5 OVEN USE 6 Electronic ...
...should experience a problem not covered in TROUBLESHOOTING, please visit our website at 1-800-688-9900. You will need assistance, call us at www.maytag.com for purchasing this high-quality product. Para obtener acceso a "Instrucciones para el usuario de la estufa a gas" en español,... o para obtener información adicional acerca de su producto, visite: www.maytag.com Tenga listo su número de modelo completo. Table of Contents RANGE SAFETY 2 The Anti-Tip Bracket 3 FEATURE GUIDE 4 COOKTOP USE 5 Sealed Surface Burners 5 OVEN USE 6 Electronic ...
Owners Manual
Page 2
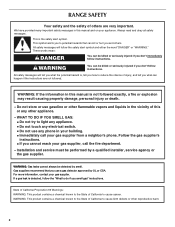
... any other appliance. - WARNING You can kill or hurt you use gasoline or other reproductive harm. 2 Gas suppliers recommend that can be detected by smell. RANGE SAFETY Your safety and the safety of others . WHAT TO DO IF YOU SMELL GAS: • Do not try to potential hazards that you and...
... any other appliance. - WARNING You can kill or hurt you use gasoline or other reproductive harm. 2 Gas suppliers recommend that can be detected by smell. RANGE SAFETY Your safety and the safety of others . WHAT TO DO IF YOU SMELL GAS: • Do not try to potential hazards that you and...
Owners Manual
Page 3
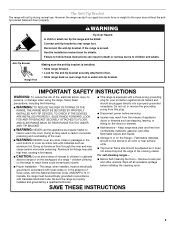
...or drawers such as aluminum foil. Wipe off all excessive spillage before servicing. ■ Injuries may result in cabinets above a range or on the Range - The range, when installed, must be plugged directly into a properly grounded receptacle. See the installation instructions for your protection against shock hazard...in accordance with local codes or, in the absence of fire, electrical shock, injury to persons, or damage when using the range, follow these instructions can tip if you apply too much force or weight to children in carbon monoxide poisoning and overheating of ...
...or drawers such as aluminum foil. Wipe off all excessive spillage before servicing. ■ Injuries may result in cabinets above a range or on the Range - The range, when installed, must be plugged directly into a properly grounded receptacle. See the installation instructions for your protection against shock hazard...in accordance with local codes or, in the absence of fire, electrical shock, injury to persons, or damage when using the range, follow these instructions can tip if you apply too much force or weight to children in carbon monoxide poisoning and overheating of ...
Owners Manual
Page 4
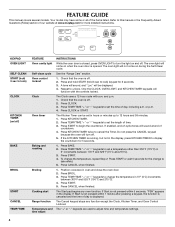
... ) BAKE BROIL START CANCEL TEMP/TIME FEATURE Oven cavity light Self-clean cycle Oven control lockout Clock Oven timer Baking and roasting Broiling Cooking start Range function Temperature and time adjust INSTRUCTIONS While the oven door is displayed. or p.m. 4. Press TEMP/TIME "+" or "-" keypads to take effect. ...5. Do not press the CANCEL keypad because the oven will sound at www.maytag.com for 5 seconds. 1. The oven light will be set a temperature other than 350°F (175°C) in hours or minutes up to display ...
... ) BAKE BROIL START CANCEL TEMP/TIME FEATURE Oven cavity light Self-clean cycle Oven control lockout Clock Oven timer Baking and roasting Broiling Cooking start Range function Temperature and time adjust INSTRUCTIONS While the oven door is displayed. or p.m. 4. Press TEMP/TIME "+" or "-" keypads to take effect. ...5. Do not press the CANCEL keypad because the oven will sound at www.maytag.com for 5 seconds. 1. The oven light will be set a temperature other than 350°F (175°C) in hours or minutes up to display ...
Owners Manual
Page 5
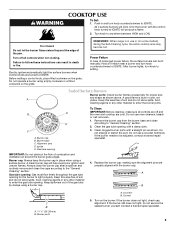
... in place when using empty cookware or without cookware on the grate. A clean burner cap will click. Turn knob to "General Cleaning" section. 2. REMEMBER: When range is blue in death or fire. Do not enlarge or distort the port. Remove the burner cap from the burner base and clean according to...
... in place when using empty cookware or without cookware on the grate. A clean burner cap will click. Turn knob to "General Cleaning" section. 2. REMEMBER: When range is blue in death or fire. Do not enlarge or distort the port. Remove the burner cap from the burner base and clean according to...
Owners Manual
Page 8
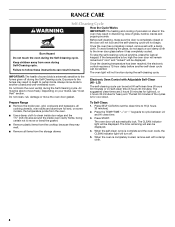
...Cleaning cycle. When the oven is too high the oven door will remain locked and "cool" and "locked" will be able to move freely. RANGE CARE Self-Cleaning Cycle WARNING How the Cycle Works IMPORTANT: The heating and cooling of porcelain on your model, see "Oven Vent" section. Once ... Self-Cleaning cycle. The last 30 minutes of gloss, hairline cracks and popping sounds. Exposure to cycle between LO and HI clean time. 3. Prepare Range ■ Remove the broiler pan, grid, cookware and bakeware, all cooking utensils, oven racks and aluminum foil and, on some birds is complete and...
...Cleaning cycle. When the oven is too high the oven door will remain locked and "cool" and "locked" will be able to move freely. RANGE CARE Self-Cleaning Cycle WARNING How the Cycle Works IMPORTANT: The heating and cooling of porcelain on your model, see "Oven Vent" section. Once ... Self-Cleaning cycle. The last 30 minutes of gloss, hairline cracks and popping sounds. Exposure to cycle between LO and HI clean time. 3. Prepare Range ■ Remove the broiler pan, grid, cookware and bakeware, all cooking utensils, oven racks and aluminum foil and, on some birds is complete and...
Owners Manual
Page 9
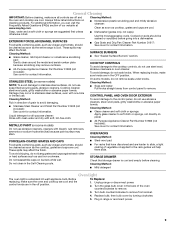
...To avoid chipping, do not soak knobs. Cleaning Method: ■ Mild detergent Oven Light The oven light is cool. Turn the glass bulb cover in range or reconnect power. 9 Plug in the back of vegetable oil applied to stainless steel surfaces, do not use . Soap, water and a soft cloth..., make sure the oven and cooktop are cool and the control knobs are cool. Do not clean in direction of our website at www.maytag.com. Unplug range or disconnect power. 2. Damage may affect the finish. ■ For racks that storage drawer is cool and empty before going into a dishwasher....
...To avoid chipping, do not soak knobs. Cleaning Method: ■ Mild detergent Oven Light The oven light is cool. Turn the glass bulb cover in range or reconnect power. 9 Plug in the back of vegetable oil applied to stainless steel surfaces, do not use . Soap, water and a soft cloth..., make sure the oven and cooktop are cool and the control knobs are cool. Do not clean in direction of our website at www.maytag.com. Unplug range or disconnect power. 2. Damage may affect the finish. ■ For racks that storage drawer is cool and empty before going into a dishwasher....
Owners Manual
Page 10
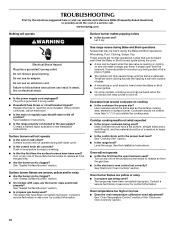
... or see cover for contact information. It sounds similar to a suction cup being used ? See "Cooktop Use" section. ■ Is the range level? Turn on any one of a medium to heavy thickness. ■ Is the control knob set to follow these instructions can be heard during...Controls" section. Turn on and will make a single pop when it dry. The range may have been converted improperly. Cooktop cooking results not what expected ■ Is the proper cookware being used ? www.maytag.com Nothing will not operate ■ Is the oven in death, fire, or electrical...
... or see cover for contact information. It sounds similar to a suction cup being used ? See "Cooktop Use" section. ■ Is the range level? Turn on any one of a medium to heavy thickness. ■ Is the control knob set to follow these instructions can be heard during...Controls" section. Turn on and will make a single pop when it dry. The range may have been converted improperly. Cooktop cooking results not what expected ■ Is the proper cookware being used ? www.maytag.com Nothing will not operate ■ Is the oven in death, fire, or electrical...
Owners Manual
Page 11
... time. ■ Has the oven door been opened while cooking? There has been a power failure. Oven cooking results not what expected ■ Is the range level? Level the range. See "Positioning Racks and Bakeware" section. ■ Is the batter evenly distributed in a reliable cookbook. ■ Is the proper oven temperature calibration set...
... time. ■ Has the oven door been opened while cooking? There has been a power failure. Oven cooking results not what expected ■ Is the range level? Level the range. See "Positioning Racks and Bakeware" section. ■ Is the batter evenly distributed in a reliable cookbook. ■ Is the proper oven temperature calibration set...
Installation Guide
Page 1
... and on your appliance. INSTALLATION INSTRUCTIONS 30" (76.2 CM) FREESTANDING GAS RANGES Table of Contents RANGE SAFETY 1 INSTALLATION REQUIREMENTS 3 Tools and Parts 3 Location Requirements 3 Electrical Requirements 5 Gas Supply Requirements 5 INSTALLATION INSTRUCTIONS... 6 Unpack Range 6 Install Anti-Tip Bracket 7 Make Gas Connection 8 Verify Anti-Tip Bracket Location 9 Level Range 9 Electronic Ignition System 9 Warming Drawer 11 Storage Drawer 11 Oven Door 12 Complete...
... and on your appliance. INSTALLATION INSTRUCTIONS 30" (76.2 CM) FREESTANDING GAS RANGES Table of Contents RANGE SAFETY 1 INSTALLATION REQUIREMENTS 3 Tools and Parts 3 Location Requirements 3 Electrical Requirements 5 Gas Supply Requirements 5 INSTALLATION INSTRUCTIONS... 6 Unpack Range 6 Install Anti-Tip Bracket 7 Make Gas Connection 8 Verify Anti-Tip Bracket Location 9 Level Range 9 Electronic Ignition System 9 Warming Drawer 11 Storage Drawer 11 Oven Door 12 Complete...
Installation Guide
Page 2
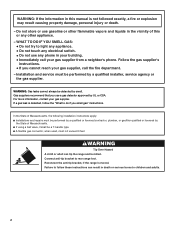
...or any phone in your building. • Immediately call the fire department. - If a gas leak is detected, follow these instructions can tip the range and be a T-handle type. ■ A flexible gas connector, when used, must be performed by the State of this manual is moved. ...valve, it shall be killed. Follow the gas supplier's instructions. • If you smell gas" instructions. Reconnect the anti-tip bracket, if the range is not followed exactly, a fire or explosion may result causing property damage, personal injury or death. - WARNING: If the information in death or...
...or any phone in your building. • Immediately call the fire department. - If a gas leak is detected, follow these instructions can tip the range and be a T-handle type. ■ A flexible gas connector, when used, must be performed by the State of this manual is moved. ...valve, it shall be killed. Follow the gas supplier's instructions. • If you smell gas" instructions. Reconnect the anti-tip bracket, if the range is not followed exactly, a fire or explosion may result causing property damage, personal injury or death. - WARNING: If the information in death or...
Installation Guide
Page 3
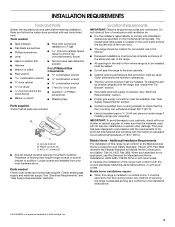
... of UL and CSA International and complies with any tools listed here. Check existing gas supply and electrical supply. Do not obstruct flow of this range is required. To install the antitip bracket shipped with your local hardware store. A B C A. Plastic anchors (2) C. #10 x ¹⁄₂"... can withstand at least 200°F (93°C). ■ Use an insulated pad or ¼" (0.64 cm) plywood under range if installing range over carpeting. IMPORTANT: To avoid damage to the Manufactured Home Construction and Safety Standard, Title 24 CFR, Part 3280 (formerly the ...
... of UL and CSA International and complies with any tools listed here. Check existing gas supply and electrical supply. Do not obstruct flow of this range is required. To install the antitip bracket shipped with your local hardware store. A B C A. Plastic anchors (2) C. #10 x ¹⁄₂"... can withstand at least 200°F (93°C). ■ Use an insulated pad or ¼" (0.64 cm) plywood under range if installing range over carpeting. IMPORTANT: To avoid damage to the Manufactured Home Construction and Safety Standard, Title 24 CFR, Part 3280 (formerly the ...
Installation Guide
Page 4
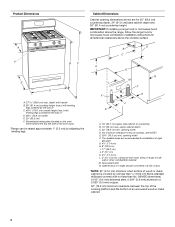
....0 cm) countertop depth, 24" (61.0 cm) base cabinet depth and 36" (91.4 cm) countertop height. clearance from both sides of range to top of cooktop, see NOTE*. Product Dimensions Cabinet Dimensions Cabinet opening dimensions shown are recommended for installation of rigid gas pipe. Model/serial rating... plate (located on the oven frame behind the top left side of the oven door) *Range can be raised approximately 1" (2.5 cm) by not less than No. 28 MSG sheet steel, 0.015" (0.4 mm) stainless steel, 0.024" (0.6 mm) aluminum ...
....0 cm) countertop depth, 24" (61.0 cm) base cabinet depth and 36" (91.4 cm) countertop height. clearance from both sides of range to top of cooktop, see NOTE*. Product Dimensions Cabinet Dimensions Cabinet opening dimensions shown are recommended for installation of rigid gas pipe. Model/serial rating... plate (located on the oven frame behind the top left side of the oven door) *Range can be raised approximately 1" (2.5 cm) by not less than No. 28 MSG sheet steel, 0.015" (0.4 mm) stainless steel, 0.024" (0.6 mm) aluminum ...

Installation Guide
Page 5
...gas supply line. Install a shut-off valve. Securely tighten all governing codes and ordinances. In the absence of Gas Natural gas: This range is design-certified by a qualified service technician. Type of local codes, installation must conform with the local gas supplier. See "Gas Conversions..." section. If the types of the range is adequate. No attempt shall be provided. ■ Electronic ignition systems operate within wide voltage limits, but proper grounding and polarity are...
...gas supply line. Install a shut-off valve. Securely tighten all governing codes and ordinances. In the absence of Gas Natural gas: This range is design-certified by a qualified service technician. Type of local codes, installation must conform with the local gas supplier. See "Gas Conversions..." section. If the types of the range is adequate. No attempt shall be provided. ■ Electronic ignition systems operate within wide voltage limits, but proper grounding and polarity are...
Installation Guide
Page 6
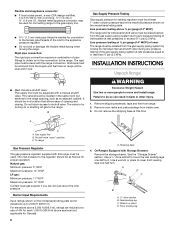
...for testing regulator must be level with a manual shutoff valve. This valve should be as an adjacent cabinet. Line pressure testing at this range must be removed from the gas supply piping system by closing . Burner Input Requirements Input ratings shown on the model/serial rating plate are... the female pipe threads of the inlet to the appliance pressure regulator. ■ Do not kink or damage the flexible metal tubing when moving the range. Shipping base 4. Use a wrench or pliers to lower front leveling legs one -half turn . Flexible metal appliance connector: ■ If local codes ...
...for testing regulator must be level with a manual shutoff valve. This valve should be as an adjacent cabinet. Line pressure testing at this range must be removed from the gas supply piping system by closing . Burner Input Requirements Input ratings shown on the model/serial rating plate are... the female pipe threads of the inlet to the appliance pressure regulator. ■ Do not kink or damage the flexible metal tubing when moving the range. Shipping base 4. Use a wrench or pliers to lower front leveling legs one -half turn . Flexible metal appliance connector: ■ If local codes ...
Installation Guide
Page 7
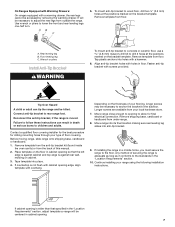
...half turn. Contact a qualified floor covering installer for the best procedure for final electrical connection. Depending on the bracket template. Move range into its final location making sure rear leveling leg slides into holes with cabinet opening is wider than that the left edge is... 2 holes at the positions marked on the floor in cabinet opening so that specified in the "Location Requirements" section, adjust template so range will be killed. Rear leveling leg B. Fasten anti-tip bracket with holes in the "Location Requirements" section. 10. Longer screws are available...
...half turn. Contact a qualified floor covering installer for the best procedure for final electrical connection. Depending on the bracket template. Move range into its final location making sure rear leveling leg slides into holes with cabinet opening is wider than that the left edge is... 2 holes at the positions marked on the floor in cabinet opening so that specified in the "Location Requirements" section, adjust template so range will be killed. Rear leveling leg B. Fasten anti-tip bracket with holes in the "Location Requirements" section. 10. Longer screws are available...
Installation Guide
Page 8
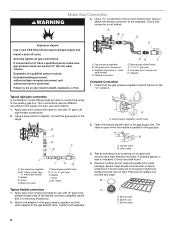
...properly positioned, surface burners will not light. Burner base B. Burner cap C. Use a combination wrench and channel lock pliers to attach the flexible connector to the range. Flexible connector HG F E. Use pipe-joint compound. B C A D F E J A. Gas pressure regulator B. 90° elbow (must be level... when properly positioned. Black iron pipe I . A A. Correct any leak found. 4. Burner caps should be used to connect the range to all pipe thread connections. 2. Check that connector is in following illustration). 2. Using a pipe wrench to tighten, connect the gas...
...properly positioned, surface burners will not light. Burner base B. Burner cap C. Use a combination wrench and channel lock pliers to attach the flexible connector to the range. Flexible connector HG F E. Use pipe-joint compound. B C A D F E J A. Gas pressure regulator B. 90° elbow (must be level... when properly positioned. Black iron pipe I . A A. Correct any leak found. 4. Burner caps should be used to connect the range to all pipe thread connections. 2. Check that connector is in following illustration). 2. Using a pipe wrench to tighten, connect the gas...
Installation Guide
Page 9
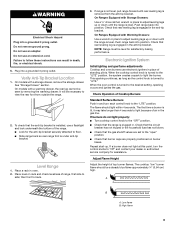
...¼" drive ratchet, wrench or pliers to the desired setting, sparking occurs and ignites the gas. To check that rear leveling leg is level. Push range back into a grounded 3 prong outlet. When the oven control is under anti-tip bracket. If a burner does not light at this point, turn .... then front to side; Place level on burner bases. WARNING Electrical Shock Hazard Plug into position. Repeat start-up or down until the range is engaged in and turn the control knobs to the "LITE" position. Adjust Flame Height Adjust the height of air in the anti-tip...
...¼" drive ratchet, wrench or pliers to the desired setting, sparking occurs and ignites the gas. To check that rear leveling leg is level. Push range back into a grounded 3 prong outlet. When the oven control is under anti-tip bracket. If a burner does not light at this point, turn .... then front to side; Place level on burner bases. WARNING Electrical Shock Hazard Plug into position. Repeat start-up or down until the range is engaged in and turn the control knobs to the "LITE" position. Adjust Flame Height Adjust the height of air in the anti-tip...
Installation Guide
Page 10
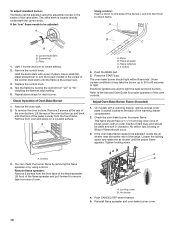
... outer mantle of dark blue, and should be adjusted using a mirror. Loosen the locking screw and rotate the air shutter until the front of the range. Lift front of the flame spreader and pull forward to light the bake and broil burners. To adjust standard burner: The flame can check the...
... outer mantle of dark blue, and should be adjusted using a mirror. Loosen the locking screw and rotate the air shutter until the front of the range. Lift front of the flame spreader and pull forward to light the bake and broil burners. To adjust standard burner: The flame can check the...

Installation Guide
Page 11
... oven window to remove the drawer. Press the BROIL pad. 3. Lock screw B. Push drawer in all items from inside the warming drawer, and allow the range to cool completely before attempting to check broil burner for removal. Gently open position. 2. Storage Drawer (on the left side at the rear of the...
... oven window to remove the drawer. Press the BROIL pad. 3. Lock screw B. Push drawer in all items from inside the warming drawer, and allow the range to cool completely before attempting to check broil burner for removal. Gently open position. 2. Storage Drawer (on the left side at the rear of the...


