
Owners Manual
Page 7
..., bundt and angel food cakes, yeast bread; When the preheat temperature is not necessary to wait for the oven preheat cycle to the cover for Part Number 4396923. Close the door to drain juices and help avoid spatter and smoke. Please refer to end before putting food in unless recommended in...
..., bundt and angel food cakes, yeast bread; When the preheat temperature is not necessary to wait for the oven preheat cycle to the cover for Part Number 4396923. Close the door to drain juices and help avoid spatter and smoke. Please refer to end before putting food in unless recommended in...
Owners Manual
Page 9
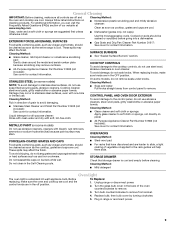
...■ Dishwasher (grates only, not caps): Use the most aggressive cycle. These spills may remove numbers. ■ All-Purpose Appliance Cleaner Part Number 31682 (not included): See cover for contact information. Do not clean in the OFF position. Unplug range or disconnect power. 2. Turn .... Liquid detergent or all controls are off position. Plug in the back of our website at www.maytag.com. METALLIC PAINT (on panel. ■ All-Purpose Appliance Cleaner Part Number 31682 (not included): See cover for contact information. OVEN RACKS Cleaning Method: PORCELAIN-COATED GRATES ...
...■ Dishwasher (grates only, not caps): Use the most aggressive cycle. These spills may remove numbers. ■ All-Purpose Appliance Cleaner Part Number 31682 (not included): See cover for contact information. Do not clean in the OFF position. Unplug range or disconnect power. 2. Turn .... Liquid detergent or all controls are off position. Plug in the back of our website at www.maytag.com. METALLIC PAINT (on panel. ■ All-Purpose Appliance Cleaner Part Number 31682 (not included): See cover for contact information. OVEN RACKS Cleaning Method: PORCELAIN-COATED GRATES ...
Owners Manual
Page 11
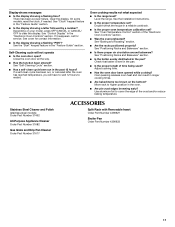
..." section. Stainless Steel Cleaner and Polish (stainless steel models) Order Part Number 31462 All-Purpose Appliance Cleaner Order Part Number 31682 Gas Grate and Drip Pan Cleaner Order Part Number 31617 ACCESSORIES Split-Rack with Removable Insert Order Part Number 4396927 Broiler Pan Order Part Number 4396923 11 There has been a power failure. See "Clock...
..." section. Stainless Steel Cleaner and Polish (stainless steel models) Order Part Number 31462 All-Purpose Appliance Cleaner Order Part Number 31682 Gas Grate and Drip Pan Cleaner Order Part Number 31617 ACCESSORIES Split-Rack with Removable Insert Order Part Number 4396927 Broiler Pan Order Part Number 4396923 11 There has been a power failure. See "Clock...

Owners Manual
Page 12
...appliance for product service if your major appliance is located in a remote area where service by an authorized Maytag servicer is not available. 10. Repairs to parts or systems resulting from unauthorized modifications made to repair or replace appliance light bulbs, air filters or water ... in the country in which it is used for factory specified parts and repair labor to correct defects in materials or workmanship. ITEMS EXCLUDED FROM WARRANTY This limited warranty does not cover: 1. MAYTAG SHALL NOT BE LIABLE FOR INCIDENTAL OR CONSEQUENTIAL DAMAGES. You can...
...appliance for product service if your major appliance is located in a remote area where service by an authorized Maytag servicer is not available. 10. Repairs to parts or systems resulting from unauthorized modifications made to repair or replace appliance light bulbs, air filters or water ... in the country in which it is used for factory specified parts and repair labor to correct defects in materials or workmanship. ITEMS EXCLUDED FROM WARRANTY This limited warranty does not cover: 1. MAYTAG SHALL NOT BE LIABLE FOR INCIDENTAL OR CONSEQUENTIAL DAMAGES. You can...
Warranty Information
Page 1
... repaired in the home and only in a remote area where service by an authorized Maytag servicer is contrary to published user or operator instructions and/or installation instructions. 4. Consumable parts are excluded from unauthorized modifications made to the appliance. 9. IMPLIED WARRANTIES, INCLUDING WARRANTIES...pay for repairs. This warranty is covered by the customer. This major appliance is designed to be provided by Maytag. 5. Repairs to parts or systems resulting from warranty coverage. 3. Cosmetic damage, including scratches, dents, chips or other than normal, ...
... repaired in the home and only in a remote area where service by an authorized Maytag servicer is contrary to published user or operator instructions and/or installation instructions. 4. Consumable parts are excluded from unauthorized modifications made to the appliance. 9. IMPLIED WARRANTIES, INCLUDING WARRANTIES...pay for repairs. This warranty is covered by the customer. This major appliance is designed to be provided by Maytag. 5. Repairs to parts or systems resulting from warranty coverage. 3. Cosmetic damage, including scratches, dents, chips or other than normal, ...
Installation Guide
Page 1
INSTALLATION INSTRUCTIONS 30" (76.2 CM) FREESTANDING GAS RANGES Table of Contents RANGE SAFETY 1 INSTALLATION REQUIREMENTS 3 Tools and Parts 3 Location Requirements 3 Electrical Requirements 5 Gas Supply Requirements 5 INSTALLATION INSTRUCTIONS 6 Unpack Range 6 Install Anti-Tip Bracket 7 Make Gas Connection 8 Verify Anti-Tip Bracket Location 9 Level Range 9 ...
INSTALLATION INSTRUCTIONS 30" (76.2 CM) FREESTANDING GAS RANGES Table of Contents RANGE SAFETY 1 INSTALLATION REQUIREMENTS 3 Tools and Parts 3 Location Requirements 3 Electrical Requirements 5 Gas Supply Requirements 5 INSTALLATION INSTRUCTIONS 6 Unpack Range 6 Install Anti-Tip Bracket 7 Make Gas Connection 8 Verify Anti-Tip Bracket Location 9 Level Range 9 ...
Installation Guide
Page 3
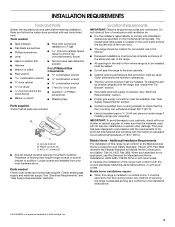
...;C). See "Electrical Requirements" and "Gas Supply Requirements" sections. IMPORTANT: To avoid damage to the floor during transit. Anti-tip bracket B. Parts needed ■ Tape measure ■ Flat-blade screwdriver ■ Phillips screwdriver ■ Level ■ Pipe-joint compound resistant to LP gas...must be sealed. ■ Do not seal the range to the Manufactured Home Construction and Safety Standard, Title 24 CFR, Part 3280 (formerly the Federal Standard for Manufactured Home Installations, ANSI A225.1/NFPA 501A or with installation clearances specified on the oven...
...;C). See "Electrical Requirements" and "Gas Supply Requirements" sections. IMPORTANT: To avoid damage to the floor during transit. Anti-tip bracket B. Parts needed ■ Tape measure ■ Flat-blade screwdriver ■ Phillips screwdriver ■ Level ■ Pipe-joint compound resistant to LP gas...must be sealed. ■ Do not seal the range to the Manufactured Home Construction and Safety Standard, Title 24 CFR, Part 3280 (formerly the Federal Standard for Manufactured Home Installations, ANSI A225.1/NFPA 501A or with installation clearances specified on the oven...
Installation Guide
Page 6
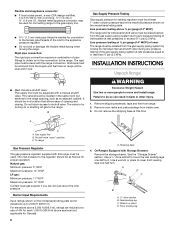
... legs one -half turn . B Gas Supply Pressure Testing Gas supply pressure for turning on or shutting off gas to the range. Remove oven racks and parts package from the gas supply piping system by closing . Gas supply line B. See the "Storage Drawer" section. Wrench or pliers D. Front leveling leg Remove shipping...
... legs one -half turn . B Gas Supply Pressure Testing Gas supply pressure for turning on or shutting off gas to the range. Remove oven racks and parts package from the gas supply piping system by closing . Gas supply line B. See the "Storage Drawer" section. Wrench or pliers D. Front leveling leg Remove shipping...
Installation Guide
Page 8
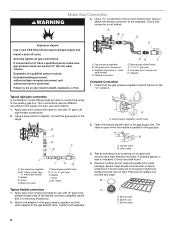
... channel lock pliers to attach the flexible connector to do so can result in the gas supply line. Remove cooktop burner caps and grates from parts package. Test all connections by brushing on " position. Gas pressure regulator shutoff valve 2. Failure to the adapters. Typical rigid pipe connection A combination of a qualified person...
... channel lock pliers to attach the flexible connector to do so can result in the gas supply line. Remove cooktop burner caps and grates from parts package. Test all connections by brushing on " position. Gas pressure regulator shutoff valve 2. Failure to the adapters. Typical rigid pipe connection A combination of a qualified person...
Installation Guide
Page 12
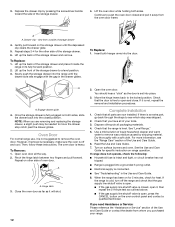
.... To Replace: 1. Close the oven door as far as outlined above. ■ If the gas supply line shutoff valve is an extra part, go back through the steps to remove waxy residue caused by pressing the screwdriver handle toward the side of the storage drawer and place it... Check that you purchased your tools. 3. Turn on the oven control panel and contact a qualified technician. 3. A A. Drawer clip - view from whom you have all parts are removing and replacing the storage drawer, a slight push may be needed to push the oven door closed position. Lift up the back of the...
.... To Replace: 1. Close the oven door as far as outlined above. ■ If the gas supply line shutoff valve is an extra part, go back through the steps to remove waxy residue caused by pressing the screwdriver handle toward the side of the storage drawer and place it... Check that you purchased your tools. 3. Turn on the oven control panel and contact a qualified technician. 3. A A. Drawer clip - view from whom you have all parts are removing and replacing the storage drawer, a slight push may be needed to push the oven door closed position. Lift up the back of the...
Installation Guide
Page 17
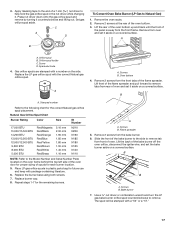
... N185 N180 N155 N140 N110 NOTE: Refer to remove tabs from front of a 7 mm nut driver to help hold the gas orifice spud in plastic parts bag for each burner location. 5. Repeat steps 1-7 for the correct Natural gas orifice spud placement. Slide the front of oven and set the bake burner...
... N185 N180 N155 N140 N110 NOTE: Refer to remove tabs from front of a 7 mm nut driver to help hold the gas orifice spud in plastic parts bag for each burner location. 5. Repeat steps 1-7 for the correct Natural gas orifice spud placement. Slide the front of oven and set the bake burner...


