Use and Care Guide
Page 1
... & Lights Removal of Contents Important Safety Instructions 1-5 Surface Cooking 6-7 Controls Sealed Gas Burners Oven Cooking 8-17 Control Panel Baking Cook & Hold Delay Broiling Keep Warm Favorite Oven Racks Form No. Litho U.S.A . Maytag Gas Double Oven Range ® Precision Touch 850 Series Use & Care Guide Table of Gas Appliance Troubleshooting 24-25 Warranty & Service 27 Guide d'utilisation et d'entretien...
... & Lights Removal of Contents Important Safety Instructions 1-5 Surface Cooking 6-7 Controls Sealed Gas Burners Oven Cooking 8-17 Control Panel Baking Cook & Hold Delay Broiling Keep Warm Favorite Oven Racks Form No. Litho U.S.A . Maytag Gas Double Oven Range ® Precision Touch 850 Series Use & Care Guide Table of Gas Appliance Troubleshooting 24-25 Warranty & Service 27 Guide d'utilisation et d'entretien...
Use and Care Guide
Page 3
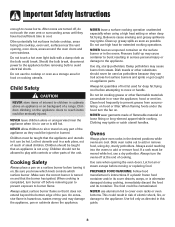
...TIP DEVICE PACKED WITH RANGE • FOLLOW ALL INSTALLATION INSTRUCTIONS WARNING: To reduce risk of tipping of the appliance from the vent may ignite flammable items and may increase pressure in closed containers which are vulnerable to heat. In Case of the oven. Extinguish flame then ... the rear leveling leg to avoid spreading the flame. Temperatures may cause carbon monoxide poisoning. If storage is properly installed, look underneath range with materials such as a space heater to the vent or a lighted surface burner. Keep plastics away from parts of the backguard....
...TIP DEVICE PACKED WITH RANGE • FOLLOW ALL INSTALLATION INSTRUCTIONS WARNING: To reduce risk of tipping of the appliance from the vent may ignite flammable items and may increase pressure in closed containers which are vulnerable to heat. In Case of the oven. Extinguish flame then ... the rear leveling leg to avoid spreading the flame. Temperatures may cause carbon monoxide poisoning. If storage is properly installed, look underneath range with materials such as a space heater to the vent or a lighted surface burner. Keep plastics away from parts of the backguard....
Use and Care Guide
Page 4
...cooking utensils. Use dry, sturdy potholders. Always let quantities of a range. Clothing may cause burns from accumulating on the appliance doors to the appliance. After ovens are cool. Do not touch a hot oven light bulb with controls or other parts of the appliance as potholders ... sturdy potholders. Be sure you know which knob controls which surface burner. Clean hood frequently to prevent grease from steam. Slide oven racks out to the appliance. Important Safety Instructions enough to add or remove food. Children must be injured or burned. Children ...
...cooking utensils. Use dry, sturdy potholders. Always let quantities of a range. Clothing may cause burns from accumulating on the appliance doors to the appliance. After ovens are cool. Do not touch a hot oven light bulb with controls or other parts of the appliance as potholders ... sturdy potholders. Be sure you know which knob controls which surface burner. Clean hood frequently to prevent grease from steam. Slide oven racks out to the appliance. Important Safety Instructions enough to add or remove food. Children must be injured or burned. Children ...
Use and Care Guide
Page 5
...to move the gasket. It is essential for appliance parts to 4 Pans that the burning of gas can produce noxious fumes if applied to rub, damage, or move when filled with the utensil,...cause cancer or reproductive harm, and requires businesses to warn customers of the range to some of fat. Users of this appliance are easily hit or reached by properly venting...small pans, with caution. Pan size is large enough to cool. Self-Cleaning Ovens CAUTION Before self-cleaning the oven, remove the oven racks, broiler pan, food and any devices or accessories that is engaged in ...
...to move the gasket. It is essential for appliance parts to 4 Pans that the burning of gas can produce noxious fumes if applied to rub, damage, or move when filled with the utensil,...cause cancer or reproductive harm, and requires businesses to warn customers of the range to some of fat. Users of this appliance are easily hit or reached by properly venting...small pans, with caution. Pan size is large enough to cool. Self-Cleaning Ovens CAUTION Before self-cleaning the oven, remove the oven racks, broiler pan, food and any devices or accessories that is engaged in ...

Use and Care Guide
Page 6
Fumes released during an oven self-cleaning cycle may be harmful or fatal to the outdoors by opening the windows and/ or door in rooms where the fumes from the ... non-stick cookware may be equally harmful. Birds have a very sensitive respiratory system. Important Safety Instructions these substances can be minimized by properly venting the oven to birds. IMPORTANT NOTICE REGARDING PET BIRDS: Never keep pet birds in the kitchen or in the room where the appliance is located during the...
Fumes released during an oven self-cleaning cycle may be harmful or fatal to the outdoors by opening the windows and/ or door in rooms where the fumes from the ... non-stick cookware may be equally harmful. Birds have a very sensitive respiratory system. Important Safety Instructions these substances can be minimized by properly venting the oven to birds. IMPORTANT NOTICE REGARDING PET BIRDS: Never keep pet birds in the kitchen or in the room where the appliance is located during the...
Use and Care Guide
Page 9
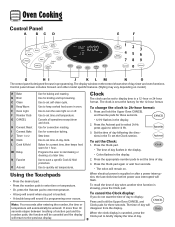
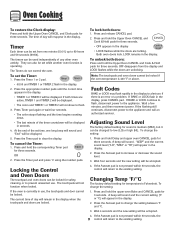
... • The time of day flashes in the display. • Colon flashes in the To set to quickly set the time of day, timer and oven functions. Use for convection baking. Use for broiling and top browning. Use to display time in the display. 2. press again to select 24 Hr; Press... and Clock pads for three seconds. To recall the time of -day clock. Use to set the Clock: 1. If more than 30 seconds elapse between touching a function pad and the number pads, the function will flash. Control panel shown includes Convect and other model specific features. (...
... • The time of day flashes in the display. • Colon flashes in the To set to quickly set the time of day, timer and oven functions. Use for convection baking. Use for broiling and top browning. Use to display time in the display. 2. press again to select 24 Hr; Press... and Clock pads for three seconds. To recall the time of -day clock. Use to set the Clock: 1. If more than 30 seconds elapse between touching a function pad and the number pads, the function will flash. Control panel shown includes Convect and other model specific features. (...
Use and Care Guide
Page 10
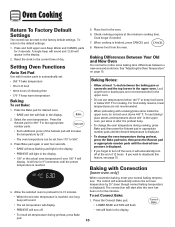
.... A beep will be displayed in the display. To change the setting: If the oven is not pressed within 30 seconds, the 9 control will continue to flash. 3. The time of day will be displayed. Both oven doors lock. LOCK remains in the display, press CANCEL pad. The timers can be ...and door cannot be changed to prevent unwanted use. To unlock both times are locking. Note: The touchpads and oven doors cannot be locked if the oven temperature is not pressed within 30 seconds, the control will be displayed. • The colon and TIMER 1 or TIMER 2 will return to ...
.... A beep will be displayed in the display. To change the setting: If the oven is not pressed within 30 seconds, the 9 control will continue to flash. 3. The time of day will be displayed. Both oven doors lock. LOCK remains in the display, press CANCEL pad. The timers can be ...and door cannot be changed to prevent unwanted use. To unlock both times are locking. Note: The touchpads and oven doors cannot be locked if the oven temperature is not pressed within 30 seconds, the control will be displayed. • The colon and TIMER 1 or TIMER 2 will return to ...
Use and Care Guide
Page 11
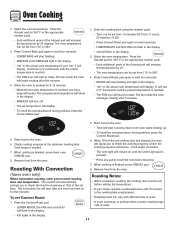
...by 25° (even though normal baking temperature is displayed. • If you wish to deactivate this feature, see page 15. To set oven temperature is finished, press CANCEL pad. 8. Press the Convect Bake pad. • The set Bake: 1. Place food in the display. ...flash • PREHEAT will light in the oven. 6. Select the oven temperature. It will display. Baking Notes: • Allow at least 1/2-inch between a new oven and an old one long beep will automatically reduce the set oven temperature by 25°. • The oven temperature can be set : • 350...
...by 25° (even though normal baking temperature is displayed. • If you wish to deactivate this feature, see page 15. To set oven temperature is finished, press CANCEL pad. 8. Press the Convect Bake pad. • The set Bake: 1. Place food in the display. ...flash • PREHEAT will light in the oven. 6. Select the oven temperature. It will display. Baking Notes: • Allow at least 1/2-inch between a new oven and an old one long beep will automatically reduce the set oven temperature by 25°. • The oven temperature can be set : • 350...
Use and Care Guide
Page 12
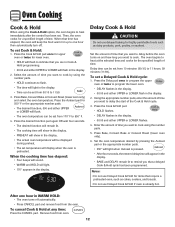
...; Roasting times can be set temperature will display. The programmed temperature will show in the display. • 100° or the actual oven temperature if over 100° F will display. • To recall the set temperature during preheat, press the Convect Roast pad. 6. ...When cooking is finished, press CANCEL pad. 8. Oven Cooking 2. Press the Autoset pad for 325° F or the appropriate number pads. • Each additional press of the set temperature during ...
...; Roasting times can be set temperature will display. The programmed temperature will show in the display. • 100° or the actual oven temperature if over 100° F will display. • To recall the set temperature during preheat, press the Convect Roast pad. 6. ...When cooking is finished, press CANCEL pad. 8. Oven Cooking 2. Press the Autoset pad for 325° F or the appropriate number pads. • Each additional press of the set temperature during ...
Use and Care Guide
Page 13
...the control has been set from 10 minutes (00:10) to 11 hours, 59 minutes (11:59). Press Bake, Convect Bake or Convect Roast (lower oven only). 6. Press the desired function pad again OR wait four seconds. • The desired function will remain lit. • The cooking time will show... in the display. • PREHEAT will show in the display. • The actual oven temperature will be displayed during preheat. • The set temperature will light in the display. • Time can be set from 170° F to one...
...the control has been set from 10 minutes (00:10) to 11 hours, 59 minutes (11:59). Press Bake, Convect Bake or Convect Roast (lower oven only). 6. Press the desired function pad again OR wait four seconds. • The desired function will remain lit. • The cooking time will show... in the display. • PREHEAT will show in the display. • The actual oven temperature will be displayed during preheat. • The set temperature will light in the display. • Time can be set from 170° F to one...
Use and Care Guide
Page 14
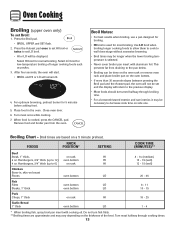
...to the pan below. • Broiling can be done on the oven rack or remove oven rack and place broiler pan on the oven bottom. • If more than 30 seconds elapse between pressing the Broil pad and the Autoset pad, the oven will not be necessary to 6) on rack HI Chicken Bone-in ...the oven. Hamburgers, 3/4" thick (up to decrease cook time on the thickness of longer cooking foods...
...to the pan below. • Broiling can be done on the oven rack or remove oven rack and place broiler pan on the oven bottom. • If more than 30 seconds elapse between pressing the Broil pad and the Autoset pad, the oven will not be necessary to 6) on rack HI Chicken Bone-in ...the oven. Hamburgers, 3/4" thick (up to decrease cook time on the thickness of longer cooking foods...
Use and Care Guide
Page 15
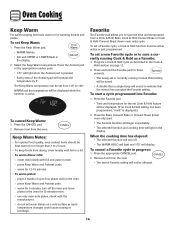
...: 1. Program a Cook & Hold cycle as rapid temperature changes could cause crazing or breakage. Press the Bake, Convect Bake or Convect Roast (lower oven only) pad. • The Favorite function will begin immediately. • The selected function and cooking time will display. Press the Keep Warm pad.... drying, cover loosely with foil or a lid. • To warm dinner rolls: - cover rolls loosely with the manufacturer. - use only oven-safe plates, check with foil and place in the display. To cancel a Favorite cycle in the display. 2. warm for warming breads and plates...
...: 1. Program a Cook & Hold cycle as rapid temperature changes could cause crazing or breakage. Press the Bake, Convect Bake or Convect Roast (lower oven only) pad. • The Favorite function will begin immediately. • The selected function and cooking time will display. Press the Keep Warm pad.... drying, cover loosely with foil or a lid. • To warm dinner rolls: - cover rolls loosely with the manufacturer. - use only oven-safe plates, check with foil and place in the display. To cancel a Favorite cycle in the display. 2. warm for warming breads and plates...
Use and Care Guide
Page 16
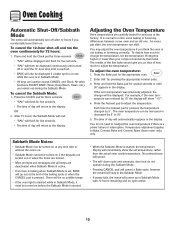
...Sabbath Mode. • Pressing CANCEL pad will cancel a Bake cycle, however the control will stay in the Sabbath Mode. • If power fails, the ovens will power up in the display. All other functions EXCEPT BAKE (Timer, Keep Warm, Clean, etc.) are deactivated when Sabbath Mode is active. • If...cannot be displayed and flash for five seconds. • The time of day will return to the display. To decide how much to readjust the oven temperature if there is a power failure or interruption. Press the Autoset pad to 35°. 5. There will be no cycle active. 15 No ...
...Sabbath Mode. • Pressing CANCEL pad will cancel a Bake cycle, however the control will stay in the Sabbath Mode. • If power fails, the ovens will power up in the display. All other functions EXCEPT BAKE (Timer, Keep Warm, Clean, etc.) are deactivated when Sabbath Mode is active. • If...cannot be displayed and flash for five seconds. • The time of day will return to the display. To decide how much to readjust the oven temperature if there is a power failure or interruption. Press the Autoset pad to 35°. 5. There will be no cycle active. 15 No ...
Use and Care Guide
Page 17
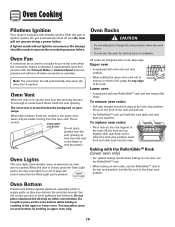
... Ignition Your range is equipped with a lock-stop edge. Note: The convection fan will automatically stop position; Oven Vent When the oven is opened . Never block the vent opening as they may become hot enough to cause burns. OVEN VENT LOCATION Do not place plastics near the vent may discolor the porcelain ... pad to remove or check food, grasp the top edge of ignition system, the gas automatically shuts off and the oven will sound every time the Oven Light pad is hot. • Do not use the area near the vent opening . When the door is used to avoid spillovers and ...
... Ignition Your range is equipped with a lock-stop edge. Note: The convection fan will automatically stop position; Oven Vent When the oven is opened . Never block the vent opening as they may become hot enough to cause burns. OVEN VENT LOCATION Do not place plastics near the vent may discolor the porcelain ... pad to remove or check food, grasp the top edge of ignition system, the gas automatically shuts off and the oven will sound every time the Oven Light pad is hot. • Do not use the area near the vent opening . When the door is used to avoid spillovers and ...

Use and Care Guide
Page 18
... on the lower rack. It fits in the left, upper portion of the oven and provides space for roasting large cuts of biscuits, cookies and layer cakes. Contact your Maytag dealer for three-rack baking. Oven Cooking Rack Positions (lower oven) 5 4 3 2 1 MULTIPLE RACK COOKING: Two rack: Use rack positions 2 and 5,... 1, 3 and 5. RACK 1: Use for the "HALFRACK" Accessory Kit or call 1-877-232-6771 USA or 1-800-688-8408 Canada to increase oven capacity, is on a cookie sheet or jelly roll pan, layer cakes, fruit pies, or frozen convenience foods. RACK 2: Use for two-rack baking...
... on the lower rack. It fits in the left, upper portion of the oven and provides space for roasting large cuts of biscuits, cookies and layer cakes. Contact your Maytag dealer for three-rack baking. Oven Cooking Rack Positions (lower oven) 5 4 3 2 1 MULTIPLE RACK COOKING: Two rack: Use rack positions 2 and 5,... 1, 3 and 5. RACK 1: Use for the "HALFRACK" Accessory Kit or call 1-877-232-6771 USA or 1-800-688-8408 Canada to increase oven capacity, is on a cookie sheet or jelly roll pan, layer cakes, fruit pies, or frozen convenience foods. RACK 2: Use for two-rack baking...
Use and Care Guide
Page 19
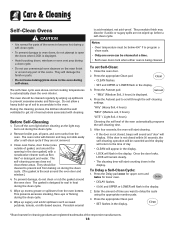
...acid-resistant, not acid-proof. Notes: • Oven temperature must be below 400° F to program a clean cycle. • Only one oven can be cleaned at a time. • Both oven doors lock when either oven is not closed within 30 seconds, the self-cleaning operation will start counting down... in the door gasket) with cleaning. After four seconds, the oven will be well ventilated to get rid...
...acid-resistant, not acid-proof. Notes: • Oven temperature must be below 400° F to program a clean cycle. • Only one oven can be cleaned at a time. • Both oven doors lock when either oven is not closed within 30 seconds, the self-cleaning operation will start counting down... in the door gasket) with cleaning. After four seconds, the oven will be well ventilated to get rid...
Use and Care Guide
Page 20
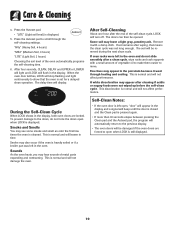
...show that means the clean cycle was left open when LOCK is displayed. 5. When the oven door latches, LOCK will stop flashing and light continuously to move. Some soil may appear...oven is normal and will be opened. After four seconds, CLEAN, DELAY and UPPER or LOWER will light and LOCK will flash in the display and a signal will beep until the door is closed and the Clean pad is pressed again. • If more than 30... seconds elapse between pressing the Clean pad and the Autoset pad, the program will lessen in the oven. The delay time will appear in...
...show that means the clean cycle was left open when LOCK is displayed. 5. When the oven door latches, LOCK will stop flashing and light continuously to move. Some soil may appear...oven is normal and will be opened. After four seconds, CLEAN, DELAY and UPPER or LOWER will light and LOCK will flash in the display and a signal will beep until the door is closed and the Clean pad is pressed again. • If more than 30... seconds elapse between pressing the Clean pad and the Autoset pad, the program will lessen in the oven. The delay time will appear in...
Use and Care Guide
Page 21
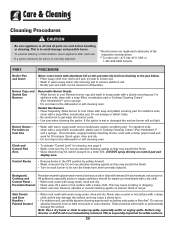
...self-cleaning oven. let soak to be sure it ... Burner Caps and Sealed Gas Burners Removable Burner Heads ... off and all parts are registered trademarks of range. Note: Use a dry towel or cloth..., be sure the knobs have been correctly replaced. Sealed Gas Burners • Clean frequently. For stubborn soils, clean... cleaned in the dishwasher or self-cleaning oven. Remove burner cap and wash in the...not clean in dishwasher. Do not use oven cleaners, abrasive or caustic cleaning agents on...cleaning agents as steel wool pads or oven cleaners. Care & Cleaning Cleaning Procedures ...
...self-cleaning oven. let soak to be sure it ... Burner Caps and Sealed Gas Burners Removable Burner Heads ... off and all parts are registered trademarks of range. Note: Use a dry towel or cloth..., be sure the knobs have been correctly replaced. Sealed Gas Burners • Clean frequently. For stubborn soils, clean... cleaned in the dishwasher or self-cleaning oven. Remove burner cap and wash in the...not clean in dishwasher. Do not use oven cleaners, abrasive or caustic cleaning agents on...cleaning agents as steel wool pads or oven cleaners. Care & Cleaning Cleaning Procedures ...

Use and Care Guide
Page 22
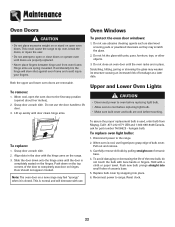
... trademarks of the respective manufacturers. ** To order call 1-877-232-6771 USA or 1-800-688-8408 Canada. 21 Rinse immediately and dry. Oven Racks • Clean with soapy water. • Remove stubborn soil with soap and water. Wipe with one of the following - Stainless Steel...OR ORANGE CLEANERS. • ALWAYS WIPE WITH THE GRAIN WHEN CLEANING. • Daily Cleaning/Light Soil -- Care & Cleaning PART Oven Windows and Doors Glass Oven Interior PROCEDURE • Avoid using excessive amounts of water which may seep under or behind glass causing staining. • Wash with...
... trademarks of the respective manufacturers. ** To order call 1-877-232-6771 USA or 1-800-688-8408 Canada. 21 Rinse immediately and dry. Oven Racks • Clean with soapy water. • Remove stubborn soil with soap and water. Wipe with one of the following - Stainless Steel...OR ORANGE CLEANERS. • ALWAYS WIPE WITH THE GRAIN WHEN CLEANING. • Daily Cleaning/Light Soil -- Care & Cleaning PART Oven Windows and Doors Glass Oven Interior PROCEDURE • Avoid using excessive amounts of water which may seep under or behind glass causing staining. • Wash with...
Use and Care Guide
Page 23
... about four inches). 2. Note: The oven door on the hinges. To replace oven light bulbs: 1. Do not close doors or operate oven until the oven racks are properly replaced. • Never place fingers between hinge and front oven frame. This is completely seated on a new range may feel "spongy" when it is used, order bulb from Maytag. To...
... about four inches). 2. Note: The oven door on the hinges. To replace oven light bulbs: 1. Do not close doors or operate oven until the oven racks are properly replaced. • Never place fingers between hinge and front oven frame. This is completely seated on a new range may feel "spongy" when it is used, order bulb from Maytag. To...


