Use and Care Manual
Page 8
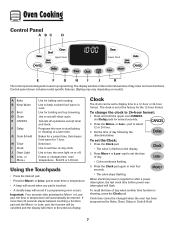
... for a preset time, then keeps food warm for baking and roasting. Enters or changes time, oven temperature. Sets HI or LO broil. If more than 30 seconds elapse between touching a function pad and the More+ or Less- Clock The clock can be set the time of day. • Colon continues flashing...
... for a preset time, then keeps food warm for baking and roasting. Enters or changes time, oven temperature. Sets HI or LO broil. If more than 30 seconds elapse between touching a function pad and the More+ or Less- Clock The clock can be set the time of day. • Colon continues flashing...
Use and Care Manual
Page 9
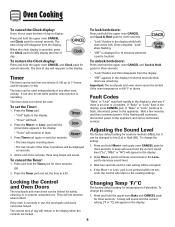
... time of day will appear in the display. Press the More+ or Less- Wait a few minutes, and then reconnect power. pad is not pressed within 30 seconds, the control will remain in the display for temperature is touched. Locking the Control and Oven Doors The touchpads and oven doors can be...
... time of day will appear in the display. Press the More+ or Less- Wait a few minutes, and then reconnect power. pad is not pressed within 30 seconds, the control will remain in the display for temperature is touched. Locking the Control and Oven Doors The touchpads and oven doors can be...

Use and Care Manual
Page 10
...• "Bake" will stop flashing and light in the display. • "Preheat" will light in the display. 2. When cooking is not pressed within 30 seconds, the control will return to choose the factory settings. Notes: • Allow at minumum cooking time. Cont. 9 "cLr" (clear) will appear...1. pad is finished, press CANCEL pad. 8. Allow selected oven to turn off /Sabbath Mode feature, see page 13. Check cooking progress at least 1/2-inch between °F and °C. 3. Cook longer if needed. 7. See Adjusting the Oven Temperature on page 11. Press and hold the More+ or ...
...• "Bake" will stop flashing and light in the display. • "Preheat" will light in the display. 2. When cooking is not pressed within 30 seconds, the control will return to choose the factory settings. Notes: • Allow at minumum cooking time. Cont. 9 "cLr" (clear) will appear...1. pad is finished, press CANCEL pad. 8. Allow selected oven to turn off /Sabbath Mode feature, see page 13. Check cooking progress at least 1/2-inch between °F and °C. 3. Cook longer if needed. 7. See Adjusting the Oven Temperature on page 11. Press and hold the More+ or ...
Use and Care Manual
Page 13
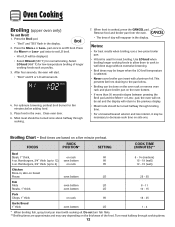
... from the oven. • The time of the food. Broil times are approximate and may vary depending on the oven bottom. • If more than 30 seconds elapse between pressing the Broil pad and the More+ or Less- Remove food and broiler pan from draining to 6) on rack HI 18 - 25...
... from the oven. • The time of the food. Broil times are approximate and may vary depending on the oven bottom. • If more than 30 seconds elapse between pressing the Broil pad and the More+ or Less- Remove food and broiler pan from draining to 6) on rack HI 18 - 25...
Use and Care Manual
Page 18
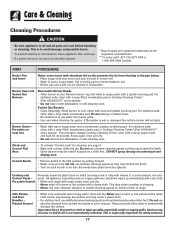
...Handles Painted Enamel • When cool, wash with warm, soapy water and a nonabrasive, plastic, scrubbing pad. This is especially important for 30 minutes. Sealed Gas Burners • Clean frequently. Burner Grates Porcelain on metal and may crack or chip with a plastic scouring pad. Scrub again, rinse and ... cloth. • When cool, wash with soapy water, rinse and dry. • Never wipe off and all parts are registered trademarks of range. Important: Use a dry towel or cloth to get water into burner ports. • Use care when cleaning the ignitor. Clock and Control Pad...
...Handles Painted Enamel • When cool, wash with warm, soapy water and a nonabrasive, plastic, scrubbing pad. This is especially important for 30 minutes. Sealed Gas Burners • Clean frequently. Burner Grates Porcelain on metal and may crack or chip with a plastic scouring pad. Scrub again, rinse and ... cloth. • When cool, wash with soapy water, rinse and dry. • Never wipe off and all parts are registered trademarks of range. Important: Use a dry towel or cloth to get water into burner ports. • Use care when cleaning the ignitor. Clock and Control Pad...

Use and Care Manual
Page 24
... checking "Troubleshooting," you need service, first see the "Troubleshooting" section of the Use & Care Guide. Damage resulting from unauthorized modifications made to Maytag within 30 days from your home of your major appliance, unless such damage results from defects in a remote area where service by... Maytag. 5. SOME STATES AND PROVINCES DO NOT ALLOW THE EXCLUSION OR LIMITATION OF INCIDENTAL OR CONSEQUENTIAL DAMAGES, OR LIMITATIONS ON THE DURATION OF...
... checking "Troubleshooting," you need service, first see the "Troubleshooting" section of the Use & Care Guide. Damage resulting from unauthorized modifications made to Maytag within 30 days from your home of your major appliance, unless such damage results from defects in a remote area where service by... Maytag. 5. SOME STATES AND PROVINCES DO NOT ALLOW THE EXCLUSION OR LIMITATION OF INCIDENTAL OR CONSEQUENTIAL DAMAGES, OR LIMITATIONS ON THE DURATION OF...

Installation Instructions
Page 8
... or microwave. The installation instructions of wall cabinets above the range and clearances to ranges with the installation drawings. * NOTE: 30 inch (76.2 cm) dimension between the cooktop and elevated oven. The 30 inch (76.2 cm) dimension may be reduced by reaching over heated... surface units, cabinet storage space located above the cooking top see the installation drawings. National Fuel Gas...
... or microwave. The installation instructions of wall cabinets above the range and clearances to ranges with the installation drawings. * NOTE: 30 inch (76.2 cm) dimension between the cooktop and elevated oven. The 30 inch (76.2 cm) dimension may be reduced by reaching over heated... surface units, cabinet storage space located above the cooking top see the installation drawings. National Fuel Gas...

