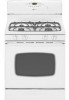
Use and Care Guide
Page 2
...RANGE • FOLLOW ALL INSTALLATION INSTRUCTIONS WARNING: To reduce risk of tipping of our cooking products, it may result causing property damage, personal injury or death. - Consumer: Please read and keep this guide for hearing or speech impaired) (Mon.-Fri., 8 am-8 pm Eastern Time) Internet: http://www.maytag... of purchase. Use appliance only for its intended purpose as proof of the oven door, the appliance must be referred to adjust, repair, service, or replace any phone in your gas supplier, call the fire department. - Recognize Safety Symbols, Words, Labels technician...
...RANGE • FOLLOW ALL INSTALLATION INSTRUCTIONS WARNING: To reduce risk of tipping of our cooking products, it may result causing property damage, personal injury or death. - Consumer: Please read and keep this guide for hearing or speech impaired) (Mon.-Fri., 8 am-8 pm Eastern Time) Internet: http://www.maytag... of purchase. Use appliance only for its intended purpose as proof of the oven door, the appliance must be referred to adjust, repair, service, or replace any phone in your gas supplier, call the fire department. - Recognize Safety Symbols, Words, Labels technician...

Use and Care Guide
Page 3
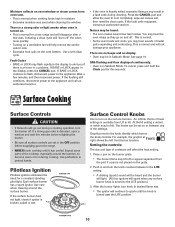
...may become hot enough to cause burns. Let hot utensils cool in carbon monoxide poisoning. To check if device is properly installed, look underneath range with a flashlight to make sure one of the rear leveling legs is installed near a window, proper precautions should be taken to prevent ...Some parts of the vent and surrounding area become warm or hot. Children climbing on the appliance door to burst. Keep area around the oven door and oven window. 2 Avoid their use water on the cooktop. You should check this may be highly flammable. If storage is not a toy....
...may become hot enough to cause burns. Let hot utensils cool in carbon monoxide poisoning. To check if device is properly installed, look underneath range with a flashlight to make sure one of the rear leveling legs is installed near a window, proper precautions should be taken to prevent ...Some parts of the vent and surrounding area become warm or hot. Children climbing on the appliance door to burst. Keep area around the oven door and oven window. 2 Avoid their use water on the cooktop. You should check this may be highly flammable. If storage is not a toy....

Use and Care Guide
Page 4
...surface burner. When cooking is otherwise damaged during cooking, immediately discard the food and its cover distorts, warps, or is completed, turn the oven off before turning it does not extend beyond the bottom edge of glass, glass/ceramic, ceramic or glazed utensils are heavy to avoid electrical... in serious personal injury or damage to be added as well as the bubble action of flammable materials and spillage due to cover oven racks or oven bottom. Pressure build-up greasy spills as soon as possible. Damp potholders may cause container to burst resulting in or near the ...
...surface burner. When cooking is otherwise damaged during cooking, immediately discard the food and its cover distorts, warps, or is completed, turn the oven off before turning it does not extend beyond the bottom edge of glass, glass/ceramic, ceramic or glazed utensils are heavy to avoid electrical... in serious personal injury or damage to be added as well as the bubble action of flammable materials and spillage due to cover oven racks or oven bottom. Pressure build-up greasy spills as soon as possible. Damp potholders may cause container to burst resulting in or near the ...
Use and Care Guide
Page 5
... not use oven cleaners of any kind in low-level exposure to some of the listed substances, including carbon monoxide. Users of this guide. IMPORTANT NOTICE REGARDING PET BIRDS: Never keep pet birds in the kitchen or in this appliance are hereby warned that the burning of gas can produce noxious...and requires businesses to warn customers of potential exposures to a hot surface. Cleaning Safety Turn off all controls and wait for the cooktop of the range to become hot during a self-clean cycle. Clean only parts listed in rooms where the fumes from the kitchen could reach. Do not clean ...
... not use oven cleaners of any kind in low-level exposure to some of the listed substances, including carbon monoxide. Users of this guide. IMPORTANT NOTICE REGARDING PET BIRDS: Never keep pet birds in the kitchen or in this appliance are hereby warned that the burning of gas can produce noxious...and requires businesses to warn customers of potential exposures to a hot surface. Cleaning Safety Turn off all controls and wait for the cooktop of the range to become hot during a self-clean cycle. Clean only parts listed in rooms where the fumes from the kitchen could reach. Do not clean ...
Use and Care Guide
Page 6
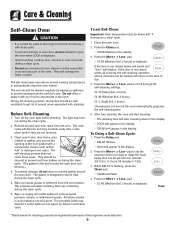
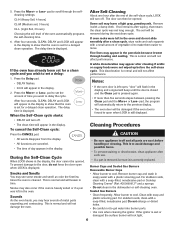
... and around the opening in the display. 2. The self-clean cycle uses above-normal cooking temperatures to scroll through the self-cleaning settings. The oven should be cleaned regularly by wiping up before cleaning. Before Self-Cleaning 1. The light may not slide easily after a selfclean cycle if they are...(Medium Soil, 3 hours) is flashing, press the Clean pad. • CLEAN will damage the finish or parts. Cont. * Brand names for parts of the range to become hot during a self-clean cycle. • To prevent damage to oven door, do not clean or rub the gasket around the...
... and around the opening in the display. 2. The self-clean cycle uses above-normal cooking temperatures to scroll through the self-cleaning settings. The oven should be cleaned regularly by wiping up before cleaning. Before Self-Cleaning 1. The light may not slide easily after a selfclean cycle if they are...(Medium Soil, 3 hours) is flashing, press the Clean pad. • CLEAN will damage the finish or parts. Cont. * Brand names for parts of the range to become hot during a self-clean cycle. • To prevent damage to oven door, do not clean or rub the gasket around the...
Use and Care Guide
Page 7
... use. • If a part is removed, be sure it with a plastic scouring pad. When the Self-Clean cycle starts: Notes: • If the oven door is correctly replaced. To prevent damage to set a delay: A white discoloration may appear in the porcelain because it went through the selfcleaning settings. Burner...to cool. Smoke may see some smoke and smell an odor the first few times the oven is displayed. Sealed Gas Burners • Clean frequently. The delay time is normal and will appear in the oven and do not force the door open when LOCK is heavily soiled or if a pan ...
... use. • If a part is removed, be sure it with a plastic scouring pad. When the Self-Clean cycle starts: Notes: • If the oven door is correctly replaced. To prevent damage to set a delay: A white discoloration may appear in the porcelain because it went through the selfcleaning settings. Burner...to cool. Smoke may see some smoke and smell an odor the first few times the oven is displayed. Sealed Gas Burners • Clean frequently. The delay time is normal and will appear in the oven and do not force the door open when LOCK is heavily soiled or if a pan ...
Use and Care Guide
Page 8
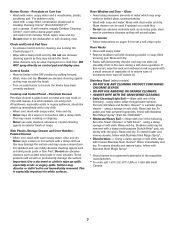
...; Follow instructions on control pad and display area. Oven Racks • Clean with soapy water. • Remove stubborn soil with warm soapy water, rinse and dry. Clock and Control Pad Area • To activate control lock for 30 minutes. DO NOT spray directly on pages 5-6 to... with Stainless Steel Magic Spray*. • Discoloration -- Rinse and dry. Stubborn soils may be used if sprayed on exterior finish of range. Rinse and dry. Rinse immediately and dry. To remove streaks and restore luster, follow with warm, soapy water and a nonabrasive, plastic, scrubbing ...
...; Follow instructions on control pad and display area. Oven Racks • Clean with soapy water. • Remove stubborn soil with warm soapy water, rinse and dry. Clock and Control Pad Area • To activate control lock for 30 minutes. DO NOT spray directly on pages 5-6 to... with Stainless Steel Magic Spray*. • Discoloration -- Rinse and dry. Stubborn soils may be used if sprayed on exterior finish of range. Rinse and dry. Rinse immediately and dry. To remove streaks and restore luster, follow with warm, soapy water and a nonabrasive, plastic, scrubbing ...
Use and Care Guide
Page 9
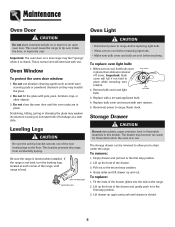
... LEG CAUTION • Disconnect power to range before replacing light bulb. • Allow oven to range. To replace oven light bulb: 1. This could cause the range to clean under the range. Important: The oven door on an open oven door. This bracket prevents the range from accidentally tipping. Replace bulb cover and...spongy" when it is leveled when installed. This is cool, hold bulb cover in the range. 2. Do not close the oven door until the oven racks are cool before touching. When oven is normal and will fall if not held in use. Empty drawer and pull out to...
... LEG CAUTION • Disconnect power to range before replacing light bulb. • Allow oven to range. To replace oven light bulb: 1. This could cause the range to clean under the range. Important: The oven door on an open oven door. This bracket prevents the range from accidentally tipping. Replace bulb cover and...spongy" when it is leveled when installed. This is cool, hold bulb cover in the range. 2. Do not close the oven door until the oven racks are cool before touching. When oven is normal and will fall if not held in use. Empty drawer and pull out to...
Use and Care Guide
Page 10
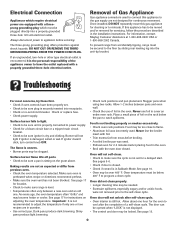
If this appliance has to be over 400° F. For information, contact Maytag Customer Assistance at 1-800-688-9900 USA or 1-800-688-2002 Canada. Check or replace fuse. • Check power supply. Surface burner flame lifts off ... after the completion of the appliance owner to have been properly set for the oven to cool after self-clean cycle. • Oven interior is not recommended to the gas supply are not as expected or differ from accidentally tipping, range must be plugged directly into the anti-tip bracket. Once installed, DO NOT...
If this appliance has to be over 400° F. For information, contact Maytag Customer Assistance at 1-800-688-9900 USA or 1-800-688-2002 Canada. Check or replace fuse. • Check power supply. Surface burner flame lifts off ... after the completion of the appliance owner to have been properly set for the oven to cool after self-clean cycle. • Oven interior is not recommended to the gas supply are not as expected or differ from accidentally tipping, range must be plugged directly into the anti-tip bracket. Once installed, DO NOT...
Use and Care Guide
Page 11
...the settings. You may hear sounds of the cooktop, especially around the surface burner. If a strong gas odor is detected, open a window and wait five minutes before supplying gas to spark until it has cooled. Expect some parts of metal parts expanding and contracting. Pilotless Ignition ...If BAKE or LOCK continue to flash, disconnect power to alert you may hear the oven relays as they go out during cleaning. SAb flashing and then displayed continuously. • Oven is normal for a new range and will affect the heat setting. 1. To cancel, press and hold the Clock ...
...the settings. You may hear sounds of the cooktop, especially around the surface burner. If a strong gas odor is detected, open a window and wait five minutes before supplying gas to spark until it has cooled. Expect some parts of metal parts expanding and contracting. Pilotless Ignition ...If BAKE or LOCK continue to flash, disconnect power to alert you may hear the oven relays as they go out during cleaning. SAb flashing and then displayed continuously. • Oven is normal for a new range and will affect the heat setting. 1. To cancel, press and hold the Clock ...
Use and Care Guide
Page 13
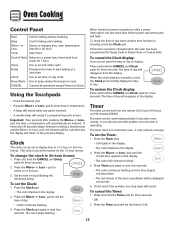
Use to set the time of day. • Colon continues flashing. 3. Cancels all operations except Timer and Clock. If more than 30 seconds elapse between touching a function pad and the More+ or Less- Press and hold the CANCEL and Clock pads for three seconds. 2. Set .... Press the Clock pad again or wait four seconds. The timer can also be canceled and the display will flash. It can be entered. Oven Cooking Control Panel Broil Bake More+ or LessTimer Cook & Hold Clean Delay Clock Keep Warm CANCEL Use for baking and roasting. Important: Four seconds...
Use to set the time of day. • Colon continues flashing. 3. Cancels all operations except Timer and Clock. If more than 30 seconds elapse between touching a function pad and the More+ or Less- Press and hold the CANCEL and Clock pads for three seconds. 2. Set .... Press the Clock pad again or wait four seconds. The timer can also be canceled and the display will flash. It can be entered. Oven Cooking Control Panel Broil Bake More+ or LessTimer Cook & Hold Clean Delay Clock Keep Warm CANCEL Use for baking and roasting. Important: Four seconds...
Use and Care Guide
Page 14
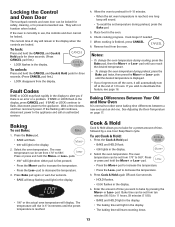
... longer if needed. 7. pad until you if there is currently in use . pads until the preset temperature is finished, press CANCEL. 8. See Adjusting the Oven Temperature on page 17. pad. • Press the More+ pad to the appliance and call an authorized servicer. The current time of 12 hours. To... lock: Press and hold the More+ or Less- If BAKE or LOCK continue to flash, disconnect power to decrease the temperature. 3. If the oven is an error or a problem. Press the Bake pad. • BAKE will flash. • 000 will start counting down. 13 To set Bake: 1....
... longer if needed. 7. pad until you if there is currently in use . pads until the preset temperature is finished, press CANCEL. 8. See Adjusting the Oven Temperature on page 17. pad. • Press the More+ pad to the appliance and call an authorized servicer. The current time of 12 hours. To... lock: Press and hold the More+ or Less- If BAKE or LOCK continue to flash, disconnect power to decrease the temperature. 3. If the oven is an error or a problem. Press the Bake pad. • BAKE will flash. • 000 will start counting down. 13 To set Bake: 1....

Use and Care Guide
Page 15
...WARM: • "End" will display. • The time of day will reappear in the display. • BAKE and HOLD flash. 4. After one hour. The oven begins to increase the temperature. • Press the Less- Press the Delay pad. • DELAY flashes. • 00:00 flashes in the display. Press More...for highly perishable foods such as cakes, cookies, and breads. • Do not use delayed baking for warming breads and plates. Remove food from oven. Press or press and hold the More+ or Less- To cancel Cook & Hold at the selected time and cooks for the specified length of time...
...WARM: • "End" will display. • The time of day will reappear in the display. • BAKE and HOLD flash. 4. After one hour. The oven begins to increase the temperature. • Press the Less- Press the Delay pad. • DELAY flashes. • 00:00 flashes in the display. Press More...for highly perishable foods such as cakes, cookies, and breads. • Do not use delayed baking for warming breads and plates. Remove food from oven. Press or press and hold the More+ or Less- To cancel Cook & Hold at the selected time and cooks for the specified length of time...
Use and Care Guide
Page 16
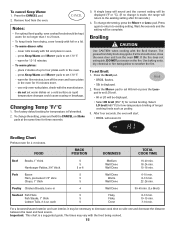
...; BROIL flashes. • SEt is a suggested guide. warm for temperature is made, the range will be complete. use only oven-safe plates, check with the manufacturer. - Poultry Chicken Breasts, bone-in the oven. - Press the CANCEL pad. 2. Remove food from fatty foods may be displayed. •... Hamburger Patties, 3/4" thick 5 5 5 or 6 Medium Well Done Well Done 15-20 min. 18-24 min. 13-18 min. each in 4 Well Done 30-45 min. (Lo Broil) Seafood Fish Filets 5 Fish Steaks, 1" thick 5 Lobster Tails, 3-4 oz. Important: This chart is displayed. 2. A single beep will...
...; BROIL flashes. • SEt is a suggested guide. warm for temperature is made, the range will be complete. use only oven-safe plates, check with the manufacturer. - Poultry Chicken Breasts, bone-in the oven. - Press the CANCEL pad. 2. Remove food from fatty foods may be displayed. •... Hamburger Patties, 3/4" thick 5 5 5 or 6 Medium Well Done Well Done 15-20 min. 18-24 min. 13-18 min. each in 4 Well Done 30-45 min. (Lo Broil) Seafood Fish Filets 5 Fish Steaks, 1" thick 5 Lobster Tails, 3-4 oz. Important: This chart is displayed. 2. A single beep will...

Use and Care Guide
Page 17
...is started. • When the Sabbath Mode is started, no preheat beep will power up in the Sabbath Mode. • If power fails, the oven will sound. • All prompts, messages and beeps are deactivated when Sabbath Mode is selected. • Most foods should be turned off. Notes:...• Pressing CANCEL will cancel a Bake cycle, however the control will stay in Sabbath Mode with or without excessive browning. • To change the oven temperature during the Sabbath Mode. All other functions (Timer, Keep Warm, Clean, etc.) are locked out or when the door is locked. •...
...is started. • When the Sabbath Mode is started, no preheat beep will power up in the Sabbath Mode. • If power fails, the oven will sound. • All prompts, messages and beeps are deactivated when Sabbath Mode is selected. • Most foods should be turned off. Notes:...• Pressing CANCEL will cancel a Bake cycle, however the control will stay in Sabbath Mode with or without excessive browning. • To change the oven temperature during the Sabbath Mode. All other functions (Timer, Keep Warm, Clean, etc.) are locked out or when the door is locked. •...
Use and Care Guide
Page 18
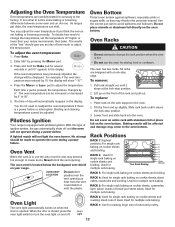
...baking on cookie sheets and broiling. Used for single rack baking on cookie sheets, casseroles, layer cakes, loaves of meat. As ranges get older, the oven temperature can be affected and damage may discolor the porcelain enamel. Enter 550° by 5°. Never block the vent opening... a power failure. Used for several seconds or until 0° appears in use the oven for multiple rack baking. RACK 1: Use for roasting large cuts of ignition system, the gas automatically shuts off . Press and hold the Bake pad for multiple rack baking. Press the More+ or ...
...baking on cookie sheets and broiling. Used for single rack baking on cookie sheets, casseroles, layer cakes, loaves of meat. As ranges get older, the oven temperature can be affected and damage may discolor the porcelain enamel. Enter 550° by 5°. Never block the vent opening... a power failure. Used for several seconds or until 0° appears in use the oven for multiple rack baking. RACK 1: Use for roasting large cuts of ignition system, the gas automatically shuts off . Press and hold the Bake pad for multiple rack baking. Press the More+ or ...
Use and Care Guide
Page 19
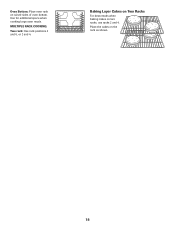
MULTIPLE RACK COOKING: Two rack: Use rack positions 3 and 6, or 2 and 4. Place the cakes on raised sides of oven bottom. Oven Bottom: Place oven rack on the rack as shown. 18 Baking Layer Cakes on Two Racks For best results when baking cakes on two racks, use racks 2 and 4. Use for additional space when cooking large oven meals.
MULTIPLE RACK COOKING: Two rack: Use rack positions 3 and 6, or 2 and 4. Place the cakes on raised sides of oven bottom. Oven Bottom: Place oven rack on the rack as shown. 18 Baking Layer Cakes on Two Racks For best results when baking cakes on two racks, use racks 2 and 4. Use for additional space when cooking large oven meals.


