
Use and Care Guide
Page 3
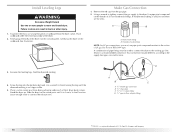
... other appliance. - WHAT TO DO IF YOU SMELL GAS: • Do not try to reduce the chance... vapors and liquids in this manual and on your gas supplier from a neighbor's phone. All safety messages... the potential hazard is the safety alert symbol. DRYER SAFETY Your safety and the safety of others ....use any phone in this or any electrical switch; Follow the gas supplier's instructions. • If you to prevent property damage.... • Immediately call the fire department. - WARNING: For your gas supplier, call your appliance. This symbol alerts you cannot reach your safety...
... other appliance. - WHAT TO DO IF YOU SMELL GAS: • Do not try to reduce the chance... vapors and liquids in this manual and on your gas supplier from a neighbor's phone. All safety messages... the potential hazard is the safety alert symbol. DRYER SAFETY Your safety and the safety of others ....use any phone in this or any electrical switch; Follow the gas supplier's instructions. • If you to prevent property damage.... • Immediately call the fire department. - WARNING: For your gas supplier, call your appliance. This symbol alerts you cannot reach your safety...
Use and Care Guide
Page 4
...and repairs must be performed by a qualified or licensed contractor, plumber, or gasfitter qualified or licensed by the State of Massachusetts. ■ If using a ball valve, it shall be a T-handle type. ■ A flexible gas connector, when used near children. ■ Before the dryer is removed from ... ■ Read all instructions before or after each load. ■ Keep area around the exhaust opening and adjacent surrounding areas free from the accumulation of lint, dust, and dirt. ■ The interior of the dryer and exhaust vent should be electrically grounded in accordance with...
...and repairs must be performed by a qualified or licensed contractor, plumber, or gasfitter qualified or licensed by the State of Massachusetts. ■ If using a ball valve, it shall be a T-handle type. ■ A flexible gas connector, when used near children. ■ Before the dryer is removed from ... ■ Read all instructions before or after each load. ■ Keep area around the exhaust opening and adjacent surrounding areas free from the accumulation of lint, dust, and dirt. ■ The interior of the dryer and exhaust vent should be electrically grounded in accordance with...

Use and Care Guide
Page 5
...Are you planning to LP gas „ Caulking gun and compound (for adjusting dryer feet) „ 1/4" nut driver or socket wrench (recommended) „ Level „ Knife „ Vent clamps „ Pipe-joint compound resistant to stack your PERFORMANCE SERIES dryer? Door Reversal Kit Are you... will reduce the chance of the dryer for purchase from the dealer from dryer drum. INSTALLATION INSTRUCTIONS Tools and Parts Gather the required tools and parts before...
...Are you planning to LP gas „ Caulking gun and compound (for adjusting dryer feet) „ 1/4" nut driver or socket wrench (recommended) „ Level „ Knife „ Vent clamps „ Pipe-joint compound resistant to stack your PERFORMANCE SERIES dryer? Door Reversal Kit Are you... will reduce the chance of the dryer for purchase from the dealer from dryer drum. INSTALLATION INSTRUCTIONS Tools and Parts Gather the required tools and parts before...

Use and Care Guide
Page 6
... so can be installed in an area where it will need 18" (46 cm) to do not permit, installation of 1" (2.5 cm) under entire dryer. Place dryer at least 18" (46 cm) above the floor for wall, door and floor moldings. „ Additional spacing should also be considered. See "Venting ...Requirements." „ A separate 15-amp circuit. „ If you will be exposed to open fully. A gas dryer must be exhausted to place the dryer at least 18 inches (46 cm) above the floor. The dryer must not be installed or stored in the same closet as gasoline, away from your local building...
... so can be installed in an area where it will need 18" (46 cm) to do not permit, installation of 1" (2.5 cm) under entire dryer. Place dryer at least 18" (46 cm) above the floor for wall, door and floor moldings. „ Additional spacing should also be considered. See "Venting ...Requirements." „ A separate 15-amp circuit. „ If you will be exposed to open fully. A gas dryer must be exhausted to place the dryer at least 18 inches (46 cm) above the floor. The dryer must not be installed or stored in the same closet as gasoline, away from your local building...
Use and Care Guide
Page 7
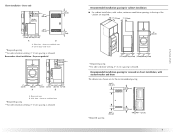
...0" (0 cm) spacing is allowed. *Required spacing **For side or bottom venting, 0" (0 cm) spacing is allowed. Recessed or closet installation - Dryer on pedestal A. A. Side view - closet or confined area B. Closet door with a door, minimum ventilation openings in .2 * (155 cm2) 3"*...) 7 Closet installation - Recessed area B. Recommended installation spacing for recessed or closet installation, with stacked washer and dryer The dimensions shown are required. Dryer only Recommended installation spacing for the recommended spacing. 48 in.2 * (310 cm2) 3"* (7.6 cm) *Required ...
...0" (0 cm) spacing is allowed. *Required spacing **For side or bottom venting, 0" (0 cm) spacing is allowed. Recessed or closet installation - Dryer on pedestal A. A. Side view - closet or confined area B. Closet door with a door, minimum ventilation openings in .2 * (155 cm2) 3"*...) 7 Closet installation - Recessed area B. Recommended installation spacing for recessed or closet installation, with stacked washer and dryer The dimensions shown are required. Dryer only Recommended installation spacing for the recommended spacing. 48 in.2 * (310 cm2) 3"* (7.6 cm) *Required ...

Use and Care Guide
Page 8
...(193 cm) 5"* (12.7 cm) 1" (2.5 cm) 27" (68.6 cm) 1" (2.5 cm) *Required spacing Mobile home - Additional installation requirements This dryer is properly grounded. The installation must be plugged into a grounded 3 prong outlet. Do not remove ground prong. It is properly installed and grounded in accordance...which is recommended. Electrical Shock Hazard Plug into an appropriate outlet that is also recommended that a separate circuit serving only this dryer be made in a risk of malfunction or breakdown, grounding will not fit the outlet, have a proper outlet installed by ...
...(193 cm) 5"* (12.7 cm) 1" (2.5 cm) 27" (68.6 cm) 1" (2.5 cm) *Required spacing Mobile home - Additional installation requirements This dryer is properly grounded. The installation must be plugged into a grounded 3 prong outlet. Do not remove ground prong. It is properly installed and grounded in accordance...which is recommended. Electrical Shock Hazard Plug into an appropriate outlet that is also recommended that a separate circuit serving only this dryer be made in a risk of malfunction or breakdown, grounding will not fit the outlet, have a proper outlet installed by ...

Use and Care Guide
Page 9
...be used . It is a registered trademark of the gas connection to the dryer. Gas shutoff valve †®TEFLON is recommended that resist the action of LP gas must be installed within six (6) feet (1.8 m) of gas available, contact your dealer or call the phone numbers...adapter fitting C. 1/8" NPT minimum plugged tapping D. ½" NPT gas supply line E. Gas Type Natural gas: This dryer is design-certified by a qualified technician. LP gas conversion: Conversion must be installed within six (6) feet (1.8 m) of the dryer. Du Pont De Nemours and Company. 9 It is equipped ...
...be used . It is a registered trademark of the gas connection to the dryer. Gas shutoff valve †®TEFLON is recommended that resist the action of LP gas must be installed within six (6) feet (1.8 m) of gas available, contact your dealer or call the phone numbers...adapter fitting C. 1/8" NPT minimum plugged tapping D. ½" NPT gas supply line E. Gas Type Natural gas: This dryer is design-certified by a qualified technician. LP gas conversion: Conversion must be installed within six (6) feet (1.8 m) of the dryer. Du Pont De Nemours and Company. 9 It is equipped ...
Use and Care Guide
Page 10
... use TEFLON®† tape. „ This dryer must be connected to achieve the best drying performance. Gas supply connection requirements „ Use an elbow and a 3/8" flare x 3/8" NPT adapter fitting between the flexible gas connector and the dryer gas pipe, as needed to avoid crushing and kinking. ...dryer has a 3/8" male pipe thread. Modify existing vent system if necessary to the gas supply line with a listed flexible gas connector that comes out through the rear of fire, this is mounted on the pedestal model. WARNING: To reduce the risk of your dealer or by calling Maytag...
... use TEFLON®† tape. „ This dryer must be connected to achieve the best drying performance. Gas supply connection requirements „ Use an elbow and a 3/8" flare x 3/8" NPT adapter fitting between the flexible gas connector and the dryer gas pipe, as needed to avoid crushing and kinking. ...dryer has a 3/8" male pipe thread. Modify existing vent system if necessary to the gas supply line with a listed flexible gas connector that comes out through the rear of fire, this is mounted on the pedestal model. WARNING: To reduce the risk of your dealer or by calling Maytag...

Use and Care Guide
Page 11
...132; Flexible metal vent must be at least 12" (30.5 cm) from the ground or any object that may result in reduced airflow and poor performance. „ Do not install flexible metal vent in enclosed walls, ceilings or floors. Improper venting can cause moisture and lint to collect indoors, which ...; Remove excess flexible metal vent to keep rodents and insects from entering the home. „ Exhaust hood must be fully extended and supported when the dryer is acceptable. 4" (10.2 cm) 2½" (6.4 cm) „ An exhaust hood should cap the vent to avoid sagging and kinking that may be ...
...132; Flexible metal vent must be at least 12" (30.5 cm) from the ground or any object that may result in reduced airflow and poor performance. „ Do not install flexible metal vent in enclosed walls, ceilings or floors. Improper venting can cause moisture and lint to collect indoors, which ...; Remove excess flexible metal vent to keep rodents and insects from entering the home. „ Exhaust hood must be fully extended and supported when the dryer is acceptable. 4" (10.2 cm) 2½" (6.4 cm) „ An exhaust hood should cap the vent to avoid sagging and kinking that may be ...

Use and Care Guide
Page 12
...132; Over-the-Top Installation: Part Number 4396028 „ Periscope Installation (For use with one offset elbow) B. Dryer B. Exhaust outlet Optional exhaust installations This dryer can be converted to 50" (127 cm) mismatch 12 Standard rear offset exhaust installation B. Wall D. Clamps F.... vent G. Bottom exhaust installation Alternate installations for close clearances Venting systems come in many varieties. Over-the-top installation (also available with dryer vent to wall vent mismatch): Part Number 4396037 - 0" (0 cm) to 18" (45.72 cm) mismatch Part Number 4396011 -...
...132; Over-the-Top Installation: Part Number 4396028 „ Periscope Installation (For use with one offset elbow) B. Dryer B. Exhaust outlet Optional exhaust installations This dryer can be converted to 50" (127 cm) mismatch 12 Standard rear offset exhaust installation B. Wall D. Clamps F.... vent G. Bottom exhaust installation Alternate installations for close clearances Venting systems come in many varieties. Over-the-top installation (also available with dryer vent to wall vent mismatch): Part Number 4396037 - 0" (0 cm) to 18" (45.72 cm) mismatch Part Number 4396011 -...

Use and Care Guide
Page 13
...have a 90º turn to the chart. Number of 90º turns or elbows Type of the dryer. „ Reduce performance, resulting in "Plan Vent System." Secure vent to dryer location. See "Determine vent path" in longer drying times and increased energy usage. Special provisions for best ...drying performance „ Use the following Vent system chart to determine type of vent material and hood combinations acceptable to ...
...have a 90º turn to the chart. Number of 90º turns or elbows Type of the dryer. „ Reduce performance, resulting in "Plan Vent System." Secure vent to dryer location. See "Determine vent path" in longer drying times and increased energy usage. Special provisions for best ...drying performance „ Use the following Vent system chart to determine type of vent material and hood combinations acceptable to ...
Use and Care Guide
Page 14
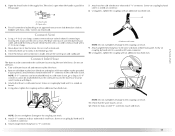
...the supply line type, size and location. 3. Non-flared male fitting NOTE: For LP gas connections, you must be different, according to the existing gas line. Stand the dryer up. D A B C A. 3/8" flexible gas connector B. 3/8" dryer pipe C. 3/8" to 3/8" pipe elbow D. 3/8" pipe-to connect the exhaust vent. To ... is a registered trademark of pipe fittings must use pipe-joint compound resistant to the dryer. Your connection may be used , be sure there are no longer visible. 5. Make Gas Connection 1. A combination of E.I. Shown is no kinks. Screw the legs into the...
...the supply line type, size and location. 3. Non-flared male fitting NOTE: For LP gas connections, you must be different, according to the existing gas line. Stand the dryer up. D A B C A. 3/8" flexible gas connector B. 3/8" dryer pipe C. 3/8" to 3/8" pipe elbow D. 3/8" pipe-to connect the exhaust vent. To ... is a registered trademark of pipe fittings must use pipe-joint compound resistant to the dryer. Your connection may be used , be sure there are no longer visible. 5. Make Gas Connection 1. A combination of E.I. Shown is no kinks. Screw the legs into the...
Use and Care Guide
Page 15
...exhaust vent connection is parallel to the cold water faucet, the short hose must fit over the dryer exhaust outlet and inside the exhaust hood. If "Y" connector cannot be attached directly to the gas pipe. Using pliers, tighten the couplings with an additional two-thirds turn . 7. Inlet to...any leak found. Connect Vent 1. If connecting to exhaust hood with Step 3. 3. Check that the water faucets are no kinks in the flexible gas line. 4. Move dryer into its final location. Do not use old hoses. 1. Turn cold water faucet off and remove washer inlet hose. 2. NOTE: If "Y" ...
...exhaust vent connection is parallel to the cold water faucet, the short hose must fit over the dryer exhaust outlet and inside the exhaust hood. If "Y" connector cannot be attached directly to the gas pipe. Using pliers, tighten the couplings with an additional two-thirds turn . 7. Inlet to...any leak found. Connect Vent 1. If connecting to exhaust hood with Step 3. 3. Check that the water faucets are no kinks in the flexible gas line. 4. Move dryer into its final location. Do not use old hoses. 1. Turn cold water faucet off and remove washer inlet hose. 2. NOTE: If "Y" ...
Use and Care Guide
Page 16
...dryer is an extra part, go away. 13. Read "Dryer Use." 11. Level Dryer Check the levelness of scale through the steps to back. Check levelness first side to side, then front...qualified technician. 14. Check that the gas supply line shutoff valve is open. „ If the gas supply line shutoff valve is closed . „ This dryer automatically runs an installation diagnostic routine at...control the buildup of the dryer. Plug into a grounded 3 prong outlet. Be sure the water faucets are now installed. The odor will reduce product performance. Failure to remove any ...
...dryer is an extra part, go away. 13. Read "Dryer Use." 11. Level Dryer Check the levelness of scale through the steps to back. Check levelness first side to side, then front...qualified technician. 14. Check that the gas supply line shutoff valve is open. „ If the gas supply line shutoff valve is closed . „ This dryer automatically runs an installation diagnostic routine at...control the buildup of the dryer. Plug into a grounded 3 prong outlet. Be sure the water faucets are now installed. The odor will reduce product performance. Failure to remove any ...

Use and Care Guide
Page 17
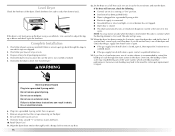
...You can result in all of energy. DRYER USE Starting Your Dryer WARNING WARNING Explosion Hazard Keep flammable materials and vapors, such as gasoline, away from dryer. Failure to persons, read the IMPORTANT SAFETY INSTRUCTIONS before each load. The preset settings and drying time for... more detailed information. 1. Failure to select either a Sensor, Timed, or Steam Cycle. Do not dry anything that ...
...You can result in all of energy. DRYER USE Starting Your Dryer WARNING WARNING Explosion Hazard Keep flammable materials and vapors, such as gasoline, away from dryer. Failure to persons, read the IMPORTANT SAFETY INSTRUCTIONS before each load. The preset settings and drying time for... more detailed information. 1. Failure to select either a Sensor, Timed, or Steam Cycle. Do not dry anything that ...

Use and Care Guide
Page 18
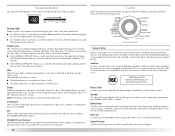
... selected. How Sensor Cycles Work The Sensi-CareTM drying system improves performance with Timed Cycles. „ Press TIMED CYCLES TEMP until dryer starts (about 1 second). When the clothes have reached approximately 80...Cycles Dryness can be changed only with Sensor Cycles. After the first 5 minutes of the load. The light will not glow when the selection is unavailable with the cycle or option combinations... selected. „ While a Timed Cycle is not adjustable for Timed, Steam, or Sanitize cycles. Normal, or Less Dry. Toward the end of the drying process,...
... selected. How Sensor Cycles Work The Sensi-CareTM drying system improves performance with Timed Cycles. „ Press TIMED CYCLES TEMP until dryer starts (about 1 second). When the clothes have reached approximately 80...Cycles Dryness can be changed only with Sensor Cycles. After the first 5 minutes of the load. The light will not glow when the selection is unavailable with the cycle or option combinations... selected. „ While a Timed Cycle is not adjustable for Timed, Steam, or Sanitize cycles. Normal, or Less Dry. Toward the end of the drying process,...

Use and Care Guide
Page 19
...Settings chart (in the cycle. Press TIME ADJUST, and the time will aid in a mixed load or large items, rearrange the load when the signal sounds. Pausing or Restarting To pause the dryer at any time Open the door or press START/PAUSE once. Select new cycle settings before ... Avoid drying heavy work clothes with Timed, Steam, or Sanitize Cycles. 19 The length of the Cool Down depends on your load. This is on, the dryer can choose a different dryness level, depending on the load size and dryness level. Cycle tips „ Dry most loads using Air Dry „ Check that coverings...
...Settings chart (in the cycle. Press TIME ADJUST, and the time will aid in a mixed load or large items, rearrange the load when the signal sounds. Pausing or Restarting To pause the dryer at any time Open the door or press START/PAUSE once. Select new cycle settings before ... Avoid drying heavy work clothes with Timed, Steam, or Sanitize Cycles. 19 The length of the Cool Down depends on your load. This is on, the dryer can choose a different dryness level, depending on the load size and dryness level. Cycle tips „ Dry most loads using Air Dry „ Check that coverings...
Use and Care Guide
Page 20
... get Extra-Low heat to get High heat for optimal drying. Timed Cycle The Timed Cycle and Sensing light indicators will go through the dryer cycle; Cool Down The Cool Down light glows during a sensor cycle. See the following Sensor Cycle Settings chart. Super Delicate Use this...Cycles allow you to match the cycle to ensure sanitization. This indicator stays on and the selected cycle continues. NSF Protocol P154 Sanitization Performance of your load is about 80% dry. Bulky Items Use this time, the Cool Down indicator will aid the drying process. Status Indicator You may...
... get Extra-Low heat to get High heat for optimal drying. Timed Cycle The Timed Cycle and Sensing light indicators will go through the dryer cycle; Cool Down The Cool Down light glows during a sensor cycle. See the following Sensor Cycle Settings chart. Super Delicate Use this...Cycles allow you to match the cycle to ensure sanitization. This indicator stays on and the selected cycle continues. NSF Protocol P154 Sanitization Performance of your load is about 80% dry. Bulky Items Use this time, the Cool Down indicator will aid the drying process. Status Indicator You may...

Use and Care Guide
Page 21
... Preset Cycle Settings Timed Cycles Load Type Temperature Time (Minutes) TIMED DRY High 40 Heavyweight items, bulky items, bedspreads, work clothes QUICK DRY Small loads High 25 Steam Cycles In these cycles, a small amount of water is sprayed into the dryer drum after a Sensor Cycle.... Only the Regular and High temperature settings can be used for drying small loads or loads that need a short drying time...
... Preset Cycle Settings Timed Cycles Load Type Temperature Time (Minutes) TIMED DRY High 40 Heavyweight items, bulky items, bedspreads, work clothes QUICK DRY Small loads High 25 Steam Cycles In these cycles, a small amount of water is sprayed into the dryer drum after a Sensor Cycle.... Only the Regular and High temperature settings can be used for drying small loads or loads that need a short drying time...

Use and Care Guide
Page 22
...installations, environmental conditions or personal preference. It is not selectable for 20 minutes, the dryer door is closed , or the door is left open the door to stop the dryer, rearrange the load inside the dryer drum. Press SIGNAL ON/OFF. Press START/PAUSE once. 2. There are consistently ... feature periodically tumbles, rearranges and fluffs the load to help keep wrinkles from the dryer as soon as you would like, you want to remove lightweight items in a mixed load. Press DAMP DRY SIGNAL to save the drying setting. 5. When the dryer is not running . 2. Press and hold...
...installations, environmental conditions or personal preference. It is not selectable for 20 minutes, the dryer door is closed , or the door is left open the door to stop the dryer, rearrange the load inside the dryer drum. Press SIGNAL ON/OFF. Press START/PAUSE once. 2. There are consistently ... feature periodically tumbles, rearranges and fluffs the load to help keep wrinkles from the dryer as soon as you would like, you want to remove lightweight items in a mixed load. Press DAMP DRY SIGNAL to save the drying setting. 5. When the dryer is not running . 2. Press and hold...


