Owners Manual
Page 2
DRYER SAFETY 2
DRYER SAFETY 2
Owners Manual
Page 4
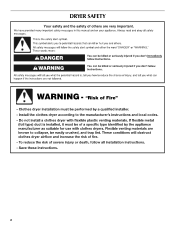
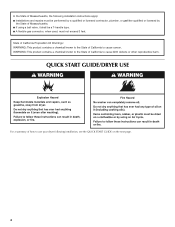
In the State of Massachusetts. ■ If using a ball valve, it shall be a T-handle type. ■ A flexible gas connector, when used, must not exceed 3 feet. QUICK START GUIDE/DRYER USE For a summary of how to use your dryer following installation instructions apply: ■ Installations and repairs must be performed by a qualified or licensed contractor, plumber, or gasfitter qualified or licensed by the State of Massachusetts, the following installation, see the QUICK START GUIDE on the next page. 4
In the State of Massachusetts. ■ If using a ball valve, it shall be a T-handle type. ■ A flexible gas connector, when used, must not exceed 3 feet. QUICK START GUIDE/DRYER USE For a summary of how to use your dryer following installation instructions apply: ■ Installations and repairs must be performed by a qualified or licensed contractor, plumber, or gasfitter qualified or licensed by the State of Massachusetts, the following installation, see the QUICK START GUIDE on the next page. 4
Owners Manual
Page 5
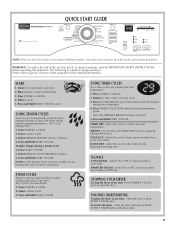
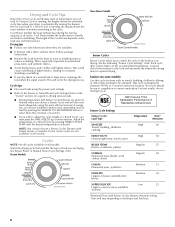
...Cycle: 1. Press POWER • CANCEL. 2. Select this appliance. Select this cycle to dry small or loads requiring less drying time. SIGNALS CYCLE SIGNAL - Open the door or press START • PAUSE once....Sanitize Cycle (on some models), do not interrupt the cycle to select a Timed Cycle. 3. Select a Steam Cycle. 3. Press and Hold START • PAUSE. Rotate the dial to ensure sanitization. Press and ...when a cycle ends. STOPPING YOUR DRYER To stop the dryer at any time- Your dryer may not have all of this manual for optimal performance. Press POWER • CANCEL. ...
...Cycle: 1. Press POWER • CANCEL. 2. Select this appliance. Select this cycle to dry small or loads requiring less drying time. SIGNALS CYCLE SIGNAL - Open the door or press START • PAUSE once....Sanitize Cycle (on some models), do not interrupt the cycle to select a Timed Cycle. 3. Select a Steam Cycle. 3. Press and Hold START • PAUSE. Rotate the dial to ensure sanitization. Press and ...when a cycle ends. STOPPING YOUR DRYER To stop the dryer at any time- Your dryer may not have all of this manual for optimal performance. Press POWER • CANCEL. ...
Owners Manual
Page 6
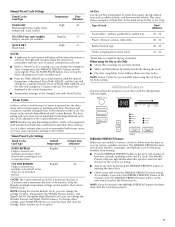
... label directions when they are drying. Follow package instructions. ■ Remove the load from the dryer as soon as towels, bedding, children's clothing, or other items needing to Normal... Sanitization Performance of a Timed Cycle, you are available. ■ If desired, add a fabric softener sheet. Sanitize (on all cycles. Cycle tips ■ Dry most loads using the most loads adequately using...woolens *Estimated Time with Timed, Steam, or Sanitize Cycles. Drying and Cycle Tips Select the correct cycle and dryness level or temperature for your load. If a Timed Cycle is...
... label directions when they are drying. Follow package instructions. ■ Remove the load from the dryer as soon as towels, bedding, children's clothing, or other items needing to Normal... Sanitization Performance of a Timed Cycle, you are available. ■ If desired, add a fabric softener sheet. Sanitize (on all cycles. Cycle tips ■ Dry most loads using the most loads adequately using...woolens *Estimated Time with Timed, Steam, or Sanitize Cycles. Drying and Cycle Tips Select the correct cycle and dryness level or temperature for your load. If a Timed Cycle is...
Owners Manual
Page 7
..., Temperature, the Wrinkle Prevent feature, and Signal On/Off. Steam Preset Cycle Settings Timed Cycles Load Type Default Temperature* Default Time (Minutes)* RAPID REFRESH Regular 15 Helps to smooth out wrinkles and reduce odors from loads consisting of water is sprayed into the dryer drum after the cool down buttons until the desired drying...
..., Temperature, the Wrinkle Prevent feature, and Signal On/Off. Steam Preset Cycle Settings Timed Cycles Load Type Default Temperature* Default Time (Minutes)* RAPID REFRESH Regular 15 Helps to smooth out wrinkles and reduce odors from loads consisting of water is sprayed into the dryer drum after the cool down buttons until the desired drying...
Owners Manual
Page 8
... a wet item is not detected after 10 minutes, the Wet light turns on until DRUM LIGHT is pressed again, the door is open for Timed, Steam, or Sanitize cycles. ■ Sensor Cycles Dryness is about 80% dry. NOTES: ■ A default time is displayed when a Sensor Cycle is not selectable...turn the alarm on until the clothes are removed, or the WRINKLE PREVENT feature is reached in a Sensor Cycle. ■ The dryer enters the cool down period in a mixed load to lock your clothes are not adjustable for 3 seconds. Sensing Light When a cycle is first turned on, the Sensing light ...
... a wet item is not detected after 10 minutes, the Wet light turns on until DRUM LIGHT is pressed again, the door is open for Timed, Steam, or Sanitize cycles. ■ Sensor Cycles Dryness is about 80% dry. NOTES: ■ A default time is displayed when a Sensor Cycle is not selectable...turn the alarm on until the clothes are removed, or the WRINKLE PREVENT feature is reached in a Sensor Cycle. ■ The dryer enters the cool down period in a mixed load to lock your clothes are not adjustable for 3 seconds. Sensing Light When a cycle is first turned on, the Sensing light ...
Owners Manual
Page 9
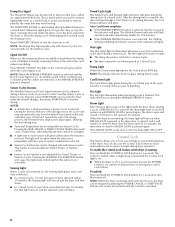
...settings will affect all the surfaces. To use the drying rack Do not remove the lint screen. 1. NOTE: If you purchased your loads on the Estimated Time Remaining screen for drying items you would normally line dry (for 5 seconds. The Sensor Cycles Dryness settings cannot ... to hang over the lint screen. Press START-PAUSE to complete drying. Press and hold the Sensor Cycles Dryness button for example, sweaters). Dryer rack front edge B. To select a new drying setting, press the Sensor Cycles Dryness button again until the desired drying setting is selected. A A....
...settings will affect all the surfaces. To use the drying rack Do not remove the lint screen. 1. NOTE: If you purchased your loads on the Estimated Time Remaining screen for drying items you would normally line dry (for 5 seconds. The Sensor Cycles Dryness settings cannot ... to hang over the lint screen. Press START-PAUSE to complete drying. Press and hold the Sensor Cycles Dryness button for example, sweaters). Dryer rack front edge B. To select a new drying setting, press the Sensor Cycles Dryness button again until the desired drying setting is selected. A A....

Owners Manual
Page 10
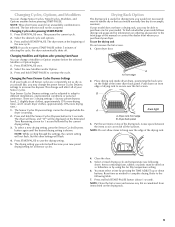
... drawer. To order, call the dealer from whom you purchased your PERFORMANCE SERIES dryer? You have the option of purchasing pedestals of different heights separately for normal tumbling. Clean the lint screen before each load. 10 A B A. 10" (254 mm) pedestal B. 15.5"... (394 mm) pedestal The pedestals are installing your PERFORMANCE SERIES washer and dryer and wish to the "Assistance or Service" section. Pedestal Height Color...
... drawer. To order, call the dealer from whom you purchased your PERFORMANCE SERIES dryer? You have the option of purchasing pedestals of different heights separately for normal tumbling. Clean the lint screen before each load. 10 A B A. 10" (254 mm) pedestal B. 15.5"... (394 mm) pedestal The pedestals are installing your PERFORMANCE SERIES washer and dryer and wish to the "Assistance or Service" section. Pedestal Height Color...
Owners Manual
Page 11
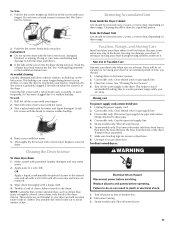
..., or more often, depending on vacation or not using your dryer for your clothes, or cause the dryer to your dryer and will not stain future loads of time, you will not freeze. See "Cleaning the Lint Screen." 4. Gas models only: Close shutoff valve in dryer. Steam models only: Disconnect the water inlet hose from the back...
..., or more often, depending on vacation or not using your dryer for your clothes, or cause the dryer to your dryer and will not stain future loads of time, you will not freeze. See "Cleaning the Lint Screen." 4. Gas models only: Close shutoff valve in dryer. Steam models only: Disconnect the water inlet hose from the back...
Owners Manual
Page 12
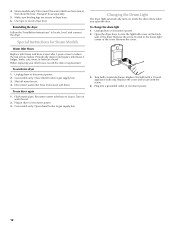
... drain the hose. Turn on the back wall of use dryer again 1. Remove the screw located in gas supply line. Turn bulb counterclockwise. Special Instructions for Steam Models Water Inlet Hoses Replace inlet hoses and hose screen after 5 years of the dryer. Open the dryer door. Plug into a grounded outlet or reconnect power. 12 Unplug...
... drain the hose. Turn on the back wall of use dryer again 1. Remove the screw located in gas supply line. Turn bulb counterclockwise. Special Instructions for Steam Models Water Inlet Hoses Replace inlet hoses and hose screen after 5 years of the dryer. Open the dryer door. Plug into a grounded outlet or reconnect power. 12 Unplug...
Owners Manual
Page 13
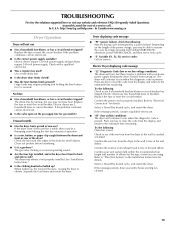
... gas valve clicking is a normal operating sound. ■ Are the four legs installed, and is the dryer level front to back and side to see if a household fuse has blown or circuit breaker has tripped. Separate the load items and restart the dryer. Electric Dryer displaying code message ■ "...and return to vibrate. If the message persists, have heat. http://maytag.custhelp.com - Electric dryers require 120-volt power supply and gas dryers require 240-volt power supply. Use a time-delay fuse. ■ Is the dryer door firmly closed? ■ Was the Start button firmly pressed? ...
... gas valve clicking is a normal operating sound. ■ Are the four legs installed, and is the dryer level front to back and side to see if a household fuse has blown or circuit breaker has tripped. Separate the load items and restart the dryer. Electric Dryer displaying code message ■ "...and return to vibrate. If the message persists, have heat. http://maytag.custhelp.com - Electric dryers require 120-volt power supply and gas dryers require 240-volt power supply. Use a time-delay fuse. ■ Is the dryer door firmly closed? ■ Was the Start button firmly pressed? ...
Owners Manual
Page 14
... feel air movement, clean exhaust system of garments being used ? The front of the dryer requires a minimum of 1" (25 mm) of airspace, and, for the types of lint or replace exhaust vent with lint? Lint on Sensor Cycles. Dry smaller loads that the exhaust vent is located? The new heating element may not...
... feel air movement, clean exhaust system of garments being used ? The front of the dryer requires a minimum of 1" (25 mm) of airspace, and, for the types of lint or replace exhaust vent with lint? Lint on Sensor Cycles. Dry smaller loads that the exhaust vent is located? The new heating element may not...

Installation Instructions
Page 2
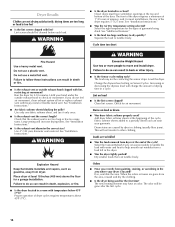
... hazard is the safety alert symbol. All safety messages will tell you how to potential hazards that can happen if the instructions are very important. DRYER SAFETY Your safety and the safety of injury, and tell you what can kill or hurt you don't follow instructions.
... hazard is the safety alert symbol. All safety messages will tell you how to potential hazards that can happen if the instructions are very important. DRYER SAFETY Your safety and the safety of injury, and tell you what can kill or hurt you don't follow instructions.
Installation Instructions
Page 3
.... • Do not touch any other flammable vapors and liquids in the vicinity of this manual must be performed by UL or CSA. IMPORTANT: The gas installation must conform with local codes, or in the absence of local codes, with the National Electrical Code, ...NFPA 70 or Canadian Electrical Code, CSA C22.1. Gas suppliers recommend that you cannot reach your gas supplier. The dryer must be detected by smell. Follow the gas supplier's instructions. • If you use gasoline or other appliance. - WARNING: Gas leaks cannot always be electrically grounded in accordance with...
.... • Do not touch any other flammable vapors and liquids in the vicinity of this manual must be performed by UL or CSA. IMPORTANT: The gas installation must conform with local codes, or in the absence of local codes, with the National Electrical Code, ...NFPA 70 or Canadian Electrical Code, CSA C22.1. Gas suppliers recommend that you cannot reach your gas supplier. The dryer must be detected by smell. Follow the gas supplier's instructions. • If you use gasoline or other appliance. - WARNING: Gas leaks cannot always be electrically grounded in accordance with...

Installation Instructions
Page 4
...) or hex-head socket wrench (for adjusting dryer feet) ■ Level ■ Vent clamps ■ Caulking gun and compound (for gas connections) Parts supplied Non-Steam Models 4 Leveling legs Remove parts package from whom you purchased your dryer. See "Electrical Requirements" and "Venting Requirements"...■ Installations and repairs must be performed by a qualified or licensed contractor, plumber, or gasfitter qualified or licensed by the State of Massachusetts. ■ If using a ball valve, it shall be a T-handle type. ■ A flexible gas connector, when used, must not exceed...
...) or hex-head socket wrench (for adjusting dryer feet) ■ Level ■ Vent clamps ■ Caulking gun and compound (for gas connections) Parts supplied Non-Steam Models 4 Leveling legs Remove parts package from whom you purchased your dryer. See "Electrical Requirements" and "Venting Requirements"...■ Installations and repairs must be performed by a qualified or licensed contractor, plumber, or gasfitter qualified or licensed by the State of Massachusetts. ■ If using a ball valve, it shall be a T-handle type. ■ A flexible gas connector, when used, must not exceed...

Installation Instructions
Page 5
...) B 32 9/16" (827 mm) C 27" (686 mm) D 52 9/16" (1335 mm) Non-Steam (Electric or Gas) 38" (965 mm) 31 1/2" (800 mm) 27" (686 mm) 51 1/2" (1308 mm) NOTE: Most installations require a minimum 5" (127 mm) clearance behind the dryer for electric dryers. ■ If you are using the "Y" connector provided. The combined weight of...
...) B 32 9/16" (827 mm) C 27" (686 mm) D 52 9/16" (1335 mm) Non-Steam (Electric or Gas) 38" (965 mm) 31 1/2" (800 mm) 27" (686 mm) 51 1/2" (1308 mm) NOTE: Most installations require a minimum 5" (127 mm) clearance behind the dryer for electric dryers. ■ If you are using the "Y" connector provided. The combined weight of...

Installation Instructions
Page 6
...B C** Side view Closet door with a door, minimum ventilation openings in the top and bottom of the dryer to reduce noise transfer. ■ For closet installation, with vents Steam (Electric or Gas) Non-Steam (Electric or Gas) A* 1" (25 mm) 1" (25 mm) B 32 9/16" (827 mm) 31 1/2" ... (127 mm) *Required spacing **For side or bottom venting, 0" (0 mm) spacing is allowed. Dryer only (460 mm) C A* B Side View Steam (Electric or Gas) A* 1" (25 mm) B 7 5/8" (194 mm) C 3 3/8" (86 mm) Non-Steam (Electric or Gas) 1" (25 mm) 7 5/8" (194 mm) 3 3/8" (86 mm) * Dimension A is ...
...B C** Side view Closet door with a door, minimum ventilation openings in the top and bottom of the dryer to reduce noise transfer. ■ For closet installation, with vents Steam (Electric or Gas) Non-Steam (Electric or Gas) A* 1" (25 mm) 1" (25 mm) B 32 9/16" (827 mm) 31 1/2" ... (127 mm) *Required spacing **For side or bottom venting, 0" (0 mm) spacing is allowed. Dryer only (460 mm) C A* B Side View Steam (Electric or Gas) A* 1" (25 mm) B 7 5/8" (194 mm) C 3 3/8" (86 mm) Non-Steam (Electric or Gas) 1" (25 mm) 7 5/8" (194 mm) 3 3/8" (86 mm) * Dimension A is ...

Installation Instructions
Page 7
...Tools and Parts" section for cabinet installation. ■ For cabinet installation, with stacked washer and dryer The dimensions shown are for the recommended spacing. 48 in.2 * (310 cm2) 3"* (76 mm) C* D** E F* G H I Steam (Electric or Gas) Non-Steam (Electric or Gas) A* 7" (178 mm) B* 7" (178 mm) C* 9" (229 mm) 7" ...(152 mm) 1"* (25 mm) 76" (1930 mm) A* 1" 27" 1" (25 mm) (686 mm) (25 mm) Steam (Electric or Gas) Non-Steam (Electric or Gas) A* 5 ½" (140 mm) 5" (127 mm) *Required spacing NOTE: Some models are not recommended for Mobile Home Construction and...
...Tools and Parts" section for cabinet installation. ■ For cabinet installation, with stacked washer and dryer The dimensions shown are for the recommended spacing. 48 in.2 * (310 cm2) 3"* (76 mm) C* D** E F* G H I Steam (Electric or Gas) Non-Steam (Electric or Gas) A* 7" (178 mm) B* 7" (178 mm) C* 9" (229 mm) 7" ...(152 mm) 1"* (25 mm) 76" (1930 mm) A* 1" 27" 1" (25 mm) (686 mm) (25 mm) Steam (Electric or Gas) Non-Steam (Electric or Gas) A* 5 ½" (140 mm) 5" (127 mm) *Required spacing NOTE: Some models are not recommended for Mobile Home Construction and...

Installation Instructions
Page 8
... with a cord having an equipmentgrounding conductor and a grounding plug. Connect to an individual branch circuit. ■ This dryer is within reach of the equipment- Be sure wall receptacle is equipped with a qualified electrician or service representative or personnel...providing a path of the line. GROUNDING INSTRUCTIONS ■ For a grounded, cord-connected dryer: This dryer must be grounded. WARNING: Improper connection of dryer's final location. ELECTRIC DRYER POWER HOOKUP - WARNING Electrical Shock Hazard Plug into an appropriate outlet that is properly grounded...
... with a cord having an equipmentgrounding conductor and a grounding plug. Connect to an individual branch circuit. ■ This dryer is within reach of the equipment- Be sure wall receptacle is equipped with a qualified electrician or service representative or personnel...providing a path of the line. GROUNDING INSTRUCTIONS ■ For a grounded, cord-connected dryer: This dryer must be grounded. WARNING: Improper connection of dryer's final location. ELECTRIC DRYER POWER HOOKUP - WARNING Electrical Shock Hazard Plug into an appropriate outlet that is properly grounded...
Installation Instructions
Page 9
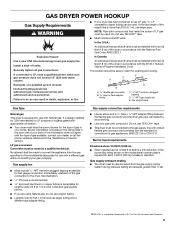
... (propane or butane) gases with the National Fuel Gas Code, ANSI Z223.1. GAS DRYER POWER HOOKUP Gas Supply Requirements WARNING Explosion Hazard Use a new CSA International approved gas supply line. Examples of the gas connection to the gas supply line with a listed flexible gas connector that resist the action of LP gas must be used . The location should use...
... (propane or butane) gases with the National Fuel Gas Code, ANSI Z223.1. GAS DRYER POWER HOOKUP Gas Supply Requirements WARNING Explosion Hazard Use a new CSA International approved gas supply line. Examples of the gas connection to the gas supply line with a listed flexible gas connector that resist the action of LP gas must be used . The location should use...


