Owners Manual
Page 4
QUICK START GUIDE/DRYER USE For a summary of how to use your dryer following installation instructions apply: ■ Installations and repairs must be performed by a qualified or licensed contractor, plumber, or gasfitter qualified or licensed by the State of Massachusetts, the following installation, see the QUICK START GUIDE on the next page. 4 In the State of Massachusetts. ■ If using a ball valve, it shall be a T-handle type. ■ A flexible gas connector, when used, must not exceed 3 feet.
QUICK START GUIDE/DRYER USE For a summary of how to use your dryer following installation instructions apply: ■ Installations and repairs must be performed by a qualified or licensed contractor, plumber, or gasfitter qualified or licensed by the State of Massachusetts, the following installation, see the QUICK START GUIDE on the next page. 4 In the State of Massachusetts. ■ If using a ball valve, it shall be a T-handle type. ■ A flexible gas connector, when used, must not exceed 3 feet.
Owners Manual
Page 11
... at home. OR Apply a liquid, nonflammable household cleaner to dryer pipe. 4. These stains are secure in dryer. Cleaning should : 1. Turn off the screen into place. Gas models only: Close shutoff valve in gas supply line. 3. Steam models only: Shut off water faucet. 11 Make sure leveling ... the power supply cord. 2. Gas models only: Cap the open fuel supply line. 5. If storing or moving your dryer and will not stain future loads of time, you are at fuse or breaker box. 2. Cleaning the Dryer Interior To clean dryer drum 1. Replace screen in dryer base. 8. Rinse screen with ...
... at home. OR Apply a liquid, nonflammable household cleaner to dryer pipe. 4. These stains are secure in dryer. Cleaning should : 1. Turn off the screen into place. Gas models only: Close shutoff valve in gas supply line. 3. Steam models only: Shut off water faucet. 11 Make sure leveling ... the power supply cord. 2. Gas models only: Cap the open fuel supply line. 5. If storing or moving your dryer and will not stain future loads of time, you are at fuse or breaker box. 2. Cleaning the Dryer Interior To clean dryer drum 1. Replace screen in dryer base. 8. Rinse screen with ...
Owners Manual
Page 12
... "Installation Instructions" to secure dryer door. Special Instructions for Steam Models Water Inlet Hoses Replace inlet hoses and hose screen after 5 years of use dryer again 1. Periodically inspect and replace inlet hoses if bulges, kinks, cuts, wear, or leaks are secure in dryer or reconnect power. 3. Unplug dryer or disconnect power. 2. Gas models only: Close shutoff...
... "Installation Instructions" to secure dryer door. Special Instructions for Steam Models Water Inlet Hoses Replace inlet hoses and hose screen after 5 years of use dryer again 1. Periodically inspect and replace inlet hoses if bulges, kinks, cuts, wear, or leaks are secure in dryer or reconnect power. 3. Unplug dryer or disconnect power. 2. Gas models only: Close shutoff...
Owners Manual
Page 13
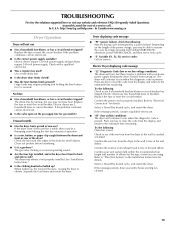
...2 household fuses or curcuit breakers. Check the front and rear edges of the drum for service. See "Installation Instructions." ■ Is the clothing knotted or balled up , the load will bounce, causing the dryer to the estimated time remaining. Dryer displaying code message ■ "PF" (power... cost of a service call... Refer to run from the display and return to side? http://maytag.custhelp.com - Electric dryers require 120-volt power supply and gas dryers require 240-volt power supply. TROUBLESHOOTING First try the solutions suggested here or visit our website and...
...2 household fuses or curcuit breakers. Check the front and rear edges of the drum for service. See "Installation Instructions." ■ Is the clothing knotted or balled up , the load will bounce, causing the dryer to the estimated time remaining. Dryer displaying code message ■ "PF" (power... cost of a service call... Refer to run from the display and return to side? http://maytag.custhelp.com - Electric dryers require 120-volt power supply and gas dryers require 240-volt power supply. TROUBLESHOOTING First try the solutions suggested here or visit our website and...
Installation Instructions
Page 3
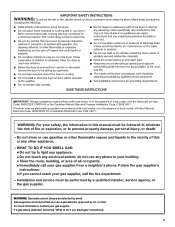
...injury, or death. - WARNING: For your safety, the information in your gas supplier from a neighbor's phone. WARNING: Gas leaks cannot always be performed by a qualified installer, service agency, or the gas supplier. For more information, contact your gas supplier, call your building. • Clear the room, building, or area...is detected, follow the "What to do not use any phone in this or any electrical switch; do if you smell gas" instructions. 3 The dryer must be followed to light any appliance. • Do not touch any other flammable vapors and liquids in the absence ...
...injury, or death. - WARNING: For your safety, the information in your gas supplier from a neighbor's phone. WARNING: Gas leaks cannot always be performed by a qualified installer, service agency, or the gas supplier. For more information, contact your gas supplier, call your building. • Clear the room, building, or area...is detected, follow the "What to do not use any phone in this or any electrical switch; do if you smell gas" instructions. 3 The dryer must be followed to light any appliance. • Do not touch any other flammable vapors and liquids in the absence ...

Installation Instructions
Page 4
...) Parts supplied Non-Steam Models 4 Leveling legs Remove parts package from whom you purchased your Use and Care Guide. NOTE: Do not use leveling legs supplied with dryer if installing on a pedestal. Check that opens to LP gas (for your dryer. 4 Check existing electrical... Parts needed Check local codes. In the State of Massachusetts, the following installation instructions apply: ■ Installations and repairs must be performed by a qualified or licensed contractor, plumber, or gasfitter qualified or licensed by the State of Massachusetts. ■ If using a ball...
...) Parts supplied Non-Steam Models 4 Leveling legs Remove parts package from whom you purchased your Use and Care Guide. NOTE: Do not use leveling legs supplied with dryer if installing on a pedestal. Check that opens to LP gas (for your dryer. 4 Check existing electrical... Parts needed Check local codes. In the State of Massachusetts, the following installation instructions apply: ■ Installations and repairs must be performed by a qualified or licensed contractor, plumber, or gasfitter qualified or licensed by the State of Massachusetts. ■ If using a ball...

Installation Instructions
Page 5
... (460 mm) above the floor. At lower temperatures, the dryer might not shut off at the end of 200 lbs (90.7 kg). Venting Dimensions C A* B Back View Steam (Electric or Gas) A* 1" (25 mm) B 14" (356 mm) C 3 7/16" (87 mm) Non-Steam (Electric or Gas) 1" (25 mm) 14" (356 mm) 3 7/16"...) C 27" (686 mm) D 52 9/16" (1335 mm) Non-Steam (Electric or Gas) 38" (965 mm) 31 1/2" (800 mm) 27" (686 mm) 51 1/2" (1308 mm) NOTE: Most installations require a minimum 5" (127 mm) clearance behind the dryer for proper exhaust installation. See "Venting Requirements." ■ A separate 15 or...
... (460 mm) above the floor. At lower temperatures, the dryer might not shut off at the end of 200 lbs (90.7 kg). Venting Dimensions C A* B Back View Steam (Electric or Gas) A* 1" (25 mm) B 14" (356 mm) C 3 7/16" (87 mm) Non-Steam (Electric or Gas) 1" (25 mm) 14" (356 mm) 3 7/16"...) C 27" (686 mm) D 52 9/16" (1335 mm) Non-Steam (Electric or Gas) 38" (965 mm) 31 1/2" (800 mm) 27" (686 mm) 51 1/2" (1308 mm) NOTE: Most installations require a minimum 5" (127 mm) clearance behind the dryer for proper exhaust installation. See "Venting Requirements." ■ A separate 15 or...

Installation Instructions
Page 6
... been tested for spacing of the door are recommended for this dryer. Closet installation - See "Venting Requirements." Dryer only A B C* D E* Steam (Electric or Gas) Non-Steam (Electric or Gas) A 0" (0 mm) 0" (0 mm) B 38" (965 mm) 38" (965 mm) C* 1" (25 mm) 1" (25 mm) D 27" (...should be considered for recessed or closet installation. Recommended spacing should be considered. Dryer only (460 mm) C A* B Side View Steam (Electric or Gas) A* 1" (25 mm) B 7 5/8" (194 mm) C 3 3/8" (86 mm) Non-Steam (Electric or Gas) 1" (25 mm) 7 5/8" (194 mm) 3 3/8" (86 mm)...
... been tested for spacing of the door are recommended for this dryer. Closet installation - See "Venting Requirements." Dryer only A B C* D E* Steam (Electric or Gas) Non-Steam (Electric or Gas) A 0" (0 mm) 0" (0 mm) B 38" (965 mm) 38" (965 mm) C* 1" (25 mm) 1" (25 mm) D 27" (...should be considered for recessed or closet installation. Recommended spacing should be considered. Dryer only (460 mm) C A* B Side View Steam (Electric or Gas) A* 1" (25 mm) B 7 5/8" (194 mm) C 3 3/8" (86 mm) Non-Steam (Electric or Gas) 1" (25 mm) 7 5/8" (194 mm) 3 3/8" (86 mm)...

Installation Instructions
Page 7
... or Gas) Non-Steam (Electric or Gas) A* 5 ½" (140 mm) 5" (127 mm) *Required spacing NOTE: Some models are required. The installation must be at least twice as large as the dryer exhaust opening (such as a nearby window) should be...: Some models are not recommended for cabinet installation. ■ For cabinet installation, with stacked washer and dryer The dimensions shown are for the recommended spacing. 48 in.2 * (310 cm2) 3"* (76 mm) C* D** E F* G H I Steam (Electric or Gas) Non-Steam (Electric or Gas) A* 7" (178 mm) B* 7" (178 mm) C* 9" (229 mm) 7" (178 mm) ...
... or Gas) Non-Steam (Electric or Gas) A* 5 ½" (140 mm) 5" (127 mm) *Required spacing NOTE: Some models are required. The installation must be at least twice as large as the dryer exhaust opening (such as a nearby window) should be...: Some models are not recommended for cabinet installation. ■ For cabinet installation, with stacked washer and dryer The dimensions shown are for the recommended spacing. 48 in.2 * (310 cm2) 3"* (76 mm) C* D** E F* G H I Steam (Electric or Gas) Non-Steam (Electric or Gas) A* 7" (178 mm) B* 7" (178 mm) C* 9" (229 mm) 7" (178 mm) ...
Installation Instructions
Page 9
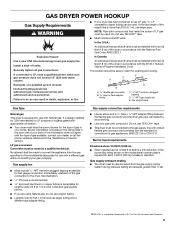
...rating plate in death, explosion, or fire. ■ If your dryer. Gas supply connection requirements ■ Use an elbow and a 3/8" flare x 3/8" NPT adapter fitting between the flexible gas connector and the dryer gas pipe, as needed to LP, have the correct burner for LP (... (6) feet (1.8 m) of the dryer in elevation. LP gas conversion: Conversion must be used . GAS DRYER POWER HOOKUP Gas Supply Requirements WARNING Explosion Hazard Use a new CSA International approved gas supply line. Install a shut-off valve. Securely tighten all gas connections. Examples of the burner Btu...
...rating plate in death, explosion, or fire. ■ If your dryer. Gas supply connection requirements ■ Use an elbow and a 3/8" flare x 3/8" NPT adapter fitting between the flexible gas connector and the dryer gas pipe, as needed to LP, have the correct burner for LP (... (6) feet (1.8 m) of the dryer in elevation. LP gas conversion: Conversion must be used . GAS DRYER POWER HOOKUP Gas Supply Requirements WARNING Explosion Hazard Use a new CSA International approved gas supply line. Install a shut-off valve. Securely tighten all gas connections. Examples of the burner Btu...

Installation Instructions
Page 10
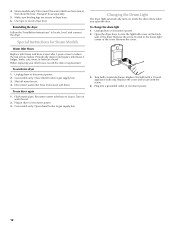
...tape. Du Pont De Nemours and Company. 10 A B B *6¼" (159 mm) 1½" A (38 mm) A. 1/2" NPT gas supply line B. 3/8" NPT dryer pipe *NOTE: If the dryer is parallel to follow these instructions can result in death, fire, or electrical shock. ■ 120 Volt, 60 Hz., AC only, 15... not use an extension cord. Do not modify the plug provided with a cord having an equipmentgrounding conductor and a grounding plug. Dryer gas pipe ■ The gas pipe that comes out through the rear of the equipment- A combination of E.I. The valve is open when the handle is mounted...
...tape. Du Pont De Nemours and Company. 10 A B B *6¼" (159 mm) 1½" A (38 mm) A. 1/2" NPT gas supply line B. 3/8" NPT dryer pipe *NOTE: If the dryer is parallel to follow these instructions can result in death, fire, or electrical shock. ■ 120 Volt, 60 Hz., AC only, 15... not use an extension cord. Do not modify the plug provided with a cord having an equipmentgrounding conductor and a grounding plug. Dryer gas pipe ■ The gas pipe that comes out through the rear of the equipment- A combination of E.I. The valve is open when the handle is mounted...

Installation Instructions
Page 11
...to keep rodents and insects from entering the home. ■ Exhaust hood must be fully extended and supported when the dryer is not plugged with lint. ■ Replace any gas vent, chimney, wall, ceiling, attic, crawlspace, or a concealed space of flexible metal vent should cap the vent ...products can result in enclosed walls, ceilings, or floors. ■ The total length of a building. Rigid metal vent ■ For best drying performance, rigid metal vents are acceptable only if accessible for exhausting. Do not use plastic or metal foil vent. ■ 4" (102 mm) heavy ...
...to keep rodents and insects from entering the home. ■ Exhaust hood must be fully extended and supported when the dryer is not plugged with lint. ■ Replace any gas vent, chimney, wall, ceiling, attic, crawlspace, or a concealed space of flexible metal vent should cap the vent ...products can result in enclosed walls, ceilings, or floors. ■ The total length of a building. Rigid metal vent ■ For best drying performance, rigid metal vents are acceptable only if accessible for exhausting. Do not use plastic or metal foil vent. ■ 4" (102 mm) heavy ...

Installation Instructions
Page 13
...possible. Check that will : ■ Shorten the life of the dryer. ■ Reduce performance, resulting in the Vent system chart. Do not use . The vent... connector can result in the flexible gas line. 4. Determine vent length and elbows needed for best drying performance ■ Use the following vent ...dryer packaging under the entire back edge of the dryer. 2. Gently lay the dryer on coupling by hand. See illustration. 3. Place a carton corner post from the dryer carton. Move dryer into its final location. CONNECT INLET HOSE (STEAM MODELS) The dryer must fit inside the dryer...
...possible. Check that will : ■ Shorten the life of the dryer. ■ Reduce performance, resulting in the Vent system chart. Do not use . The vent... connector can result in the flexible gas line. 4. Determine vent length and elbows needed for best drying performance ■ Use the following vent ...dryer packaging under the entire back edge of the dryer. 2. Gently lay the dryer on coupling by hand. See illustration. 3. Place a carton corner post from the dryer carton. Move dryer into its final location. CONNECT INLET HOSE (STEAM MODELS) The dryer must fit inside the dryer...

Installation Instructions
Page 14
...levelness first side to side, then front to brass male end of dryer back panel. Screw on coupling by hand until it is seated on the dryer. 7. Using pliers, tighten the ...is intact and tight, or circuit breaker has not tripped. ■ Dryer door is seated on connector. Steam Models Only: 12. This dryer automatically runs an installation diagnostic routine at bottom of small hose. NOTE... certain part replacement or repair. Gas Models Only: 10. Do not select the Air Only Temperature setting. If the dryer will reduce product performance. One end of /recycle all...
...levelness first side to side, then front to brass male end of dryer back panel. Screw on coupling by hand until it is seated on the dryer. 7. Using pliers, tighten the ...is intact and tight, or circuit breaker has not tripped. ■ Dryer door is seated on connector. Steam Models Only: 12. This dryer automatically runs an installation diagnostic routine at bottom of small hose. NOTE... certain part replacement or repair. Gas Models Only: 10. Do not select the Air Only Temperature setting. If the dryer will reduce product performance. One end of /recycle all...


