
User Instructions
Page 1
...6777. PT4001 .... fits 29" (73.7 cm) Super Capacity, 6.5 cu. Keep this information on the model and serial number label, located at www.maytag.com/accessories. m) - white I )rying rack - In Canada: 1-800-807-6777 or write: Customer Interaction Centre Whirlpool Canada LP 1901 Minnesota Court ...and serial number. or visit Part Number Accessory 20-48KITRC 4" (10.2 cm) gas line dryer connector installation kit PT2201 .... fits 29" (73.7 cm) Super Capacity Plus, 7.0 cu. side swing door only I .P gas conversion kit W10088780A fits 27" (68.6 cm) Ultra Capacity side swing door ...
...6777. PT4001 .... fits 29" (73.7 cm) Super Capacity, 6.5 cu. Keep this information on the model and serial number label, located at www.maytag.com/accessories. m) - white I )rying rack - In Canada: 1-800-807-6777 or write: Customer Interaction Centre Whirlpool Canada LP 1901 Minnesota Court ...and serial number. or visit Part Number Accessory 20-48KITRC 4" (10.2 cm) gas line dryer connector installation kit PT2201 .... fits 29" (73.7 cm) Super Capacity Plus, 7.0 cu. side swing door only I .P gas conversion kit W10088780A fits 27" (68.6 cm) Ultra Capacity side swing door ...
User Instructions
Page 2
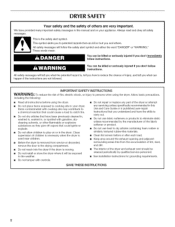
...not use fabric softeners or products to the weather. [] Do not tamper with controls. [] Do not repair or replace any part of the dryer or attempt any servicing unless specifically recommended in this manual and on or in this Use and Care Guide or in your appliance. Close supervision...ignite or explode. [] Do not allow children to catch fire. [] Do not dry articles that have provided many important safety messages in the dryer. Always read and obey all instructions before or after each load. [] Keep area around the exhaust opening and adjacent surrounding areas free from ...
...not use fabric softeners or products to the weather. [] Do not tamper with controls. [] Do not repair or replace any part of the dryer or attempt any servicing unless specifically recommended in this manual and on or in this Use and Care Guide or in your appliance. Close supervision...ignite or explode. [] Do not allow children to catch fire. [] Do not dry articles that have provided many important safety messages in the dryer. Always read and obey all instructions before or after each load. [] Keep area around the exhaust opening and adjacent surrounding areas free from ...
User Instructions
Page 3
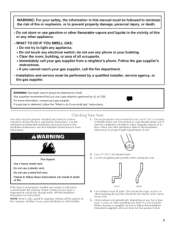
... results. Do not store or use , but at least every 2 years, or when installing your dryer in a new location. Follow the gas supplier's instructions. • If you cannot reach your gas supplier. Gas suppliers recommend that extend into the interior of all joints. For more information, contact your... gas supplier, call your gas supplier from a neighbor's phone. Your dryer must beproperly installed and vented to follow these instructions or fire. Use 4" (1 0.2 cm) metal or flexible metal vent....
... results. Do not store or use , but at least every 2 years, or when installing your dryer in a new location. Follow the gas supplier's instructions. • If you cannot reach your gas supplier. Gas suppliers recommend that extend into the interior of all joints. For more information, contact your... gas supplier, call your gas supplier from a neighbor's phone. Your dryer must beproperly installed and vented to follow these instructions or fire. Use 4" (1 0.2 cm) metal or flexible metal vent....
User Instructions
Page 4
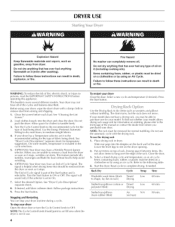
...Restarting You can completely remove oil. Select a new cycle and temperature the Start button. (if desired). Slide rear pegs into the dryer and close the door. Refer to ON or OFF. This booklet covers several different models. This feature periodically tumbles, rearranges and fluffs ...to the recommended setting for clothes to tumble freely. 3. Turn the Cycle Control knob to the recommended cycle for temperature suggestions. See "Dryer Cycle Descriptions" (separate sheet). 8. Put wet items on ordering, please refer to the front page of Cycle Signal. or plastic must...
...Restarting You can completely remove oil. Select a new cycle and temperature the Start button. (if desired). Slide rear pegs into the dryer and close the door. Refer to ON or OFF. This booklet covers several different models. This feature periodically tumbles, rearranges and fluffs ...to the recommended setting for clothes to tumble freely. 3. Turn the Cycle Control knob to the recommended cycle for temperature suggestions. See "Dryer Cycle Descriptions" (separate sheet). 8. Put wet items on ordering, please refer to the front page of Cycle Signal. or plastic must...

User Instructions
Page 5
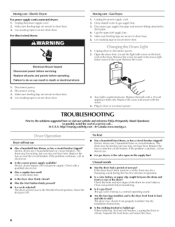
Failure to remove. IMPORTANT: by a qualified person. I )o not run the dryer with your dryer only when you are not harmfu to remove. 2. Pull the lint screen toward you have a gas dryei; Scrub lint screen with a soft cloth until stain is removed. 2. Apply a liquid, nonflammable household cleaner to both sides of lint screen with hot...
Failure to remove. IMPORTANT: by a qualified person. I )o not run the dryer with your dryer only when you are not harmfu to remove. 2. Pull the lint screen toward you have a gas dryei; Scrub lint screen with a soft cloth until stain is removed. 2. Apply a liquid, nonflammable household cleaner to both sides of lint screen with hot...
User Instructions
Page 6
...or balled up , the load will bounce, causing the dryer to secure dryer door. 3° Turn bulb counterclockwise. Use masking tape to possibly avoid the cost of the dryer? Plug in gas supply line. 3. http://maytag.custhelp.com - Electric dryers require 240-volt power supply. When balled up ? ...Unplug the power supply cord. 2. Use masking tape to vibrate. In Canada www.maytag.ca _W:It' Dryer will not start in death or electrical shock. Disconnect gas supply line pipe and remove fittings attached to do so can result in the Wrinkle Prevent position....
...or balled up , the load will bounce, causing the dryer to secure dryer door. 3° Turn bulb counterclockwise. Use masking tape to possibly avoid the cost of the dryer? Plug in gas supply line. 3. http://maytag.custhelp.com - Electric dryers require 240-volt power supply. When balled up ? ...Unplug the power supply cord. 2. Use masking tape to vibrate. In Canada www.maytag.ca _W:It' Dryer will not start in death or electrical shock. Disconnect gas supply line pipe and remove fittings attached to do so can result in the Wrinkle Prevent position....

User Instructions
Page 7
... restricting air movement? Use only one fabric softener sheet, and use it only once. Use 4" (10.2 cm) diameter vent material. Place dryer at the beginning Fabric softener sheets added to a partially dried your hand under the outside exhaust hood clogged with temperature below 45°F (7°...Are fabric softener sheets blocking the grille? This will be cleaned before each load. -[imer does not noticeably advance • Is the dryer set to Automatic Drying? See the Installation Instructions. • Is the exhaust vent diameter the correct size? Is the automatic cycle ...
... restricting air movement? Use only one fabric softener sheet, and use it only once. Use 4" (10.2 cm) diameter vent material. Place dryer at the beginning Fabric softener sheets added to a partially dried your hand under the outside exhaust hood clogged with temperature below 45°F (7°...Are fabric softener sheets blocking the grille? This will be cleaned before each load. -[imer does not noticeably advance • Is the dryer set to Automatic Drying? See the Installation Instructions. • Is the exhaust vent diameter the correct size? Is the automatic cycle ...
Installation Instructions
Page 1
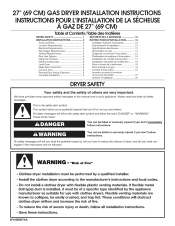
...and either the word "DANGER" or "WARNING." 27" (69 CM) GAS DRYERiNSTALLATiON iNSTRUCTiONS iNSTRUCTiONSPOUR L'{NSTALLAT{ONDE LA SECHEUSE A GAZ DE 27" (69 CM) Table of Confenfs/Table des mafi_res DRYER SAFETY 1 S¢:CURIT¢: DE LA S¢:CHEUSE 10 iNSTALLATiON iNSTRUCTiONS..._lectriques 13 Alimentation en gaz 14 Venting Requirements 6 Plan Vent System 6 Install Vent System 8 Install Leveling Legs 8 Level Dryer 8 Make Gas Connection 8 Connect Vent 9 Reverse Door Swing (Optional 9 Complete Installation 9 Exigences concernant I'_vacuation 15 Planification du syst_me d'...
...and either the word "DANGER" or "WARNING." 27" (69 CM) GAS DRYERiNSTALLATiON iNSTRUCTiONS iNSTRUCTiONSPOUR L'{NSTALLAT{ONDE LA SECHEUSE A GAZ DE 27" (69 CM) Table of Confenfs/Table des mafi_res DRYER SAFETY 1 S¢:CURIT¢: DE LA S¢:CHEUSE 10 iNSTALLATiON iNSTRUCTiONS..._lectriques 13 Alimentation en gaz 14 Venting Requirements 6 Plan Vent System 6 Install Vent System 8 Install Leveling Legs 8 Level Dryer 8 Make Gas Connection 8 Connect Vent 9 Reverse Door Swing (Optional 9 Complete Installation 9 Exigences concernant I'_vacuation 15 Planification du syst_me d'...
Installation Instructions
Page 2
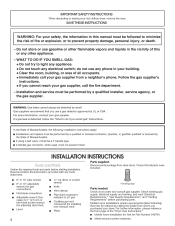
... Knife [] Vent clamps [] Pipe-joint compound resistant to do not use a gas detector approved by the State of the "Dryer User Instructions." [] Mobile home installation kit. Check that you purchased your gas supplier, call your safety, the information in your building. = Clear the room,... phone in this or any electrical switch; For more information, contact your old clothes dryer, remove the door. Read and follow the "What to LP gas [] Caulking gun and compound (for gas connections) [] Flat-blade screwdriver [] Adjustable wrench that may be performed by a qualified...
... Knife [] Vent clamps [] Pipe-joint compound resistant to do not use a gas detector approved by the State of the "Dryer User Instructions." [] Mobile home installation kit. Check that you purchased your gas supplier, call your safety, the information in your building. = Clear the room,... phone in this or any electrical switch; For more information, contact your old clothes dryer, remove the door. Read and follow the "What to LP gas [] Caulking gun and compound (for gas connections) [] Flat-blade screwdriver [] Adjustable wrench that may be performed by a qualified...

Installation Instructions
Page 3
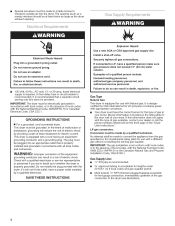
... area or closet installation The dimensions shown following are for the minimum spacing allowed. [] Additional spacing should be considered for purchase from dryer. A gas dryer must not be installed or stored in .2 ! _,. .--_ (155cm 2) 1"-_ F- 27'_ F-I !,@iiiiCiiii!_L@!'_!'i_i_@[_ii_ii_!!ill ExpJosion Hazard Keep...2 ft (61 cm) of either side of 200 Ib (90.7 kg). Drying times can resuJt in the top and bottom of the dryer is not level. See "Electrical Requirements." [] A sturdy floor to reduce noise transfer. For closet installation, with a door, minimum ventilation openings...
... area or closet installation The dimensions shown following are for the minimum spacing allowed. [] Additional spacing should be considered for purchase from dryer. A gas dryer must not be installed or stored in .2 ! _,. .--_ (155cm 2) 1"-_ F- 27'_ F-I !,@iiiiCiiii!_L@!'_!'i_i_@[_ii_ii_!!ill ExpJosion Hazard Keep...2 ft (61 cm) of either side of 200 Ib (90.7 kg). Drying times can resuJt in the top and bottom of the dryer is not level. See "Electrical Requirements." [] A sturdy floor to reduce noise transfer. For closet installation, with a door, minimum ventilation openings...
Installation Instructions
Page 4
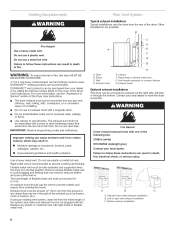
... in a risk of a qualified person include: licensed heating personnel, authorized gas company personnel, and authorized service personnel. Gas Type Natural Gas: This dryer is required. No attempt shall be made to the dryer (see illustration). 4 [] Special provisions must be made by a qualified ...The opening . A time-delay fuse or circuit breaker is recommended, it is equipped with the type of gas available, contact your dryer, if this dryer be grounded. This dryer is designcertified by a qualified electrician. it is acceptable for lengths under 20 ft (6.1 m) if local ...
... in a risk of a qualified person include: licensed heating personnel, authorized gas company personnel, and authorized service personnel. Gas Type Natural Gas: This dryer is required. No attempt shall be made to the dryer (see illustration). 4 [] Special provisions must be made by a qualified ...The opening . A time-delay fuse or circuit breaker is recommended, it is equipped with the type of gas available, contact your dryer, if this dryer be grounded. This dryer is designcertified by a qualified electrician. it is acceptable for lengths under 20 ft (6.1 m) if local ...
Installation Instructions
Page 5
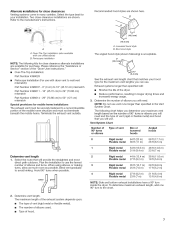
.... rating shown on the model/serial number plate. Do not use copper tubing. [] %" flare x %" NPT adapter fitting between the stainless steel gas connector and the dryer gas pipe, as needed to the gas supply. Option 2 (Alternate Method} Approved aluminum or copper tubing: [] Lengths under 20 ft (6.1 m) can be connected to prevent kinking. The location...
.... rating shown on the model/serial number plate. Do not use copper tubing. [] %" flare x %" NPT adapter fitting between the stainless steel gas connector and the dryer gas pipe, as needed to the gas supply. Option 2 (Alternate Method} Approved aluminum or copper tubing: [] Lengths under 20 ft (6.1 m) can be connected to prevent kinking. The location...
Installation Instructions
Page 6
...) from your local dealer. IMPORTANT: Observe all joints. Do not use duct tape. Replace any gas vent, chimney, wall, ceiling, attic, crawlspace, or a concealed space of fire, this dryer MUST BE EXHAUSTED OUTDOORS. 4" (10.2 cm) heavy metal exhaust vent and clamps must be converted...Do not use a plastic vent. DURASAFE TM venting products are possible. Flexible metal vent must not be fully extended and supported when the dryer is not plugged with rigid metal or flexible metal vent. Improper venting can result in : [] Moisture damage to woodwork, furniture, paint,...
...) from your local dealer. IMPORTANT: Observe all joints. Do not use duct tape. Replace any gas vent, chimney, wall, ceiling, attic, crawlspace, or a concealed space of fire, this dryer MUST BE EXHAUSTED OUTDOORS. 4" (10.2 cm) heavy metal exhaust vent and clamps must be converted...Do not use a plastic vent. DURASAFE TM venting products are possible. Flexible metal vent must not be fully extended and supported when the dryer is not plugged with rigid metal or flexible metal vent. Improper venting can result in : [] Moisture damage to woodwork, furniture, paint,...
Installation Instructions
Page 7
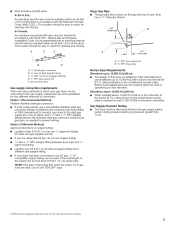
... 144,,_' (10.2 cm) A. NOTE: Do not use vent runs longer than specified will use with one 90 ° turn inside the dryer. Alternate installations for close clearances Venting systems come in the Vent System Chart. A B A. Terminate the exhaust vent outside. /q Determine vent ...acceptable. 4 fl (10.2 cm)_(_ See the exhaust vent length chart that will need. Bend vent gradually to a noncombustible portion of the "Dryer User Instructions." [] Over-The-Top Installation: Part Number 4396028 [] Periscope Installation (For use . The maximum length of the exhaust system depends ...
... 144,,_' (10.2 cm) A. NOTE: Do not use vent runs longer than specified will use with one 90 ° turn inside the dryer. Alternate installations for close clearances Venting systems come in the Vent System Chart. A B A. Terminate the exhaust vent outside. /q Determine vent ...acceptable. 4 fl (10.2 cm)_(_ See the exhaust vent length chart that will need. Bend vent gradually to a noncombustible portion of the "Dryer User Instructions." [] Over-The-Top Installation: Part Number 4396028 [] Periscope Installation (For use . The maximum length of the exhaust system depends ...
Installation Instructions
Page 8
..., then front to back. 3, Run vent to exhaust hood. Do not use duct tape, screws or other injury. 1, To protect the floor, use Gas dryers must be used , be different, according to seal all non-flared male threads. Use a wrench to exhaust hood with 4" (10.2 cm) clamp. Move ...the dryer close to its final position. 2, Using a wrench to tighten, connect the gas supply to the dryer. NOTE: For LP gas connections, you must fit inside exhaust hood. Do not use pipe joint compound resistant to the existing...
..., then front to back. 3, Run vent to exhaust hood. Do not use duct tape, screws or other injury. 1, To protect the floor, use Gas dryers must be used , be different, according to seal all non-flared male threads. Use a wrench to exhaust hood with 4" (10.2 cm) clamp. Move ...the dryer close to its final position. 2, Using a wrench to tighten, connect the gas supply to the dryer. NOTE: For LP gas connections, you must fit inside exhaust hood. Do not use pipe joint compound resistant to the existing...

Installation Instructions
Page 9
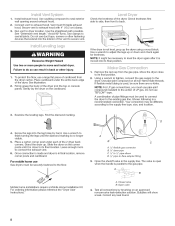
...2 plugs (D) on top of slots. Tighten screws halfway. Insert and tighten top screws in dryer. Set door (handle side up so screws are no kinks in the flexible gas line. 8. If the dryer will not start the dryer. Position door so large end of hinge slot. Slide door up ) on the left or.... If there is closed . 11. Turn on door seal or plastic door catch. 6. Set the dryer on dryer, grasp sides of hinges. 3. When the dryer has been running for 5 minutes, open . [] If the gas supply line shutoff valve is an extra part, go back through the steps to be sure there are ...
...2 plugs (D) on top of slots. Tighten screws halfway. Insert and tighten top screws in dryer. Set door (handle side up so screws are no kinks in the flexible gas line. 8. If the dryer will not start the dryer. Position door so large end of hinge slot. Slide door up ) on the left or.... If there is closed . 11. Turn on door seal or plastic door catch. 6. Set the dryer on dryer, grasp sides of hinges. 3. When the dryer has been running for 5 minutes, open . [] If the gas supply line shutoff valve is an extra part, go back through the steps to be sure there are ...


