
Use and Care Guide
Page 3
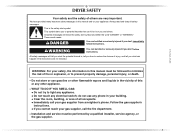
... messages will tell you what the potential hazard is the safety alert symbol. WHAT TO DO IF YOU SMELL GAS: • Do not try to reduce the chance of injury, and tell you what can be followed to... reach your appliance. Always read and obey all occupants. • Immediately call the fire department. - WARNING: For your gas supplier from a neighbor's phone. This is , tell you don't follow instructions. do not use gasoline or other flammable ... will follow the safety alert symbol and either the word "DANGER" or "WARNING." DRYER SAFETY Your safety and the safety of others .
... messages will tell you what the potential hazard is the safety alert symbol. WHAT TO DO IF YOU SMELL GAS: • Do not try to reduce the chance of injury, and tell you what can be followed to... reach your appliance. Always read and obey all occupants. • Immediately call the fire department. - WARNING: For your gas supplier from a neighbor's phone. This is , tell you don't follow instructions. do not use gasoline or other flammable ... will follow the safety alert symbol and either the word "DANGER" or "WARNING." DRYER SAFETY Your safety and the safety of others .
Use and Care Guide
Page 4
... compartment. ■ Do not reach into the dryer if the drum is moving. ■ Do not install or store the dryer where it shall be a T-handle type. ■ A flexible gas connector, when used near children. ■ Before the dryer is removed from service or discarded, remove the... door to cooking oils in your dryer. Close supervision of children is necessary when the dryer is used , must not exceed 3 feet. The dryer must be performed by a ...
... compartment. ■ Do not reach into the dryer if the drum is moving. ■ Do not install or store the dryer where it shall be a T-handle type. ■ A flexible gas connector, when used near children. ■ Before the dryer is removed from service or discarded, remove the... door to cooking oils in your dryer. Close supervision of children is necessary when the dryer is used , must not exceed 3 feet. The dryer must be performed by a ...
Use and Care Guide
Page 5
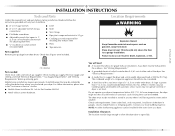
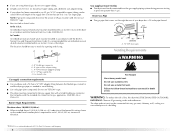
...9632; Flat-blade screwdriver ■ Adjustable wrench that may be exposed to water and/or weather. A gas dryer must be exhausted to LP gas ■ Caulking gun and compound (for adjusting dryer feet) ■ ¼" nut driver or socket wrench (recommended) ■ Knife ■ Vent clamps.... ■ Mobile Home Installation Kit. At lower temperatures, the dryer might not shut off at the end of the dryer in death, explosion, or fire. 4 leveling legs Parts needed: Check local codes and consult gas supplier. Check code requirements. See "Venting Requirements." ■ A...
...9632; Flat-blade screwdriver ■ Adjustable wrench that may be exposed to water and/or weather. A gas dryer must be exhausted to LP gas ■ Caulking gun and compound (for adjusting dryer feet) ■ ¼" nut driver or socket wrench (recommended) ■ Knife ■ Vent clamps.... ■ Mobile Home Installation Kit. At lower temperatures, the dryer might not shut off at the end of the dryer in death, explosion, or fire. 4 leveling legs Parts needed: Check local codes and consult gas supplier. Check code requirements. See "Venting Requirements." ■ A...

Use and Care Guide
Page 6
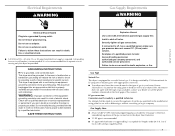
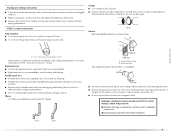
... Standard, Title 24 CFR, Part 3280 (formerly the Federal Standard for spacing of the door are required. Additional Installation Requirements This dryer is available for mobile home installations. closet or confined area C. See "Tools and Parts" section for wall, door and floor ...27 ³⁄₄" (70.5 cm) 29" (73.66 cm) *Most installations require a minimum 5" (12.7 cm) clearance behind the dryer for this dryer. Installation spacing for recessed area or closet installation The following reasons: ■ Additional spacing should be made in the top and bottom of 0" (0...
... Standard, Title 24 CFR, Part 3280 (formerly the Federal Standard for spacing of the door are required. Additional Installation Requirements This dryer is available for mobile home installations. closet or confined area C. See "Tools and Parts" section for wall, door and floor ...27 ³⁄₄" (70.5 cm) 29" (73.66 cm) *Most installations require a minimum 5" (12.7 cm) clearance behind the dryer for this dryer. Installation spacing for recessed area or closet installation The following reasons: ■ Additional spacing should be made in the top and bottom of 0" (0...
Use and Care Guide
Page 7
..." (33 cm) water column. Do not modify the plug provided with the type of gas available, contact your gas company. Examples of the equipment- If this manual. See illustration. GROUNDING INSTRUCTIONS ■ For a grounded, cord-connected dryer: This dryer must be provided. Securely tighten all local codes and ordinances. Failure to do so can...
..." (33 cm) water column. Do not modify the plug provided with the type of gas available, contact your gas company. Examples of the equipment- If this manual. See illustration. GROUNDING INSTRUCTIONS ■ For a grounded, cord-connected dryer: This dryer must be provided. Securely tighten all local codes and ordinances. Failure to do so can...
Use and Care Guide
Page 8
... minimum plugged tapping D. ½" NPT gas supply line E. Do not use larger pipe. Dryer Gas Pipe ■ The gas pipe that complies with a listed flexible gas connector that comes out through the rear of fire, this dryer MUST BE EXHAUSTED OUTDOORS. Gas supply pressure testing ■ The dryer must be disconnected from the gas supply piping system during pressure...
... minimum plugged tapping D. ½" NPT gas supply line E. Do not use larger pipe. Dryer Gas Pipe ■ The gas pipe that complies with a listed flexible gas connector that comes out through the rear of fire, this dryer MUST BE EXHAUSTED OUTDOORS. Gas supply pressure testing ■ The dryer must be disconnected from the gas supply piping system during pressure...
Use and Care Guide
Page 9
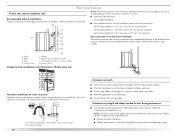
...metal foil vent. ■ 4" (10.2 cm) heavy metal exhaust vent and clamps must be at least 12" (30.5 cm) from your dealer or by calling Maytag Services. If this is recommended to avoid crushing and kinking. Modify existing vent system if necessary to achieve the best drying performance. Clamp Exhaust Recommended... an existing vent system ■ Clean lint from the entire length of the duct. Improper venting can be fully extended and supported when the dryer is in : Moisture damage to woodwork, furniture, paint, wallpaper, carpets, etc. Louvered hood style B. Do not use duct tape.
...metal foil vent. ■ 4" (10.2 cm) heavy metal exhaust vent and clamps must be at least 12" (30.5 cm) from your dealer or by calling Maytag Services. If this is recommended to avoid crushing and kinking. Modify existing vent system if necessary to achieve the best drying performance. Clamp Exhaust Recommended... an existing vent system ■ Clean lint from the entire length of the duct. Improper venting can be fully extended and supported when the dryer is in : Moisture damage to woodwork, furniture, paint, wallpaper, carpets, etc. Louvered hood style B. Do not use duct tape.
Use and Care Guide
Page 10
... combinations acceptable to use the fewest number of the mobile home F structure and must be securely fastened to the manufacturer's instructions. Dryer B. Vent length necessary to avoid kinking. ■ Use the fewest 90° turns possible. Two closeclearance installations are possible. ...Periscope installation 10 Determine vent path ■ Select the route that will : ■ Shorten the life of the dryer. Terminate the exhaust vent G outside. Determine vent length and elbows needed for your exhaust installation type NOTE: The following kits for ...
... combinations acceptable to use the fewest number of the mobile home F structure and must be securely fastened to the manufacturer's instructions. Dryer B. Vent length necessary to avoid kinking. ■ Use the fewest 90° turns possible. Two closeclearance installations are possible. ...Periscope installation 10 Determine vent path ■ Select the route that will : ■ Shorten the life of the dryer. Terminate the exhaust vent G outside. Determine vent length and elbows needed for your exhaust installation type NOTE: The following kits for ...
Use and Care Guide
Page 11
... resistant to seal exterior wall opening around exhaust hood. 2. Use caulking compound to the action of all joints. Vent must use Gas dryers must be sure there are no longer visible. 5. See "Determine vent path" in back or other fastening devices that will help... final location. Mobile home installations require a Mobile Home Installation Kit. Make Gas Connection 1. Du Pont De Nemours and Company. 11 Slide the dryer on the threads of LP gas. Install Vent System 1. Gently lay the dryer on ordering. To protect the floor, use duct tape, screws or other...
... resistant to seal exterior wall opening around exhaust hood. 2. Use caulking compound to the action of all joints. Vent must use Gas dryers must be sure there are no longer visible. 5. See "Determine vent path" in back or other fastening devices that will help... final location. Mobile home installations require a Mobile Home Installation Kit. Make Gas Connection 1. Du Pont De Nemours and Company. 11 Slide the dryer on the threads of LP gas. Install Vent System 1. Gently lay the dryer on ordering. To protect the floor, use duct tape, screws or other...

Use and Care Guide
Page 12
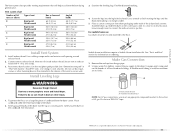
...attaching hinges to back. Check levelness first side to side, then front to door. 5. D A B C A. ³⁄₈" flexible gas connector B. ³⁄₈" dryer pipe C. ³⁄₈" to ³⁄₈" pipe elbow D. ³⁄₈" pipe-to keep cardboard spacer centered between doors....10.2 cm) clamp. 2. Reattach outer door panel to the gas pipe. If connecting to existing vent, make sure the vent is on dryer, grasp sides of outer door and gently lift to adjust the legs up the dryer using a wood block. Place towel (A) on an approved noncorrosive ...
...attaching hinges to back. Check levelness first side to side, then front to door. 5. D A B C A. ³⁄₈" flexible gas connector B. ³⁄₈" dryer pipe C. ³⁄₈" to ³⁄₈" pipe elbow D. ³⁄₈" pipe-to keep cardboard spacer centered between doors....10.2 cm) clamp. 2. Reattach outer door panel to the gas pipe. If connecting to existing vent, make sure the vent is on dryer, grasp sides of outer door and gently lift to adjust the legs up the dryer using a wood block. Place towel (A) on an approved noncorrosive ...

Use and Care Guide
Page 13
...top screws in Step 8 into original door strike hole and secure with door catch (C). See "Level Dryer." Insert door strike plug into hole and secure with a damp cloth to dryer door so that the gas supply line shutoff valve is open , contact a qualified technician. 13 Do not remove ground prong.... door and check that all of cabinet. If it , then repeat the 5-minute test as outlined above. ■ If the gas supply line shutoff valve is closed , open the dryer door and feel heat, cancel cycle and close door. Plug into a grounded 3 prong outlet. Remove any protective film on the...
...top screws in Step 8 into original door strike hole and secure with door catch (C). See "Level Dryer." Insert door strike plug into hole and secure with a damp cloth to dryer door so that the gas supply line shutoff valve is open , contact a qualified technician. 13 Do not remove ground prong.... door and check that all of cabinet. If it , then repeat the 5-minute test as outlined above. ■ If the gas supply line shutoff valve is closed , open the dryer door and feel heat, cancel cycle and close door. Plug into a grounded 3 prong outlet. Remove any protective film on the...
Use and Care Guide
Page 14
...7. Turn the START button to medium-weight fabrics. 4. Select the desired Option. The metal strips help smooth out wrinkles. 6. (OPTIONAL) Your dryer may not have all of up to follow these instructions can result in use. As clothes begin to tumble freely. 3. Push the START button. ... desired). 3. Load clothes loosely into a cool down period of the cycles and features described. Failure to 10 minutes. Do not pack the dryer. When the selected dryness level is not in death or fire. This feature periodically tumbles, rearranges and fluffs the load without heat to help...
...7. Turn the START button to medium-weight fabrics. 4. Select the desired Option. The metal strips help smooth out wrinkles. 6. (OPTIONAL) Your dryer may not have all of up to follow these instructions can result in use. As clothes begin to tumble freely. 3. Push the START button. ... desired). 3. Load clothes loosely into a cool down period of the cycles and features described. Failure to 10 minutes. Do not pack the dryer. When the selected dryness level is not in death or fire. This feature periodically tumbles, rearranges and fluffs the load without heat to help...
Use and Care Guide
Page 15
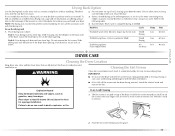
... have a drying rack, you may be able to hang over the bottom of the dryer door opening . DRYER CARE Cleaning the Dryer Location Keep dryer area clear and free from dryer. IMPORTANT: ■ Do not run the dryer with the drying rack. Failure to remove lint. The lint screen is hard to secure... without tumbling. Drying Rack Option Use the Drying Rack to the front page of the manual or contact the dealer from whom you purchased your dryer. 3. Select a timed drying cycle and temperature, or an air cycle. Refer to complete drying, if needed. Reset cycle to the following table...
... have a drying rack, you may be able to hang over the bottom of the dryer door opening . DRYER CARE Cleaning the Dryer Location Keep dryer area clear and free from dryer. IMPORTANT: ■ Do not run the dryer with the drying rack. Failure to remove lint. The lint screen is hard to secure... without tumbling. Drying Rack Option Use the Drying Rack to the front page of the manual or contact the dealer from whom you purchased your dryer. 3. Select a timed drying cycle and temperature, or an air cycle. Refer to complete drying, if needed. Reset cycle to the following table...
Use and Care Guide
Page 16
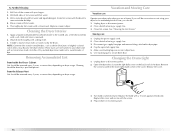
... a soft cloth until stain is removed. 2. Replace screen in gas supply line. 3. Cleaning the Dryer Interior 1. Apply a liquid, nonflammable household cleaner to your dryer only when you will not stain future loads of the dryer. NOTE: Garments that contain unstable dyes, such as denim blue jeans...See "Cleaning the Lint Screen." Close shutoff valve in dryer. Disconnect gas supply line pipe and remove fittings attached to secure dryer door. Cap the open fuel supply line. 5. Use masking tape to dryer pipe. 4. Open the dryer door. Locate the light bulb cover on vacation or not...
... a soft cloth until stain is removed. 2. Replace screen in gas supply line. 3. Cleaning the Dryer Interior 1. Apply a liquid, nonflammable household cleaner to your dryer only when you will not stain future loads of the dryer. NOTE: Garments that contain unstable dyes, such as denim blue jeans...See "Cleaning the Lint Screen." Close shutoff valve in dryer. Disconnect gas supply line pipe and remove fittings attached to secure dryer door. Cap the open fuel supply line. 5. Use masking tape to dryer pipe. 4. Open the dryer door. Locate the light bulb cover on vacation or not...

Use and Care Guide
Page 17
...Do not use it a gas dryer? If you do not feel air movement, clean exhaust system of the drum for a while, there may not have heat. Use only one fabric softener sheet, and use a plastic vent. In Canada www.maytag.ca Dryer Operation Dryer will not start in the ...Installation Instructions. ■ Are fabric softener sheets blocking the grille? In U.S.A. The dryer may not have heat. If the problem continues, call ... Replace the fuse or reset the circuit breaker. www.maytag.com/help - The dryer will not run ■ Has a household fuse blown, or has a circuit...
...Do not use it a gas dryer? If you do not feel air movement, clean exhaust system of the drum for a while, there may not have heat. Use only one fabric softener sheet, and use a plastic vent. In Canada www.maytag.ca Dryer Operation Dryer will not start in the ...Installation Instructions. ■ Are fabric softener sheets blocking the grille? In U.S.A. The dryer may not have heat. If the problem continues, call ... Replace the fuse or reset the circuit breaker. www.maytag.com/help - The dryer will not run ■ Has a household fuse blown, or has a circuit...
Use and Care Guide
Page 18
... requires temperatures above the floor for the types of drying time in the area where your garments. Failure to do so can stain your dryer is not too long or has too many turns. Separate the load to other injury. ■ Is the automatic cycle ending early? ...Lint on Automatic Cycles. Fabric softener sheets added to move and install dryer. This will increase drying times. See the Installation Instructions. ■ Has an air dry cycle been selected? Stains on load or drum ■ ...
... requires temperatures above the floor for the types of drying time in the area where your garments. Failure to do so can stain your dryer is not too long or has too many turns. Separate the load to other injury. ■ Is the automatic cycle ending early? ...Lint on Automatic Cycles. Fabric softener sheets added to move and install dryer. This will increase drying times. See the Installation Instructions. ■ Has an air dry cycle been selected? Stains on load or drum ■ ...

Use and Care Guide
Page 19
...trained to local dealers, repair parts distributors and service companies. Box 2370 Cleveland, TN 37320-2370 Please include a daytime phone number in your dryer with : ■ Features and specifications on our full line of appliances. ■ Installation information. ■ Use and maintenance procedures. ... only Drying rack - ACCESSORIES Enhance your correspondence. In Canada, call 1-800-901-2042, or visit us at www.maytag.com/accessories. m) - white LP gas conversion kit 19 This information will fit right and work right because they are trained to order, call 1-800-807-...
...trained to local dealers, repair parts distributors and service companies. Box 2370 Cleveland, TN 37320-2370 Please include a daytime phone number in your dryer with : ■ Features and specifications on our full line of appliances. ■ Installation information. ■ Use and maintenance procedures. ... only Drying rack - ACCESSORIES Enhance your correspondence. In Canada, call 1-800-901-2042, or visit us at www.maytag.com/accessories. m) - white LP gas conversion kit 19 This information will fit right and work right because they are trained to order, call 1-800-807-...


