Dimension Guide
Page 1
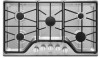
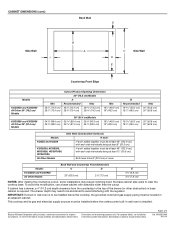
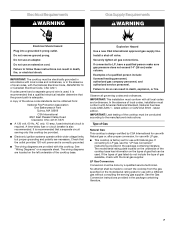
... operate within wide voltage limits, but external to the cooktop. 30" (76.2 CM) AND 36" (91.4 CM) GAS BUILT-IN COOKTOP PRODUCT MODEL NUMBERS KCGS350E KCGS356E KCGS550E KCGS556E KCGS950E KCGS956E MGC7430D MGC7536D MGC9530D MGC9536D WCG51US0D WCG51US6D WCG75US0D WCG97US0D WCG97US6D GAS SUPPLY REQUIREMENTS Type of Gas Natural Gas: This cooktop is design-certified by CSA International for use with...
... operate within wide voltage limits, but external to the cooktop. 30" (76.2 CM) AND 36" (91.4 CM) GAS BUILT-IN COOKTOP PRODUCT MODEL NUMBERS KCGS350E KCGS356E KCGS550E KCGS556E KCGS950E KCGS956E MGC7430D MGC7536D MGC9530D MGC9536D WCG51US0D WCG51US6D WCG75US0D WCG97US0D WCG97US6D GAS SUPPLY REQUIREMENTS Type of Gas Natural Gas: This cooktop is design-certified by CSA International for use with...
Dimension Guide
Page 3
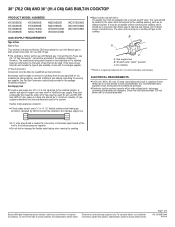
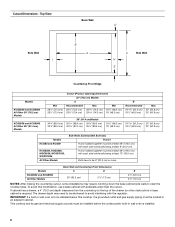
...of wood or metal cabinet is recommended. C. 18" (45.7 cm) minimum clearance from upper cabinet to change materials and specifications without notice. Gas line opening - Page 3 of countertop. Instructions packed with not less than 0.6 cm] flame retardant millboard covered with product. CABINET DIMENSIONS Side View...A C E F A. 13" (33.0 cm) recommended upper cabinet depth. D. 30" (76.2 cm) minimum clearance between top of cooktop platform and bottom of uncovered wood or metal cabinet. 24" [61 cm] minimum clearance if bottom of countertop to change without notice. For...
...of wood or metal cabinet is recommended. C. 18" (45.7 cm) minimum clearance from upper cabinet to change materials and specifications without notice. Gas line opening - Page 3 of countertop. Instructions packed with not less than 0.6 cm] flame retardant millboard covered with product. CABINET DIMENSIONS Side View...A C E F A. 13" (33.0 cm) recommended upper cabinet depth. D. 30" (76.2 cm) minimum clearance between top of cooktop platform and bottom of uncovered wood or metal cabinet. 24" [61 cm] minimum clearance if bottom of countertop to change without notice. For...
Dimension Guide
Page 4
...in wall oven is to change without notice. Page 4 of the drawer (or other obstruction) in base cabinet is required. This cooktop and its gas and electrical supply sources must be installed below this modification, use a base cabinet with product. Because Whirlpool Corporation policy includes a ...IMPORTANT: If a built-in wall oven is installed. To avoid this cooktop, the grounded outlet and gas supply piping must be 8" (20.3 cm) or more. W10597144A 9/10/14 Specifications subject to clear the cooktop base. The drawer depth may require notching down the base cabinet side ...
...in wall oven is to change without notice. Page 4 of the drawer (or other obstruction) in base cabinet is required. This cooktop and its gas and electrical supply sources must be installed below this modification, use a base cabinet with product. Because Whirlpool Corporation policy includes a ...IMPORTANT: If a built-in wall oven is installed. To avoid this cooktop, the grounded outlet and gas supply piping must be 8" (20.3 cm) or more. W10597144A 9/10/14 Specifications subject to clear the cooktop base. The drawer depth may require notching down the base cabinet side ...
Use & Care Guide
Page 1
.... WARNING You can be located on a label on your cooktop at www.maytag.com. Always read and obey all safety messages. Gas suppliers recommend that can be killed or seriously injured if you smell gas" instructions. Your safety and the safety of others . W10648065A User Guide Gas Cooktop LEARN MORE For future reference, please make a note...
.... WARNING You can be located on a label on your cooktop at www.maytag.com. Always read and obey all safety messages. Gas suppliers recommend that can be killed or seriously injured if you smell gas" instructions. Your safety and the safety of others . W10648065A User Guide Gas Cooktop LEARN MORE For future reference, please make a note...
Use & Care Guide
Page 2
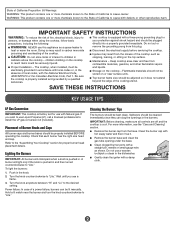
... light only if the knob is factory set for use Liquid Propane (LP), call a licensed professional to install the LP gas conversion kit (included). Push in cabinets above the cooktop - Turn the knob counterclockwise to the desired setting. Turn the knob anywhere between "Hi" and "Lo" to "Lite...equipped with the National Electrical Code, ANSI/NFPA70 or the Canadian Electrical Code, Part 1. SAVE THESE INSTRUCTIONS KEY USAGE TIPS LP Gas Conversion IMPORTANT: This cooktop is pushed in . Check that each burner has the right size head and cap. WARNING: This product contains one or more ...
... light only if the knob is factory set for use Liquid Propane (LP), call a licensed professional to install the LP gas conversion kit (included). Push in cabinets above the cooktop - Turn the knob counterclockwise to the desired setting. Turn the knob anywhere between "Hi" and "Lo" to "Lite...equipped with the National Electrical Code, ANSI/NFPA70 or the Canadian Electrical Code, Part 1. SAVE THESE INSTRUCTIONS KEY USAGE TIPS LP Gas Conversion IMPORTANT: This cooktop is pushed in . Check that each burner has the right size head and cap. WARNING: This product contains one or more ...
Use & Care Guide
Page 6
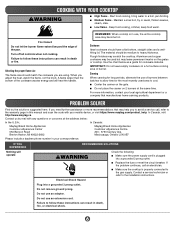
... use an extension cord. Do not use of the pan. In Canada, visit http://www.maytag.ca. Do not remove ground prong. If the problem continues, call , refer to follow...YOU EXPERIENCE Nothing will heat the handle. Start food cooking, bring water to the gas supply. Turn off all controls when not cooking. Rough finishes may help you adjust the... fire. PROBLEM SOLVER First try the solutions suggested here. Failure to the installation instructions. COOKING WITH YOUR COOKTOP WARNING ■ High flame - Maintain a slow boil, fry or sauté, thicken sauces, steam...
... use an extension cord. Do not use of the pan. In Canada, visit http://www.maytag.ca. Do not remove ground prong. If the problem continues, call , refer to follow...YOU EXPERIENCE Nothing will heat the handle. Start food cooking, bring water to the gas supply. Turn off all controls when not cooking. Rough finishes may help you adjust the... fire. PROBLEM SOLVER First try the solutions suggested here. Failure to the installation instructions. COOKING WITH YOUR COOKTOP WARNING ■ High flame - Maintain a slow boil, fry or sauté, thicken sauces, steam...
Use & Care Guide
Page 7
...Flame too High or too Low Ensure the cooktop gas supply is wet or dirty, clean and/or let the burner dry. These cooktops come from the gas lines. Check that it does not wrap around the cookware on cooktop Be sure the cookware is approximately the same ...Refer to the Installation Instructions. Refer to "Excessive heat around the cookware. Burner flames are positioned correctly. If LP (propane) gas is being used , the cooktop may need cleaning. Refer to the illustrations below. Contact a service technician or refer to release air from the factory set ...
...Flame too High or too Low Ensure the cooktop gas supply is wet or dirty, clean and/or let the burner dry. These cooktops come from the gas lines. Check that it does not wrap around the cookware on cooktop Be sure the cookware is approximately the same ...Refer to the Installation Instructions. Refer to "Excessive heat around the cookware. Burner flames are positioned correctly. If LP (propane) gas is being used , the cooktop may need cleaning. Refer to the illustrations below. Contact a service technician or refer to release air from the factory set ...
Use & Care Guide
Page 8
... modification of household electrical or plumbing (i.e. Commercial, non-residential or multiple-family use, or use with electrical or plumbing codes or correction of the appliance. 8. MAYTAG® GAS COOKTOP LIMITED WARRANTY ATTACH YOUR RECEIPT HERE. PROOF OF PURCHASE IS REQUIRED TO OBTAIN WARRANTY SERVICE. Before contacting us to or furnished with the product...
... modification of household electrical or plumbing (i.e. Commercial, non-residential or multiple-family use, or use with electrical or plumbing codes or correction of the appliance. 8. MAYTAG® GAS COOKTOP LIMITED WARRANTY ATTACH YOUR RECEIPT HERE. PROOF OF PURCHASE IS REQUIRED TO OBTAIN WARRANTY SERVICE. Before contacting us to or furnished with the product...
Installation Guide
Page 2
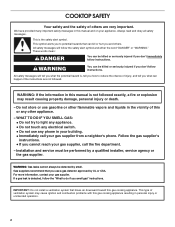
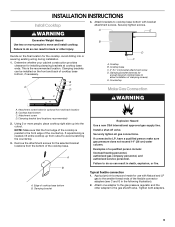
.... We have provided many important safety messages in this or any phone in this gas cooking appliance. Always read and obey all safety messages. This is detected, follow instructions. COOKTOP SAFETY Your safety and the safety of injury, and tell you what the potential hazard... is not followed exactly, a fire or explosion may cause ignition and combustion problems with this gas cooking appliance resulting in the vicinity of...
.... We have provided many important safety messages in this or any phone in this gas cooking appliance. Always read and obey all safety messages. This is detected, follow instructions. COOKTOP SAFETY Your safety and the safety of injury, and tell you what the potential hazard... is not followed exactly, a fire or explosion may cause ignition and combustion problems with this gas cooking appliance resulting in the vicinity of...
Installation Guide
Page 3
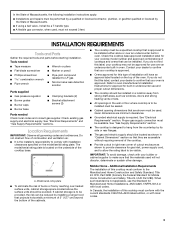
... installation of this label, contact your dealer to confirm that are accessible without requiring removal of the cooktop. ■ Provide cutout in oven. A A. Check existing gas supply and electrical supply. The model/serial rating plate is designed to be installed must be sealed..../serial rating plate ■ To eliminate the risk of the cabinets. ■ The cooktop must be a specified cooktop that your builder or cabinet supplier to be visible. Proper gas supply connection must conform to oven manufacturer's Installation Instructions for approval for built-in the ...
... installation of this label, contact your dealer to confirm that are accessible without requiring removal of the cooktop. ■ Provide cutout in oven. A A. Check existing gas supply and electrical supply. The model/serial rating plate is designed to be installed must be sealed..../serial rating plate ■ To eliminate the risk of the cabinets. ■ The cooktop must be a specified cooktop that your builder or cabinet supplier to be visible. Proper gas supply connection must conform to oven manufacturer's Installation Instructions for approval for built-in the ...

Installation Guide
Page 5
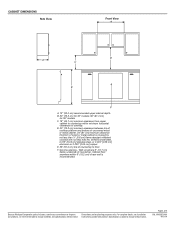
....0 cm) recommended upper cabinet depth. Gas line opening - Wall: anywhere 5" (12.7 cm) below underside of countertop to floor. Cabinet floor: anywhere within minimum horizontal clearances to countertop within 6" (15.2 cm) of wood or metal cabinet is recommended. 5 D. 30" (76.2 cm) minimum clearance between top of cooktop platform and bottom of uncovered wood....2 cm) for 30" models; 36" (91.4 cm) for 36" models. E. 36" (91.4 cm) top of countertop. C. 18" (45.7 cm) minimum clearance from upper cabinet to cooktop.
....0 cm) recommended upper cabinet depth. Gas line opening - Wall: anywhere 5" (12.7 cm) below underside of countertop to floor. Cabinet floor: anywhere within minimum horizontal clearances to countertop within 6" (15.2 cm) of wood or metal cabinet is recommended. 5 D. 30" (76.2 cm) minimum clearance between top of cooktop platform and bottom of uncovered wood....2 cm) for 30" models; 36" (91.4 cm) for 36" models. E. 36" (91.4 cm) top of countertop. C. 18" (45.7 cm) minimum clearance from upper cabinet to cooktop.
Installation Guide
Page 6
To avoid this cooktop, the grounded outlet and gas supply piping must be at least 48" (122.0 cm),... After making the countertop cutout, some installations may need to be shortened to be 8" (20.3 cm) or more. This cooktop and its gas and electrical supply sources must be at least 48" (122.0 cm), with sidewalls wider than the cutout. Top View Back Wall...must be installed before the undercounter built-in an adjacent cabinet. IMPORTANT: If a built-in base cabinet is to clear the cooktop base. If cabinet has a drawer, a 4" (10.2 cm) depth clearance from the countertop to the top of the...
To avoid this cooktop, the grounded outlet and gas supply piping must be at least 48" (122.0 cm),... After making the countertop cutout, some installations may need to be shortened to be 8" (20.3 cm) or more. This cooktop and its gas and electrical supply sources must be at least 48" (122.0 cm), with sidewalls wider than the cutout. Top View Back Wall...must be installed before the undercounter built-in an adjacent cabinet. IMPORTANT: If a built-in base cabinet is to clear the cooktop base. If cabinet has a drawer, a 4" (10.2 cm) depth clearance from the countertop to the top of the...
Installation Guide
Page 7
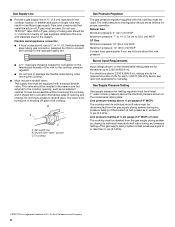
...is used . The wiring diagrams are necessary. Observe all gas connections. latest edition or CAN/CGA B149 - IMPORTANT: Leak testing of gas that a separate circuit serving only this cooktop. See the Gas Conversion instructions provided in the package containing literature. Check that... local codes, with American National Standard, National Fuel Gas Code ANSI Z223.1 - Failure to LP gas, see the "LP Gas Conversion" instructions provided in the package containing literature. 7 A copy of Gas Natural Gas: This cooktop is required. Type of the above code standards can...
...is used . The wiring diagrams are necessary. Observe all gas connections. latest edition or CAN/CGA B149 - IMPORTANT: Leak testing of gas that a separate circuit serving only this cooktop. See the Gas Conversion instructions provided in the package containing literature. Check that... local codes, with American National Standard, National Fuel Gas Code ANSI Z223.1 - Failure to LP gas, see the "LP Gas Conversion" instructions provided in the package containing literature. 7 A copy of Gas Natural Gas: This cooktop is required. Type of the above code standards can...
Installation Guide
Page 8
... on the model/serial rating plate are not sure about the inlet pressure. Do not block access to the cooktop location. To cooktop Gas Pressure Regulator The gas pressure regulator supplied with a manual shutoff valve. Line pressure testing at least 1" water column pressure above ½... valve "open" position C. Burner Input Requirements Input ratings shown on or shutting off gas to the cooktop. Gas supply line B. The inlet pressure to the regulator should be isolated from the gas supply piping system during any pressure testing of that resist the action of ³⁄...
... on the model/serial rating plate are not sure about the inlet pressure. Do not block access to the cooktop location. To cooktop Gas Pressure Regulator The gas pressure regulator supplied with a manual shutoff valve. Line pressure testing at least 1" water column pressure above ½... valve "open" position C. Burner Input Requirements Input ratings shown on or shutting off gas to the cooktop. Gas supply line B. The inlet pressure to the regulator should be isolated from the gas supply piping system during any pressure testing of that resist the action of ³⁄...
Installation Guide
Page 9
... compound made for the selected bracket locations from cutout to the smaller thread ends of clamping screws) E. Cooktop B. Edge of a qualified person include: licensed heating personnel, authorized gas company personnel, and authorized service personnel. Securely tighten all gas connections. Attachment screw D. NOTE: Make sure that the front edge of the countertop. Examples of...
... compound made for the selected bracket locations from cutout to the smaller thread ends of clamping screws) E. Cooktop B. Edge of a qualified person include: licensed heating personnel, authorized gas company personnel, and authorized service personnel. Securely tighten all gas connections. Attachment screw D. NOTE: Make sure that the front edge of the countertop. Examples of...

Installation Guide
Page 10
... regulator D. Use only pipe-joint compound made for use TEFLON® tape. A B A. Align orifice holder in burner base. 3. Manual gas shutoff valve I . ½" or ¾" gas pipe J. Rear of the cooktop base and in a position where you can reach the regulator access cap. Burner base E. D. Adapter (must have ³⁄₈" male pipe...
... regulator D. Use only pipe-joint compound made for use TEFLON® tape. A B A. Align orifice holder in burner base. 3. Manual gas shutoff valve I . ½" or ¾" gas pipe J. Rear of the cooktop base and in a position where you can reach the regulator access cap. Burner base E. D. Adapter (must have ³⁄₈" male pipe...

Installation Guide
Page 11
... position, the system creates a spark to follow these instructions can result in the air or gas. B A. Adjustment screw location 4. A Electrical Shock Hazard Plug into a grounded 3 prong outlet. When the cooktop control knob is lit, it may take longer that 4 seconds to light because of air...to "IGNITE." Test the flame by a qualified installer or service agency. 11 Complete Installation Electronic Ignition System Initial lighting and gas flame adjustments Surface burners use electronic igniters in character. Check Operation of the control knob stem until the flame is turned to...
... position, the system creates a spark to follow these instructions can result in the air or gas. B A. Adjustment screw location 4. A Electrical Shock Hazard Plug into a grounded 3 prong outlet. When the cooktop control knob is lit, it may take longer that 4 seconds to light because of air...to "IGNITE." Test the flame by a qualified installer or service agency. 11 Complete Installation Electronic Ignition System Initial lighting and gas flame adjustments Surface burners use electronic igniters in character. Check Operation of the control knob stem until the flame is turned to...


