
Owners Manual
Page 3
...electrical source and turn Cooling OFF, and then disconnect the refrigerator from refrigerator. See "Using the Controls." Allow for the water line connections. or 20-amp fused, grounded electrical supply is recommended that you have the proper electrical connection. Do not ...next to a fixed wall, leave a 3³⁄₄" (9.5 cm) minimum space between the refrigerator and wall to allow for leaks. Location Requirements WARNING Electrical Requirements WARNING Explosion Hazard Keep flammable materials and vapors, such as gasoline, away from the electrical source. ...
...electrical source and turn Cooling OFF, and then disconnect the refrigerator from refrigerator. See "Using the Controls." Allow for the water line connections. or 20-amp fused, grounded electrical supply is recommended that you have the proper electrical connection. Do not ...next to a fixed wall, leave a 3³⁄₄" (9.5 cm) minimum space between the refrigerator and wall to allow for leaks. Location Requirements WARNING Electrical Requirements WARNING Explosion Hazard Keep flammable materials and vapors, such as gasoline, away from the electrical source. ...
Owners Manual
Page 5
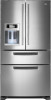
...Do not use an extension cord. Rotate the handle so that the large holes in place while you are working. Correct any leaks. Compression nut D. Flush the water system. A B C A. Create a service loop with the door studs. 2. Compression sleeve 3. 4. Brass nut B. ...See Handle graphic. Failure to refrigerator and check for leaks. Compression sleeve C. A B C D A. Complete the Installation WARNING Electrical Shock Hazard Plug into a grounded 3 prong outlet. Check connection by pulling on water supply to the valve inlet using a compression nut and...
...Do not use an extension cord. Rotate the handle so that the large holes in place while you are working. Correct any leaks. Compression nut D. Flush the water system. A B C A. Create a service loop with the door studs. 2. Compression sleeve 3. 4. Brass nut B. ...See Handle graphic. Failure to refrigerator and check for leaks. Compression sleeve C. A B C D A. Complete the Installation WARNING Electrical Shock Hazard Plug into a grounded 3 prong outlet. Check connection by pulling on water supply to the valve inlet using a compression nut and...
Owners Manual
Page 6
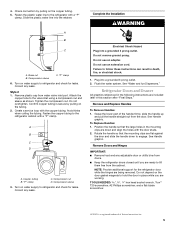
...See Drawer Front Removal graphic. Replace the base grille. Return all screws. 4. Replace the refrigerator door. NOTE: Provide additional support for leaks. Open the drawer to follow these instructions can result in the drawer front and refasten with the top of the hinge by wedging ...Connections graphic. 7. See Drawer Front Removal graphic. Replace Doors and Hinges 1. Reconnect the wiring plug on the locking collar while pulling the water line out of the left-hand side refrigerator door. 5. Remove the top hinge cover from left -hand side door from the bottom hinge...
...See Drawer Front Removal graphic. Replace the base grille. Return all screws. 4. Replace the refrigerator door. NOTE: Provide additional support for leaks. Open the drawer to follow these instructions can result in the drawer front and refasten with the top of the hinge by wedging ...Connections graphic. 7. See Drawer Front Removal graphic. Replace Doors and Hinges 1. Reconnect the wiring plug on the locking collar while pulling the water line out of the left-hand side refrigerator door. 5. Remove the top hinge cover from left -hand side door from the bottom hinge...
Owners Manual
Page 17
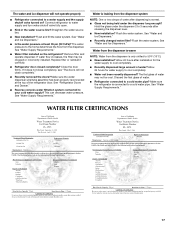
... 3 seconds after releasing the dispenser lever. ■ New installation? The water pressure to your cold water supply? Close the door firmly. This can decrease water pressure. See "Water and Ice Dispensers." ■ Recently changed water filter? Flush the water system. Allow 24 hours after dispensing is leaking from the dispenser system NOTE: One or two drops of...
... 3 seconds after releasing the dispenser lever. ■ New installation? The water pressure to your cold water supply? Close the door firmly. This can decrease water pressure. See "Water and Ice Dispensers." ■ Recently changed water filter? Flush the water system. Allow 24 hours after dispensing is leaking from the dispenser system NOTE: One or two drops of...


