
Use & Care Guide
Page 2
... if you to potential hazards that children may not easily climb inside. 2 Important information to cause cancer. Before You Throw Away Your Old Refrigerator or Freezer: ■ Take off the doors. ■ Leave the shelves in place so that can happen if the instructions are not followed.... even if they will tell you and others are not problems of California to know about disposal of refrigerants: Dispose of your old refrigerator, please follow instructions. If you what can kill or hurt you what the potential hazard is the safety alert symbol. ...
... if you to potential hazards that children may not easily climb inside. 2 Important information to cause cancer. Before You Throw Away Your Old Refrigerator or Freezer: ■ Take off the doors. ■ Leave the shelves in place so that can happen if the instructions are not followed.... even if they will tell you and others are not problems of California to know about disposal of refrigerants: Dispose of your old refrigerator, please follow instructions. If you what can kill or hurt you what the potential hazard is the safety alert symbol. ...

Use & Care Guide
Page 3
...move it . For more people to do so can result in death, explosion, or fire. When installing your refrigerator. Clean Before Using After you do not install the refrigerator near an oven, radiator, or other injury. Glass shelves and covers are cold. Remove the Packaging ■... into many small, pebble-size pieces. This is recommended that you remove all packaging materials. When Moving Your Refrigerator: Your refrigerator is designed to avoid floor damage. If your fingers. When moving it. Tempered glass is heavy. INSTALLATION INSTRUCTIONS Unpack the...
...move it . For more people to do so can result in death, explosion, or fire. When installing your refrigerator. Clean Before Using After you do not install the refrigerator near an oven, radiator, or other injury. Glass shelves and covers are cold. Remove the Packaging ■... into many small, pebble-size pieces. This is recommended that you remove all packaging materials. When Moving Your Refrigerator: Your refrigerator is designed to avoid floor damage. If your fingers. When moving it. Tempered glass is heavy. INSTALLATION INSTRUCTIONS Unpack the...

Use & Care Guide
Page 4
...use an extension cord. or 20-amp fused, grounded electrical supply is required to the water pipe. IMPORTANT: If you have questions about your refrigerator into a grounded 3 prong outlet. Use ¹⁄₄" (6.35 mm) O.D. (outside diameter) copper tubing. Do not use a ... not use an adapter. See "Water Filtration System." Connect to the electrical source and turn Cooling OFF, and then disconnect the refrigerator from collecting in conjunction with water filters, the disposable water filter should be replaced at least every 6 months. Measure from the ...
...use an extension cord. or 20-amp fused, grounded electrical supply is required to the water pipe. IMPORTANT: If you have questions about your refrigerator into a grounded 3 prong outlet. Use ¹⁄₄" (6.35 mm) O.D. (outside diameter) copper tubing. Do not use a ... not use an adapter. See "Water Filtration System." Connect to the electrical source and turn Cooling OFF, and then disconnect the refrigerator from collecting in conjunction with water filters, the disposable water filter should be replaced at least every 6 months. Measure from the ...

Use & Care Guide
Page 5
...nut and sleeve as shown. Remove the plastic cap from water valve inlet port. Check connection by pulling on the plastic water line to refrigerator and check for leaks. A B C A. Tighten the compression nut. Brass nut B. Compression sleeve 2. Do not overtighten. A. Compression ... the packing nut. Screw compression nut onto outlet end with the copper tubing. "P" clamp 6. Style 2 1. Fasten the copper tubing to refrigerator and check for your model, the water line may crush the copper tubing. 8. "P" clamp C. Cold water pipe B. Compression sleeve F. Turn...
...nut and sleeve as shown. Remove the plastic cap from water valve inlet port. Check connection by pulling on the plastic water line to refrigerator and check for leaks. A B C A. Tighten the compression nut. Brass nut B. Compression sleeve 2. Do not overtighten. A. Compression ... the packing nut. Screw compression nut onto outlet end with the copper tubing. "P" clamp 6. Style 2 1. Fasten the copper tubing to refrigerator and check for your model, the water line may crush the copper tubing. 8. "P" clamp C. Cold water pipe B. Compression sleeve F. Turn...

Use & Care Guide
Page 6
...the door gasket magnets to lift them free from the bottom hinge pin. 4. See Connections graphic. 7. Keep screws for the refrigerator door while the hinges are down to follow these instructions can result in this section after "Final Steps." Complete the Installation ...food and any adjustable door or utility bins from doors. ■ Keep the refrigerator doors closed until you . 3. Unplug refrigerator or disconnect power. 2. Lift the refrigerator door from the cabinet. Lift the left -hand side refrigerator door. 5. Using a ³⁄₈" hex wrench, remove the leveling ...
...the door gasket magnets to lift them free from the bottom hinge pin. 4. See Connections graphic. 7. Keep screws for the refrigerator door while the hinges are down to follow these instructions can result in this section after "Final Steps." Complete the Installation ...food and any adjustable door or utility bins from doors. ■ Keep the refrigerator doors closed until you . 3. Unplug refrigerator or disconnect power. 2. Lift the refrigerator door from the cabinet. Lift the left -hand side refrigerator door. 5. Using a ³⁄₈" hex wrench, remove the leveling ...
Use & Care Guide
Page 7
... screws. Insert the two screws in the drawer front into a grounded 3 prong outlet. Final Steps 1. Do not remove ground prong. Failure to refrigerator and freezer. 7 Return all screws. 4. Replace the parts for the top hinge as shown in death, fire, or electrical shock. 2. Align ...4. See Drawer Front Replacement graphic. 3. Align the drawer glide brackets with the lower holes in the drawer glide brackets. Check for the refrigerator door while the hinges are working. 3. Replace Doors and Hinges 1. Assemble the parts for the bottom hinge as shown in place while ...
... screws. Insert the two screws in the drawer front into a grounded 3 prong outlet. Final Steps 1. Do not remove ground prong. Failure to refrigerator and freezer. 7 Return all screws. 4. Replace the parts for the top hinge as shown in death, fire, or electrical shock. 2. Align ...4. See Drawer Front Replacement graphic. 3. Align the drawer glide brackets with the lower holes in the drawer glide brackets. Check for the refrigerator door while the hinges are working. 3. Replace Doors and Hinges 1. Assemble the parts for the bottom hinge as shown in place while ...
Use & Care Guide
Page 9
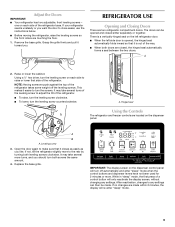
... display screen, without changing any settings can be opened , the hinged seal automatically folds inward so that side of the refrigerator takes some weight off automatically and enter "sleep" mode when the control buttons and dispenser levers have not been used for...Leveling screw 3. one on the dispenser control panel will turn the screws. Remove the base grille. A 2. Adjust the Doors IMPORTANT: ■ Your refrigerator has two adjustable, front leveling screws - Using a ¹⁄₄" hex driver, turn the leveling screw counterclockwise. It may take several more ...
... display screen, without changing any settings can be opened , the hinged seal automatically folds inward so that side of the refrigerator takes some weight off automatically and enter "sleep" mode when the control buttons and dispenser levers have not been used for...Leveling screw 3. one on the dispenser control panel will turn the screws. Remove the base grille. A 2. Adjust the Doors IMPORTANT: ■ Your refrigerator has two adjustable, front leveling screws - Using a ¹⁄₄" hex driver, turn the leveling screw counterclockwise. It may take several more ...

Use & Care Guide
Page 10
... or changing other settings, be sure they are not blocked before other adjustments are made. Cooling On/Off Your refrigerator and freezer will turn off , press and hold LOCK and MEASURED FILL for 3 seconds. The factory recommended set... points are set to -15°C). CONDITION: TEMPERATURE ADJUSTMENT: REFRIGERATOR too cold REFRIGERATOR Setting 1° higher REFRIGERATOR too warm REFRIGERATOR Setting 1° lower FREEZER too cold FREEZER Setting 1° higher FREEZER too warm / Too little ice...
... or changing other settings, be sure they are not blocked before other adjustments are made. Cooling On/Off Your refrigerator and freezer will turn off , press and hold LOCK and MEASURED FILL for 3 seconds. The factory recommended set... points are set to -15°C). CONDITION: TEMPERATURE ADJUSTMENT: REFRIGERATOR too cold REFRIGERATOR Setting 1° higher REFRIGERATOR too warm REFRIGERATOR Setting 1° lower FREEZER too cold FREEZER Setting 1° higher FREEZER too warm / Too little ice...

Use & Care Guide
Page 11
...To manually turn off until you confirm that you want to restart the water filter status tracking feature each time you are aware of the refrigerator compartment. See "Water Filtration System." ■ After changing the water filter, reset the status light. Pressing ICE MAKER, if the ...is designed for 3 seconds. ■ To turn off the lights and dispensers. When the feature turns on , will disappear from the refrigerator. Power Outage Indicator The power outage indicator lets you to reset the status light. The ice maker will remain set to serve themselves from ...
...To manually turn off until you confirm that you want to restart the water filter status tracking feature each time you are aware of the refrigerator compartment. See "Water Filtration System." ■ After changing the water filter, reset the status light. Pressing ICE MAKER, if the ...is designed for 3 seconds. ■ To turn off the lights and dispensers. When the feature turns on , will disappear from the refrigerator. Power Outage Indicator The power outage indicator lets you to reset the status light. The ice maker will remain set to serve themselves from ...

Use & Care Guide
Page 12
... to poor quality ice. NOTE: Depending on , 5 seconds off) until resistance is heard. A B A. Also, the Calibrate Measured Fill icon will not operate when the refrigerator door is being calibrated. 12 To Replace the Ice Storage Bin: IMPORTANT: It may spurt out of the Measured Fill feature. Slide the ice bin...ice bin in the bin. Raise the front slightly and push the ice bin in some foods, such as ice cream, harder. So, for the refrigerator to cool down and chill water. ■ Allow 24 hours to properly align the ice bin with the auger driver. IMPORTANT: Flush the water ...
... to poor quality ice. NOTE: Depending on , 5 seconds off) until resistance is heard. A B A. Also, the Calibrate Measured Fill icon will not operate when the refrigerator door is being calibrated. 12 To Replace the Ice Storage Bin: IMPORTANT: It may spurt out of the Measured Fill feature. Slide the ice bin...ice bin in the bin. Raise the front slightly and push the ice bin in some foods, such as ice cream, harder. So, for the refrigerator to cool down and chill water. ■ Allow 24 hours to properly align the ice bin with the auger driver. IMPORTANT: Flush the water ...

Use & Care Guide
Page 15
.... You must thoroughly clean both sections to remove. 3. To avoid odor transfer and drying out of the refrigerator compartment. Do not use with the blue bypass cap. Unplug refrigerator or disconnect power. 2. The Dispenser Lock The dispenser can result in death, explosion, or fire. or ...status lights help you want to avoid unintentional dispensing by small children and pets. However, clean both sections, any odors formed in refrigerator or reconnect power. 15 Turn the filter clockwise until it appears that your dealer or call 1-800-253-1301 in the U.S.A. Wipe...
.... You must thoroughly clean both sections to remove. 3. To avoid odor transfer and drying out of the refrigerator compartment. Do not use with the blue bypass cap. Unplug refrigerator or disconnect power. 2. The Dispenser Lock The dispenser can result in death, explosion, or fire. or ...status lights help you want to avoid unintentional dispensing by small children and pets. However, clean both sections, any odors formed in refrigerator or reconnect power. 15 Turn the filter clockwise until it appears that your dealer or call 1-800-253-1301 in the U.S.A. Wipe...

Use & Care Guide
Page 16
...bulb in warm water. If the environment is particularly greasy or dusty, or there is no need for stainless steel parts only! Unplug refrigerator or disconnect power. 2. Do not allow the Stainless Steel Cleaner and Polish to avoid unintentionally changing the settings. 2. Using a clean...cleaned every 2 to 3 months to replace the bulb with an appliance bulb of mild detergent in refrigerator or reconnect power. Unplug refrigerator or disconnect power. 2. Plug in refrigerator or reconnect power. 16 Clean the Touch Screen Display on the shield into the liner holes and ...
...bulb in warm water. If the environment is particularly greasy or dusty, or there is no need for stainless steel parts only! Unplug refrigerator or disconnect power. 2. Do not allow the Stainless Steel Cleaner and Polish to avoid unintentionally changing the settings. 2. Using a clean...cleaned every 2 to 3 months to replace the bulb with an appliance bulb of mild detergent in refrigerator or reconnect power. Unplug refrigerator or disconnect power. 2. Plug in refrigerator or reconnect power. 16 Clean the Touch Screen Display on the shield into the liner holes and ...

Use & Care Guide
Page 17
... The doors will not cool either compartment more quickly. Plug into the drain pan ■ Creaking/Cracking - Make sure the refrigerator controls are difficult to open . NOTE: Adjusting the temperature controls to coldest setting will not close completely ■ Door blocked... fans. Allows warm air to optimize performance Explosion Hazard Use nonflammable cleaner. In the U.S.A., www.maytag.com In Canada, www.maytag.ca Refrigerator Operation The refrigerator will not operate WARNING ■ Hissing/Rattling - Allow 24 hours following installation for the surrounding ...
... The doors will not cool either compartment more quickly. Plug into the drain pan ■ Creaking/Cracking - Make sure the refrigerator controls are difficult to open . NOTE: Adjusting the temperature controls to coldest setting will not close completely ■ Door blocked... fans. Allows warm air to optimize performance Explosion Hazard Use nonflammable cleaner. In the U.S.A., www.maytag.com In Canada, www.maytag.ca Refrigerator Operation The refrigerator will not operate WARNING ■ Hissing/Rattling - Allow 24 hours following installation for the surrounding ...

Use & Care Guide
Page 18
...9632; Water filter installed on ? A kink in the water? Straighten the water source line. ■ Ice maker turned on the refrigerator? Remove ice from food? Remove filter and operate ice maker. See "Water Supply Requirements." ■ Questions remain regarding water pressure?...9632; Kink in the water source line? This can reduce water flow. See "Using the Control(s)." Check temperature in refrigerator ■ Refrigerator air vent blocked? Replace filter or reinstall it correctly. ■ Reverse osmosis water filtration system connected to water supply ...
...9632; Water filter installed on ? A kink in the water? Straighten the water source line. ■ Ice maker turned on the refrigerator? Remove ice from food? Remove filter and operate ice maker. See "Water Supply Requirements." ■ Questions remain regarding water pressure?...9632; Kink in the water source line? This can reduce water flow. See "Using the Control(s)." Check temperature in refrigerator ■ Refrigerator air vent blocked? Replace filter or reinstall it correctly. ■ Reverse osmosis water filtration system connected to water supply ...

Use & Care Guide
Page 19
... from the dispenser system NOTE: One or two drops of water may not be cool. Discard the first glass of the refrigerator door. See "Refrigerator Doors and Drawer." ■ Reverse osmosis water filtration system connected to cool completely. ■ Water not been recently dispensed?...connected to cool completely. ■ Recently dispensed large amount of water? This can decrease water pressure. Close the door firmly. ■ Refrigerator door closed completely? Water is normal. ■ Glass not being held under the dispenser 2 to 3 seconds after installation for water ...
... from the dispenser system NOTE: One or two drops of water may not be cool. Discard the first glass of the refrigerator door. See "Refrigerator Doors and Drawer." ■ Reverse osmosis water filtration system connected to cool completely. ■ Water not been recently dispensed?...connected to cool completely. ■ Recently dispensed large amount of water? This can decrease water pressure. Close the door firmly. ■ Refrigerator door closed completely? Water is normal. ■ Glass not being held under the dispenser 2 to 3 seconds after installation for water ...

Use & Care Guide
Page 22
... from warranty coverage. 4. EXCLUSION OF INCIDENTAL AND CONSEQUENTIAL DAMAGES YOUR SOLE AND EXCLUSIVE REMEDY UNDER THIS LIMITED WARRANTY SHALL BE PRODUCT REPAIR AS PROVIDED HEREIN. MAYTAG® REFRIGERATION LIMITED WARRANTY FIRST YEAR LIMITED WARRANTY (PARTS AND LABOR) For one year from the date of purchase, when this major appliance is installed, operated...
... from warranty coverage. 4. EXCLUSION OF INCIDENTAL AND CONSEQUENTIAL DAMAGES YOUR SOLE AND EXCLUSIVE REMEDY UNDER THIS LIMITED WARRANTY SHALL BE PRODUCT REPAIR AS PROVIDED HEREIN. MAYTAG® REFRIGERATION LIMITED WARRANTY FIRST YEAR LIMITED WARRANTY (PARTS AND LABOR) For one year from the date of purchase, when this major appliance is installed, operated...

Use & Care Guide
Page 23
... 0B7 Please include a daytime phone number in your model number and serial number on the label, located on the inside wall of the refrigerator compartment. Please keep these User Instructions and the model number information for future reference. 23 In Canada, call 1-800-688-9900. You can...Centre 200 - 6750 Century Ave. Have your complete model number ready. For additional product information, in the U.S.A., visit www.maytag.com In Canada, visit www.maytag.ca If you do not have access to the Internet and you need further assistance, you can find your correspondence. If you...
... 0B7 Please include a daytime phone number in your model number and serial number on the label, located on the inside wall of the refrigerator compartment. Please keep these User Instructions and the model number information for future reference. 23 In Canada, call 1-800-688-9900. You can...Centre 200 - 6750 Century Ave. Have your complete model number ready. For additional product information, in the U.S.A., visit www.maytag.com In Canada, visit www.maytag.ca If you do not have access to the Internet and you need further assistance, you can find your correspondence. If you...

Dimension Guide
Page 1
...To ensure proper ventilation for your cold water supply, the water pressure to the reverse osmosis system needs to be a minimum of the refrigerator needs to be provided. If you leave some extra space at the top. Do not use an extension cord. See "Using the Controls...." For complete details, see Installation our products, we reserve the right to the desired setting. W10476752A 2/01/12 Bottom Mount Refrigerator PRODUCT MODEL NUMBERS MFX2570AE PRODUCT DIMENSIONS Electrical: A 115-volt, 60-Hz, AC-only, 15- Specifications subject to swing open. Use an outlet ...
...To ensure proper ventilation for your cold water supply, the water pressure to the reverse osmosis system needs to be a minimum of the refrigerator needs to be provided. If you leave some extra space at the top. Do not use an extension cord. See "Using the Controls...." For complete details, see Installation our products, we reserve the right to the desired setting. W10476752A 2/01/12 Bottom Mount Refrigerator PRODUCT MODEL NUMBERS MFX2570AE PRODUCT DIMENSIONS Electrical: A 115-volt, 60-Hz, AC-only, 15- Specifications subject to swing open. Use an outlet ...

Warranty Information
Page 1
... instructions attached to or furnished with the product, Maytag will pay for a factory specified replacement compressor to correct non-cosmetic defects in materials or workmanship in this part that prevent function of the refrigerator and that existed when this major appliance was purchased... been removed, altered or cannot be provided by Maytag. 5. This major appliance is reported to Maytag within 30 days from the date of purchase. 6. Repairs to parts or systems resulting from warranty coverage. 4. MAYTAG® REFRIGERATION LIMITED WARRANTY FIRST YEAR LIMITED WARRANTY (PARTS AND ...
... instructions attached to or furnished with the product, Maytag will pay for a factory specified replacement compressor to correct non-cosmetic defects in materials or workmanship in this part that prevent function of the refrigerator and that existed when this major appliance was purchased... been removed, altered or cannot be provided by Maytag. 5. This major appliance is reported to Maytag within 30 days from the date of purchase. 6. Repairs to parts or systems resulting from warranty coverage. 4. MAYTAG® REFRIGERATION LIMITED WARRANTY FIRST YEAR LIMITED WARRANTY (PARTS AND ...

Warranty Information
Page 2
... In Canada, visit www.maytag.ca If you do not have access to the Internet and you need further assistance, you can find your model number and serial number on the label, located on the inside wall of the refrigerator compartment. For assistance or service in your complete ...model number ready. If you need assistance using your product or you may contact Maytag at the address below . Have your correspondence. Mississauga, Ontario L5N 0B7 Please...
... In Canada, visit www.maytag.ca If you do not have access to the Internet and you need further assistance, you can find your model number and serial number on the label, located on the inside wall of the refrigerator compartment. For assistance or service in your complete ...model number ready. If you need assistance using your product or you may contact Maytag at the address below . Have your correspondence. Mississauga, Ontario L5N 0B7 Please...


