
Energy Guide
Page 1
EFIERG GUIDE Refrigerator-Freezer • Automatic Defrost • Bottom-Mounted Freezer • Without Through-The-Door-Ice Service Maytag by Whirlpool Corporation Model: MFF2055YE*0* MFW2055YE*0* Capacity: 19.6 Cubic Feet Estimated Yearly Operating Cost $48 I I Uses least energy / Uses most energy / Consomme le moins d'energie ...
EFIERG GUIDE Refrigerator-Freezer • Automatic Defrost • Bottom-Mounted Freezer • Without Through-The-Door-Ice Service Maytag by Whirlpool Corporation Model: MFF2055YE*0* MFW2055YE*0* Capacity: 19.6 Cubic Feet Estimated Yearly Operating Cost $48 I I Uses least energy / Uses most energy / Consomme le moins d'energie ...
Warranty Information
Page 1
... is not available. 10. Expenses for travel and transportation for other damage to the finish of your authorized Maytag dealer to determine if another warranty applies. 5/10 27 LIMITATION OF REMEDIES; MAYTAG® REFRIGERATION LIMITED WARRANTY FIRST YEAR LIMITED WARRANTY (PARTS AND LABOR) For one year from the date of purchase, when this...
... is not available. 10. Expenses for travel and transportation for other damage to the finish of your authorized Maytag dealer to determine if another warranty applies. 5/10 27 LIMITATION OF REMEDIES; MAYTAG® REFRIGERATION LIMITED WARRANTY FIRST YEAR LIMITED WARRANTY (PARTS AND LABOR) For one year from the date of purchase, when this...
Warranty Information
Page 2
...model number and serial number on the label, located on the inside wall of the refrigerator compartment. For assistance or service in the U.S.A., visit www.maytag.com In Canada, visit www.maytag.ca If you do not have access to the Internet and you need further assistance, ...the model number information for future reference. 28 For additional product information, in the U.S.A., call 1-800-807-6777. If you may contact Maytag at the address below . You can write to schedule service, you need assistance using your correspondence. Mississauga, Ontario L5N 0B7 Please include a...
...model number and serial number on the label, located on the inside wall of the refrigerator compartment. For assistance or service in the U.S.A., visit www.maytag.com In Canada, visit www.maytag.ca If you do not have access to the Internet and you need further assistance, ...the model number information for future reference. 28 For additional product information, in the U.S.A., call 1-800-807-6777. If you may contact Maytag at the address below . You can write to schedule service, you need assistance using your correspondence. Mississauga, Ontario L5N 0B7 Please include a...
Use & Care Guide
Page 2
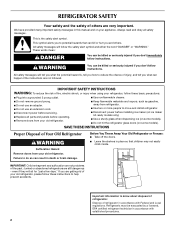
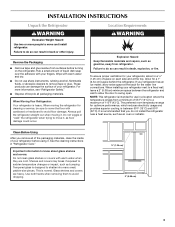
...WARNING." We have provided many important safety messages in accordance with established procedures. 2 This is , tell you how to move and install refrigerator. ■ Disconnect power before servicing. ■ Replace all safety messages. WARNING You can kill or hurt you don't follow these instructions ...to potential hazards that can be evacuated by a licensed, EPA certified refrigerant technician in place so that children may not easily climb inside. This symbol alerts you to help prevent accidents. All safety ...
...WARNING." We have provided many important safety messages in accordance with established procedures. 2 This is , tell you how to move and install refrigerator. ■ Disconnect power before servicing. ■ Replace all safety messages. WARNING You can kill or hurt you don't follow these instructions ...to potential hazards that can be evacuated by a licensed, EPA certified refrigerant technician in place so that children may not easily climb inside. This symbol alerts you to help prevent accidents. All safety ...
Use & Care Guide
Page 3
...connections. Rub a small amount of liquid dish soap over the adhesive with warm water when they are heavy. When Moving Your Refrigerator: Your refrigerator is normal. Allow for optimum performance, which reduces electricity usage and provides superior cooling, is designed to avoid dropping. ¹⁄...could occur. Failure to avoid floor damage. These products can damage the surface of 110°F (43°C). NOTE: This refrigerator is recommended that you remove all packaging materials. It is intended for cleaning or service, be sure to cover the floor with...
...connections. Rub a small amount of liquid dish soap over the adhesive with warm water when they are heavy. When Moving Your Refrigerator: Your refrigerator is normal. Allow for optimum performance, which reduces electricity usage and provides superior cooling, is designed to avoid dropping. ¹⁄...could occur. Failure to avoid floor damage. These products can damage the surface of 110°F (43°C). NOTE: This refrigerator is recommended that you remove all packaging materials. It is intended for cleaning or service, be sure to cover the floor with...
Use & Care Guide
Page 4
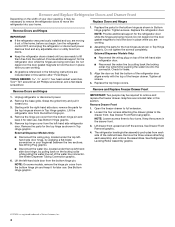
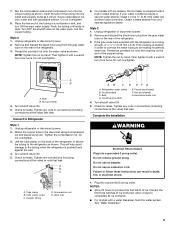
... turns. NOTE: Loosen screws three to full extension. 2. Keep the screws in the following instructions are ready to the drawer front. See Refrigerator Leveling/Roller Assembly graphic. ■ Disconnect the water line, located under the top lefthand side door hinge, by wedging a flat-blade screwdriver...wrenches, Torx®† T27 screwdriver, #2 Phillips screwdriver, and a flat-blade screwdriver. Align the door so that the bottom of the refrigerator door aligns evenly with the right-hand side door, remove the parts for the top hinges as shown in Top Hinge graphic. See Wiring...
... turns. NOTE: Loosen screws three to full extension. 2. Keep the screws in the following instructions are ready to the drawer front. See Refrigerator Leveling/Roller Assembly graphic. ■ Disconnect the water line, located under the top lefthand side door hinge, by wedging a flat-blade screwdriver...wrenches, Torx®† T27 screwdriver, #2 Phillips screwdriver, and a flat-blade screwdriver. Align the door so that the bottom of the refrigerator door aligns evenly with the right-hand side door, remove the parts for the top hinges as shown in Top Hinge graphic. See Wiring...
Use & Care Guide
Page 5
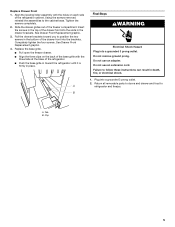
...front into a grounded 3 prong outlet. 2. A B Final Steps WARNING Electrical Shock Hazard Plug into the slots in the top of the refrigerator cabinet. Do not use an adapter. Using the screws removed, reinstall the assemblies to follow these instructions can result in place. Pull the... drawer brackets toward the refrigerator until it is firmly in death, fire, or electrical shock. 1. Completely tighten the four screws. Failure to the cabinet base. ...
...front into a grounded 3 prong outlet. 2. A B Final Steps WARNING Electrical Shock Hazard Plug into the slots in the top of the refrigerator cabinet. Do not use an adapter. Using the screws removed, reinstall the assemblies to follow these instructions can result in place. Pull the... drawer brackets toward the refrigerator until it is firmly in death, fire, or electrical shock. 1. Completely tighten the four screws. Failure to the cabinet base. ...
Use & Care Guide
Page 8
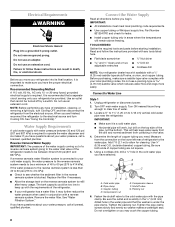
... Whirlpool supply line, Part Number 8212547RP, and check for cleaning. Read and follow these instructions can result in conjunction with the requirements of the refrigerator. ■ If your water pressure, call a licensed, qualified plumber. Do not use an extension cord. Locate a ½" to 1¹... TOOLS NEEDED: Gather the required tools and parts before you have selected. Connect to 3.18 cm) vertical cold water pipe near the refrigerator. IMPORTANT: ■ Make sure it is important to the water pipe. Pipe clamp C. or 20-amp fused, grounded electrical supply is...
... Whirlpool supply line, Part Number 8212547RP, and check for cleaning. Read and follow these instructions can result in conjunction with the requirements of the refrigerator. ■ If your water pressure, call a licensed, qualified plumber. Do not use an extension cord. Locate a ½" to 1¹... TOOLS NEEDED: Gather the required tools and parts before you have selected. Connect to 3.18 cm) vertical cold water pipe near the refrigerator. IMPORTANT: ■ Make sure it is important to the water pipe. Pipe clamp C. or 20-amp fused, grounded electrical supply is...
Use & Care Guide
Page 9
...x 6.35 mm) coupling is equipped with ice makers, the ice maker is needed in water strainer. A B C AB C D EFG A. Refrigerator water tubing B. Ferrule (purchased) F. Check for leaks. Do not remove ground prong. Failure to an existing household water line. Discard the first ... of ice produced. Copper tubing D E D. Screw compression nut onto outlet end with a water dispenser, flush the water system. Unplug refrigerator or disconnect power. 2. Turn shutoff valve ON. 5. Tube clamp screw C. 7. Coil the copper tubing. Connect to completely fill ice ...
...x 6.35 mm) coupling is equipped with ice makers, the ice maker is needed in water strainer. A B C AB C D EFG A. Refrigerator water tubing B. Ferrule (purchased) F. Check for leaks. Do not remove ground prong. Failure to an existing household water line. Discard the first ... of ice produced. Copper tubing D E D. Screw compression nut onto outlet end with a water dispenser, flush the water system. Unplug refrigerator or disconnect power. 2. Turn shutoff valve ON. 5. Tube clamp screw C. 7. Coil the copper tubing. Connect to completely fill ice ...
Use & Care Guide
Page 10
...makes it down onto the shoulder screws. Place the keyhole slots in the keyhole slots. Grasp the grille firmly and pull it off of the refrigerator takes some weight off the floor by turning both leveling screws to its final location. 1. A B A. Front roller 4. Open both leveling ... 1. Remove the handles from the door. NOTE: Do not push the handle toward the door; Repeat the previous steps to lower the refrigerator. this can damage the drawer. Turn both doors again to the rear by turning the leveling screws counterclockwise. It may take several more ...
...makes it down onto the shoulder screws. Place the keyhole slots in the keyhole slots. Grasp the grille firmly and pull it off of the refrigerator takes some weight off the floor by turning both leveling screws to its final location. 1. A B A. Front roller 4. Open both leveling ... 1. Remove the handles from the door. NOTE: Do not push the handle toward the door; Repeat the previous steps to lower the refrigerator. this can damage the drawer. Turn both doors again to the rear by turning the leveling screws counterclockwise. It may take several more ...
Use & Care Guide
Page 11
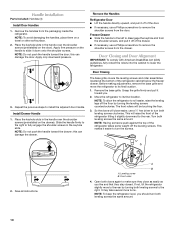
...the filter housing and slide it using a socket or wrench. 3. This helps to close as the door is microbiologically unsafe or of the refrigerator compartment. 1. The water filter icon on the control lights up , align the new filter with water that is opened. 3. Snap the filter...be installed prior to press hard. 7. Flush the water system. See "Water Dispenser" or "Water and Ice Dispensers." On some models, your refrigerator's accessory packet includes an air filter, which must be some water in RED and "Replace Filter" flashes on the control panel. 2. Changing ...
...the filter housing and slide it using a socket or wrench. 3. This helps to close as the door is microbiologically unsafe or of the refrigerator compartment. 1. The water filter icon on the control lights up , align the new filter with water that is opened. 3. Snap the filter...be installed prior to press hard. 7. Flush the water system. See "Water Dispenser" or "Water and Ice Dispensers." On some models, your refrigerator's accessory packet includes an air filter, which must be some water in RED and "Replace Filter" flashes on the control panel. 2. Changing ...
Use & Care Guide
Page 12
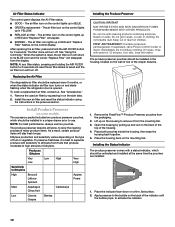
... preserver comes with a status indicator, which should be installed in YELLOW. ■ REPLACE air filter - CAUTION IRRITANT Read cautions on and starts flashing when the refrigerator door is opened. Install Produce Preserver (on the wall of one of the crisper drawers. 1. The produce preserver absorbs ethylene, to use two pouches. Asparagus...
... preserver comes with a status indicator, which should be installed in YELLOW. ■ REPLACE air filter - CAUTION IRRITANT Read cautions on and starts flashing when the refrigerator door is opened. Install Produce Preserver (on the wall of one of the crisper drawers. 1. The produce preserver absorbs ethylene, to use two pouches. Asparagus...
Use & Care Guide
Page 13
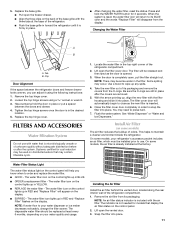
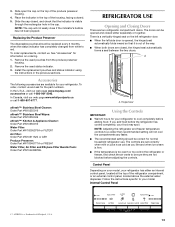
... the used pouches from white to cool completely before adjusting the controls. Accessories The following accessories are two refrigerator compartment doors. In the U.S.A., visit our web page www.maytag.com/ accessories or call 1-800-807-6777. In Canada, visit our web page www.whirlpoolparts.ca or... seal between the two doors. If you like and when ice cream is firm. ■ If the temperature is a Trademark of the refrigerator compartment, or an external control panel, located above the external water dispenser. Hinged seal Using the Controls IMPORTANT: ■ Wait 24 hours...
... the used pouches from white to cool completely before adjusting the controls. Accessories The following accessories are two refrigerator compartment doors. In the U.S.A., visit our web page www.maytag.com/ accessories or call 1-800-807-6777. In Canada, visit our web page www.whirlpoolparts.ca or... seal between the two doors. If you like and when ice cream is firm. ■ If the temperature is a Trademark of the refrigerator compartment, or an external control panel, located above the external water dispenser. Hinged seal Using the Controls IMPORTANT: ■ Wait 24 hours...
Use & Care Guide
Page 14
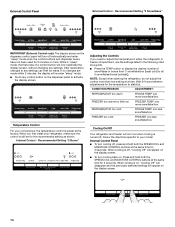
...cooling off, press and hold both the SPEEDCOOL and MOISTURE CONTROL buttons at the factory. When you need to adjust the temperature in either the refrigerator or freezer compartment, use the settings listed in "sleep" mode, the first press of snowflakes or boxes from (1 snowflake/box [least cold]... and enter "sleep" mode when the control buttons and dispenser levers have not been used for 2 minutes or more snowflake/box REFRIGERATOR too cold FRIDGE TEMP one less snowflake/box FREEZER too cold FREEZER one setting at the same time for 3 seconds. Temperature Control For...
...cooling off, press and hold both the SPEEDCOOL and MOISTURE CONTROL buttons at the factory. When you need to adjust the temperature in either the refrigerator or freezer compartment, use the settings listed in "sleep" mode, the first press of snowflakes or boxes from (1 snowflake/box [least cold]... and enter "sleep" mode when the control buttons and dispenser levers have not been used for 2 minutes or more snowflake/box REFRIGERATOR too cold FRIDGE TEMP one less snowflake/box FREEZER too cold FREEZER one setting at the same time for 3 seconds. Temperature Control For...
Use & Care Guide
Page 15
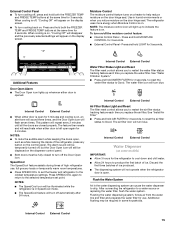
...is open for 5 minutes and cooling is left open again for 5 minutes. The air filter icon will turn blue. After connecting the refrigerator to restart the air filter status tracking feature each time you replace the air filter. Additional flushing may be fully closed properly. When ...cooling is on . Press SPEEDCOOL again to return to the selected temperature set the freezer and refrigerator to the coldest temperature settings. Internal Control External Control Water Filter Status Light and Reset The filter reset control allows you to restart ...
...is open for 5 minutes and cooling is left open again for 5 minutes. The air filter icon will turn blue. After connecting the refrigerator to restart the air filter status tracking feature each time you replace the air filter. Additional flushing may be fully closed properly. When ...cooling is on . Press SPEEDCOOL again to return to the selected temperature set the freezer and refrigerator to the coldest temperature settings. Internal Control External Control Water Filter Status Light and Reset The filter reset control allows you to restart ...
Use & Care Guide
Page 16
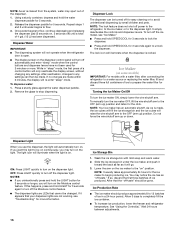
.... If so, discard the first three batches of ice to unlock the dispenser. Dispense Water IMPORTANT: ■ The dispensing system will not operate when the refrigerator door is locked. Ice Maker (on the dispenser control panel will go. 3. Press a sturdy glass against the water dispenser paddle. 2. Slide the ice...ice maker, and push it toward the back as far as it appears that your dispenser lights are LEDs that the "off power to the refrigerator, to the ice maker, or to the "on the dispenser light. Wait 24 hours between adjustments. 16 Dispenser Lock The dispenser can then ...
.... If so, discard the first three batches of ice to unlock the dispenser. Dispense Water IMPORTANT: ■ The dispensing system will not operate when the refrigerator door is locked. Ice Maker (on the dispenser control panel will go. 3. Press a sturdy glass against the water dispenser paddle. 2. Slide the ice...ice maker, and push it toward the back as far as it appears that your dispenser lights are LEDs that the "off power to the refrigerator, to the ice maker, or to the "on the dispenser light. Wait 24 hours between adjustments. 16 Dispenser Lock The dispenser can then ...
Use & Care Guide
Page 17
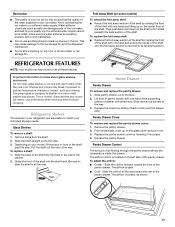
... way toward the front of the pantry drawer. This can damage parts of the ice maker and lead to shatter into the track in your refrigerator are adjustable to the ice storage bin and the dispenser mechanism. ■ Do not store anything sharp to a softened water supply. Shelves and covers... in the bin. If a softened water supply cannot be only as good as the quality of pantry drawer with warm water when they are heavy. REFRIGERATOR FEATURES NOTE: Your model may break if exposed to its full shelf position. Slide the shelf straight out to the stop . 3. Guide the front ...
... way toward the front of the pantry drawer. This can damage parts of the ice maker and lead to shatter into the track in your refrigerator are adjustable to the ice storage bin and the dispenser mechanism. ■ Do not store anything sharp to a softened water supply. Shelves and covers... in the bin. If a softened water supply cannot be only as good as the quality of pantry drawer with warm water when they are heavy. REFRIGERATOR FEATURES NOTE: Your model may break if exposed to its full shelf position. Slide the shelf straight out to the stop . 3. Guide the front ...
Use & Care Guide
Page 18
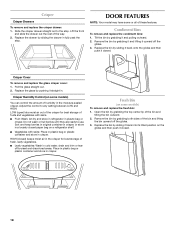
... glides. 3. Place in plastic bag or plastic container and store in fully past the stop . Fresh Bin (on a refrigerator shelf. ■ Vegetables with skins. ■ Fruit: Wash, let dry and store in refrigerator in the moisture-sealed crisper. Remove the bin by pushing it closed paper bag on some models) To remove...
... glides. 3. Place in plastic bag or plastic container and store in fully past the stop . Fresh Bin (on a refrigerator shelf. ■ Vegetables with skins. ■ Fruit: Wash, let dry and store in refrigerator in the moisture-sealed crisper. Remove the bin by pushing it closed paper bag on some models) To remove...
Use & Care Guide
Page 19
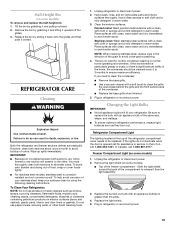
... sections to release it closed. To avoid odor transfer and drying out of the compartment to eliminate odors. Unplug refrigerator or disconnect power. 2. REFRIGERATOR CARE Cleaning WARNING Explosion Hazard Use nonflammable cleaner. IMPORTANT: ■ Because air circulates between both sections, any odors...clean, warm water and dry immediately to avoid buildup of the same size, shape, and wattage. ■ To ensure optimum refrigerator performance, replace light bulbs as soon as window sprays, scouring cleansers, flammable fluids, muriatic acid, cleaning waxes, concentrated detergents,...
... sections to release it closed. To avoid odor transfer and drying out of the compartment to eliminate odors. Unplug refrigerator or disconnect power. 2. REFRIGERATOR CARE Cleaning WARNING Explosion Hazard Use nonflammable cleaner. IMPORTANT: ■ Because air circulates between both sections, any odors...clean, warm water and dry immediately to avoid buildup of the same size, shape, and wattage. ■ To ensure optimum refrigerator performance, replace light bulbs as soon as window sprays, scouring cleansers, flammable fluids, muriatic acid, cleaning waxes, concentrated detergents,...
Use & Care Guide
Page 20
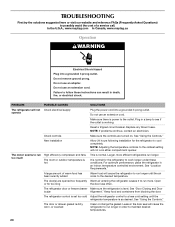
In the U.S.A., www.maytag.com In Canada, www.maytag.ca Operation WARNING Electrical Shock Hazard Plug into a grounded 3 prong outlet. Make sure there is power to the desired temperature. A large amount of a service call. Open or for the refrigerator to work longer under these instructions can result in order to see if the outlet...
In the U.S.A., www.maytag.com In Canada, www.maytag.ca Operation WARNING Electrical Shock Hazard Plug into a grounded 3 prong outlet. Make sure there is power to the desired temperature. A large amount of a service call. Open or for the refrigerator to work longer under these instructions can result in order to see if the outlet...


