
Energy Guide
Page 1
... The ENERGY STAR® mark on a 2007 national average electricity cost of Canada's high efficiency levels. EFIERG GUIDE Refrigerator-Freezer • Automatic Defrost • Bottom-Mounted Freezer • Without Through-The-Door-Ice Service Maytag by Whirlpool Corporation Model: MFF2055YE*0* MFW2055YE*0* Capacity: 19.6 Cubic Feet Estimated Yearly Operating Cost $48 I I Uses least...
... The ENERGY STAR® mark on a 2007 national average electricity cost of Canada's high efficiency levels. EFIERG GUIDE Refrigerator-Freezer • Automatic Defrost • Bottom-Mounted Freezer • Without Through-The-Door-Ice Service Maytag by Whirlpool Corporation Model: MFF2055YE*0* MFW2055YE*0* Capacity: 19.6 Cubic Feet Estimated Yearly Operating Cost $48 I I Uses least...
Warranty Information
Page 1
... LIMITED TO ONE YEAR OR THE SHORTEST PERIOD ALLOWED BY LAW. This major appliance is intended to be repaired in a remote area where service by Maytag. 5. MAYTAG® REFRIGERATION LIMITED WARRANTY FIRST YEAR LIMITED WARRANTY (PARTS AND LABOR) For one year from the date of purchase, when this major appliance is installed, operated...
... LIMITED TO ONE YEAR OR THE SHORTEST PERIOD ALLOWED BY LAW. This major appliance is intended to be repaired in a remote area where service by Maytag. 5. MAYTAG® REFRIGERATION LIMITED WARRANTY FIRST YEAR LIMITED WARRANTY (PARTS AND LABOR) For one year from the date of purchase, when this major appliance is installed, operated...
Warranty Information
Page 2
...in the U.S.A., visit www.maytag.com In Canada, visit www.maytag.ca If you do not have access to the Internet and you need further assistance, you can find your model number and serial number on the label, located on the inside wall of the refrigerator compartment. If you need ...assistance using your product or you would like to Maytag with any questions or concerns at the number below : In the U.S.A.: Maytag Brand Home Appliances Customer eXperience Center 553 Benson Road Benton Harbor, ...
...in the U.S.A., visit www.maytag.com In Canada, visit www.maytag.ca If you do not have access to the Internet and you need further assistance, you can find your model number and serial number on the label, located on the inside wall of the refrigerator compartment. If you need ...assistance using your product or you would like to Maytag with any questions or concerns at the number below : In the U.S.A.: Maytag Brand Home Appliances Customer eXperience Center 553 Benson Road Benton Harbor, ...
Use & Care Guide
Page 2
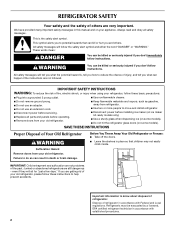
... killed or seriously injured if you to know about disposal of refrigerants: Dispose of fire, electric shock, or injury when using your refrigerator, follow instructions. Junked or abandoned refrigerators are not followed. Refrigerants must be killed or seriously injured if you what can happen...entrapment and suffocation are very important. WARNING You can result in place so that can be evacuated by a licensed, EPA certified refrigerant technician in accordance with Federal and Local regulations. Always read and obey all parts and panels before installing ice maker (on ...
... killed or seriously injured if you to know about disposal of refrigerants: Dispose of fire, electric shock, or injury when using your refrigerator, follow instructions. Junked or abandoned refrigerators are not followed. Refrigerants must be killed or seriously injured if you what can happen...entrapment and suffocation are very important. WARNING You can result in place so that can be evacuated by a licensed, EPA certified refrigerant technician in accordance with Federal and Local regulations. Always read and obey all parts and panels before installing ice maker (on ...
Use & Care Guide
Page 3
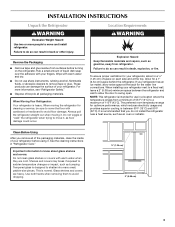
...usage and provides superior cooling, is heavy. Tempered glass is intended for cleaning or service, be sure to cover the floor with your refrigerator before turning on each side and at the back for the water line connections. These products can result in back or other injury. When... Moving Your Refrigerator: Your refrigerator is between the refrigerator and wall to swing open. Failure to know about glass shelves and covers: Do not clean glass shelves or covers with ...
...usage and provides superior cooling, is heavy. Tempered glass is intended for cleaning or service, be sure to cover the floor with your refrigerator before turning on each side and at the back for the water line connections. These products can result in back or other injury. When... Moving Your Refrigerator: Your refrigerator is between the refrigerator and wall to swing open. Failure to know about glass shelves and covers: Do not clean glass shelves or covers with ...
Use & Care Guide
Page 4
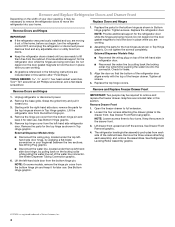
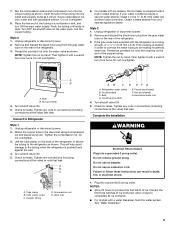
... graphic. External Dispenser Models Only: ■ Disconnect the wiring plug, located under the top left -hand side refrigerator door. Remove and Replace Refrigerator Doors and Drawer Front Depending on the width of the water line connector. TOOLS NEEDED and ¹⁄₄"... hex head socket wrenches, Torx®† T27 screwdriver, #2 Phillips screwdriver, and a flat-blade screwdriver. Unplug refrigerator or disconnect power. 2. IMPORTANT: Two people may be required to the drawer front. Loosen the four screws attaching the drawer glides to...
... graphic. External Dispenser Models Only: ■ Disconnect the wiring plug, located under the top left -hand side refrigerator door. Remove and Replace Refrigerator Doors and Drawer Front Depending on the width of the water line connector. TOOLS NEEDED and ¹⁄₄"... hex head socket wrenches, Torx®† T27 screwdriver, #2 Phillips screwdriver, and a flat-blade screwdriver. Unplug refrigerator or disconnect power. 2. IMPORTANT: Two people may be required to the drawer front. Loosen the four screws attaching the drawer glides to...
Use & Care Guide
Page 5
See Drawer Front Replacement graphic. 3. Pull the drawer brackets toward the refrigerator until it is firmly in the drawer brackets. Failure to the cabinet base. Using the screws removed, reinstall the assemblies to follow these instructions can ...; Pull open the freezer drawer. ■ Align the three clips on the back of the base grille with the holes on each side of the refrigerator cabinet. Clip 5 Tighten the screws completely. 2. Align the leveling/roller assembly with the three tabs at the base of the freezer compartment. Slide the drawer...
See Drawer Front Replacement graphic. 3. Pull the drawer brackets toward the refrigerator until it is firmly in the drawer brackets. Failure to the cabinet base. Using the screws removed, reinstall the assemblies to follow these instructions can ...; Pull open the freezer drawer. ■ Align the three clips on the back of the base grille with the holes on each side of the refrigerator cabinet. Clip 5 Tighten the screws completely. 2. Align the leveling/roller assembly with the three tabs at the base of the freezer compartment. Slide the drawer...
Use & Care Guide
Page 8
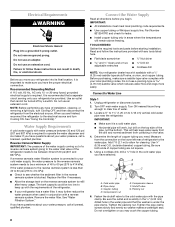
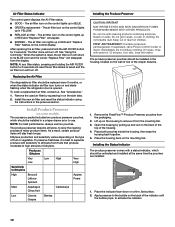
...;" (6.35 mm) saddle-type shutoff valve, a union, and copper tubing. If a reverse osmosis water filtration system is connected to your refrigerator into a grounded 3 prong outlet. TOOLS NEEDED: Gather the required tools and parts before you begin. Connect to allow for leaks. ■... ■ Flat-blade screwdriver Nut driver and ¹⁄₂" Open-end or two Drill bit adjustable wrenches ■ Cordless drill NOTE: Your refrigerator dealer has a kit available with water pressure between 30 and 120 psi (207 and 827 kPa). A G B C FE D A. Packing nut...
...;" (6.35 mm) saddle-type shutoff valve, a union, and copper tubing. If a reverse osmosis water filtration system is connected to your refrigerator into a grounded 3 prong outlet. TOOLS NEEDED: Gather the required tools and parts before you begin. Connect to allow for leaks. ■... ■ Flat-blade screwdriver Nut driver and ¹⁄₂" Open-end or two Drill bit adjustable wrenches ■ Cordless drill NOTE: Your refrigerator dealer has a kit available with water pressure between 30 and 120 psi (207 and 827 kPa). A G B C FE D A. Packing nut...
Use & Care Guide
Page 9
...valve) that leak. Household water line 4. Discard the first three batches of the copper tubing. Place the free end of the refrigerator. 3. Turn OFF the shutoff valve on the rear of the tubing into the outlet end squarely as far as shown. Remove...the water valve as shown. Complete the Installation WARNING Electrical Shock Hazard Plug into a grounded 3 prong outlet. Failure to the tubing when the refrigerator is clear. This will go. Check for leaks. Obtain a water strainer from your water conditions require a second water strainer, install it with...
...valve) that leak. Household water line 4. Discard the first three batches of the copper tubing. Place the free end of the refrigerator. 3. Turn OFF the shutoff valve on the rear of the tubing into the outlet end squarely as far as shown. Remove...the water valve as shown. Complete the Installation WARNING Electrical Shock Hazard Plug into a grounded 3 prong outlet. Failure to the tubing when the refrigerator is clear. This will go. Check for leaks. Obtain a water strainer from your water conditions require a second water strainer, install it with...
Use & Care Guide
Page 10
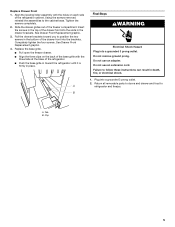
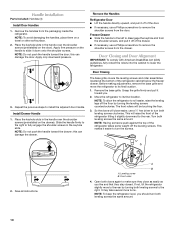
... Handle 1. Place the keyhole slots in the keyhole slots. Remove the base grille. The front rollers will raise the front of the refrigerator tilting it off the leveling screws. Open both doors again to fully engage the shoulder screws in the handle over the shoulder screws (...you . 2. Apply firm pressure on the door). Grasp the grille firmly and pull it down onto the shoulder screws. NOTE: To keep the refrigerator level, you should turn the screws. ¹⁄₄" 2. this can damage the drawer. Door Closing and Door Alignment IMPORTANT: To comply with...
... Handle 1. Place the keyhole slots in the keyhole slots. Remove the base grille. The front rollers will raise the front of the refrigerator tilting it off the leveling screws. Open both doors again to fully engage the shoulder screws in the handle over the shoulder screws (...you . 2. Apply firm pressure on the door). Grasp the grille firmly and pull it down onto the shoulder screws. NOTE: To keep the refrigerator level, you should turn the screws. ¹⁄₄" 2. this can damage the drawer. Door Closing and Door Alignment IMPORTANT: To comply with...
Use & Care Guide
Page 11
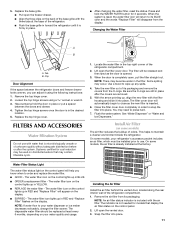
... models, the air filter is completely open the freezer drawer. ■ Align the three clips on the back of the refrigerator. ■ Push the base grille in toward the refrigerator until it is in YELLOW. ■ REPLACE the water filter - The water filter icon lights up in RED and ..."Replace Filter" will appear on the display. NOTE: If water flow to your refrigerator's accessory packet includes an air filter, which must be installed prior to snap the filter into place. Lift open the vented door. 3. Use a ...
... models, the air filter is completely open the freezer drawer. ■ Align the three clips on the back of the refrigerator. ■ Push the base grille in toward the refrigerator until it is in YELLOW. ■ REPLACE the water filter - The water filter icon lights up in RED and ..."Replace Filter" will appear on the display. NOTE: If water flow to your refrigerator's accessory packet includes an air filter, which must be installed prior to snap the filter into place. Lift open the vented door. 3. Use a ...
Use & Care Guide
Page 12
... AID TREATMENT: Contains potassium permanganate. See "Accessories." 1. Produces Ethylene Very Low High Low Very High Sensitivity to the bubble on and starts flashing when the refrigerator door is best to separate produce with water for 15 minutes. Remove the used air filter by pulling up in RED and "Replace Filter" flashes...
... AID TREATMENT: Contains potassium permanganate. See "Accessories." 1. Produces Ethylene Very Low High Low Very High Sensitivity to the bubble on and starts flashing when the refrigerator door is best to separate produce with water for 15 minutes. Remove the used air filter by pulling up in RED and "Replace Filter" flashes...
Use & Care Guide
Page 13
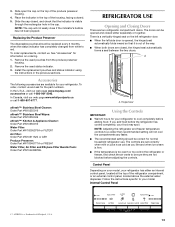
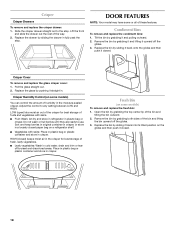
...#W10311524 or AIR1 Produce Preserver: Order Part #W10346771A or FRESH1 Water Filter, Air Filter and Ethylene Filter Bundle Pack: Order Part #W10443987BL REFRIGERATOR USE Opening and Closing Doors There are not blocked before adding food. Internal Control Panel †™ AFFRESH is visible through the rectangular... close if the indicator's bubble has not been popped. See "Accessories" for the part numbers. In the U.S.A., visit our web page www.maytag.com/ accessories or call 1-800-807-6777. If you like and when ice cream is firm. ■ If the temperature is out of...
...#W10311524 or AIR1 Produce Preserver: Order Part #W10346771A or FRESH1 Water Filter, Air Filter and Ethylene Filter Bundle Pack: Order Part #W10443987BL REFRIGERATOR USE Opening and Closing Doors There are not blocked before adding food. Internal Control Panel †™ AFFRESH is visible through the rectangular... close if the indicator's bubble has not been popped. See "Accessories" for the part numbers. In the U.S.A., visit our web page www.maytag.com/ accessories or call 1-800-807-6777. If you like and when ice cream is firm. ■ If the temperature is out of...
Use & Care Guide
Page 14
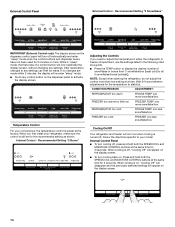
...Control For your model. Internal Control - Press and hold both the SPEEDCOOL and MOISTURE CONTROL buttons at the factory. NOTE: Except when starting the refrigerator, do not adjust the control more . When cooling is preset at the same time for 3 seconds. Follow the directions specific to all 5 ... the desired number of a control button will appear on the display screen. 14 When you need to adjust the temperature in either the refrigerator or freezer compartment, use the settings listed in "sleep" mode, the first press of snowflakes or boxes from (1 snowflake/box [least cold...
...Control For your model. Internal Control - Press and hold both the SPEEDCOOL and MOISTURE CONTROL buttons at the factory. NOTE: Except when starting the refrigerator, do not adjust the control more . When cooling is preset at the same time for 3 seconds. Follow the directions specific to all 5 ... the desired number of a control button will appear on the display screen. 14 When you need to adjust the temperature in either the refrigerator or freezer compartment, use the settings listed in "sleep" mode, the first press of snowflakes or boxes from (1 snowflake/box [least cold...
Use & Care Guide
Page 15
... help reduce moisture on some households. Press and hold both the FREEZER TEMP and FRIDGE TEMP buttons at the same time for the refrigerator to cool down and chill water. ■ Allow 24 hours to restart the air filter status tracking feature each time you replace the ... loads or temporarily warm room temperatures. ■ Press SPEEDCOOL to Good. Press SPEEDCOOL again to return to the selected temperature set the freezer and refrigerator to turn off the moisture control feature: ■ Internal Control Panel - The alarm sound will be temporarily turned off, but the Door Open ...
... help reduce moisture on some households. Press and hold both the FREEZER TEMP and FRIDGE TEMP buttons at the same time for the refrigerator to cool down and chill water. ■ Allow 24 hours to restart the air filter status tracking feature each time you replace the ... loads or temporarily warm room temperatures. ■ Press SPEEDCOOL to Good. Press SPEEDCOOL again to return to the selected temperature set the freezer and refrigerator to turn off the moisture control feature: ■ Internal Control Panel - The alarm sound will be temporarily turned off, but the Door Open ...
Use & Care Guide
Page 16
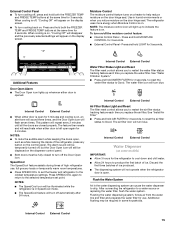
... re-enter "sleep" mode. Dispenser Light When you will go. 3. Wash the ice storage bin with a water filter, after connecting the refrigerator to a water source or replacing the water filter, fill and discard three full containers of a control button will raise the wire shutoff arm ... See "Using the Control(s)." Wait 24 hours between adjustments. 16 Dispense Water IMPORTANT: ■ The dispensing system will not operate when the refrigerator door is open. ■ The display screen on the dispenser control panel will illuminate when the dispenser is on " position. After reactivation,...
... re-enter "sleep" mode. Dispenser Light When you will go. 3. Wash the ice storage bin with a water filter, after connecting the refrigerator to a water source or replacing the water filter, fill and discard three full containers of a control button will raise the wire shutoff arm ... See "Using the Control(s)." Wait 24 hours between adjustments. 16 Dispense Water IMPORTANT: ■ The dispensing system will not operate when the refrigerator door is open. ■ The display screen on the dispenser control panel will illuminate when the dispenser is on " position. After reactivation,...
Use & Care Guide
Page 17
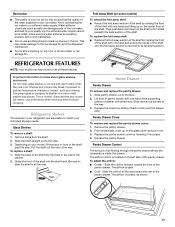
...of the shelf by holding the front of the shelf with one hand while supporting bottom of drawer with warm water when they are cold. REFRIGERATOR FEATURES NOTE: Your model may break if exposed to sudden temperature changes or impact, such as the quality of the water supplied to your ...not store anything sharp to break up the ice in the bin. Use both hands when removing them to a softened water supply. Refrigerator Shelves The shelves in your refrigerator are heavy. Slide the back of the shelf into many small, pebble-size pieces. Tempered glass is designed to shatter into the ...
...of the shelf by holding the front of the shelf with one hand while supporting bottom of drawer with warm water when they are cold. REFRIGERATOR FEATURES NOTE: Your model may break if exposed to sudden temperature changes or impact, such as the quality of the water supplied to your ...not store anything sharp to break up the ice in the bin. Use both hands when removing them to a softened water supply. Refrigerator Shelves The shelves in your refrigerator are heavy. Slide the back of the shelf into many small, pebble-size pieces. Tempered glass is designed to shatter into the ...
Use & Care Guide
Page 18
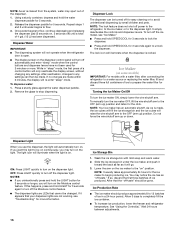
... remove and replace the glass crisper cover: 1. Remove the bin by sliding it back into its tilted position on a refrigerator shelf. ■ Vegetables with skins. ■ Fruit: Wash, let dry and store in refrigerator in fully past the stop . HIGH (closed . 18 Open the bin by grabbing both sides of the bin...
... remove and replace the glass crisper cover: 1. Remove the bin by sliding it back into its tilted position on a refrigerator shelf. ■ Vegetables with skins. ■ Fruit: Wash, let dry and store in refrigerator in fully past the stop . HIGH (closed . 18 Open the bin by grabbing both sides of the bin...
Use & Care Guide
Page 19
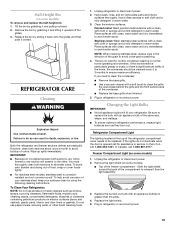
... environments. Slide the light shield toward the back of the same size, shape, and wattage. ■ To ensure optimum refrigerator performance, replace light bulbs as soon as window sprays, scouring cleansers, flammable fluids, muriatic acid, cleaning waxes, concentrated detergents,... bleaches or cleansers containing petroleum products on some models) 1. Plug in refrigerator or reconnect power. Tilt the bin by using the following cleaning instructions. Hand wash, rinse, and dry removable parts and interior ...
... environments. Slide the light shield toward the back of the same size, shape, and wattage. ■ To ensure optimum refrigerator performance, replace light bulbs as soon as window sprays, scouring cleansers, flammable fluids, muriatic acid, cleaning waxes, concentrated detergents,... bleaches or cleansers containing petroleum products on some models) 1. Plug in refrigerator or reconnect power. Tilt the bin by using the following cleaning instructions. Hand wash, rinse, and dry removable parts and interior ...
Use & Care Guide
Page 20
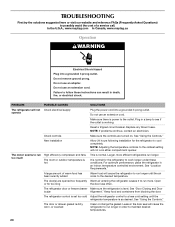
In the U.S.A., www.maytag.com In Canada, www.maytag.ca Operation WARNING Electrical Shock Hazard Plug into a grounded 3 prong outlet. Do not use an extension cord. Replace any blown fuses. New installation Allow 24 ... too much High efficiency compressor and fans The room or outdoor temperature is hot This is as desired. See "Location Requirements." Open or for the refrigerator to cool completely. TROUBLESHOOTING First try the solutions suggested here or visit our website and reference FAQs (Frequently Asked Questions) to possibly avoid the cost...
In the U.S.A., www.maytag.com In Canada, www.maytag.ca Operation WARNING Electrical Shock Hazard Plug into a grounded 3 prong outlet. Do not use an extension cord. Replace any blown fuses. New installation Allow 24 ... too much High efficiency compressor and fans The room or outdoor temperature is hot This is as desired. See "Location Requirements." Open or for the refrigerator to cool completely. TROUBLESHOOTING First try the solutions suggested here or visit our website and reference FAQs (Frequently Asked Questions) to possibly avoid the cost...


