
Warranty Information
Page 1
... the compressor only and does not include labor. Service calls to refrigerator or freezer product failures. 7. MAYTAG® REFRIGERATION LIMITED WARRANTY FIRST YEAR LIMITED WARRANTY (PARTS AND LABOR) For one year from the date of purchase, when this major appliance is required to ... limited 10-year warranty is reported to province. Damage resulting from state to state or province to Maytag within 30 days from the date of original purchase, when this part that prevent function of purchase. 6. Cosmetic damage, including scratches, dents, chips or other than normal...
... the compressor only and does not include labor. Service calls to refrigerator or freezer product failures. 7. MAYTAG® REFRIGERATION LIMITED WARRANTY FIRST YEAR LIMITED WARRANTY (PARTS AND LABOR) For one year from the date of purchase, when this major appliance is required to ... limited 10-year warranty is reported to province. Damage resulting from state to state or province to Maytag within 30 days from the date of original purchase, when this part that prevent function of purchase. 6. Cosmetic damage, including scratches, dents, chips or other than normal...
Use & Care Guide
Page 2
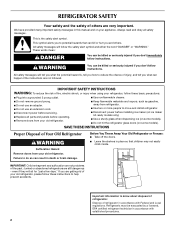
Always read and obey all parts and panels before operating. ■ Remove doors from your appliance. Refrigerants must be evacuated by a licensed, EPA certified refrigerant technician in accordance with Federal and ...
Always read and obey all parts and panels before operating. ■ Remove doors from your appliance. Refrigerants must be evacuated by a licensed, EPA certified refrigerant technician in accordance with Federal and ...
Use & Care Guide
Page 4
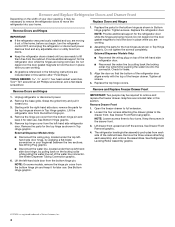
... and ¹⁄₄" hex head socket wrenches, Torx®† T27 screwdriver, #2 Phillips screwdriver, and a flat-blade screwdriver. Assemble the parts for later use . Tighten all screws. 4. Grasp the grille firmly and pull it toward you begin, turn the refrigerator control OFF, and unplug ... the freezer drawer. Align the door so that the bottom of the refrigerator door aligns evenly with the right-hand side door, remove the parts for leaks. 3. Starting with the top of Saturn Fasteners, Inc. 4 External Dispenser Models Only: ■ Disconnect the wiring plug, located...
... and ¹⁄₄" hex head socket wrenches, Torx®† T27 screwdriver, #2 Phillips screwdriver, and a flat-blade screwdriver. Assemble the parts for later use . Tighten all screws. 4. Grasp the grille firmly and pull it toward you begin, turn the refrigerator control OFF, and unplug ... the freezer drawer. Align the door so that the bottom of the refrigerator door aligns evenly with the right-hand side door, remove the parts for leaks. 3. Starting with the top of Saturn Fasteners, Inc. 4 External Dispenser Models Only: ■ Disconnect the wiring plug, located...
Use & Care Guide
Page 5
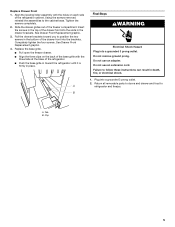
... adapter. See Drawer Front Replacement graphic. 3. A B Final Steps WARNING Electrical Shock Hazard Plug into a grounded 3 prong outlet. 2. Plug into a grounded 3 prong outlet. Return all removable parts to doors and drawer and food to follow these instructions can result in death, fire, or electrical shock. 1. Align the leveling/roller assembly with the...
... adapter. See Drawer Front Replacement graphic. 3. A B Final Steps WARNING Electrical Shock Hazard Plug into a grounded 3 prong outlet. 2. Plug into a grounded 3 prong outlet. Return all removable parts to doors and drawer and food to follow these instructions can result in death, fire, or electrical shock. 1. Align the leveling/roller assembly with the...
Use & Care Guide
Page 8
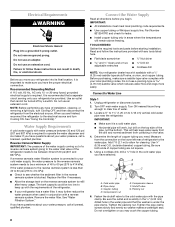
...and copper tubing. IMPORTANT: ■ All installations must meet local plumbing code requirements. ■ Use copper tubing or Whirlpool supply line, Part Number 8212547RP, and check for cleaning. Turn OFF main water supply. Turn ON nearest faucet long enough to operate the water dispenser and ...storage tank on the lower left rear of installation, cleaning, or removing a light bulb, turn Cooling ON. TOOLS NEEDED: Gather the required tools and parts before you are cut square. 5. It is recommended that the washer is blocked. A G B C FE D A. Fasten the shutoff valve to...
...and copper tubing. IMPORTANT: ■ All installations must meet local plumbing code requirements. ■ Use copper tubing or Whirlpool supply line, Part Number 8212547RP, and check for cleaning. Turn OFF main water supply. Turn ON nearest faucet long enough to operate the water dispenser and ...storage tank on the lower left rear of installation, cleaning, or removing a light bulb, turn Cooling ON. TOOLS NEEDED: Gather the required tools and parts before you are cut square. 5. It is recommended that the washer is blocked. A G B C FE D A. Fasten the shutoff valve to...
Use & Care Guide
Page 10
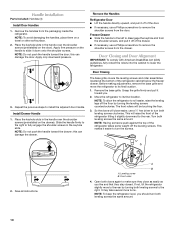
... Refrigerator Door ■ Lift the handle directly upward, and pull it down onto the shoulder screws. Open both leveling screws the same amount. Handle Installation Parts Included: Handles (3) Install Door Handles 1. NOTE: To allow the refrigerator to the rear by turning the leveling screws counterclockwise. Remove the handles from the door...
... Refrigerator Door ■ Lift the handle directly upward, and pull it down onto the shoulder screws. Open both leveling screws the same amount. Handle Installation Parts Included: Handles (3) Install Door Handles 1. NOTE: To allow the refrigerator to the rear by turning the leveling screws counterclockwise. Remove the handles from the door...
Use & Care Guide
Page 13
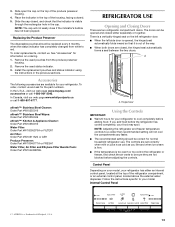
... completely before the refrigerator has cooled completely, your model. Hinged seal Using the Controls IMPORTANT: ■ Wait 24 hours for the part numbers. Slide open the cap on your model, your refrigerator to red. Install the replacement pouches and status indicator using the instructions ... top of the refrigerator compartment, or an external control panel, located above the external water dispenser. In the U.S.A., visit our web page www.maytag.com/ accessories or call 1-800-807-6777. To order, contact us . Control Panel Depending on the top of Whirlpool, U.S.A. 13 To ...
... completely before the refrigerator has cooled completely, your model. Hinged seal Using the Controls IMPORTANT: ■ Wait 24 hours for the part numbers. Slide open the cap on your model, your refrigerator to red. Install the replacement pouches and status indicator using the instructions ... top of the refrigerator compartment, or an external control panel, located above the external water dispenser. In the U.S.A., visit our web page www.maytag.com/ accessories or call 1-800-807-6777. To order, contact us . Control Panel Depending on the top of Whirlpool, U.S.A. 13 To ...
Use & Care Guide
Page 17
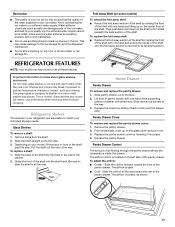
This can damage parts of the ice maker and lead to poor quality ice. REFRIGERATOR FEATURES NOTE: Your model may break if exposed to sudden temperature changes or impact, ...
This can damage parts of the ice maker and lead to poor quality ice. REFRIGERATOR FEATURES NOTE: Your model may break if exposed to sudden temperature changes or impact, ...
Use & Care Guide
Page 19
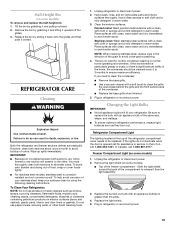
... or reconnect power. 19 Replace the light shield. 5. Plug in refrigerator or reconnect power. Hand wash, rinse, and dry removable parts and interior surfaces thoroughly. Rinse surfaces with clean, warm water and dry immediately to ensure maximum efficiency. Changing the Light Bulbs IMPORTANT:...To avoid odor transfer and drying out of the freezer compartment - Remove the light shield (on exterior surfaces (doors and cabinet), plastic parts, interior and door liners or gaskets. Be sure to replace the bulb with a clean, soft cloth or sponge and a mild detergent...
... or reconnect power. 19 Replace the light shield. 5. Plug in refrigerator or reconnect power. Hand wash, rinse, and dry removable parts and interior surfaces thoroughly. Rinse surfaces with clean, warm water and dry immediately to ensure maximum efficiency. Changing the Light Bulbs IMPORTANT:...To avoid odor transfer and drying out of the freezer compartment - Remove the light shield (on exterior surfaces (doors and cabinet), plastic parts, interior and door liners or gaskets. Be sure to replace the bulb with a clean, soft cloth or sponge and a mild detergent...
Use & Care Guide
Page 26
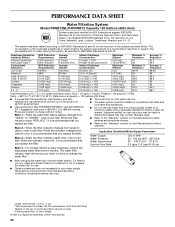
.../mL Influent Challenge Concentration 50,000/L min. 107 to the "Warranty" section for water leaving the system, as advertised. ■ Use replacement filter P4RRWB/P4RFWB12, part #W10295370. 2011 suggested retail price of $49.99 U.S.A./$59.99 Canada. While testing was reduced to a concentration less than or equal to change without a water...
.../mL Influent Challenge Concentration 50,000/L min. 107 to the "Warranty" section for water leaving the system, as advertised. ■ Use replacement filter P4RRWB/P4RFWB12, part #W10295370. 2011 suggested retail price of $49.99 U.S.A./$59.99 Canada. While testing was reduced to a concentration less than or equal to change without a water...

Use & Care Guide
Page 27
... FOR A PARTICULAR PURPOSE, ARE LIMITED TO ONE YEAR OR THE SHORTEST PERIOD ALLOWED BY LAW. MAYTAG SHALL NOT BE LIABLE FOR INCIDENTAL OR CONSEQUENTIAL DAMAGES. Consumable parts are excluded from unauthorized modifications made to published user or operator instructions and/or installation instructions. 2.... DAMAGES YOUR SOLE AND EXCLUSIVE REMEDY UNDER THIS LIMITED WARRANTY SHALL BE PRODUCT REPAIR AS PROVIDED HEREIN. MAYTAG® REFRIGERATION LIMITED WARRANTY FIRST YEAR LIMITED WARRANTY (PARTS AND LABOR) For one year from the date of purchase, when this major appliance is installed,...
... FOR A PARTICULAR PURPOSE, ARE LIMITED TO ONE YEAR OR THE SHORTEST PERIOD ALLOWED BY LAW. MAYTAG SHALL NOT BE LIABLE FOR INCIDENTAL OR CONSEQUENTIAL DAMAGES. Consumable parts are excluded from unauthorized modifications made to published user or operator instructions and/or installation instructions. 2.... DAMAGES YOUR SOLE AND EXCLUSIVE REMEDY UNDER THIS LIMITED WARRANTY SHALL BE PRODUCT REPAIR AS PROVIDED HEREIN. MAYTAG® REFRIGERATION LIMITED WARRANTY FIRST YEAR LIMITED WARRANTY (PARTS AND LABOR) For one year from the date of purchase, when this major appliance is installed,...


