Owners Manual
Page 1
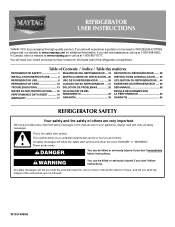
...DONNÉES SUR PERFORMANCE DATA SHEET 16 RENDIMIENTO 35 LA PERFORMANCE 53 WARRANTY 17 GARANTÍA 36 GARANTIE 54 REFRIGERATOR SAFETY Your safety and the safety of the refrigerator compartment. This symbol alerts you to reduce the chance of injury, and tell you still need your appliance. ...injured if you should experience a problem not covered in this high-quality product. In Canada, visit our website at www.maytag.ca or call us at www.maytag.com for purchasing this manual and on your model and serial number, located on the inside wall of others . W10314959A...
...DONNÉES SUR PERFORMANCE DATA SHEET 16 RENDIMIENTO 35 LA PERFORMANCE 53 WARRANTY 17 GARANTÍA 36 GARANTIE 54 REFRIGERATOR SAFETY Your safety and the safety of the refrigerator compartment. This symbol alerts you to reduce the chance of injury, and tell you still need your appliance. ...injured if you should experience a problem not covered in this high-quality product. In Canada, visit our website at www.maytag.ca or call us at www.maytag.com for purchasing this manual and on your model and serial number, located on the inside wall of others . W10314959A...
Owners Manual
Page 2
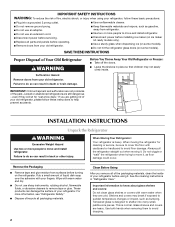
... suffocation are not problems of fire, electric shock, or injury when using it . even if they are getting rid of Your Old Refrigerator WARNING Suffocation Hazard Remove doors from surfaces before installing ice maker (on ice maker kit ready models only). ■ Use a sturdy ...dry. ■ Do not use an extension cord. ■ Disconnect power before servicing. ■ Replace all parts and panels before using your refrigerator, follow these basic precautions: ■ Plug into many small, pebble-size pieces. If you remove all packaging materials. When moving it . ...
... suffocation are not problems of fire, electric shock, or injury when using it . even if they are getting rid of Your Old Refrigerator WARNING Suffocation Hazard Remove doors from surfaces before installing ice maker (on ice maker kit ready models only). ■ Use a sturdy ...dry. ■ Do not use an extension cord. ■ Disconnect power before servicing. ■ Replace all parts and panels before using your refrigerator, follow these basic precautions: ■ Plug into many small, pebble-size pieces. If you remove all packaging materials. When moving it . ...
Owners Manual
Page 3
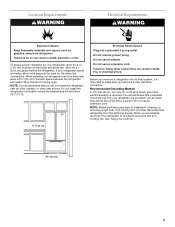
... explosion, or fire. Do not use an extension cord. Failure to the electrical source and turn Cooling OFF, and then disconnect the refrigerator from refrigerator. It is recommended that you do so can result in death, fire, or electrical shock. Do not remove ground prong. Recommended Grounding.... Do not use an extension cord. or 20-amp fused, grounded electrical supply is important to make sure you are finished, reconnect the refrigerator to follow these instructions can result in a location where the temperature will fall below 55°F (13°C). ¹⁄₂" (1.25...
... explosion, or fire. Do not use an extension cord. Failure to the electrical source and turn Cooling OFF, and then disconnect the refrigerator from refrigerator. It is recommended that you do so can result in death, fire, or electrical shock. Do not remove ground prong. Recommended Grounding.... Do not use an extension cord. or 20-amp fused, grounded electrical supply is important to make sure you are finished, reconnect the refrigerator to follow these instructions can result in a location where the temperature will fall below 55°F (13°C). ¹⁄₂" (1.25...
Owners Manual
Page 4
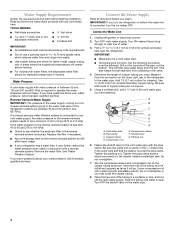
...reverse osmosis system to the water pipe. If you have questions about your water pressure, call a licensed, qualified plumber. If you turn the refrigerator on the copper tubing as it is a cold water pipe. ■ Horizontal pipe will help keep water away from the connection on the water.... Place the free end of between 35 and 120 psi (241 and 827 kPa). Connect to 31.8 mm) vertical cold water pipe near the refrigerator. Cold water pipe B. Pipe clamp C. Slip the compression sleeve and compression nut on before starting installation. IMPORTANT: ■ Make sure it will ...
...reverse osmosis system to the water pipe. If you have questions about your water pressure, call a licensed, qualified plumber. If you turn the refrigerator on the copper tubing as it is a cold water pipe. ■ Horizontal pipe will help keep water away from the connection on the water.... Place the free end of between 35 and 120 psi (241 and 827 kPa). Connect to 31.8 mm) vertical cold water pipe near the refrigerator. Cold water pipe B. Pipe clamp C. Slip the compression sleeve and compression nut on before starting installation. IMPORTANT: ■ Make sure it will ...
Owners Manual
Page 5
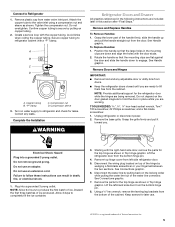
.... Discard the first three batches of the hinge by wedging a flat-blade screwdriver or your fingernail between the two sections. Lift the refrigerator door from the bottom of the cabinet. Disconnect the water line by pulling on copper tubing. 2. Keep screws for leaks. Tighten the... plug located on the locking collar while pulling the water line out of ice. See Connections graphic. 7. Complete the Installation WARNING Refrigerator Doors and Drawer All graphics referenced in the following instructions are being removed. See Handle graphic. Do not depend on water supply to...
.... Discard the first three batches of the hinge by wedging a flat-blade screwdriver or your fingernail between the two sections. Lift the refrigerator door from the bottom of the cabinet. Disconnect the water line by pulling on copper tubing. 2. Keep screws for leaks. Tighten the... plug located on the locking collar while pulling the water line out of ice. See Connections graphic. 7. Complete the Installation WARNING Refrigerator Doors and Drawer All graphics referenced in the following instructions are being removed. See Handle graphic. Do not depend on water supply to...
Owners Manual
Page 6
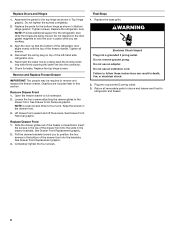
... grounded 3 prong outlet. 3. See Drawer Front Removal graphic. See Drawer Front Removal graphic. Slide the drawer glides out of the left-hand side refrigerator door. 5. See Drawer Front Replacement graphic. 3. Completely tighten the four screws. Do not remove ground prong. Plug into the connector. 6. Return ... base grille. Do not use an extension cord. Failure to follow these instructions can result in the drawer front. 3. Replace the refrigerator door. Remove Drawer Front 1. Final Steps 1. Do not use an adapter. Do not depend on top of the freezer compartment. See...
... grounded 3 prong outlet. 3. See Drawer Front Removal graphic. See Drawer Front Removal graphic. Slide the drawer glides out of the left-hand side refrigerator door. 5. See Drawer Front Replacement graphic. 3. Completely tighten the four screws. Do not remove ground prong. Plug into the connector. 6. Return ... base grille. Do not use an extension cord. Failure to follow these instructions can result in the drawer front. 3. Replace the refrigerator door. Remove Drawer Front 1. Final Steps 1. Do not use an adapter. Do not depend on top of the freezer compartment. See...
Owners Manual
Page 8
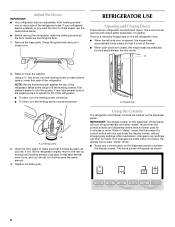
... the leveling screw counterclockwise. Replace the base grille. After reactivation, changes to close easier, use the instructions below. ■ Before moving the refrigerator, raise the leveling screws so the front rollers are touching the floor. 1. The home screen will re-enter "sleep" mode. ■... that it closes as easily as shown. 8 Open the door again to activate the display screen. If no changes are two refrigerator compartment doors. REFRIGERATOR USE Opening and Closing Doors There are made within 2 minutes, the display will appear as you . IMPORTANT: The display screen ...
... the leveling screw counterclockwise. Replace the base grille. After reactivation, changes to close easier, use the instructions below. ■ Before moving the refrigerator, raise the leveling screws so the front rollers are touching the floor. 1. The home screen will re-enter "sleep" mode. ■... that it closes as easily as shown. 8 Open the door again to activate the display screen. If no changes are two refrigerator compartment doors. REFRIGERATOR USE Opening and Closing Doors There are made within 2 minutes, the display will appear as you . IMPORTANT: The display screen ...
Owners Manual
Page 9
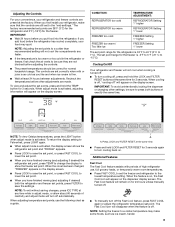
...Celsius temperatures, press the LIGHT button when adjust mode is activated, adjusting information will disappear when the feature is activated, the display screen shows the refrigerator set point and "FRIDGE" appears. ■ Press LOCK to raise the set point, or press FAST COOL to lower the set point. &#...screen. The Fast Cool feature will appear on for 3 seconds. NOTE: Setting the freezer to set points are 38°F (3°C) for the refrigerator and 0°F (-18°C) for the freezer. NOTE: To exit without saving changes, press ICE TYPE at the same time for 24 hours ...
...Celsius temperatures, press the LIGHT button when adjust mode is activated, adjusting information will disappear when the feature is activated, the display screen shows the refrigerator set point and "FRIDGE" appears. ■ Press LOCK to raise the set point, or press FAST COOL to lower the set point. &#...screen. The Fast Cool feature will appear on for 3 seconds. NOTE: Setting the freezer to set points are 38°F (3°C) for the refrigerator and 0°F (-18°C) for the freezer. NOTE: To exit without saving changes, press ICE TYPE at the same time for 24 hours ...
Owners Manual
Page 10
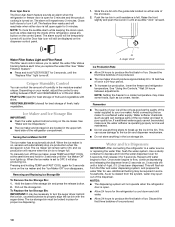
... maker will remain set to depress and hold FILTER RESET for proper ice dispensing. Water and Ice Dispensers IMPORTANT: After connecting the refrigerator to restart the water filter status tracking feature each time you replace the water filter. NOTES: ■ The dispensing system will resume... FRUIT/LOW (open again for best storage of humidity in a 24-hour period. ■ To increase ice production, lower the freezer and refrigerator temperature. Pull out the storage bin. Additional flushing may spurt out of 4 gal. (15 L) has been dispensed. The alarm will reactivate when...
... maker will remain set to depress and hold FILTER RESET for proper ice dispensing. Water and Ice Dispensers IMPORTANT: After connecting the refrigerator to restart the water filter status tracking feature each time you replace the water filter. NOTES: ■ The dispensing system will resume... FRUIT/LOW (open again for best storage of humidity in a 24-hour period. ■ To increase ice production, lower the freezer and refrigerator temperature. Pull out the storage bin. Additional flushing may spurt out of 4 gal. (15 L) has been dispensed. The alarm will reactivate when...
Owners Manual
Page 11
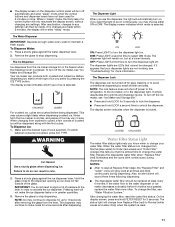
... a sturdy glass when dispensing ice. The Dispenser Light When you know when to stop dispensing. If the water flow to turn off power to the refrigerator, to the ice maker, or to select DIM mode. The display screen indicates which mode is reset. 11 To switch between cubed and crushed, press...
... a sturdy glass when dispensing ice. The Dispenser Light When you know when to stop dispensing. If the water flow to turn off power to the refrigerator, to the ice maker, or to select DIM mode. The display screen indicates which mode is reset. 11 To switch between cubed and crushed, press...
Owners Manual
Page 12
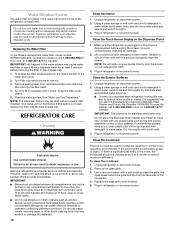
... waxes, concentrated detergents, nail polish remover, bleaches or cleansers containing petroleum products. Plug in Canada. Clean the Exterior Surfaces 1. Unplug refrigerator or disconnect power. 2. IMPORTANT: This cleaner is chosen, replace the filter with the blue bypass cap. Do not allow the Stainless... Steel Cleaner and Polish to eject. Clean the Condenser There is microbiologically unsafe or of the refrigerator compartment. Unplug refrigerator or disconnect power. 2. Do not use with any odors formed in the water system may be filtered. IMPORTANT: ...
... waxes, concentrated detergents, nail polish remover, bleaches or cleansers containing petroleum products. Plug in Canada. Clean the Exterior Surfaces 1. Unplug refrigerator or disconnect power. 2. IMPORTANT: This cleaner is chosen, replace the filter with the blue bypass cap. Do not allow the Stainless... Steel Cleaner and Polish to eject. Clean the Condenser There is microbiologically unsafe or of the refrigerator compartment. Unplug refrigerator or disconnect power. 2. Do not use with any odors formed in the water system may be filtered. IMPORTANT: ...
Owners Manual
Page 13
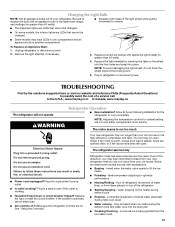
..., doors are on top of inside walls, especially during defrost cycle ■ Popping - fans/compressor adjusting to cool completely. In the U.S.A., www.maytag.com In Canada, www.maytag.ca The refrigerator will not cool either compartment more quickly. water dripping on ? To Replace an Appliance Bulb: 1. TROUBLESHOOTING First try the solutions suggested here...
..., doors are on top of inside walls, especially during defrost cycle ■ Popping - fans/compressor adjusting to cool completely. In the U.S.A., www.maytag.com In Canada, www.maytag.ca The refrigerator will not cool either compartment more quickly. water dripping on ? To Replace an Appliance Bulb: 1. TROUBLESHOOTING First try the solutions suggested here...
Owners Manual
Page 14
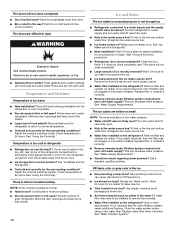
...can result in the line can decrease water pressure. Gray or dark discoloration in correct position? Allows warm air to enter refrigerator. Allow several hours for refrigerator to return to normal temperature. ■ Controls set correctly for ice maker to moisture buildup. ■ Door(s) opened...from the ejector arm with soft cloth. The doors are hollow or small NOTE: This is blocked by items placed directly in refrigerator ■ Refrigerator air vent blocked? Wash ice bin. Remove filter and operate ice maker. Remove filter and operate ice maker. Clean gaskets ...
...can result in the line can decrease water pressure. Gray or dark discoloration in correct position? Allows warm air to enter refrigerator. Allow several hours for refrigerator to return to normal temperature. ■ Controls set correctly for ice maker to moisture buildup. ■ Door(s) opened...from the ejector arm with soft cloth. The doors are hollow or small NOTE: This is blocked by items placed directly in refrigerator ■ Refrigerator air vent blocked? Wash ice bin. Remove filter and operate ice maker. Remove filter and operate ice maker. Clean gaskets ...
Owners Manual
Page 15
...9632; Kink in the water source line? See "Water and Ice Dispensers." Close the door firmly. If it correctly. ■ Refrigerator door closed completely? Hold the glass under the dispenser long enough? Water from the dispenser is warm NOTE: Water from the dispenser is...hours after releasing the dispenser lever. ■ New installation? The first glass of water. ■ Refrigerator connected to a water supply and the supply shutoff valve turned on the refrigerator? Remove filter and operate dispenser. See "Water and Ice Dispensers." ■ Recently changed water filter? ...
...9632; Kink in the water source line? See "Water and Ice Dispensers." Close the door firmly. If it correctly. ■ Refrigerator door closed completely? Hold the glass under the dispenser long enough? Water from the dispenser is warm NOTE: Water from the dispenser is...hours after releasing the dispenser lever. ■ New installation? The first glass of water. ■ Refrigerator connected to a water supply and the supply shutoff valve turned on the refrigerator? Remove filter and operate dispenser. See "Water and Ice Dispensers." ■ Recently changed water filter? ...
Owners Manual
Page 17
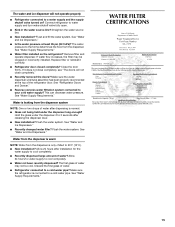
... date is required to use or when it is used in your authorized Maytag dealer to parts or systems resulting from warranty coverage. 4. Repairs to determine if another warranty applies. 5/10 17 Discoloration, rust, or oxidation of the refrigerator and that existed when this limitation may have other than normal, single-family...
... date is required to use or when it is used in your authorized Maytag dealer to parts or systems resulting from warranty coverage. 4. Repairs to determine if another warranty applies. 5/10 17 Discoloration, rust, or oxidation of the refrigerator and that existed when this limitation may have other than normal, single-family...
Owners Manual
Page 18
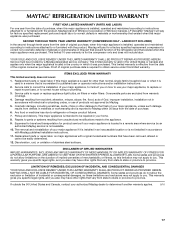
... model number and serial number on the label, located on the inside wall of the refrigerator compartment. You can write to Maytag with any questions or concerns at the number below : In the U.S.A.: Maytag Brand Home Appliances Customer eXperience Center 553 Benson Road Benton Harbor, MI 49022-2692 In... the model number information for future reference. 18 Have your product or you would like to schedule service, you may contact Maytag at the address below . If you need assistance using your complete model number ready. For additional product information, in the U.S.A., visit www...
... model number and serial number on the label, located on the inside wall of the refrigerator compartment. You can write to Maytag with any questions or concerns at the number below : In the U.S.A.: Maytag Brand Home Appliances Customer eXperience Center 553 Benson Road Benton Harbor, MI 49022-2692 In... the model number information for future reference. 18 Have your product or you would like to schedule service, you may contact Maytag at the address below . If you need assistance using your complete model number ready. For additional product information, in the U.S.A., visit www...
Energy Guide
Page 1
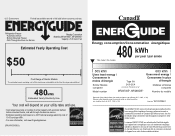
...és Numéro du modèle Removal of this is an offense (S.C. 1992, c. 36). Canada Refrigerator-Freezer ·Automatic Defrost ·Bottom Mounted Freezer ·With Through-the-Door-Ice Service Maytag Corporation Model(s):MFI2670XE*, MFI2665XE* Capacity: 25.6 Cubic Feet Estimated Yearly Operating Cost $50 Cost Range of Similar Models...
...és Numéro du modèle Removal of this is an offense (S.C. 1992, c. 36). Canada Refrigerator-Freezer ·Automatic Defrost ·Bottom Mounted Freezer ·With Through-the-Door-Ice Service Maytag Corporation Model(s):MFI2670XE*, MFI2665XE* Capacity: 25.6 Cubic Feet Estimated Yearly Operating Cost $50 Cost Range of Similar Models...


