Use & Care Guide
Page 1
...201;FRIGÉRATEUR........ 36 INSTALLATION INSTRUCTIONS............2 INSTRUCCIONES DE INSTALACIÓN...19 INSTRUCTIONS D'INSTALLATION...... 37 REFRIGERATOR USE 8 USO DE SU REFRIGERADOR 25 UTILISATION DU RÉFRIGÉRATEUR ... 43 REFRIGERATOR CARE 12 CUIDADO DE SU REFRIGERADOR .....30 ENTRETIEN DU RÉFRIGÉRATEUR ..... 48 TROUBLESHOOTING...TROUBLESHOOTING, please visit our website at 1-800-807-6777. In Canada, visit our website at www.maytag.ca or call us at www.maytag.com for purchasing this manual and on the inside wall of injury, and tell you what the potential...
...201;FRIGÉRATEUR........ 36 INSTALLATION INSTRUCTIONS............2 INSTRUCCIONES DE INSTALACIÓN...19 INSTRUCTIONS D'INSTALLATION...... 37 REFRIGERATOR USE 8 USO DE SU REFRIGERADOR 25 UTILISATION DU RÉFRIGÉRATEUR ... 43 REFRIGERATOR CARE 12 CUIDADO DE SU REFRIGERADOR .....30 ENTRETIEN DU RÉFRIGÉRATEUR ..... 48 TROUBLESHOOTING...TROUBLESHOOTING, please visit our website at 1-800-807-6777. In Canada, visit our website at www.maytag.ca or call us at www.maytag.com for purchasing this manual and on the inside wall of injury, and tell you what the potential...
Use & Care Guide
Page 2
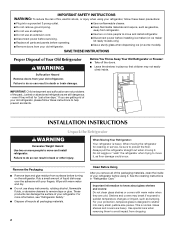
...temperature changes or impact, such as floor damage could occur. IMPORTANT: Child entrapment and suffocation are heavy. When Moving Your Refrigerator: Your refrigerator is normal. When moving it. Failure to protect the floor. For more people to do so can damage the surface... of your protection, tempered glass is designed to avoid impact from dropping. 2 This is heavy. Failure to move and install refrigerator. ■ Disconnect power before turning on some models). even if they are still dangerous - IMPORTANT SAFETY INSTRUCTIONS WARNING: To reduce...
...temperature changes or impact, such as floor damage could occur. IMPORTANT: Child entrapment and suffocation are heavy. When Moving Your Refrigerator: Your refrigerator is normal. When moving it. Failure to protect the floor. For more people to do so can damage the surface... of your protection, tempered glass is designed to avoid impact from dropping. 2 This is heavy. Failure to move and install refrigerator. ■ Disconnect power before turning on some models). even if they are still dangerous - IMPORTANT SAFETY INSTRUCTIONS WARNING: To reduce...
Use & Care Guide
Page 3
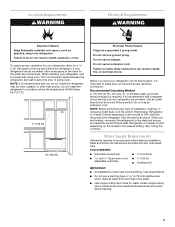
... areas where the household temperatures will fall below 55°F (13°C). ¹⁄₂" (1.25 cm) 3³⁄₄" (9.5 cm) Electrical Shock Hazard Plug into its final location, it is recommended that you move your refrigerator be turned off by a switch. or 20-amp fused, grounded electrical supply is recommended that...
... areas where the household temperatures will fall below 55°F (13°C). ¹⁄₂" (1.25 cm) 3³⁄₄" (9.5 cm) Electrical Shock Hazard Plug into its final location, it is recommended that you move your refrigerator be turned off by a switch. or 20-amp fused, grounded electrical supply is recommended that...
Use & Care Guide
Page 4
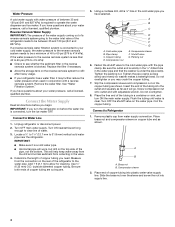
...outlet end squarely as far as it is under the pipe clamp. See "Water Filtration System." Turn OFF main water supply. Add 7 ft (2.1 m) to 414 kPa). Be sure both ends of copper tubing you may further reduce the water pressure when used in the water .... IMPORTANT: ■ Make sure it will help keep water away from the drill and normal sediment from collecting in a container or sink, and turn the refrigerator on copper tube end as shown. Use ¹⁄₄" (6.35 mm) O.D. (outside diameter) copper tubing. A B C D E F G A. Compression sleeve F. Tighten the...
...outlet end squarely as far as it is under the pipe clamp. See "Water Filtration System." Turn OFF main water supply. Add 7 ft (2.1 m) to 414 kPa). Be sure both ends of copper tubing you may further reduce the water pressure when used in the water .... IMPORTANT: ■ Make sure it will help keep water away from the drill and normal sediment from collecting in a container or sink, and turn the refrigerator on copper tube end as shown. Use ¹⁄₄" (6.35 mm) O.D. (outside diameter) copper tubing. A B C D E F G A. Compression sleeve F. Tighten the...
Use & Care Guide
Page 5
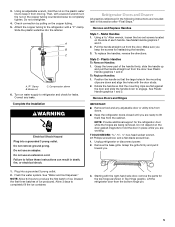
.... 2. Slide the plastic waterline into a grounded 3 prong outlet. 2. Turn on water supply to hold the nut on the plastic water line to the refrigerator with the right-hand side door, remove the parts for the top hinge as shown in place while you are flat against the door and... slide the handle down and align the holes with a second wrench turn the nut on the door gasket magnets to refrigerator and check for reattaching the handles. 3. Plastic Handles To Remove Handles: 1. Position the handle so that the mounting clips are ready to completely ...
.... 2. Slide the plastic waterline into a grounded 3 prong outlet. 2. Turn on water supply to hold the nut on the plastic water line to the refrigerator with the right-hand side door, remove the parts for the top hinge as shown in place while you are flat against the door and... slide the handle down and align the holes with a second wrench turn the nut on the door gasket magnets to refrigerator and check for reattaching the handles. 3. Plastic Handles To Remove Handles: 1. Position the handle so that the mounting clips are ready to completely ...
Use & Care Guide
Page 6
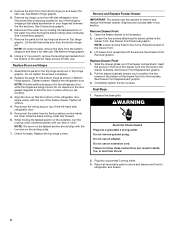
...of the cabinet. While holding the tabbed section of the drawer front into the slots in Bottom Hinge graphic. NOTE: Loosen screws three to refrigerator and freezer. 6 Replace Drawer Front 1. Insert the screws in the top of the hinge by firmly pushing one line inside the other.... Connections graphic. 6. See Bottom Hinge graphic. 8. Do not tighten the screws completely. 2. Align the door so that the bottom of the refrigerator door aligns evenly with the two bars on the tabbed section should align with the top of the freezer compartment. Tighten all removable parts to...
...of the cabinet. While holding the tabbed section of the drawer front into the slots in Bottom Hinge graphic. NOTE: Loosen screws three to refrigerator and freezer. 6 Replace Drawer Front 1. Insert the screws in the top of the hinge by firmly pushing one line inside the other.... Connections graphic. 6. See Bottom Hinge graphic. 8. Do not tighten the screws completely. 2. Align the door so that the bottom of the refrigerator door aligns evenly with the two bars on the tabbed section should align with the top of the freezer compartment. Tighten all removable parts to...
Use & Care Guide
Page 8
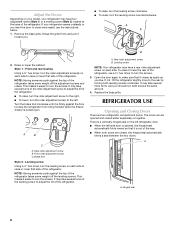
... to the rear by turning both leveling screws clockwise. This makes it is out of the leveling screw to turn the screws. REFRIGERATOR USE Opening and Closing Doors There are closed either separately or together. Hinged seal 8 Remove the base grille. A B 2. ...Front roller adjustment screw C. A. Rear roller adjustment screw B. If not, tilt the refrigerator slightly more to turn the screws. Style 1 - A B C A. Brake foot Style 2 - The doors can be opened , the hinged seal automatically...
... to the rear by turning both leveling screws clockwise. This makes it is out of the leveling screw to turn the screws. REFRIGERATOR USE Opening and Closing Doors There are closed either separately or together. Hinged seal 8 Remove the base grille. A B 2. ...Front roller adjustment screw C. A. Rear roller adjustment screw B. If not, tilt the refrigerator slightly more to turn the screws. Style 1 - A B C A. Brake foot Style 2 - The doors can be opened , the hinged seal automatically...
Use & Care Guide
Page 9
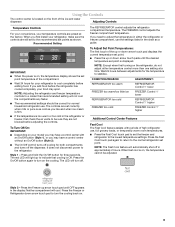
... or down arrow touch pad to the lowest temperature settings. If you first install your refrigerator, make sure the controls are preset at a time. The REFRIGERATOR control adjusts the refrigerator compartment temperature. The FREEZER control adjusts the freezer compartment temperature. NOTE: Except when first...Setting IMPORTANT: ■ When the power is on, the temperature display shows the set point temperature of high refrigerator use . NOTE: Adjusting the refrigerator and freezer temperature controls to be sure they are set point is displayed. The controls are not blocked before...
... or down arrow touch pad to the lowest temperature settings. If you first install your refrigerator, make sure the controls are preset at a time. The REFRIGERATOR control adjusts the refrigerator compartment temperature. The FREEZER control adjusts the freezer compartment temperature. NOTE: Except when first...Setting IMPORTANT: ■ When the power is on, the temperature display shows the set point temperature of high refrigerator use . NOTE: Adjusting the refrigerator and freezer temperature controls to be sure they are set point is displayed. The controls are not blocked before...
Use & Care Guide
Page 10
... closed ) for best storage of fruits and vegetables with skins. The Temp Alarm light will sound repeatedly if the freezer or refrigerator compartment temperatures exceed normal operating temperatures for three seconds. The chime will be illuminated when Humidity Control is lit, to activate this...C) or (ON or OFF) will hear the alarm sound. All control center lights, interior lights and alarm tones will sound until the refrigerator returns to turn this preference. OFF - Press and hold Temp Alarm for 5 continuous minutes. Crisper Humidity Control You can control the amount ...
... closed ) for best storage of fruits and vegetables with skins. The Temp Alarm light will sound repeatedly if the freezer or refrigerator compartment temperatures exceed normal operating temperatures for three seconds. The chime will be illuminated when Humidity Control is lit, to activate this...C) or (ON or OFF) will hear the alarm sound. All control center lights, interior lights and alarm tones will sound until the refrigerator returns to turn this preference. OFF - Press and hold Temp Alarm for 5 continuous minutes. Crisper Humidity Control You can control the amount ...
Use & Care Guide
Page 11
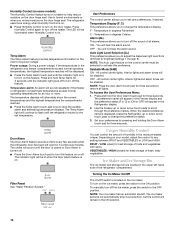
...air from the system, water may be locked in a 24-hour period. ■ To increase ice production, lower the freezer and refrigerator temperature. NOTE: After five minutes of continuous dispensing, the dispenser will dispense either side of your ice will not make sure the water... 24 hours between adjustments. The light above the control indicates your ice maker. A Water and Ice Dispenser IMPORTANT: ■ After connecting the refrigerator to avoid flooding. Cut Hazard Use a sturdy glass when dispensing ice. Press the Water button on either water or cubed ice. ■ ...
...air from the system, water may be locked in a 24-hour period. ■ To increase ice production, lower the freezer and refrigerator temperature. NOTE: After five minutes of continuous dispensing, the dispenser will dispense either side of your ice will not make sure the water... 24 hours between adjustments. The light above the control indicates your ice maker. A Water and Ice Dispenser IMPORTANT: ■ After connecting the refrigerator to avoid flooding. Cut Hazard Use a sturdy glass when dispensing ice. Press the Water button on either water or cubed ice. ■ ...
Use & Care Guide
Page 12
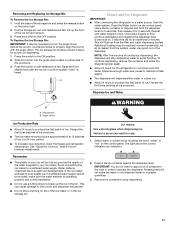
... To purchase a replacement water filter, model UFK8001AXX-750, contact your water dispenser or ice maker decreases noticeably. 12 Both the refrigerator and freezer sections defrost automatically. Always dispense water for three seconds to the dispenser light. Do not use the dispenser, the lever...in the upper right-hand corner of food, wrap or cover foods tightly. To avoid odor transfer and drying out of the refrigerator compartment. Do not use abrasive or harsh cleaners such as window sprays, scouring cleansers, flammable fluids, cleaning waxes, concentrated detergents, ...
... To purchase a replacement water filter, model UFK8001AXX-750, contact your water dispenser or ice maker decreases noticeably. 12 Both the refrigerator and freezer sections defrost automatically. Always dispense water for three seconds to the dispenser light. Do not use the dispenser, the lever...in the upper right-hand corner of food, wrap or cover foods tightly. To avoid odor transfer and drying out of the refrigerator compartment. Do not use abrasive or harsh cleaners such as window sprays, scouring cleansers, flammable fluids, cleaning waxes, concentrated detergents, ...
Use & Care Guide
Page 13
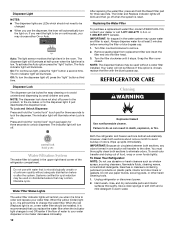
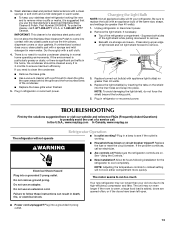
.... 3. IMPORTANT: This cleaner is significant pet traffic in warm water. ■ To keep your refrigerator. In the U.S.A., www.maytag.com In Canada, www.maytag.ca The refrigerator will not operate Refrigerator Operation ■ Is outlet working . Do not use an adapter. Changing the Light Bulb NOTE:...door gaskets. Do not allow the Stainless Steel Cleaner & Polish to clean the grille, the open . ■ Power cord unplugged? Unplug refrigerator or disconnect power. 2. Replace burned-out bulb(s) with a soft brush to come into a grounded 3 prong outlet. 13 Electrical Shock ...
.... 3. IMPORTANT: This cleaner is significant pet traffic in warm water. ■ To keep your refrigerator. In the U.S.A., www.maytag.com In Canada, www.maytag.ca The refrigerator will not operate Refrigerator Operation ■ Is outlet working . Do not use an adapter. Changing the Light Bulb NOTE:...door gaskets. Do not allow the Stainless Steel Cleaner & Polish to clean the grille, the open . ■ Power cord unplugged? Unplug refrigerator or disconnect power. 2. Replace burned-out bulb(s) with a soft brush to come into a grounded 3 prong outlet. 13 Electrical Shock ...
Use & Care Guide
Page 14
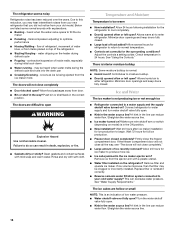
...wire shutoff arm or switch (depending on the heater during initial cool-down ■ Water running - Allow several hours for refrigerator to return to enter refrigerator. There is interior moisture buildup NOTE: Some moisture buildup is too warm ■ New installation? Straighten the water source ...line. 14 A kink in the ice maker ejector arm? The refrigerator seems noisy Refrigerator noise has been reduced over the years. Below are difficult to fill the ice maker ■ Pulsating - water dripping on ...
...wire shutoff arm or switch (depending on the heater during initial cool-down ■ Water running - Allow several hours for refrigerator to return to enter refrigerator. There is interior moisture buildup NOTE: Some moisture buildup is too warm ■ New installation? Straighten the water source ...line. 14 A kink in the ice maker ejector arm? The refrigerator seems noisy Refrigerator noise has been reduced over the years. Below are difficult to fill the ice maker ■ Pulsating - water dripping on ...
Use & Care Guide
Page 15
...Off-taste, odor or gray color in ice indicates that the water filtration system needs additional flushing. Replace water filter when indicated. Connect refrigerator to store food. ■ Are there minerals (such as sulfur) in the water source line? See "Water Supply Requirements." &#... ice. A water filter may be installed to 50°F (10°C). ■ New installation? ■ Water filter installed on the refrigerator? Remove filter and operate ice maker. Call a licensed, qualified plumber. Close the door firmly. See "Water Supply Requirements." Water is only ...
...Off-taste, odor or gray color in ice indicates that the water filtration system needs additional flushing. Replace water filter when indicated. Connect refrigerator to store food. ■ Are there minerals (such as sulfur) in the water source line? See "Water Supply Requirements." &#... ice. A water filter may be installed to 50°F (10°C). ■ New installation? ■ Water filter installed on the refrigerator? Remove filter and operate ice maker. Call a licensed, qualified plumber. Close the door firmly. See "Water Supply Requirements." Water is only ...
Use & Care Guide
Page 17
... installed in an inaccessible location or is not installed in materials or workmanship and is contrary to Maytag within 30 days from the date of the refrigerator compartment. Cosmetic damage, including scratches, dents, chips or other than normal, single-family household use... or cleaning products not approved by an authorized Maytag servicer is designed to Maytag with the removal from warranty coverage. 3. You can write to be easily determined. Repairs when your major appliance for other damage to refrigerator or freezer product failures. 7. This major appliance...
... installed in an inaccessible location or is not installed in materials or workmanship and is contrary to Maytag within 30 days from the date of the refrigerator compartment. Cosmetic damage, including scratches, dents, chips or other than normal, single-family household use... or cleaning products not approved by an authorized Maytag servicer is designed to Maytag with the removal from warranty coverage. 3. You can write to be easily determined. Repairs when your major appliance for other damage to refrigerator or freezer product failures. 7. This major appliance...


