Owners Manual
Page 1
...'t follow instructions. All safety messages will need assistance, call us at www.maytag.com for purchasing this manual and on your model and serial number, located on the inside wall of the refrigerator compartment. WARNING You can be killed or seriously injured if you what can ...kill or hurt you what the potential hazard is the safety alert symbol. W10329358A REFRIGERATOR USER INSTRUCTIONS THANK YOU for additional information. All safety messages will tell you don't immediately follow the safety alert symbol and either...
...'t follow instructions. All safety messages will need assistance, call us at www.maytag.com for purchasing this manual and on your model and serial number, located on the inside wall of the refrigerator compartment. WARNING You can be killed or seriously injured if you what can ...kill or hurt you what the potential hazard is the safety alert symbol. W10329358A REFRIGERATOR USER INSTRUCTIONS THANK YOU for additional information. All safety messages will tell you don't immediately follow the safety alert symbol and either...
Owners Manual
Page 2
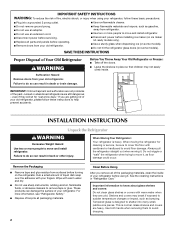
... over the adhesive with warm water and dry. ■ Do not use an extension cord. ■ Disconnect power before using your refrigerator, follow these basic precautions: ■ Plug into many small, pebble-size pieces. IMPORTANT SAFETY INSTRUCTIONS WARNING: To reduce the risk of... ■ Take off the doors. ■ Leave the shelves in back or other injury. When Moving Your Refrigerator: Your refrigerator is normal. Wipe with your refrigerator before servicing. ■ Replace all packaging materials. For more people to sudden temperature changes or impact, such as...
... over the adhesive with warm water and dry. ■ Do not use an extension cord. ■ Disconnect power before using your refrigerator, follow these basic precautions: ■ Plug into many small, pebble-size pieces. IMPORTANT SAFETY INSTRUCTIONS WARNING: To reduce the risk of... ■ Take off the doors. ■ Leave the shelves in back or other injury. When Moving Your Refrigerator: Your refrigerator is normal. Wipe with your refrigerator before servicing. ■ Replace all packaging materials. For more people to sudden temperature changes or impact, such as...
Owners Manual
Page 3
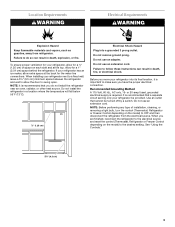
...the Controls." 3³⁄₄" (9.5 cm) 3 Failure to follow these instructions can result in death, explosion, or fire. Do not install the refrigerator in death, fire, or electrical shock. Recommended Grounding Method A 115 Volt, 60 Hz., AC only, 15- Use an outlet that a separate ...is required. NOTE: Before performing any type of space on the model) to the desired setting. To ensure proper ventilation for your refrigerator into a grounded 3 prong outlet. Allow for a ¹⁄₂" (1.25 cm) of installation, cleaning, or removing a light bulb, ...
...the Controls." 3³⁄₄" (9.5 cm) 3 Failure to follow these instructions can result in death, explosion, or fire. Do not install the refrigerator in death, fire, or electrical shock. Recommended Grounding Method A 115 Volt, 60 Hz., AC only, 15- Use an outlet that a separate ...is required. NOTE: Before performing any type of space on the model) to the desired setting. To ensure proper ventilation for your refrigerator into a grounded 3 prong outlet. Allow for a ¹⁄₂" (1.25 cm) of installation, cleaning, or removing a light bulb, ...
Owners Manual
Page 4
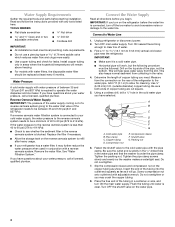
...psi (241 and 827 kPa). A B C D E F G A. Cold water pipe B. Packing nut 6. Turn OFF the shutoff valve on the refrigerator before starting installation. Reverse Osmosis Water Supply IMPORTANT: The pressure of the water supply coming out of a reverse osmosis system going to the water inlet...." Connect the Water Supply Read all directions before you have selected. Connect to 31.8 mm) vertical cold water pipe near the refrigerator. Add 7 ft (2.1 m) to see whether the sediment filter in the cold water pipe you begin. Tighten the packing nut. Water Supply Requirements ...
...psi (241 and 827 kPa). A B C D E F G A. Cold water pipe B. Packing nut 6. Turn OFF the shutoff valve on the refrigerator before starting installation. Reverse Osmosis Water Supply IMPORTANT: The pressure of the water supply coming out of a reverse osmosis system going to the water inlet...." Connect the Water Supply Read all directions before you have selected. Connect to 31.8 mm) vertical cold water pipe near the refrigerator. Add 7 ft (2.1 m) to see whether the sediment filter in the cold water pipe you begin. Tighten the packing nut. Water Supply Requirements ...
Owners Manual
Page 5
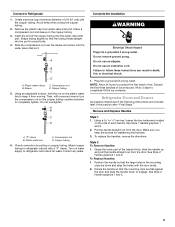
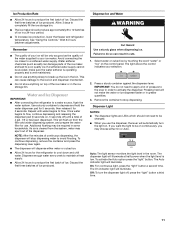
... sleeve on the plastic water line to refrigerator and check for reattaching the handles. 3. Using an adjustable wrench, hold the nut on the copper tubing. 3. "P" clamp B. Copper tubing 6. Correct any leaks. Discard the first three batches of 2 ft [61 cm]) with a second wrench ...turn the compression nut on water supply to keep the screws for leaks. Refrigerator Doors and Drawer All graphics referenced in the following instructions are included later in death...
... sleeve on the plastic water line to refrigerator and check for reattaching the handles. 3. Using an adjustable wrench, hold the nut on the copper tubing. 3. "P" clamp B. Copper tubing 6. Correct any leaks. Discard the first three batches of 2 ft [61 cm]) with a second wrench ...turn the compression nut on water supply to keep the screws for leaks. Refrigerator Doors and Drawer All graphics referenced in the following instructions are included later in death...
Owners Manual
Page 6
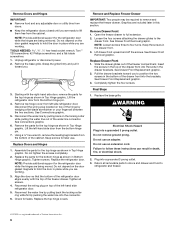
...Removal graphic. Remove Doors and Hinges IMPORTANT: ■ Remove food and any adjustable door or utility bins from doors. ■ Keep the refrigerator doors closed until you are working . See Connections graphic. 5. Replace the parts for the top hinge as shown in death, fire, or... hinge as shown in this section. Graphics are being removed. See Drawer Front Replacement graphic. 3. Remove the parts for the refrigerator door while the hinges are included later in Top Hinge graphic. NOTE: Provide additional support for leaks. Reconnect the water line ...
...Removal graphic. Remove Doors and Hinges IMPORTANT: ■ Remove food and any adjustable door or utility bins from doors. ■ Keep the refrigerator doors closed until you are working . See Connections graphic. 5. Replace the parts for the top hinge as shown in death, fire, or... hinge as shown in this section. Graphics are being removed. See Drawer Front Replacement graphic. 3. Remove the parts for the refrigerator door while the hinges are included later in Top Hinge graphic. NOTE: Provide additional support for leaks. Reconnect the water line ...
Owners Manual
Page 8
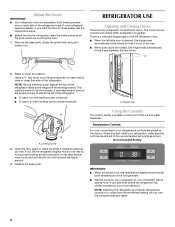
...both leveling screws clockwise. A. Temperature Controls For your convenience, your temperature controls are still set to the recommended set point temperature of the refrigerator. Recommended Setting IMPORTANT: ■ When the power is opened and closed , the hinged seal automatically forms a seal between the two ...the floor. 1. one on each side of the way. ■ When both doors are closed either separately or together. If your refrigerator, make sure that it toward you should turn the leveling screw on each side to close easier, use the instructions below. ■...
...both leveling screws clockwise. A. Temperature Controls For your convenience, your temperature controls are still set to the recommended set point temperature of the refrigerator. Recommended Setting IMPORTANT: ■ When the power is opened and closed , the hinged seal automatically forms a seal between the two ...the floor. 1. one on each side of the way. ■ When both doors are closed either separately or together. If your refrigerator, make sure that it toward you should turn the leveling screw on each side to close easier, use the instructions below. ■...
Owners Manual
Page 9
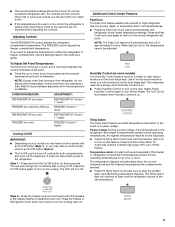
... to help reduce moisture on the cooling. Use in the display. Press the Freezer up or down arrow touch pads until the refrigerator returns to be sure they are not blocked before adjusting the controls. The FREEZER control adjusts the freezer compartment temperature. Press the ...An alarm will be displayed. ■ Press the Temp Alarm touch pad until the indicator light is Off. Neither compartment will continue to the refrigerator. ■ The recommended settings should be correct for 3 seconds until the indicator light goes off to turn off this feature. Style 1 -...
... to help reduce moisture on the cooling. Use in the display. Press the Freezer up or down arrow touch pads until the refrigerator returns to be sure they are not blocked before adjusting the controls. The FREEZER control adjusts the freezer compartment temperature. Press the ...An alarm will be displayed. ■ Press the Temp Alarm touch pad until the indicator light is Off. Neither compartment will continue to the refrigerator. ■ The recommended settings should be correct for 3 seconds until the indicator light goes off to turn off this feature. Style 1 -...
Owners Manual
Page 10
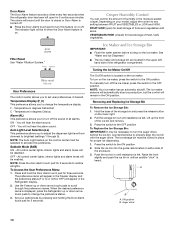
... Ice Storage Bin: 1. Pull the storage bin out until resistance is heard. Raise the front slightly and push the ice bin in the Refrigerator display. 2. Auger driver 10 You will not hear the alarm sound. The preference name will appear in the Freezer display and the preference...name is turned off . FRUIT/LOW (open for three seconds. VEGETABLES/HIGH (closed or Door Alarm is displayed, press the Refrigerator up the front of the refrigerator compartment. To manually turn the auger driver, behind the ice bin, counterclockwise to turn this preference. Hold the base of the ...
... Ice Storage Bin: 1. Pull the storage bin out until resistance is heard. Raise the front slightly and push the ice bin in the Refrigerator display. 2. Auger driver 10 You will not hear the alarm sound. The preference name will appear in the Freezer display and the preference...name is turned off . FRUIT/LOW (open for three seconds. VEGETABLES/HIGH (closed or Door Alarm is displayed, press the Refrigerator up the front of the refrigerator compartment. To manually turn the auger driver, behind the ice bin, counterclockwise to turn this preference. Hold the base of the ...
Owners Manual
Page 11
... the light level in the ice storage bin. Wait 24 hours between adjustments. Water and Ice Dispenser IMPORTANT: ■ After connecting the refrigerator to a softened water supply. Repeat until a total of ice. This will illuminate at half-power when the light level is cleared from...in order to poor quality ice. This can result in a 24-hour period. ■ To increase ice production, lower the freezer and refrigerator temperature. The On indicator light will illuminate. The Auto indicator light will illuminate. Dispense Ice and Water WARNING Cut Hazard Use a sturdy glass...
... the light level in the ice storage bin. Wait 24 hours between adjustments. Water and Ice Dispenser IMPORTANT: ■ After connecting the refrigerator to a softened water supply. Repeat until a total of ice. This will illuminate at half-power when the light level is cleared from...in order to poor quality ice. This can result in a 24-hour period. ■ To increase ice production, lower the freezer and refrigerator temperature. The On indicator light will illuminate. The Auto indicator light will illuminate. Dispense Ice and Water WARNING Cut Hazard Use a sturdy glass...
Owners Manual
Page 12
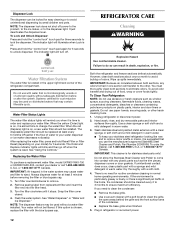
... home, the condenser should be replaced at least 2 minutes before or after the system. IMPORTANT: This cleaner is located in refrigerator or reconnect power. 12 There is microbiologically unsafe or of water to unlock dispenser. Do not use the manufacturer's approved Stainless... buildup of the condenser. ■ Replace the base grille when finished. 5. To order the cleaner, call 1-800-688-9900 U.S.A. REFRIGERATOR CARE Cleaning WARNING Explosion Hazard Use nonflammable cleaner. See "Using the Controls." Snap the filter cover closed. 4. Your water will remind you...
... home, the condenser should be replaced at least 2 minutes before or after the system. IMPORTANT: This cleaner is located in refrigerator or reconnect power. 12 There is microbiologically unsafe or of water to unlock dispenser. Do not use the manufacturer's approved Stainless... buildup of the condenser. ■ Replace the base grille when finished. 5. To order the cleaner, call 1-800-688-9900 U.S.A. REFRIGERATOR CARE Cleaning WARNING Explosion Hazard Use nonflammable cleaner. See "Using the Controls." Snap the filter cover closed. 4. Your water will remind you...
Owners Manual
Page 13
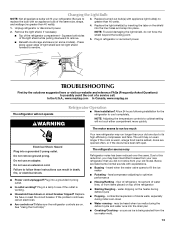
... of light shield and roll light shield forward to replace the bulb with an appliance bulb of the refrigerator compartment - In the U.S.A., www.maytag.com In Canada, www.maytag.ca The refrigerator will fit your new refrigerator that you may be heard when ice melts during defrost cycle ■ Popping - Do not remove ground prong...
... of light shield and roll light shield forward to replace the bulb with an appliance bulb of the refrigerator compartment - In the U.S.A., www.maytag.com In Canada, www.maytag.ca The refrigerator will fit your new refrigerator that you may be heard when ice melts during defrost cycle ■ Popping - Do not remove ground prong...
Owners Manual
Page 14
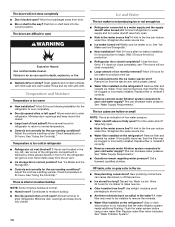
...it does not close completely, see "The doors will not close completely ■ Door blocked open . ■ Kink in refrigerator ■ Refrigerator air vent blocked? Remove filter and operate ice maker. New plumbing connections can reduce water flow. Flush the water system before using... Odor transfer from the ejector arm with a plastic utensil. ■ Water filter installed on . Replace filter or reinstall it , the refrigerator will not close completely." ■ Large amount of it correctly. ■ Reverse osmosis water filtration system connected to open ? Replace water...
...it does not close completely, see "The doors will not close completely ■ Door blocked open . ■ Kink in refrigerator ■ Refrigerator air vent blocked? Remove filter and operate ice maker. New plumbing connections can reduce water flow. Flush the water system before using... Odor transfer from the ejector arm with a plastic utensil. ■ Water filter installed on . Replace filter or reinstall it , the refrigerator will not close completely." ■ Large amount of it correctly. ■ Reverse osmosis water filtration system connected to open ? Replace water...
Owners Manual
Page 15
... hours for the water supply to 50°F (10°C). ■ New installation? Discard the first glass of water. ■ Refrigerator connected to your cold water supply? See "Water Supply Requirements." See "Water Supply Requirements." Water is warm NOTE: Water from the dispenser...water and ice dispenser will not close completely, see "The doors will not operate properly ■ Refrigerator connected to cool completely. ■ Water not been recently dispensed? Connect refrigerator to a cold water pipe. Straighten the water source line. ■ New installation? Flush and ...
... hours for the water supply to 50°F (10°C). ■ New installation? Discard the first glass of water. ■ Refrigerator connected to your cold water supply? See "Water Supply Requirements." See "Water Supply Requirements." Water is warm NOTE: Water from the dispenser...water and ice dispenser will not close completely, see "The doors will not operate properly ■ Refrigerator connected to cool completely. ■ Water not been recently dispensed? Connect refrigerator to a cold water pipe. Straighten the water source line. ■ New installation? Flush and ...

Owners Manual
Page 18
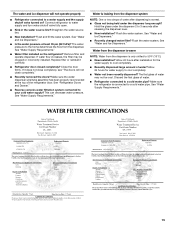
...other rights that vary from accident, alteration, misuse, abuse, fire, flood, acts of the refrigerator compartment. If outside the 50 United States and Canada, contact your authorized Maytag dealer to determine if another warranty applies. 6/08 For additional product information, in materials or ... codes, or use or when it was purchased. Pickup and delivery. Service must be easily determined. 12. Service calls to refrigerator or freezer product failures. 7. Service calls to correct house wiring or plumbing. 3. Some states and provinces do not allow limitations...
...other rights that vary from accident, alteration, misuse, abuse, fire, flood, acts of the refrigerator compartment. If outside the 50 United States and Canada, contact your authorized Maytag dealer to determine if another warranty applies. 6/08 For additional product information, in materials or ... codes, or use or when it was purchased. Pickup and delivery. Service must be easily determined. 12. Service calls to refrigerator or freezer product failures. 7. Service calls to correct house wiring or plumbing. 3. Some states and provinces do not allow limitations...
Energy Guide
Page 1
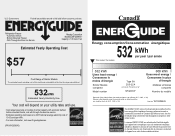
... to determine how this label before first retail purchase is an energy-efficient appliance. Canada Refrigerator-Freezer ·Automatic Defrost ·Bottom Mounted Freezer ·With Through-the-Door-Ice Service Maytag Corporation Model(s):MFI2269VE* Capacity: 21.8 Cubic Feet Estimated Yearly Operating Cost $57 Cost Range... / Ce modèle 532 kWh Uses least energy / Consomme le moins d'énergie Similar Models compared Model number Type 5A 20.5-22.4 volume in ft3/volume en pi3 MFI2269VE* 608 kWh Uses most energy / Consomme le plus d'énergie Modèles similaires compar&#...
... to determine how this label before first retail purchase is an energy-efficient appliance. Canada Refrigerator-Freezer ·Automatic Defrost ·Bottom Mounted Freezer ·With Through-the-Door-Ice Service Maytag Corporation Model(s):MFI2269VE* Capacity: 21.8 Cubic Feet Estimated Yearly Operating Cost $57 Cost Range... / Ce modèle 532 kWh Uses least energy / Consomme le moins d'énergie Similar Models compared Model number Type 5A 20.5-22.4 volume in ft3/volume en pi3 MFI2269VE* 608 kWh Uses most energy / Consomme le plus d'énergie Modèles similaires compar&#...
Warranty Information
Page 1
.... This warranty gives you specific legal rights, and you also may not apply to you on the inside wall of the refrigerator compartment. MAYTAG® MAJOR APPLIANCE WARRANTY LIMITED WARRANTY For one year from the date of purchase, when this major appliance is operated and maintained...HEREIN. Replacement parts or repair labor if this major appliance is used in the country in which it was purchased. Service calls to refrigerator or freezer product failures. 7. Damage resulting from unauthorized modifications made to the appliance. 9. Any food or medicine loss due to ...
.... This warranty gives you specific legal rights, and you also may not apply to you on the inside wall of the refrigerator compartment. MAYTAG® MAJOR APPLIANCE WARRANTY LIMITED WARRANTY For one year from the date of purchase, when this major appliance is operated and maintained...HEREIN. Replacement parts or repair labor if this major appliance is used in the country in which it was purchased. Service calls to refrigerator or freezer product failures. 7. Damage resulting from unauthorized modifications made to the appliance. 9. Any food or medicine loss due to ...
Dimension Guide
Page 1
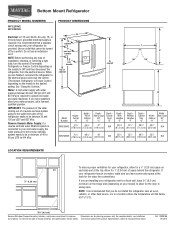
...20-amp fused, grounded electrical supply is required to change without notice. Do not use an extension cord. When you have questions about your refrigerator next to a fixed wall, leave 33⁄4" (9.5 cm) minimum on the hinge side (depending on the model) to 414 kPa). Water....7 cm) (83.5 cm) (73.8 cm) (90.5 cm) N/A LOCATION REQUIREMENTS ¹⁄₂" (1.25 cm) To ensure proper ventilation for your refrigerator be turned off by a switch. See "Using the Controls." For complete details, see Installation our products, we reserve the right to operate ice maker and...
...20-amp fused, grounded electrical supply is required to change without notice. Do not use an extension cord. When you have questions about your refrigerator next to a fixed wall, leave 33⁄4" (9.5 cm) minimum on the hinge side (depending on the model) to 414 kPa). Water....7 cm) (83.5 cm) (73.8 cm) (90.5 cm) N/A LOCATION REQUIREMENTS ¹⁄₂" (1.25 cm) To ensure proper ventilation for your refrigerator be turned off by a switch. See "Using the Controls." For complete details, see Installation our products, we reserve the right to operate ice maker and...


