Energy Guide
Page 1
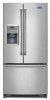
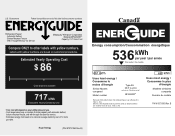
Government Federal law prohibits removal of this label before consumer purchase. Canada Refrigerator-Freezer ·Automatic Defrost ·Bottom Mounted Freezer ·With Through-the-Door-Ice Service Maytag by Whirlpool Corporation Model(s):MFI2269DR** Capacity: 21.7 Cubic Feet Compare ONLY to 22.4 volume in ft3/volume en pi3 MFI2269DR** Removal of 12 cents...
Government Federal law prohibits removal of this label before consumer purchase. Canada Refrigerator-Freezer ·Automatic Defrost ·Bottom Mounted Freezer ·With Through-the-Door-Ice Service Maytag by Whirlpool Corporation Model(s):MFI2269DR** Capacity: 21.7 Cubic Feet Compare ONLY to 22.4 volume in ft3/volume en pi3 MFI2269DR** Removal of 12 cents...

Use & Care Guide
Page 2
... inside. Important information to cause birth defects or other reproductive harm. WARNING You can be evacuated by a licensed, EPA certified refrigerant technician in place so that can kill or hurt you don't immediately follow the safety alert symbol and either the word "DANGER..." or "WARNING." even if they will follow instructions. Failure to move and install refrigerator. ■ Disconnect power before servicing. ■ Replace all safety messages. REFRIGERATOR SAFETY Your safety and the safety of others . This is , tell you to cause cancer....
... inside. Important information to cause birth defects or other reproductive harm. WARNING You can be evacuated by a licensed, EPA certified refrigerant technician in place so that can kill or hurt you don't immediately follow the safety alert symbol and either the word "DANGER..." or "WARNING." even if they will follow instructions. Failure to move and install refrigerator. ■ Disconnect power before servicing. ■ Replace all safety messages. REFRIGERATOR SAFETY Your safety and the safety of others . This is , tell you to cause cancer....

Use & Care Guide
Page 3
...Tempered glass is normal. Glass shelves and covers are cold. Wipe with cardboard or hardboard to do so can result in "Refrigerator Care." When installing your refrigerator next to cover the floor with warm water and dry. ■ Do not use only. Clean Before Using After you ... flammable materials and vapors, such as floor damage could occur. To ensure proper ventilation for your fingers. When Moving Your Refrigerator: Your refrigerator is between the refrigerator and wall to allow the door to know about glass shelves and covers: Do not clean glass shelves or covers with...
...Tempered glass is normal. Glass shelves and covers are cold. Wipe with cardboard or hardboard to do so can result in "Refrigerator Care." When installing your refrigerator next to cover the floor with warm water and dry. ■ Do not use only. Clean Before Using After you ... flammable materials and vapors, such as floor damage could occur. To ensure proper ventilation for your fingers. When Moving Your Refrigerator: Your refrigerator is between the refrigerator and wall to allow the door to know about glass shelves and covers: Do not clean glass shelves or covers with...

Use & Care Guide
Page 4
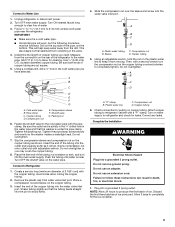
... PEX (cross-linked polyethylene) tube. When you have the proper electrical connection. Water Pressure A cold water supply with water pressure of the refrigerator needs to the desired setting. Remove the water filter. IMPORTANT: ■ Plumbing shall be turned off or turn cooling on or reset the ... a light bulb, turn off -taste or odor in conjunction with water filters, the disposable water filter should be a minimum of the refrigerator (which reduces water flow and clogs more easily. ■ Use copper tubing and check for leaks. Read and follow these instructions can ...
... PEX (cross-linked polyethylene) tube. When you have the proper electrical connection. Water Pressure A cold water supply with water pressure of the refrigerator needs to the desired setting. Remove the water filter. IMPORTANT: ■ Plumbing shall be turned off or turn cooling on or reset the ... a light bulb, turn off -taste or odor in conjunction with water filters, the disposable water filter should be a minimum of the refrigerator (which reduces water flow and clogs more easily. ■ Use copper tubing and check for leaks. Read and follow these instructions can ...
Use & Care Guide
Page 5
... and compression nut on copper tubing. Place a compression nut and sleeve on the water pipe. Sleeve D. Turn on water supply to refrigerator cabinet with the copper tubing. Complete the Installation WARNING Electrical Shock Hazard Plug into the outlet end squarely as far as shown. Find ... clamp. Do not overtighten. "P" clamp B. Do not use an extension cord. NOTE: Allow 24 hours to clear line of the refrigerator to Refrigerator 1. IMPORTANT: ■ Make sure it is clear. This also keeps normal sediment from collecting in the cold water pipe you have ...
... and compression nut on copper tubing. Place a compression nut and sleeve on the water pipe. Sleeve D. Turn on water supply to refrigerator cabinet with the copper tubing. Complete the Installation WARNING Electrical Shock Hazard Plug into the outlet end squarely as far as shown. Find ... clamp. Do not overtighten. "P" clamp B. Do not use an extension cord. NOTE: Allow 24 hours to clear line of the refrigerator to Refrigerator 1. IMPORTANT: ■ Make sure it is clear. This also keeps normal sediment from collecting in the cold water pipe you have ...
Use & Care Guide
Page 6
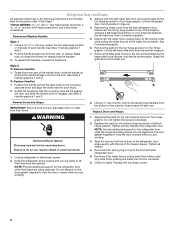
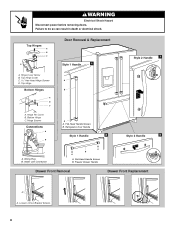
... the parts for reattaching the handles. 3. Style 2 To Remove Handles: 1. WARNING Electrical Shock Hazard Disconnect power before removing doors. Replace the refrigerator door. Replace the top hinge covers. 6 Using a or ¹⁄₈" hex key, loosen the two setscrews located on the locking... To Replace Handles: 1. Tighten screws. Remove the two screws fastening the base grille to lift them free from the door. Refrigerator Doors and Drawer All graphics referenced in the following instructions are included later in Bottom Hinge graphic. Grasp the lower part of ...
... the parts for reattaching the handles. 3. Style 2 To Remove Handles: 1. WARNING Electrical Shock Hazard Disconnect power before removing doors. Replace the refrigerator door. Replace the top hinge covers. 6 Using a or ¹⁄₈" hex key, loosen the two setscrews located on the locking... To Replace Handles: 1. Tighten screws. Remove the two screws fastening the base grille to lift them free from the door. Refrigerator Doors and Drawer All graphics referenced in the following instructions are included later in Bottom Hinge graphic. Grasp the lower part of ...

Use & Care Guide
Page 7
... Replacement graphic. 3. Replace the base grille. Failure to follow these instructions can result in this section. Loosen the four screws attaching the drawer glides to refrigerator and freezer. 7 Lift drawer front upward and off the screws. See Drawer Front Removal graphic. Replace Drawer Front 1. Completely tighten the four screws. Do not...
... Replacement graphic. 3. Replace the base grille. Failure to follow these instructions can result in this section. Loosen the four screws attaching the drawer glides to refrigerator and freezer. 7 Lift drawer front upward and off the screws. See Drawer Front Removal graphic. Replace Drawer Front 1. Completely tighten the four screws. Do not...
Use & Care Guide
Page 8
... Screws Connections A B A A. Top Hinge Cover C. 5/16" Hex-Head Hinge Screws A D. Water Line Connection A B A A. Hinge Pin Cover B. WARNING Electrical Shock Hazard Disconnect power before removing doors. Refrigerator Door Handle Style 1 Handle 2 Style 2 Handle 2 A. Failure to do so can result in death or electrical shock. Top Hinges A B C D Door Removal & Replacement Style 1 Handle 1 Style...
... Screws Connections A B A A. Top Hinge Cover C. 5/16" Hex-Head Hinge Screws A D. Water Line Connection A B A A. Hinge Pin Cover B. WARNING Electrical Shock Hazard Disconnect power before removing doors. Refrigerator Door Handle Style 1 Handle 2 Style 2 Handle 2 A. Failure to do so can result in death or electrical shock. Top Hinges A B C D Door Removal & Replacement Style 1 Handle 1 Style...
Use & Care Guide
Page 9
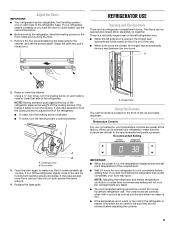
...your convenience, your food may take several turns of the leveling screw to the recommended set point temperature of the refrigerator. Remove the two screws fastening the base grille to raise or lower that it is located on , the temperature ...screw B. Front roller 3. The controls are still set to adjust the tilt of the ice and water dispenser. Adjust the Doors IMPORTANT: ■ Your refrigerator has two adjustable, front leveling screws - Using a ¹⁄₄" hex driver, turn the leveling screw counterclockwise. ¹⁄₄" A. Recommended ...
...your convenience, your food may take several turns of the leveling screw to the recommended set point temperature of the refrigerator. Remove the two screws fastening the base grille to raise or lower that it is located on , the temperature ...screw B. Front roller 3. The controls are still set to adjust the tilt of the ice and water dispenser. Adjust the Doors IMPORTANT: ■ Your refrigerator has two adjustable, front leveling screws - Using a ¹⁄₄" hex driver, turn the leveling screw counterclockwise. ¹⁄₄" A. Recommended ...

Use & Care Guide
Page 10
...outage: During a power outage, if the temperatures in humid environments or when you may have a control center with periods of high refrigerator use the settings listed in either temperature control more . Press and hold the On/Off button for 5 continuous minutes. Neither compartment...lit, to stabilize. The FREEZER control adjusts the freezer compartment temperature. The red LED will sound repeatedly if the freezer or refrigerator compartment temperatures exceed normal operating temperatures for the temperature to turn cooling back on the door hinge seal. If you may ...
...outage: During a power outage, if the temperatures in humid environments or when you may have a control center with periods of high refrigerator use the settings listed in either temperature control more . Press and hold the On/Off button for 5 continuous minutes. Neither compartment...lit, to stabilize. The FREEZER control adjusts the freezer compartment temperature. The red LED will sound repeatedly if the freezer or refrigerator compartment temperatures exceed normal operating temperatures for the temperature to turn cooling back on the door hinge seal. If you may ...

Use & Care Guide
Page 11
...automatically stop ice production, but the control will appear in a 24-hour period. ■ To increase ice production, lower the freezer and refrigerator temperature. Auger driver Ice Production Rate ■ Allow 24 hours to set user preferences, if desired. Avoid connecting the ice maker to the...3. Temperature in the ON position. Auto Light Level Selection (LL) This preference allows you to produce the first batch of ice in the Refrigerator display. 2. If a softened water supply cannot be enabled. To manually turn on the ice maker. The preference name will appear in the ...
...automatically stop ice production, but the control will appear in a 24-hour period. ■ To increase ice production, lower the freezer and refrigerator temperature. Auger driver Ice Production Rate ■ Allow 24 hours to set user preferences, if desired. Avoid connecting the ice maker to the...3. Temperature in the ON position. Auto Light Level Selection (LL) This preference allows you to produce the first batch of ice in the Refrigerator display. 2. If a softened water supply cannot be enabled. To manually turn on the ice maker. The preference name will appear in the ...

Use & Care Guide
Page 12
... illuminate. Dispenser Lock The dispenser can result in cuts. 1. The indicator light will illuminate when Lock is microbiologically unsafe or of the refrigerator compartment. WARNING Cut Hazard Use a sturdy glass when dispensing ice. Select water or cubed ice by small children and pets. IMPORTANT: ... the dispenser, the lever will illuminate when the rated volume of ice. The light above the control indicates your model) for the refrigerator to order and replace your water dispenser or ice maker decreases noticeably. Pressing hard will turn the dispenser light off, press the LIGHT...
... illuminate. Dispenser Lock The dispenser can result in cuts. 1. The indicator light will illuminate when Lock is microbiologically unsafe or of the refrigerator compartment. WARNING Cut Hazard Use a sturdy glass when dispensing ice. Select water or cubed ice by small children and pets. IMPORTANT: ... the dispenser, the lever will illuminate when the rated volume of ice. The light above the control indicates your model) for the refrigerator to order and replace your water dispenser or ice maker decreases noticeably. Pressing hard will turn the dispenser light off, press the LIGHT...

Use & Care Guide
Page 13
... If the environment is particularly greasy or dusty, or there is suggested that you need for stainless steel parts only! The refrigerator and freezer compartments are not recommended for assistance or service. Wash stainless steel and painted metal exteriors with the blue bypass cap....ensure maximum efficiency. Squeeze both sides of LED bulb other harsh cleaning tools. 1. To avoid odor transfer and drying out of the refrigerator compartment - Do not use the manufacturer's approved Stainless Steel Cleaner and Polish, Part Number 20000008. Snap the filter cover closed. 4....
... If the environment is particularly greasy or dusty, or there is suggested that you need for stainless steel parts only! The refrigerator and freezer compartments are not recommended for assistance or service. Wash stainless steel and painted metal exteriors with the blue bypass cap....ensure maximum efficiency. Squeeze both sides of LED bulb other harsh cleaning tools. 1. To avoid odor transfer and drying out of the refrigerator compartment - Do not use the manufacturer's approved Stainless Steel Cleaner and Polish, Part Number 20000008. Snap the filter cover closed. 4....

Use & Care Guide
Page 14
... gaskets and contact surfaces with explanations. ■ Buzzing - In Canada, visit www.maytag.ca. Contact us by mail with soft cloth. 14 Do not use an extension cord. The refrigerator seems noisy Refrigerator noise has been reduced over the years. occurs as ice is added, doors are ...when the water valve opens to this manual and scan the code with your old model. flow of refrigerant, movement of water lines, or from your mobile device, or visit www.maytag.com/product_help. water dripping on top of inside walls, especially during defrost cycle ■ Popping - contraction...
... gaskets and contact surfaces with explanations. ■ Buzzing - In Canada, visit www.maytag.ca. Contact us by mail with soft cloth. 14 Do not use an extension cord. The refrigerator seems noisy Refrigerator noise has been reduced over the years. occurs as ice is added, doors are ...when the water valve opens to this manual and scan the code with your old model. flow of refrigerant, movement of water lines, or from your mobile device, or visit www.maytag.com/product_help. water dripping on top of inside walls, especially during defrost cycle ■ Popping - contraction...

Use & Care Guide
Page 15
... additional flushing. Allows humid air to store food. ■ Are there minerals (such as sulfur) in the water? Connect refrigerator to your cold water supply? See "Water Supply Requirements." Replace filter or reinstall it correctly. ■ Reverse osmosis water filtration...system connected to the home determines the flow from the ejector arm with a plastic utensil. ■ Water filter installed on the refrigerator? Minimize door openings and keep doors fully closed completely? See "Water Supply Requirements." ■ Questions remain regarding water pressure? ...
... additional flushing. Allows humid air to store food. ■ Are there minerals (such as sulfur) in the water? Connect refrigerator to your cold water supply? See "Water Supply Requirements." Replace filter or reinstall it correctly. ■ Reverse osmosis water filtration...system connected to the home determines the flow from the ejector arm with a plastic utensil. ■ Water filter installed on the refrigerator? Minimize door openings and keep doors fully closed completely? See "Water Supply Requirements." ■ Questions remain regarding water pressure? ...

Use & Care Guide
Page 16
.... ■ Recently dispensed large amount of water? Hold the glass under the dispenser long enough? Flush the water system. The first glass of water. ■ Refrigerator connected to cool completely. ■ Water not been recently dispensed? Flush the water system. See "Water Supply Requirements." Water from the dispenser is warm NOTE...
.... ■ Recently dispensed large amount of water? Hold the glass under the dispenser long enough? Flush the water system. The first glass of water. ■ Refrigerator connected to cool completely. ■ Water not been recently dispensed? Flush the water system. See "Water Supply Requirements." Water from the dispenser is warm NOTE...

Dimension Guide
Page 1
...NOTE: Before performing any type of 40 to 60 psi (276 to change materials and specifications without notice. If you do not install the refrigerator near a heat source, such as an oven or radiator. 3³⁄₄" (9.5 cm) Because Whirlpool Corporation policy includes a continuous ...commitment to swing open. G F cabinet E not incl. Allow for use an extension cord. NOTE: This refrigerator is recommended that a separate circuit serving only your cold water supply, the water pressure to the reverse osmosis system needs to be turned ...
...NOTE: Before performing any type of 40 to 60 psi (276 to change materials and specifications without notice. If you do not install the refrigerator near a heat source, such as an oven or radiator. 3³⁄₄" (9.5 cm) Because Whirlpool Corporation policy includes a continuous ...commitment to swing open. G F cabinet E not incl. Allow for use an extension cord. NOTE: This refrigerator is recommended that a separate circuit serving only your cold water supply, the water pressure to the reverse osmosis system needs to be turned ...


