Use and Care Manual
Page 2
... receptacle. CAUTION CAUTION - Hazards or unsafe practices which WILL result in severe personal injury or death. Junked or abandoned refrigerators are not problems of your refrigerator. If you throw away your protection against possible electrical shock hazards. Where a standard two-prong wall receptacle is encountered,...provides the proper use an adapter plug. DANGER To reduce risk of injury or death, follow the instructions below for your old refrigerator or freezer: • Take off the doors. • Leave the shelves in this guide are getting rid of the past. This ...
... receptacle. CAUTION CAUTION - Hazards or unsafe practices which WILL result in severe personal injury or death. Junked or abandoned refrigerators are not problems of your refrigerator. If you throw away your protection against possible electrical shock hazards. Where a standard two-prong wall receptacle is encountered,...provides the proper use an adapter plug. DANGER To reduce risk of injury or death, follow the instructions below for your old refrigerator or freezer: • Take off the doors. • Leave the shelves in this guide are getting rid of the past. This ...

Use and Care Manual
Page 3
...to operate on a separate 115 volt, 15 amp., 60 cycle line. 8. Do not remove warning tag from electrical supply before using your refrigerator in refrigerator. 18. Have worn power cords and/or loose plugs replaced by grasping the plug, not the cord. 1. SAVE THESE INSTRUCTIONS 2 Disconnect... spills or water leakage associated with local codes and be operated in Use and Care Guide or published user-repair instructions. Check with refrigerator controls. 12. Do not tamper with a qualified electrician if you are beyond personal skill level. 14. If damage occurs, have ...
...to operate on a separate 115 volt, 15 amp., 60 cycle line. 8. Do not remove warning tag from electrical supply before using your refrigerator in refrigerator. 18. Have worn power cords and/or loose plugs replaced by grasping the plug, not the cord. 1. SAVE THESE INSTRUCTIONS 2 Disconnect... spills or water leakage associated with local codes and be operated in Use and Care Guide or published user-repair instructions. Check with refrigerator controls. 12. Do not tamper with a qualified electrician if you are beyond personal skill level. 14. If damage occurs, have ...

Use and Care Manual
Page 4
... less frequently when you are preset at the factory at 38° F (3° C) in the refrigerator compartment and 0° F (-18° C) in the refrigerator and freezer compartments. B Light Sensor Senses light level within the room. Press and hold pad for Continuous or three... more information on controls. 3 To activate: press the pad once. To activate: press until green light turns off . Use to control the temperature in the freezer compartment. To deactivate: press pad again. Quick Reference Guide A B C K D J E F H I Light J Max Cool K Vacation Mode Use to ...
... less frequently when you are preset at the factory at 38° F (3° C) in the refrigerator compartment and 0° F (-18° C) in the refrigerator and freezer compartments. B Light Sensor Senses light level within the room. Press and hold pad for Continuous or three... more information on controls. 3 To activate: press the pad once. To activate: press until green light turns off . Use to control the temperature in the freezer compartment. To deactivate: press pad again. Quick Reference Guide A B C K D J E F H I Light J Max Cool K Vacation Mode Use to ...

Use and Care Manual
Page 5
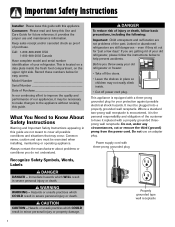
...the toe grille mounting clips with straps or bungee cords. Measuring the Opening When installing your opening smaller than back of refrigerator and that the refrigerator is level from damage, observe the following: • Protect vinyl or other flooring with cabinet material (contact a ...position is completely covered, use power tools when performing leveling procedure. Do not over-tighten. Leveling To enhance the appearance and maintain performance, the refrigerator should be leveled per instructions below 55° F (13° C) or rises above 110° F (43° C). AB BA...
...the toe grille mounting clips with straps or bungee cords. Measuring the Opening When installing your opening smaller than back of refrigerator and that the refrigerator is level from damage, observe the following: • Protect vinyl or other flooring with cabinet material (contact a ...position is completely covered, use power tools when performing leveling procedure. Do not over-tighten. Leveling To enhance the appearance and maintain performance, the refrigerator should be leveled per instructions below 55° F (13° C) or rises above 110° F (43° C). AB BA...

Use and Care Manual
Page 6
... Phillips screws to walls and flooring, protect vinyl or other flooring with top hinge, from center hinge pin on top left side refrigerator door, along with cardboard, rugs or other protective material. Remove both stabilizing brackets with a flat blade screwdriver or fingernail. 8. ...and retain for 24 hours. Disconnect waterline. Installation Door and Drawer Removal Some installations require door/drawer removal to transport the refrigerator to remove hinge; WARNING To avoid electrical shock which can cause severe personal injury or death, observe the following: •...
... Phillips screws to walls and flooring, protect vinyl or other flooring with top hinge, from center hinge pin on top left side refrigerator door, along with cardboard, rugs or other protective material. Remove both stabilizing brackets with a flat blade screwdriver or fingernail. 8. ...and retain for 24 hours. Disconnect waterline. Installation Door and Drawer Removal Some installations require door/drawer removal to transport the refrigerator to remove hinge; WARNING To avoid electrical shock which can cause severe personal injury or death, observe the following: •...

Use and Care Manual
Page 7
...16" hex head driver. 4. Ensure the connection does not leak before removing doors. Move drawer slides fully forward. 6. While holding refrigerator door upright, tighten down top hinge with 5⁄16" hex head screws. 3. Slide the black locking collar fully forward. 7. CAUTION... side of drawer front to refrigerator before installing the upper hinge cover. 10. To Remove: 6. Lift out lower drawer assembly. 6 After replacing doors, connect power. A "click" is heard ensuring Tabs waterlines are correctly locked in place. Slide freezer bins forward and Connector lift ...
...16" hex head driver. 4. Ensure the connection does not leak before removing doors. Move drawer slides fully forward. 6. While holding refrigerator door upright, tighten down top hinge with 5⁄16" hex head screws. 3. Slide the black locking collar fully forward. 7. CAUTION... side of drawer front to refrigerator before installing the upper hinge cover. 10. To Remove: 6. Lift out lower drawer assembly. 6 After replacing doors, connect power. A "click" is heard ensuring Tabs waterlines are correctly locked in place. Slide freezer bins forward and Connector lift ...

Use and Care Manual
Page 8
...lower drawer assembly with the door studs. Install the lower assembly by aligning hooks of the drawer slides. 3. Align the large square notches on freezer drawer. 6. Grasp the handle firmly and slide down on inside of the fresh food compartment or attached to full extension. 2. Replace and ...that were removed from the surface. Handles Note: If not installed, the handle is flat against the door. 5. Pull both ends of your refrigerator. Lower door front into slots located on both rails out to the back of the handle. 4. Note: All four drawer bracket supports must be...
...lower drawer assembly with the door studs. Install the lower assembly by aligning hooks of the drawer slides. 3. Align the large square notches on freezer drawer. 6. Grasp the handle firmly and slide down on inside of the fresh food compartment or attached to full extension. 2. Replace and ...that were removed from the surface. Handles Note: If not installed, the handle is flat against the door. 5. Pull both ends of your refrigerator. Lower door front into slots located on both rails out to the back of the handle. 4. Note: All four drawer bracket supports must be...
Use and Care Manual
Page 9
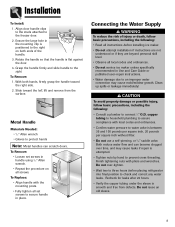
...to the right. With both ends of injury or death, follow basic precautions, including the following : • Read all instructions before placing refrigerator into final position to check and correct any water leaks. To Replace: • Align handle with the mounting posts. • Fully ...Care Guide or published user-repair instructions. • Water damage due to prevent cross threading. Grasp the handle firmly and slide handle to the freezer door. 2. Metal Handle Materials Needed: • 3⁄32" Allen wrench • Gloves to connect 1⁄4" O.D. Connecting the Water Supply...
...to the right. With both ends of injury or death, follow basic precautions, including the following : • Read all instructions before placing refrigerator into final position to check and correct any water leaks. To Replace: • Align handle with the mounting posts. • Fully ...Care Guide or published user-repair instructions. • Water damage due to prevent cross threading. Grasp the handle firmly and slide handle to the freezer door. 2. Metal Handle Materials Needed: • 3⁄32" Allen wrench • Gloves to connect 1⁄4" O.D. Connecting the Water Supply...

Use and Care Manual
Page 10
... (2) • 1⁄4" hex nut driver Notes: • Use copper tubing only for two to three hours prior to moving the refrigerator to confirm connection is out of service loop. 1. Important: Do not over sleeve and screw nut into water supply line before closing .... Opening and Closing Your Fresh Food Doors Your new refrigerator is uniquely designed with copper tubing (minimum 2' diameter). Connect tubing to remove the vertical hinged section from water supply connection. 6. ...
... (2) • 1⁄4" hex nut driver Notes: • Use copper tubing only for two to three hours prior to moving the refrigerator to confirm connection is out of service loop. 1. Important: Do not over sleeve and screw nut into water supply line before closing .... Opening and Closing Your Fresh Food Doors Your new refrigerator is uniquely designed with copper tubing (minimum 2' diameter). Connect tubing to remove the vertical hinged section from water supply connection. 6. ...

Use and Care Manual
Page 11
... on. To deactivate, press the Vacation Mode pad again OR open either the freezer or refrigerator section to next lower number by pressing the pad. Temperature Control Guide Refrigerator Set the refrigerator control to stabilize for lighting the dispenser - The light feature is activated. Vacation...again. To Deactivate Auto or Continuous Light: Press the Light pad a third time. Refrigerator too warm Set the refrigerator control to normal operating mode. 10 Press the in the freezer compartment. After replacing the filter, press and hold the Reset Filter pad for three ...
... on. To deactivate, press the Vacation Mode pad again OR open either the freezer or refrigerator section to next lower number by pressing the pad. Temperature Control Guide Refrigerator Set the refrigerator control to stabilize for lighting the dispenser - The light feature is activated. Vacation...again. To Deactivate Auto or Continuous Light: Press the Light pad a third time. Refrigerator too warm Set the refrigerator control to normal operating mode. 10 Press the in the freezer compartment. After replacing the filter, press and hold the Reset Filter pad for three ...

Use and Care Manual
Page 12
... is automatically activated and the indicator light illuminates. Door Alarm The Door Alarm feature will alert you if the freezer or refrigerator temperatures exceed normal operating temperatures due to show the current compartment temperatures and the highest compartment temperatures reached when the.... To Deactivate: Press and hold the Door Alarm pad for three seconds. An Audible Alarm will sound repeatedly if the freezer or refrigerator temperatures have stabilized. This feature provides the ability to change the status. 3. Using the Controls Notes: • Door openings...
... is automatically activated and the indicator light illuminates. Door Alarm The Door Alarm feature will alert you if the freezer or refrigerator temperatures exceed normal operating temperatures due to show the current compartment temperatures and the highest compartment temperatures reached when the.... To Deactivate: Press and hold the Door Alarm pad for three seconds. An Audible Alarm will sound repeatedly if the freezer or refrigerator temperatures have stabilized. This feature provides the ability to change the status. 3. Using the Controls Notes: • Door openings...

Use and Care Manual
Page 13
...should be more than five minutes, an automatic lock out sensor will remain in dispenser tray. Removable Tray The removable tray at the bottom of the ice storage bin to reduce spraying. To Dispense Ice and Water: • Select Water or Cube ice mode by pushing... right of the dispenser area is locked. A green indicator light above the button will not activate during hot weather and after initially connecting refrigerator to stop water dispensing. Press the switch on , all keypad functions. See Dispenser Lock/Unlock for three seconds. Automatic Ice Maker Connect...
...should be more than five minutes, an automatic lock out sensor will remain in dispenser tray. Removable Tray The removable tray at the bottom of the ice storage bin to reduce spraying. To Dispense Ice and Water: • Select Water or Cube ice mode by pushing... right of the dispenser area is locked. A green indicator light above the button will not activate during hot weather and after initially connecting refrigerator to stop water dispensing. Press the switch on , all keypad functions. See Dispenser Lock/Unlock for three seconds. Automatic Ice Maker Connect...

Use and Care Manual
Page 14
...C), ice maker fills with the left fresh food door opened at the ends. Removing ice storage bin while ON could result in place. • After freezer section reaches between 0° to 2° F (-18° to health. An audible "click" is heard when the ice bin is in ice...continue to prevent mold/mildew growth. • Do not dispense ice directly into guide rails located on the automatic ice making mechanism while the refrigerator is felt. Slide bin into thin glass, fine china or delicate crystal. 13 WARNING To avoid personal injury or property damage, observe the ...
...C), ice maker fills with the left fresh food door opened at the ends. Removing ice storage bin while ON could result in place. • After freezer section reaches between 0° to 2° F (-18° to health. An audible "click" is heard when the ice bin is in ice...continue to prevent mold/mildew growth. • Do not dispense ice directly into guide rails located on the automatic ice making mechanism while the refrigerator is felt. Slide bin into thin glass, fine china or delicate crystal. 13 WARNING To avoid personal injury or property damage, observe the ...

Use and Care Manual
Page 15
..., steps 2 and 3. Turn filter counterclockwise until filter stops. Water Filter Water Filter Removal and Installation WARNING To avoid serious illness or death, do not use refrigerator where water is unsafe or of unknown quality without a water filter cartridge. If you choose this certificate have replacement cartridge available when filter change filter...
..., steps 2 and 3. Turn filter counterclockwise until filter stops. Water Filter Water Filter Removal and Installation WARNING To avoid serious illness or death, do not use refrigerator where water is unsafe or of unknown quality without a water filter cartridge. If you choose this certificate have replacement cartridge available when filter change filter...

Use and Care Manual
Page 16
... mg/L 0.081 mg/L 0.208 mg/L 0.002 mg/L 0.015 mg/L Effluent Average Maximum 0.31 NTU .049 NTU Water Filter System Specification and Performance Data Sheet TM Refrigerator Water Filter Cartridge Model UKF8001AXX Specifications Service Flow Rate (Maximum 0.78 GPM (2.9 L/min) Rated Service Life UKF8001AXX-750 (Maximum) ......750 gallons /2838 liters Maximum Operating...
... mg/L 0.081 mg/L 0.208 mg/L 0.002 mg/L 0.015 mg/L Effluent Average Maximum 0.31 NTU .049 NTU Water Filter System Specification and Performance Data Sheet TM Refrigerator Water Filter Cartridge Model UKF8001AXX Specifications Service Flow Rate (Maximum 0.78 GPM (2.9 L/min) Rated Service Life UKF8001AXX-750 (Maximum) ......750 gallons /2838 liters Maximum Operating...

Use and Care Manual
Page 17
... Frame Assembly: • Reverse the removal procedure. Be sure the shelf is pushed to sudden temperature change. Spill-CatcherTM Glass Shelves Your refrigerator has Spill-CatcherTM glass shelves. The shelves have a spill retainer edge which allows for easier clean up the front and pull the shelf straight... to return to the original position. To Remove a Shelf: • Slightly tilt up the front and lift up the front edge of the refrigerator compartment. To Slide Out EasyGlide™ Shelf: • Grasp the front of the shelf, then pull the shelf straight out. Shelves may vary...
... Frame Assembly: • Reverse the removal procedure. Be sure the shelf is pushed to sudden temperature change. Spill-CatcherTM Glass Shelves Your refrigerator has Spill-CatcherTM glass shelves. The shelves have a spill retainer edge which allows for easier clean up the front and pull the shelf straight... to return to the original position. To Remove a Shelf: • Slightly tilt up the front and lift up the front edge of the refrigerator compartment. To Slide Out EasyGlide™ Shelf: • Grasp the front of the shelf, then pull the shelf straight out. Shelves may vary...

Use and Care Manual
Page 20
... will develop on their cartons for longer time periods (see page 17). • Sort fruits and vegetables before use . Frozen Food Storage • The freezer compartment of a refrigerator should be wrapped securely so leakage and contamination of other foods. • While vegetables need a certain amount of frozen foods. • Leave space between...
... will develop on their cartons for longer time periods (see page 17). • Sort fruits and vegetables before use . Frozen Food Storage • The freezer compartment of a refrigerator should be wrapped securely so leakage and contamination of other foods. • While vegetables need a certain amount of frozen foods. • Leave space between...

Use and Care Manual
Page 21
..., plums, avocados 3 to 4 days Not recommended Ripen at 60° to 70° F (16° to 21° C). If refrigerated, store uncovered. Cut off any mold. Food Storage Tips Food Storage Chart Storage times are approximate and may vary depending on type of packaging, storage... temperature, and the quality of yolks to be frozen, add 1 tsp. FOODS REFRIGERATOR FREEZER STORAGE TIPS DAIRY PRODUCTS Butter Milk and cream 1 month 1 week Store in original carton. Check carton date. Citrus fruits 1 to 2 ...
..., plums, avocados 3 to 4 days Not recommended Ripen at 60° to 70° F (16° to 21° C). If refrigerated, store uncovered. Cut off any mold. Food Storage Tips Food Storage Chart Storage times are approximate and may vary depending on type of packaging, storage... temperature, and the quality of yolks to be frozen, add 1 tsp. FOODS REFRIGERATOR FREEZER STORAGE TIPS DAIRY PRODUCTS Butter Milk and cream 1 month 1 week Store in original carton. Check carton date. Citrus fruits 1 to 2 ...

Use and Care Manual
Page 22
...months Place in Crisper Drawer Asparagus 1 to 2 days 8 to two weeks in the meat and cheese drawer. Food Storage Tips FOODS REFRIGERATOR FREEZER STORAGE TIPS VEGETABLES Store in the meat and cheese drawer. Leave peas in the meat and cheese drawer. When freezing longer than two ...weeks, overwrap with freezer wrap. Place in pods. Wrap odorous foods and refrigerate in the crisper. Brussels sprouts, broccoli, cauliflower, green peas, lima beans, onions, peppers 3 to 5 days...
...months Place in Crisper Drawer Asparagus 1 to 2 days 8 to two weeks in the meat and cheese drawer. Food Storage Tips FOODS REFRIGERATOR FREEZER STORAGE TIPS VEGETABLES Store in the meat and cheese drawer. Leave peas in the meat and cheese drawer. When freezing longer than two ...weeks, overwrap with freezer wrap. Place in pods. Wrap odorous foods and refrigerate in the crisper. Brussels sprouts, broccoli, cauliflower, green peas, lima beans, onions, peppers 3 to 5 days...
Use and Care Manual
Page 23
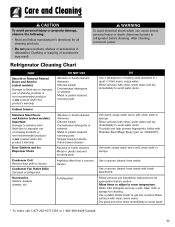
...soft, clean cloth or sponge. Rinse surfaces with brush attachment. Dry glass and clear items immediately to access. Cracking or warping of refrigerator. WARNING To avoid electrical shock which can cause severe personal injury or death, disconnect power to room temperature. Use a vacuum cleaner hose... nozzle with clean, warm water and dry immediately to avoid water spots. Allow items to adjust to refrigerator before cleaning. Use a plastic bristle brush to improper use a soft, clean cloth or sponge for all cleaning products. • Do ...
...soft, clean cloth or sponge. Rinse surfaces with brush attachment. Dry glass and clear items immediately to access. Cracking or warping of refrigerator. WARNING To avoid electrical shock which can cause severe personal injury or death, disconnect power to room temperature. Use a vacuum cleaner hose... nozzle with clean, warm water and dry immediately to avoid water spots. Allow items to adjust to refrigerator before cleaning. Use a plastic bristle brush to improper use a soft, clean cloth or sponge for all cleaning products. • Do ...


