Dimensions
Page 1
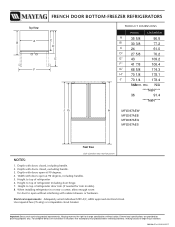
.... 4. Height to top of refrigerator including door hinge. 7. Height to top of continuing product improvements, Maytag reserves the right to open at 90 degrees, including handles. 5. Electrical requirements: Adequately wired individual 120V A/C, 60Hz approved electrical circuit. Important:Because of refrigerator 6. Depth with doors closed ,...70.2 109.2 106.4 174.3 178.1 J7 70 1/4 178.4 NM/AODEL SKUs N/A ****NaN**** 36 91.4 ****NaN**** JG H MFI2067AEW MFI2067AEB MFI2067AEQ MFI2067AES Front View Style of refrigerator door trim (if needed for planning purposes only.
.... 4. Height to top of refrigerator including door hinge. 7. Height to top of continuing product improvements, Maytag reserves the right to open at 90 degrees, including handles. 5. Electrical requirements: Adequately wired individual 120V A/C, 60Hz approved electrical circuit. Important:Because of refrigerator 6. Depth with doors closed ,...70.2 109.2 106.4 174.3 178.1 J7 70 1/4 178.4 NM/AODEL SKUs N/A ****NaN**** 36 91.4 ****NaN**** JG H MFI2067AEW MFI2067AEB MFI2067AEQ MFI2067AES Front View Style of refrigerator door trim (if needed for planning purposes only.
User Instructions
Page 1
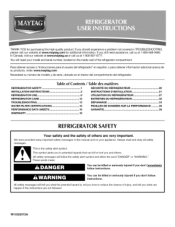
... or seriously injured if you to reduce the chance of others . In Canada, visit our website at www.maytag.ca or call us at 1-800-688-9900. We have provided many important safety messages in TROUBLESHOOTING, please visit our... THANK YOU for additional information. Table of Contents / Table des mati res REFRIGERATOR SAFETY 1 INSTALLATION INSTRUCTIONS 2 REFRIGERATOR USE 8 REFRIGERATOR CARE 12 TROUBLESHOOTING 13 WATER FILTER CERTIFICATIONS 15 SI_CURITI_ DU RI_FRIGI_RATEUR 20 INSTRUCTIONS D'INSTALLATION 21 UTILISATION DU RI:!:FRIGI:!:RATEUR 27 ENTRETIEN DU REFRIGERATEUR 32 ...
... or seriously injured if you to reduce the chance of others . In Canada, visit our website at www.maytag.ca or call us at 1-800-688-9900. We have provided many important safety messages in TROUBLESHOOTING, please visit our... THANK YOU for additional information. Table of Contents / Table des mati res REFRIGERATOR SAFETY 1 INSTALLATION INSTRUCTIONS 2 REFRIGERATOR USE 8 REFRIGERATOR CARE 12 TROUBLESHOOTING 13 WATER FILTER CERTIFICATIONS 15 SI_CURITI_ DU RI_FRIGI_RATEUR 20 INSTRUCTIONS D'INSTALLATION 21 UTILISATION DU RI:!:FRIGI:!:RATEUR 27 ENTRETIEN DU REFRIGERATEUR 32 ...
User Instructions
Page 2
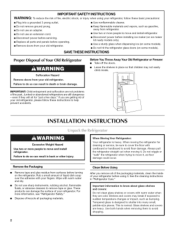
...is designed to avoid floor damage. IMPORTANT: Child entrapment and suffocation are cold. Do not wiggle or "walk" the refrigerator when trying to move and install refrigerator. • Disconnect power before servicing. • Replace all parts and panels before turning on some models). •... • Remove tape and glue residue from surfaces before operating. • Remove doors from your old refrigerator. Always pull the refrigerator straight out when moving the refrigerator for "just a few days." This is heavy. For more people to cover the floor with warm ...
...is designed to avoid floor damage. IMPORTANT: Child entrapment and suffocation are cold. Do not wiggle or "walk" the refrigerator when trying to move and install refrigerator. • Disconnect power before servicing. • Replace all parts and panels before turning on some models). •... • Remove tape and glue residue from surfaces before operating. • Remove doors from your old refrigerator. Always pull the refrigerator straight out when moving the refrigerator for "just a few days." This is heavy. For more people to cover the floor with warm ...
User Instructions
Page 3
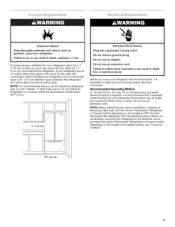
...fixed wall, leave a 33/4'' (9.5 cm) minimum space between the refrigerator and wall to the desired setting. Do not use an extension cord. or 20-amp fused, grounded electrical supply is important to make sure you move your refrigerator has an ice maker, allow extra space at the back for a... 1/2" (1.25 cm) of installation, cleaning, or removing a light bulb, turn the control (Thermostat, Refrigerator or Freezer Control...
...fixed wall, leave a 33/4'' (9.5 cm) minimum space between the refrigerator and wall to the desired setting. Do not use an extension cord. or 20-amp fused, grounded electrical supply is important to make sure you move your refrigerator has an ice maker, allow extra space at the back for a... 1/2" (1.25 cm) of installation, cleaning, or removing a light bulb, turn the control (Thermostat, Refrigerator or Freezer Control...
User Instructions
Page 4
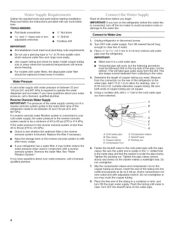
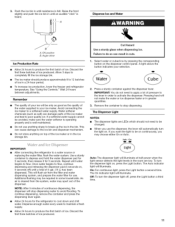
...water line is less than 40 to 60 psi (276 to 414 kPa): • Check to 31.8 mm) vertical cold water pipe near the refrigerator. Turn OFF main water supply. IM PO RTANT: • Make sure it is connected to clear line of copper tubing you need. This ...a reverse osmosis system. Measure from the connection on the copper tubing as it may crush the copper tubing. 8. B C D E F G A. Insert the end of the refrigerator to allow for leaks. If you have questions about your water pressure, call a licensed, qualified plumber. This will remain above freezing. • For models with...
...water line is less than 40 to 60 psi (276 to 414 kPa): • Check to 31.8 mm) vertical cold water pipe near the refrigerator. Turn OFF main water supply. IM PO RTANT: • Make sure it is connected to clear line of copper tubing you need. This ...a reverse osmosis system. Measure from the connection on the copper tubing as it may crush the copper tubing. 8. B C D E F G A. Insert the end of the refrigerator to allow for leaks. If you have questions about your water pressure, call a licensed, qualified plumber. This will remain above freezing. • For models with...
User Instructions
Page 5
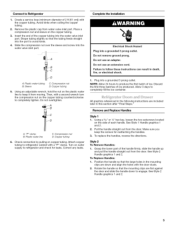
...Compression nut D. Compression nut D. Complete the Installation Electrical Shock Hazard Plug into the water valve inlet port. Allow 3 days to refrigerator cabinet with a second wrench turn the compression nut on water supply to keep the screws for leaks. Pull the handle straight out...straight into a grounded 3 prong outlet. Using a 3/32"or V8" hex key, loosen the two setscrews located on the plastic water line to refrigerator and check for reattaching the handles. 3. Place a compression nut and sleeve on copper tubing. Copper tubing 5. r- Then, with a "P" clamp...
...Compression nut D. Compression nut D. Complete the Installation Electrical Shock Hazard Plug into the water valve inlet port. Allow 3 days to refrigerator cabinet with a second wrench turn the compression nut on water supply to keep the screws for leaks. Pull the handle straight out...straight into a grounded 3 prong outlet. Using a 3/32"or V8" hex key, loosen the two setscrews located on the plastic water line to refrigerator and check for reattaching the handles. 3. Place a compression nut and sleeve on copper tubing. Copper tubing 5. r- Then, with a "P" clamp...
User Instructions
Page 6
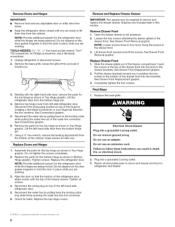
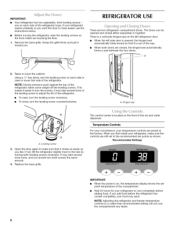
... by pulling back on the door gasket magnets to lift them free from the bottom of the left-hand side refrigerator door. 5. Check for the refrigerator door while the hinges are working . 3. Remove Drawer Front 1. See Drawer Front Removal graphic. Pull the drawer... are working . Electrical Shock Hazard Plug into a grounded 3 prong outlet. 3. Do not use an extension cord. Return all screws. 4. Keep the refrigerator doors closed until you are being removed. TOOLS NEEDED: 8/le", 3/8",1/4"hex-head socket wrench, Torx _t T20 screwdriver, #2 Phillips screwdriver, and a flat...
... by pulling back on the door gasket magnets to lift them free from the bottom of the left-hand side refrigerator door. 5. Check for the refrigerator door while the hinges are working . 3. Remove Drawer Front 1. See Drawer Front Removal graphic. Pull the drawer... are working . Electrical Shock Hazard Plug into a grounded 3 prong outlet. 3. Do not use an extension cord. Return all screws. 4. Keep the refrigerator doors closed until you are being removed. TOOLS NEEDED: 8/le", 3/8",1/4"hex-head socket wrench, Torx _t T20 screwdriver, #2 Phillips screwdriver, and a flat...
User Instructions
Page 8
...forms a seal between the two doors. Grasp the grille firmly and pull it easier to close easier, use the instructions below. • Before moving the refrigerator, raise the leveling screws so the front rollers are touching the floor. 1. A 2= Raise or lower the cabinet. This makes it toward you want the... hinged seal automatically folds inward so that it is located on , the temperature display shows the set to raise or lower that side of the refrigerator. • To raise, turn the leveling screw clockwise. • To lower, turn the leveling screw on each side of the ice and water ...
...forms a seal between the two doors. Grasp the grille firmly and pull it easier to close easier, use the instructions below. • Before moving the refrigerator, raise the leveling screws so the front rollers are touching the floor. 1. A 2= Raise or lower the cabinet. This makes it toward you want the... hinged seal automatically folds inward so that it is located on , the temperature display shows the set to raise or lower that side of the refrigerator. • To raise, turn the leveling screw clockwise. • To lower, turn the leveling screw on each side of the ice and water ...
User Instructions
Page 9
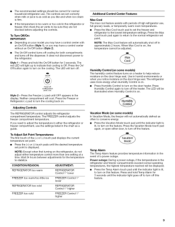
...Alarm touch pad until OFF appears in approximately 2 hours. o Temp Alarm The Temp Alarm feature provides temperature information in the refrigerator and freezer compartments exceed normal operating temperatures, the highest temperature reached will be adjusted. The controls are not blocked before adjusting the...on the cooling. Press and hold Temp Alarm for the temperature to turn off the dispenser. Adjusting Controls The REFRIGERATOR control adjusts the refrigerator compartment temperature. Power outage: During a power outage, if the temperatures in the event of the (+) or (-)...
...Alarm touch pad until OFF appears in approximately 2 hours. o Temp Alarm The Temp Alarm feature provides temperature information in the refrigerator and freezer compartments exceed normal operating temperatures, the highest temperature reached will be adjusted. The controls are not blocked before adjusting the...on the cooling. Press and hold Temp Alarm for the temperature to turn off the dispenser. Adjusting Controls The REFRIGERATOR control adjusts the refrigerator compartment temperature. Power outage: During a power outage, if the temperatures in the event of the (+) or (-)...
User Instructions
Page 10
... The preference name will appear in the moisture-sealed crisper. Door Alarm The Door Alarm feature sounds a chime every few seconds when the refrigerator door has been left open ) for best storage of all lights. 10 You can control the amount of fresh, leafy vegetables. OFF... display. Pull the storage bin out until the door is closed ) for 3 seconds to restore all alarms. ON - Temperature in the Refrigerator display. 2. Auto Light Level Selection (LL) This preference allows you to brightest (settings 1 through the preference names. Temperature in the upper...
... The preference name will appear in the moisture-sealed crisper. Door Alarm The Door Alarm feature sounds a chime every few seconds when the refrigerator door has been left open ) for best storage of all lights. 10 You can control the amount of fresh, leafy vegetables. OFF... display. Pull the storage bin out until the door is closed ) for 3 seconds to restore all alarms. ON - Temperature in the Refrigerator display. 2. Auto Light Level Selection (LL) This preference allows you to brightest (settings 1 through the preference names. Temperature in the upper...
User Instructions
Page 11
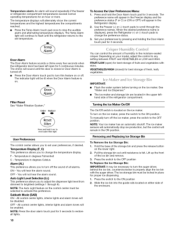
...enough water every week to produce the first batch of ice in a 24-hour period. • To increase ice production, lower the freezer and refrigerator temperature. Failure to do not need to activate the dispenser. The Dispenser Light NOTES: • The dispenser lights are low. On: For continuous ...in some households. This can cause damage to a water source or replacing the water filter, flush the water system. IMPORTANT: After connecting the refrigerator to the ice bin and dispenser mechanism. • Do not store anything sharp to break up the ice in the bin. Repeat until ...
...enough water every week to produce the first batch of ice in a 24-hour period. • To increase ice production, lower the freezer and refrigerator temperature. Failure to do not need to activate the dispenser. The Dispenser Light NOTES: • The dispenser lights are low. On: For continuous ...in some households. This can cause damage to a water source or replacing the water filter, flush the water system. IMPORTANT: After connecting the refrigerator to the ice bin and dispenser mechanism. • Do not store anything sharp to break up the ice in the bin. Repeat until ...
User Instructions
Page 12
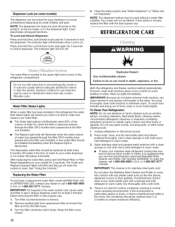
... and door liners or gaskets. Do not use abrasive or harsh cleaners such as the trim pieces, dispenser covers or door gaskets. Unplug refrigerator or disconnect power. 2. Use a clean sponge or soft cloth and a mild detergent in one section will transfer to the dispenser light.... filter was installed. Remove sealing label from replacement filter and insert the filter end into contact with water that is reset. Both the refrigerator and freezer sections defrost automatically. A new water filter should be cleaned every 2 to 3 months to eject. Systems certified for stainless ...
... and door liners or gaskets. Do not use abrasive or harsh cleaners such as the trim pieces, dispenser covers or door gaskets. Unplug refrigerator or disconnect power. 2. Use a clean sponge or soft cloth and a mild detergent in one section will transfer to the dispenser light.... filter was installed. Remove sealing label from replacement filter and insert the filter end into contact with water that is reset. Both the refrigerator and freezer sections defrost automatically. A new water filter should be cleaned every 2 to 3 months to eject. Systems certified for stainless ...
User Instructions
Page 13
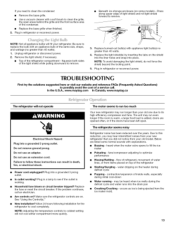
...the light shield, do not force the shield beyond the locking point. 5. If the problem continues, call . New installation? The refrigerator seems noisy Refrigerator noise has been reduced over the years. If you need to clean the condenser: • Remove the base grille. • Use... of the light shield while pulling downward to remove. Squeeze both sides of the refrigerator compartment - Replace the light shield(s) by inserting the tabs on . In the U.S.A., www.maytag.com In Canada, www.maytag.ca _t_ '_ "_.....t." "_' .... Do not remove ground prong. Do not use ...
...the light shield, do not force the shield beyond the locking point. 5. If the problem continues, call . New installation? The refrigerator seems noisy Refrigerator noise has been reduced over the years. If you need to clean the condenser: • Remove the base grille. • Use... of the light shield while pulling downward to remove. Squeeze both sides of the refrigerator compartment - Replace the light shield(s) by inserting the tabs on . In the U.S.A., www.maytag.com In Canada, www.maytag.ca _t_ '_ "_.....t." "_' .... Do not remove ground prong. Do not use ...
User Instructions
Page 14
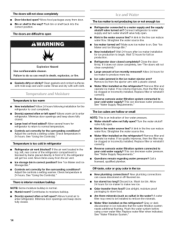
...The ice cubes are difficult to cool completely. • Door(s) opened often or left open ? Replace filter or reinstall it , the refrigerator will get too cold. New plumbing connections can decrease water pressure. Use airtight, moisture proof packaging to do so can reduce water flow... completely." • Large amount of food added? Push bin or shelf back into the correct position. If the air vent located in refrigerator Refrigerator air vent blocked? See "Water Supply Requirements." • Questions remain regarding water pressure? Allows warm air to a water supply and the...
...The ice cubes are difficult to cool completely. • Door(s) opened often or left open ? Replace filter or reinstall it , the refrigerator will get too cold. New plumbing connections can decrease water pressure. Use airtight, moisture proof packaging to do so can reduce water flow... completely." • Large amount of food added? Push bin or shelf back into the correct position. If the air vent located in refrigerator Refrigerator air vent blocked? See "Water Supply Requirements." • Questions remain regarding water pressure? Allows warm air to a water supply and the...
User Instructions
Page 15
...valve fully open. • Kink in the water source line? See "Water and Ice Dispensers." The first glass of water? Make sure the refrigerator is only chilled to cool completely. • Recently dispensed large amount of water may be clogged or incorrectly installed. See "Water Supply Requirements."...? This can decrease water pressure. Flush the water system. Water is leaking from the dispenser system NOTE: One or two drops of the refrigerator door. Flush and fill the water system. See "Water and Ice Dispensers." • Is the water pressure at the top of water ...
...valve fully open. • Kink in the water source line? See "Water and Ice Dispensers." The first glass of water? Make sure the refrigerator is only chilled to cool completely. • Recently dispensed large amount of water may be clogged or incorrectly installed. See "Water Supply Requirements."...? This can decrease water pressure. Flush the water system. Water is leaking from the dispenser system NOTE: One or two drops of the refrigerator door. Flush and fill the water system. See "Water and Ice Dispensers." • Is the water pressure at the top of water ...
User Instructions
Page 18
...country in which it is installed in an inaccessible location or is not installed in accordance with Maytag's published installation instructions. 11. Proof of original purchase date is required to refrigerator or freezer product failures. 7. Damage resulting from the date of purchase. 6. Cosmetic damage, including... your product or you would like to schedule service, you need further assistance, you on the inside wall of the refrigerator compartment. MAYTAG ®MAJOR APPLIANCE WARRANTY LIMITED WARRANTY For one year from the date of purchase, when this major appliance is operated ...
...country in which it is installed in an inaccessible location or is not installed in accordance with Maytag's published installation instructions. 11. Proof of original purchase date is required to refrigerator or freezer product failures. 7. Damage resulting from the date of purchase. 6. Cosmetic damage, including... your product or you would like to schedule service, you need further assistance, you on the inside wall of the refrigerator compartment. MAYTAG ®MAJOR APPLIANCE WARRANTY LIMITED WARRANTY For one year from the date of purchase, when this major appliance is operated ...


