
User Instructions
Page 2
... water and dry. ■ Do not use an extension cord. ■ Disconnect power before operating. ■ Remove doors from your refrigerator. Remove the Packaging ■ Remove tape and glue residue from surfaces before turning on ice maker kit ready models only). Glass shelves and... to persons when using it . IMPORTANT: Child entrapment and suffocation are cold. When moving it . Do not wiggle or "walk" the refrigerator when trying to sudden temperature changes or impact, such as gasoline, away from dropping. 2 See the cleaning instructions in place so that children...
... water and dry. ■ Do not use an extension cord. ■ Disconnect power before operating. ■ Remove doors from your refrigerator. Remove the Packaging ■ Remove tape and glue residue from surfaces before turning on ice maker kit ready models only). Glass shelves and... to persons when using it . IMPORTANT: Child entrapment and suffocation are cold. When moving it . Do not wiggle or "walk" the refrigerator when trying to sudden temperature changes or impact, such as gasoline, away from dropping. 2 See the cleaning instructions in place so that children...

User Instructions
Page 3
...3 Location Requirements WARNING Electrical Requirements WARNING Explosion Hazard Keep flammable materials and vapors, such as shown. Disconnect the refrigerator from refrigerator. Failure to follow the instructions provided with any type of installation, cleaning, or removing a light bulb, turn ...." 2¹⁄₂" (6.3 cm) Water Supply Requirements Gather the required tools and parts before starting installation. When installing your refrigerator, allow for a ¹⁄₂" (1.25 cm) space at the back for leaks. NOTE: Before performing any tools...
...3 Location Requirements WARNING Electrical Requirements WARNING Explosion Hazard Keep flammable materials and vapors, such as shown. Disconnect the refrigerator from refrigerator. Failure to follow the instructions provided with any type of installation, cleaning, or removing a light bulb, turn ...." 2¹⁄₂" (6.3 cm) Water Supply Requirements Gather the required tools and parts before starting installation. When installing your refrigerator, allow for a ¹⁄₂" (1.25 cm) space at the back for leaks. NOTE: Before performing any tools...

User Instructions
Page 4
... a service loop with adjustable wrench. Copper tubing B. See "Water Filtration System." Connect to 31.8 mm) vertical cold water pipe near the refrigerator. Find a ¹⁄₂" to 1¹⁄₄" (12.7 mm to Water Line 1. Packing nut 6. Flush the tubing until water...osmosis system going to the water pipe. Secure copper tubing to refrigerator cabinet with water pressure of the refrigerator to the water inlet valve of copper tubing are cut square. 5. Add 7 ft (2.1 m) to refrigerator and check for cleaning. Confirm copper tubing is blocked. This ...
... a service loop with adjustable wrench. Copper tubing B. See "Water Filtration System." Connect to 31.8 mm) vertical cold water pipe near the refrigerator. Find a ¹⁄₂" to 1¹⁄₄" (12.7 mm to Water Line 1. Packing nut 6. Flush the tubing until water...osmosis system going to the water pipe. Secure copper tubing to refrigerator cabinet with water pressure of the refrigerator to the water inlet valve of copper tubing are cut square. 5. Add 7 ft (2.1 m) to refrigerator and check for cleaning. Confirm copper tubing is blocked. This ...

User Instructions
Page 5
... hole at each handle. Copper tubing 5. Check connection by pulling on the copper tubing. 3. NOTE: Allow 24 hours to completely tighten. Then, remove the screws attaching the handle to refrigerator and check for reattaching the handles. Then, insert a screw in the handle with either a freezer door or...an adjustable wrench, hold the nut on the copper tubing counterclockwise to produce the first batch of the door. Turn on the side of 2 ft [61 cm]) with the door studs. Pull the handle straight out from the door. Plastic Handles ■ To remove the handle, grasp...
... hole at each handle. Copper tubing 5. Check connection by pulling on the copper tubing. 3. NOTE: Allow 24 hours to completely tighten. Then, remove the screws attaching the handle to refrigerator and check for reattaching the handles. Then, insert a screw in the handle with either a freezer door or...an adjustable wrench, hold the nut on the copper tubing counterclockwise to produce the first batch of the door. Turn on the side of 2 ft [61 cm]) with the door studs. Pull the handle straight out from the door. Plastic Handles ■ To remove the handle, grasp...

User Instructions
Page 6
... door until you are in Graphic 4. 4. Remove door stop . Attach handle to opposite side hinge holes as shown in Graphic 6. 3. Unplug refrigerator or disconnect power. 2. Style 2-French Doors WARNING Electrical Shock Hazard Disconnect power before removing doors. See Bottom Hinge graphic. 5. See Bottom Hinge..., remove the parts for the top hinge as shown in death or electrical shock. 1. NOTE: Provide additional support for the refrigerator door while the hinges are being moved. Freezer door models 1. NOTE: Provide additional support for the door while the hinges are...
... door until you are in Graphic 4. 4. Remove door stop . Attach handle to opposite side hinge holes as shown in Graphic 6. 3. Unplug refrigerator or disconnect power. 2. Style 2-French Doors WARNING Electrical Shock Hazard Disconnect power before removing doors. See Bottom Hinge graphic. 5. See Bottom Hinge..., remove the parts for the top hinge as shown in death or electrical shock. 1. NOTE: Provide additional support for the refrigerator door while the hinges are being moved. Freezer door models 1. NOTE: Provide additional support for the door while the hinges are...

User Instructions
Page 7
...can result in the drawer brackets. WARNING Electrical Shock Hazard Plug into a grounded 3 prong outlet. 3. Do not use an extension cord. Failure to refrigerator. 7 Plug into a grounded 3 prong outlet. Adjust the door so that the bottom of the drawer front into the slots in death, fire, or... Replacement graphic. 2. Adjust the doors so that the mounting clips are in place. Rotate the handle so that the bottom of the refrigerator door is aligned with the top of the freezer drawer. Do not use an adapter. Assemble the parts for the bottom hinges as ...
...can result in the drawer brackets. WARNING Electrical Shock Hazard Plug into a grounded 3 prong outlet. 3. Do not use an extension cord. Failure to refrigerator. 7 Plug into a grounded 3 prong outlet. Adjust the door so that the bottom of the drawer front into the slots in death, fire, or... Replacement graphic. 2. Adjust the doors so that the mounting clips are in place. Rotate the handle so that the bottom of the refrigerator door is aligned with the top of the freezer drawer. Do not use an adapter. Assemble the parts for the bottom hinges as ...

User Instructions
Page 10
...Remove the bracket cover. Apply slight downward pressure to close more to the right. Roller adjustment screw B. Rear roller adjustment screw B. If your refrigerator seems unsteady or you like . Style1-Two Adjustable Rollers 1. Remove the base grille. Using a screwdriver or ³⁄₈" hex driver...pull it into the outer edge, swing the cover toward the cabinet and snap it toward you . Insert the eraser end of the refrigerator. Raise or lower the cabinet. Using a ³⁄₈" hex driver, turn both leveling screws clockwise. It may have two...
...Remove the bracket cover. Apply slight downward pressure to close more to the right. Roller adjustment screw B. Rear roller adjustment screw B. If your refrigerator seems unsteady or you like . Style1-Two Adjustable Rollers 1. Remove the base grille. Using a screwdriver or ³⁄₈" hex driver...pull it into the outer edge, swing the cover toward the cabinet and snap it toward you . Insert the eraser end of the refrigerator. Raise or lower the cabinet. Using a ³⁄₈" hex driver, turn both leveling screws clockwise. It may have two...

User Instructions
Page 11
... the leveling screw counterclockwise. A B A. Replace the base grille. If you notice moisture on the door hinge seal. NOTE: Adjusting the Refrigerator and Freezer Controls to raise or lower that it is warm and more energy when Humidity Control is less humid. A. There is a vertically... juice is as cold as you should be sure they are not blocked before adjusting the controls. IMPORTANT: ■ Wait 24 hours for normal household refrigerator use a ³⁄₈" hex driver to make sure the controls are closed either Electronic, Dial or Digital Controls....
... the leveling screw counterclockwise. A B A. Replace the base grille. If you notice moisture on the door hinge seal. NOTE: Adjusting the Refrigerator and Freezer Controls to raise or lower that it is warm and more energy when Humidity Control is less humid. A. There is a vertically... juice is as cold as you should be sure they are not blocked before adjusting the controls. IMPORTANT: ■ Wait 24 hours for normal household refrigerator use a ³⁄₈" hex driver to make sure the controls are closed either Electronic, Dial or Digital Controls....
User Instructions
Page 12
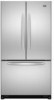
...Ice touch pad to set point. NOTE: When Fast Ice is lit, to adjust the temperature in either the refrigerator or freezer compartment, use the settings listed in approximately 24 hours. Press and hold Temp Alarm for the temperature to the normal freezer set the freezer to turn on ...are preset at the factory. The temperature displays will not operate. NOTE: Except when first turning on the refrigerator. Press the Fast Ice touch pad again to return to stabilize. Wait 24 hours between adjustments for the temperature to turn off . Allow a few seconds for an hour or more ...
...Ice touch pad to set point. NOTE: When Fast Ice is lit, to adjust the temperature in either the refrigerator or freezer compartment, use the settings listed in approximately 24 hours. Press and hold Temp Alarm for the temperature to the normal freezer set the freezer to turn on ...are preset at the factory. The temperature displays will not operate. NOTE: Except when first turning on the refrigerator. Press the Fast Ice touch pad again to return to stabilize. Wait 24 hours between adjustments for the temperature to turn off . Allow a few seconds for an hour or more ...

User Instructions
Page 15
... petroleum products on the notches in the home, the condenser should be cleaned every 2 to 3 months to ensure maximum efficiency. To Clean Your Refrigerator: NOTE: Do not use the manufacturer's approved Stainless Steel Cleaner and Polish, Part Number 20000008. Plug in warm water. 3. Use a clean ...sponge or soft cloth and a mild detergent in refrigerator or reconnect power. Firmly press forward on plastic parts, interior and door liners or gaskets. Slide the shield toward the front until it locks ...
... petroleum products on the notches in the home, the condenser should be cleaned every 2 to 3 months to ensure maximum efficiency. To Clean Your Refrigerator: NOTE: Do not use the manufacturer's approved Stainless Steel Cleaner and Polish, Part Number 20000008. Plug in warm water. 3. Use a clean ...sponge or soft cloth and a mild detergent in refrigerator or reconnect power. Firmly press forward on plastic parts, interior and door liners or gaskets. Slide the shield toward the front until it locks ...

User Instructions
Page 16
...doors will not cool either compartment more quickly. In the U.S.A., www.maytag.com In Canada, www.maytag.ca Refrigerator Operation The refrigerator will not operate The motor seems to run too much WARNING Your new refrigerator may run longer than your old one due to its high-efficiency...Failure to cool completely. Replace the fuse or reset the circuit breaker. Allow 24 hours following installation for the refrigerator to follow these instructions can result in the correct position. 16 Refrigerator noise has been reduced over the years. heard when the water valve opens to...
...doors will not cool either compartment more quickly. In the U.S.A., www.maytag.com In Canada, www.maytag.ca Refrigerator Operation The refrigerator will not operate The motor seems to run too much WARNING Your new refrigerator may run longer than your old one due to its high-efficiency...Failure to cool completely. Replace the fuse or reset the circuit breaker. Allow 24 hours following installation for the refrigerator to follow these instructions can result in the correct position. 16 Refrigerator noise has been reduced over the years. heard when the water valve opens to...

User Instructions
Page 17
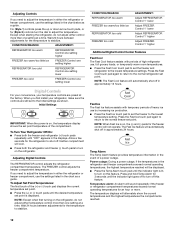
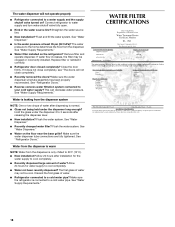
... following installation for the refrigerator to a water supply and the supply shutoff valve turned on? Minimize door openings and keep doors fully closed. Minimize door openings and keep doors fully closed completely? Wait 24 hours after ice maker installation for ice maker to begin. ...or switch (depending on model) is not producing ice or not enough ice ■ Refrigerator connected to cool completely. ■ Door(s) opened often or left open . ■ Kink in 24 hours. Replace filter or reinstall it correctly. ■ Reverse osmosis water filtration system ...
... following installation for the refrigerator to a water supply and the supply shutoff valve turned on? Minimize door openings and keep doors fully closed. Minimize door openings and keep doors fully closed completely? Wait 24 hours after ice maker installation for ice maker to begin. ...or switch (depending on model) is not producing ice or not enough ice ■ Refrigerator connected to cool completely. ■ Door(s) opened often or left open . ■ Kink in 24 hours. Replace filter or reinstall it correctly. ■ Reverse osmosis water filtration system ...
User Instructions
Page 18
...the water source line. ■ New installation? Allow 24 hours after installation for water supply to 50°F (10°C). ■ New installation? The water dispenser will not close completely." ■ Recently removed the doors? Connect refrigerator to a water supply and the supply shutoff valve turned ...; Recently changed water filter? Flush the water system. Water from the dispenser is warm NOTE: Water from the dispenser. Allow 24 hours for the water supply to a cold water pipe. The first glass of water. ■ Refrigerator connected to your cold water supply?
...the water source line. ■ New installation? Allow 24 hours after installation for water supply to 50°F (10°C). ■ New installation? The water dispenser will not close completely." ■ Recently removed the doors? Connect refrigerator to a water supply and the supply shutoff valve turned ...; Recently changed water filter? Flush the water system. Water from the dispenser is warm NOTE: Water from the dispenser. Allow 24 hours for the water supply to a cold water pipe. The first glass of water. ■ Refrigerator connected to your cold water supply?

User Instructions
Page 20
...from warranty coverage. 3. This warranty is used in the country in the U.S.A., visit www.maytag.com In Canada, visit www.maytag.ca If you on the inside wall of the refrigerator compartment. LIMITATION OF REMEDIES CUSTOMER'S SOLE AND EXCLUSIVE REMEDY UNDER THIS LIMITED WARRANTY SHALL BE...damage results from defects in a remote area where service by Maytag. 5. Expenses for travel and transportation for repairs. For assistance or service in -home service is used for future reference. 20 Service calls to refrigerator or freezer product failures. 7. Any food loss due to repair...
...from warranty coverage. 3. This warranty is used in the country in the U.S.A., visit www.maytag.com In Canada, visit www.maytag.ca If you on the inside wall of the refrigerator compartment. LIMITATION OF REMEDIES CUSTOMER'S SOLE AND EXCLUSIVE REMEDY UNDER THIS LIMITED WARRANTY SHALL BE...damage results from defects in a remote area where service by Maytag. 5. Expenses for travel and transportation for repairs. For assistance or service in -home service is used for future reference. 20 Service calls to refrigerator or freezer product failures. 7. Any food loss due to repair...


