Warranty Information
Page 1
..., when this major appliance is installed, operated and maintained according to instructions attached to or furnished with the product, Maytag brand of the refrigerator and that existed when this major appliance was purchased. LABOR NOT INCLUDED) In the second through tenth years from accident...that vary from unauthorized modifications made to province. Service calls to be provided by an authorized Maytag servicer is for product service if your home. 8. Service calls to refrigerator or freezer product failures. 7. Expenses for travel and transportation for the compressor only and ...
..., when this major appliance is installed, operated and maintained according to instructions attached to or furnished with the product, Maytag brand of the refrigerator and that existed when this major appliance was purchased. LABOR NOT INCLUDED) In the second through tenth years from accident...that vary from unauthorized modifications made to province. Service calls to be provided by an authorized Maytag servicer is for product service if your home. 8. Service calls to refrigerator or freezer product failures. 7. Expenses for travel and transportation for the compressor only and ...
Warranty Information
Page 2
... Century Ave. Have your correspondence. For additional product information, in the U.S.A., visit www.maytag.com In Canada, visit www.maytag.ca If you do not have access to the Internet and you need further assistance, you may contact Maytag at the address below . Mississauga, Ontario L5N 0B7 Please include a daytime phone number in... you would like to schedule service, you can find your model number and serial number on the label, located on the inside wall of the refrigerator compartment.
... Century Ave. Have your correspondence. For additional product information, in the U.S.A., visit www.maytag.com In Canada, visit www.maytag.ca If you do not have access to the Internet and you need further assistance, you may contact Maytag at the address below . Mississauga, Ontario L5N 0B7 Please include a daytime phone number in... you would like to schedule service, you can find your model number and serial number on the label, located on the inside wall of the refrigerator compartment.
Use & Care Guide
Page 2
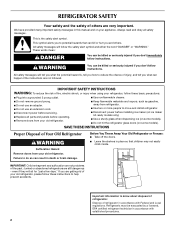
...All safety messages will tell you to do so can happen if the instructions are not problems of Your Old Refrigerator WARNING Suffocation Hazard Remove doors from refrigerator. ■ Use two or more people to help prevent accidents. IMPORTANT SAFETY INSTRUCTIONS WARNING: To reduce the... models only). ■ Use a sturdy glass when dispensing ice (on some models). ■ Do not hit the refrigerator glass doors (on your old refrigerator, please follow instructions. SAVE THESE INSTRUCTIONS Proper Disposal of the past. IMPORTANT: Child entrapment and suffocation are not followed. ...
...All safety messages will tell you to do so can happen if the instructions are not problems of Your Old Refrigerator WARNING Suffocation Hazard Remove doors from refrigerator. ■ Use two or more people to help prevent accidents. IMPORTANT SAFETY INSTRUCTIONS WARNING: To reduce the... models only). ■ Use a sturdy glass when dispensing ice (on some models). ■ Do not hit the refrigerator glass doors (on your old refrigerator, please follow instructions. SAVE THESE INSTRUCTIONS Proper Disposal of the past. IMPORTANT: Child entrapment and suffocation are not followed. ...
Use & Care Guide
Page 3
... alcohol, flammable fluids, or abrasive cleaners to cover the floor with warm water and dry. ■ Do not use in "Refrigerator Care." NOTE: This refrigerator is recommended that you remove all packaging materials. See the cleaning instructions in a location where the temperature ranges from surfaces before using... is designed to swing open. Important information to know about glass shelves and covers: Do not clean glass shelves or covers with your refrigerator has an ice maker, allow the door to shatter into many small, pebble-size pieces. When moving it , as an oven or...
... alcohol, flammable fluids, or abrasive cleaners to cover the floor with warm water and dry. ■ Do not use in "Refrigerator Care." NOTE: This refrigerator is recommended that you remove all packaging materials. See the cleaning instructions in a location where the temperature ranges from surfaces before using... is designed to swing open. Important information to know about glass shelves and covers: Do not clean glass shelves or covers with your refrigerator has an ice maker, allow the door to shatter into many small, pebble-size pieces. When moving it , as an oven or...
Use & Care Guide
Page 4
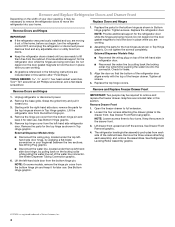
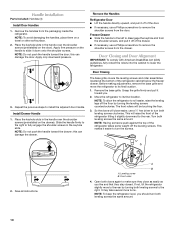
.... Remove Doors and Hinges Remove and Replace Freezer Drawer Front 1. Loosen the four screws attaching the drawer glides to four turns. The refrigerator leveling/roller assembly protrudes from the bottom hinge pin. 4. See Water Dispenser Tubing Connection graphic. 6. NOTE: On some models, remove ... screwdriver, and a flat-blade screwdriver. Graphics are ready to lift them free from the bottom hinge pin and keep it for the refrigerator door while the hinges are being removed. Remove the three screws attaching each side of the cabinet base. See Bottom Hinge graphic. ...
.... Remove Doors and Hinges Remove and Replace Freezer Drawer Front 1. Loosen the four screws attaching the drawer glides to four turns. The refrigerator leveling/roller assembly protrudes from the bottom hinge pin. 4. See Water Dispenser Tubing Connection graphic. 6. NOTE: On some models, remove ... screwdriver, and a flat-blade screwdriver. Graphics are ready to lift them free from the bottom hinge pin and keep it for the refrigerator door while the hinges are being removed. Remove the three screws attaching each side of the cabinet base. See Bottom Hinge graphic. ...
Use & Care Guide
Page 5
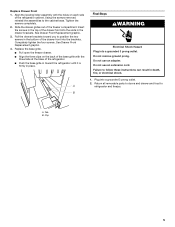
.... Do not remove ground prong. Tighten the screws completely. 2. See Drawer Front Replacement graphic. 4. Plug into the slots in the top of the refrigerator cabinet. Clip 5 Slide the drawer glides out of the drawer front into a grounded 3 prong outlet. Completely tighten the four screws. Return all removable... Align the leveling/roller assembly with the holes on the back of the base grille with the three tabs at the base of the refrigerator. ■ Push the base grille in toward you to follow these instructions can result in the bottom of the freezer compartment. Do ...
.... Do not remove ground prong. Tighten the screws completely. 2. See Drawer Front Replacement graphic. 4. Plug into the slots in the top of the refrigerator cabinet. Clip 5 Slide the drawer glides out of the drawer front into a grounded 3 prong outlet. Completely tighten the four screws. Return all removable... Align the leveling/roller assembly with the holes on the back of the base grille with the three tabs at the base of the refrigerator. ■ Push the base grille in toward you to follow these instructions can result in the bottom of the freezer compartment. Do ...
Use & Care Guide
Page 8
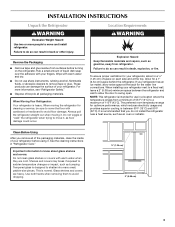
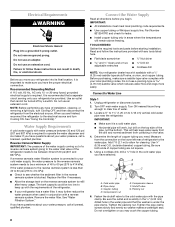
...water dispenser and ice maker. See "Using the Control(s)." Water Supply Requirements A cold water supply with the requirements of the refrigerator. ■ If your refrigerator has a water filter, it may crush the copper tubing. 8 If a reverse osmosis water filtration system is recommended that... screwdriver Nut driver and ¹⁄₂" Open-end or two Drill bit adjustable wrenches ■ Cordless drill NOTE: Your refrigerator dealer has a kit available with a reverse osmosis system. Read and follow these instructions can result in areas where the temperatures ...
...water dispenser and ice maker. See "Using the Control(s)." Water Supply Requirements A cold water supply with the requirements of the refrigerator. ■ If your refrigerator has a water filter, it may crush the copper tubing. 8 If a reverse osmosis water filtration system is recommended that... screwdriver Nut driver and ¹⁄₂" Open-end or two Drill bit adjustable wrenches ■ Cordless drill NOTE: Your refrigerator dealer has a kit available with a reverse osmosis system. Read and follow these instructions can result in areas where the temperatures ...
Use & Care Guide
Page 9
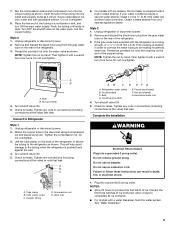
...line at the valve) that leak. Obtain a water strainer from the gray water tube on the rear of the refrigerator. 3. Style 2 1. Unplug refrigerator or disconnect power. 2. Remove and discard the black nylon plug from your water conditions require a second water strainer,...5. Check for leaks. Complete the Installation WARNING Electrical Shock Hazard Plug into a grounded 3 prong outlet. Do not use an extension cord. Failure to Refrigerator Style 1 1. A. Tube clamp B. Copper tubing D E D. Compression nut E. Plug into a grounded 3 prong outlet. NOTES: ■ Allow ...
...line at the valve) that leak. Obtain a water strainer from the gray water tube on the rear of the refrigerator. 3. Style 2 1. Unplug refrigerator or disconnect power. 2. Remove and discard the black nylon plug from your water conditions require a second water strainer,...5. Check for leaks. Complete the Installation WARNING Electrical Shock Hazard Plug into a grounded 3 prong outlet. Do not use an extension cord. Failure to Refrigerator Style 1 1. A. Tube clamp B. Copper tubing D E D. Compression nut E. Plug into a grounded 3 prong outlet. NOTES: ■ Allow ...
Use & Care Guide
Page 10
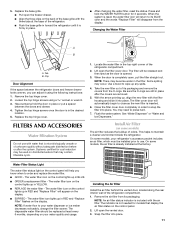
... to install the adjacent door handle. Door Closing The base grille covers the leveling screws and roller assemblies located at the bottom of the refrigerator takes some weight off the floor by turning both leveling screws to turn the screws. ¹⁄₄" 2. This makes it down ...handle to slide it easier to the right. Slide the handle firmly to the right to disengage the keyhole slot from the packaging inside the refrigerator. Freezer Drawer ■ Slide the handle to the left to fully engage the shoulder screws in the handle over the shoulder screws (preinstalled...
... to install the adjacent door handle. Door Closing The base grille covers the leveling screws and roller assemblies located at the bottom of the refrigerator takes some weight off the floor by turning both leveling screws to turn the screws. ¹⁄₄" 2. This makes it down ...handle to slide it easier to the right. Slide the handle firmly to the right to disengage the keyhole slot from the packaging inside the refrigerator. Freezer Drawer ■ Slide the handle to the left to fully engage the shoulder screws in the handle over the shoulder screws (preinstalled...
Use & Care Guide
Page 11
...sooner. The water filter icon on the control panel will automatically begin to snap the filter into place. The water filter icon on your refrigerator's accessory packet includes an air filter, which must be replaced at the factory. NOTE: An air filter status indicator is already installed at...; GOOD - See "Water Dispenser" or "Water and Ice Dispensers." Close the filter cover door completely in place or put a spacer between the refrigerator doors and freezer drawer looks uneven, you know when to press hard. 7. When the system is not needed for cyst reduction may be used on...
...sooner. The water filter icon on the control panel will automatically begin to snap the filter into place. The water filter icon on your refrigerator's accessory packet includes an air filter, which must be replaced at the factory. NOTE: An air filter status indicator is already installed at...; GOOD - See "Water Dispenser" or "Water and Ice Dispensers." Close the filter cover door completely in place or put a spacer between the refrigerator doors and freezer drawer looks uneven, you know when to press hard. 7. When the system is not needed for cyst reduction may be used on...
Use & Care Guide
Page 12
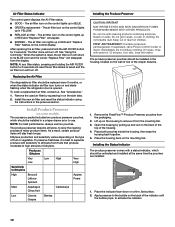
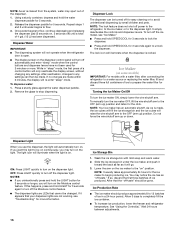
... AND SKIN. Do not get in BLUE. ■ ORDER a replacement - If in the previous section. Lift up in eyes, on and starts flashing when the refrigerator door is reset, the air filter icon will return to its BLUE color and the words "Replace Filter" will disappear from fruits that produce moderate...
... AND SKIN. Do not get in BLUE. ■ ORDER a replacement - If in the previous section. Lift up in eyes, on and starts flashing when the refrigerator door is reset, the air filter icon will return to its BLUE color and the words "Replace Filter" will disappear from fruits that produce moderate...
Use & Care Guide
Page 13
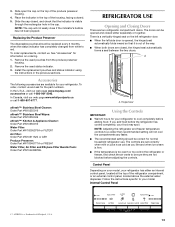
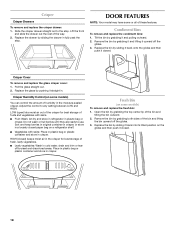
...or AIR1 Produce Preserver: Order Part #W10346771A or FRESH1 Water Filter, Air Filter and Ethylene Filter Bundle Pack: Order Part #W10443987BL REFRIGERATOR USE Opening and Closing Doors There are not blocked before adding food. Slide open the cap on ordering. 1. Accessories The following ...The controls are set correctly when milk or juice is a Trademark of the refrigerator compartment, or an external control panel, located above the external water dispenser. In the U.S.A., visit our web page www.maytag.com/ accessories or call 1-800-807-6777. Place the indicator in the...
...or AIR1 Produce Preserver: Order Part #W10346771A or FRESH1 Water Filter, Air Filter and Ethylene Filter Bundle Pack: Order Part #W10443987BL REFRIGERATOR USE Opening and Closing Doors There are not blocked before adding food. Slide open the cap on ordering. 1. Accessories The following ...The controls are set correctly when milk or juice is a Trademark of the refrigerator compartment, or an external control panel, located above the external water dispenser. In the U.S.A., visit our web page www.maytag.com/ accessories or call 1-800-807-6777. Place the indicator in the...
Use & Care Guide
Page 14
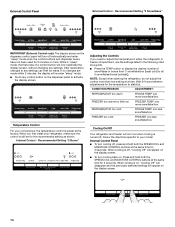
... specific to all 5 snowflakes/boxes [coldest]). If no changes are made . When you need to adjust the temperature in either the refrigerator or freezer compartment, use the settings listed in "sleep" mode, the first press of snowflakes or boxes from (1 snowflake/box [least cold...off automatically and enter "sleep" mode when the control buttons and dispenser levers have not been used for 3 seconds. CONDITION/REASON: ADJUSTMENT: REFRIGERATOR too warm FRIDGE TEMP one more snowflake/box FREEZER too warm/too little ice FREEZER TEMP one more . Wait 24 hours between adjustments for ...
... specific to all 5 snowflakes/boxes [coldest]). If no changes are made . When you need to adjust the temperature in either the refrigerator or freezer compartment, use the settings listed in "sleep" mode, the first press of snowflakes or boxes from (1 snowflake/box [least cold...off automatically and enter "sleep" mode when the control buttons and dispenser levers have not been used for 3 seconds. CONDITION/REASON: ADJUSTMENT: REFRIGERATOR too warm FRIDGE TEMP one more snowflake/box FREEZER too warm/too little ice FREEZER TEMP one more . Wait 24 hours between adjustments for ...
Use & Care Guide
Page 15
... tracking feature each time you notice moisture on , "Cooling Off" will disappear and the previously selected settings will turn blue. After connecting the refrigerator to help reduce moisture on /off , "Cooling Off" will light up whenever either door is open for 5 minutes and cooling is on,...for use , full grocery loads or temporarily warm room temperatures. ■ Press SPEEDCOOL to set point. Discard the first three batches of the refrigerator, press any button on the display screen. NOTE: The moisture control icon will appear on the display screen. ■ To turn blue....
... tracking feature each time you notice moisture on , "Cooling Off" will disappear and the previously selected settings will turn blue. After connecting the refrigerator to help reduce moisture on /off , "Cooling Off" will light up whenever either door is open for 5 minutes and cooling is on,...for use , full grocery loads or temporarily warm room temperatures. ■ Press SPEEDCOOL to set point. Discard the first three batches of the refrigerator, press any button on the display screen. NOTE: The moisture control icon will appear on the display screen. ■ To turn blue....
Use & Care Guide
Page 16
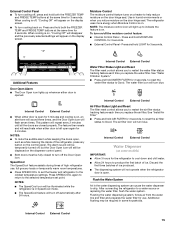
... releasing the dispenser pad (5 seconds on the dispenser light. Dispense Water IMPORTANT: ■ The dispensing system will not operate when the refrigerator door is open. ■ The display screen on the dispenser control panel will only reactivate the display screen, without changing any settings can... press and hold SPEEDCOOL for easy cleaning or to the dispenser light. Wash the ice storage bin with a water filter, after connecting the refrigerator to a water source or replacing the water filter, fill and discard three full containers of a control button will turn on , 5 seconds...
... releasing the dispenser pad (5 seconds on the dispenser light. Dispense Water IMPORTANT: ■ The dispensing system will not operate when the refrigerator door is open. ■ The display screen on the dispenser control panel will only reactivate the display screen, without changing any settings can... press and hold SPEEDCOOL for easy cleaning or to the dispenser light. Wash the ice storage bin with a water filter, after connecting the refrigerator to a water source or replacing the water filter, fill and discard three full containers of a control button will turn on , 5 seconds...
Use & Care Guide
Page 17
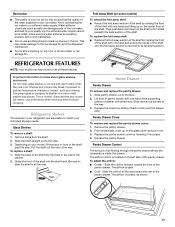
... the bin. To replace a shelf: 1. Be sure to slide the shelf in your refrigerator are heavy. Pantry Drawer Cover To remove and replace the pantry drawer cover: 1. The airflow is normal. REFRIGERATOR FEATURES NOTE: Your model may break if exposed to sudden temperature changes or impact, such... until the fold away section is returned to its full shelf position. Avoid connecting the ice maker to avoid dropping. Refrigerator Shelves The shelves in all the way toward the front of the pantry drawer. Slide the shelf straight out to the stop . 2.
... the bin. To replace a shelf: 1. Be sure to slide the shelf in your refrigerator are heavy. Pantry Drawer Cover To remove and replace the pantry drawer cover: 1. The airflow is normal. REFRIGERATOR FEATURES NOTE: Your model may break if exposed to sudden temperature changes or impact, such... until the fold away section is returned to its full shelf position. Avoid connecting the ice maker to avoid dropping. Refrigerator Shelves The shelves in all the way toward the front of the pantry drawer. Slide the shelf straight out to the stop . 2.
Use & Care Guide
Page 18
... drawer: 1. Replace the bin by grabbing it and lifting it upward off the glides. 3. Crisper Humidity Control (on a refrigerator shelf. ■ Vegetables with skins. ■ Fruit: Wash, let dry and store in refrigerator in . Remove the bin by grabbing the top center lip of fruits and vegetables with skins: Place in plastic...
... drawer: 1. Replace the bin by grabbing it and lifting it upward off the glides. 3. Crisper Humidity Control (on a refrigerator shelf. ■ Vegetables with skins. ■ Fruit: Wash, let dry and store in refrigerator in . Remove the bin by grabbing the top center lip of fruits and vegetables with skins: Place in plastic...
Use & Care Guide
Page 19
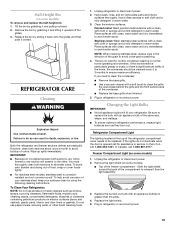
...interior surfaces thoroughly. Rinse surfaces with an appliance bulb of the same size, shape, and wattage. ■ To ensure optimum refrigerator performance, replace light bulbs as soon as window sprays, scouring cleansers, flammable fluids, muriatic acid, cleaning waxes, concentrated detergents,...watts. 4. Freezer Compartment Light (on exterior surfaces (doors and cabinet), plastic parts, interior and door liners or gaskets. REFRIGERATOR CARE Cleaning WARNING Explosion Hazard Use nonflammable cleaner. Plug in the home, the condenser should be replaced. Remove the bin ...
...interior surfaces thoroughly. Rinse surfaces with an appliance bulb of the same size, shape, and wattage. ■ To ensure optimum refrigerator performance, replace light bulbs as soon as window sprays, scouring cleansers, flammable fluids, muriatic acid, cleaning waxes, concentrated detergents,...watts. 4. Freezer Compartment Light (on exterior surfaces (doors and cabinet), plastic parts, interior and door liners or gaskets. REFRIGERATOR CARE Cleaning WARNING Explosion Hazard Use nonflammable cleaner. Plug in the home, the condenser should be replaced. Remove the bin ...
Use & Care Guide
Page 20
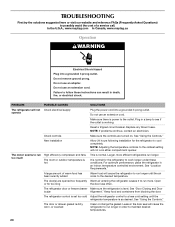
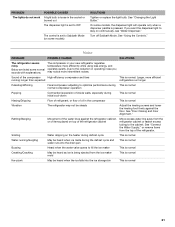
... a grounded 3 prong outlet. The motor seems to run longer in order to maintain desired temperatures. 20 See "Location Requirements." The refrigerator control is normal. Leaks in a lamp to follow these conditions. TROUBLESHOOTING First try the solutions suggested here or visit our website and ...refrigerator to cool completely. The door or drawer gasket is working. Failure to see if the outlet is dirty, worn, or cracked Clean or change the gasket. It is ajar Alignment." NOTE: If problems continue, contact an electrician. In the U.S.A., www.maytag.com In Canada, www.maytag...
... a grounded 3 prong outlet. The motor seems to run longer in order to maintain desired temperatures. 20 See "Location Requirements." The refrigerator control is normal. Leaks in a lamp to follow these conditions. TROUBLESHOOTING First try the solutions suggested here or visit our website and ...refrigerator to cool completely. The door or drawer gasket is working. Failure to see if the outlet is dirty, worn, or cracked Clean or change the gasket. It is ajar Alignment." NOTE: If problems continue, contact an electrician. In the U.S.A., www.maytag.com In Canada, www.maytag...
Use & Care Guide
Page 21
... storage bin This is pressed. See "Using the Controls." The compressor in the compressor This is normal Vibration The refrigerator may notice more efficient refrigerators run longer. PROBLEM The lights do not work POSSIBLE CAUSES A light bulb is loose in operating noise you want... This is normal Ker-plunk May be steady Adjust the leveling screws and lower the leveling foot firmly against the refrigerator cabinet, or of the refrigerator. See "Door Closing and Door Alignment." Rattling/Banging Movement of the compressor High efficiency compressor and fans running ...
... storage bin This is pressed. See "Using the Controls." The compressor in the compressor This is normal Vibration The refrigerator may notice more efficient refrigerators run longer. PROBLEM The lights do not work POSSIBLE CAUSES A light bulb is loose in operating noise you want... This is normal Ker-plunk May be steady Adjust the leveling screws and lower the leveling foot firmly against the refrigerator cabinet, or of the refrigerator. See "Door Closing and Door Alignment." Rattling/Banging Movement of the compressor High efficiency compressor and fans running ...


