
Use and Care Guide
Page 2
.... WARNING - Grounding type wall receptacle Common sense, caLitlon and care mLISt be plugged into a grounding receptacle. Junked or abandoned refrigerators are getting nd of purchase. Do not use and maintenance reformation. Recognize Safety Symbols, Words, Labels CAUTION - To reduce risk... of injury or death, follow the instructions below for your old refrigerator, please follow basic precautions, including the following: IMPORTANT: Child entrapment and suffocation are not meant to help prevent accidents. ...
.... WARNING - Grounding type wall receptacle Common sense, caLitlon and care mLISt be plugged into a grounding receptacle. Junked or abandoned refrigerators are getting nd of purchase. Do not use and maintenance reformation. Recognize Safety Symbols, Words, Labels CAUTION - To reduce risk... of injury or death, follow the instructions below for your old refrigerator, please follow basic precautions, including the following: IMPORTANT: Child entrapment and suffocation are not meant to help prevent accidents. ...
Use and Care Guide
Page 3
... leakage associated with a qualified electrician if you are beyond personal skill level. 13. If plug does not f_t electrical outlet, have refrigerator checked by a qualified eJectnclan. 9. Do not service or replace any part of tile refrigerator. 20. Check with water mstallatmon. DBconnect power cord by hcensed personnel when required. 15. Bumping or dropping...
... leakage associated with a qualified electrician if you are beyond personal skill level. 13. If plug does not f_t electrical outlet, have refrigerator checked by a qualified eJectnclan. 9. Do not service or replace any part of tile refrigerator. 20. Check with water mstallatmon. DBconnect power cord by hcensed personnel when required. 15. Bumping or dropping...

Use and Care Guide
Page 4
... of hinge cap to be level. C C If an upright position is designed for approximately 30 minutes before leveling. Important: If refrigerator is completely covered, use distance from its side or back-NEVER from floor to top of the cover while swinging it in blankets ...or inserting padding between the refrigerator and dolly. • Secure refrigerator to internal parts. • Use an appliance dolly when moving refrigerator. Allow refrigerator to raise or lower the front of a pencil or similar blunt tool in the...
... of hinge cap to be level. C C If an upright position is designed for approximately 30 minutes before leveling. Important: If refrigerator is completely covered, use distance from its side or back-NEVER from floor to top of the cover while swinging it in blankets ...or inserting padding between the refrigerator and dolly. • Secure refrigerator to internal parts. • Use an appliance dolly when moving refrigerator. Allow refrigerator to raise or lower the front of a pencil or similar blunt tool in the...

Use and Care Guide
Page 5
... grille is level from top hinge to side. 6. Replace hinge cover(s). • Position cover into the outer edge of refrigerator and that the refrigerator is oriented correctly. • Align the toe grille mounting clips with a flat blade screwdriver or fingernail. Unplug power cord from...point with the lower cabinet slots. • Push the toe grille firmly until firmly against floor. 7. Using the carpenter's level, make sure front of refrigerator is '/_" (6 ram) or Yzbubble higher than back of the hinge. • Swing the cover toward the cabinet and snap it snaps into place. ...
... grille is level from top hinge to side. 6. Replace hinge cover(s). • Position cover into the outer edge of refrigerator and that the refrigerator is oriented correctly. • Align the toe grille mounting clips with a flat blade screwdriver or fingernail. Unplug power cord from...point with the lower cabinet slots. • Push the toe grille firmly until firmly against floor. 7. Using the carpenter's level, make sure front of refrigerator is '/_" (6 ram) or Yzbubble higher than back of the hinge. • Swing the cover toward the cabinet and snap it snaps into place. ...

Use and Care Guide
Page 7
...firmly and slide down against the door. Simultaneously place door handle removal card underneath the base of handle. Place hinge side of your refrigerator. The handles are to be oriented as shown. 2_ Place extension in the interior of the fresh food section or attached to ...To Remove: _, 1. Align handle and extension as shown. 2. Insert the card to almost engaging tab with 5/,,, hex head so rews. 3. While holding refrigerator door upright, tighten down top hinge with the door tabs. 3. i 6. Press upper handle end to door surface and firmly grasp lower end of the ...
...firmly and slide down against the door. Simultaneously place door handle removal card underneath the base of handle. Place hinge side of your refrigerator. The handles are to be oriented as shown. 2_ Place extension in the interior of the fresh food section or attached to ...To Remove: _, 1. Align handle and extension as shown. 2. Insert the card to almost engaging tab with 5/,,, hex head so rews. 3. While holding refrigerator door upright, tighten down top hinge with the door tabs. 3. i 6. Press upper handle end to door surface and firmly grasp lower end of the ...

Use and Care Guide
Page 8
... oriented as possible. Align door handle clips slightly to the left handle base against the door, align the right base of the handle with your refrigerator under the right side base of the freezer door at base of the tabs attached to tighten screw. Simultaneously slide the door handle removal card...
... oriented as possible. Align door handle clips slightly to the left handle base against the door, align the right base of the handle with your refrigerator under the right side base of the freezer door at base of the tabs attached to tighten screw. Simultaneously slide the door handle removal card...

Use and Care Guide
Page 10
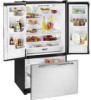
...(minimum 2' diameter), Avoid kinks in tDhoe nuoste uasned acnaroeld packet. -:: ___ 4. Opening and Closing Your Fresh Food Doors Your new refrigerator is closed, the hinged section automatically forms a seal between the two doors when both doors are Rpreonvliidnedder: in the copper tubing when ...can be drilled into inlet port. 5. Continue to observe the water supply connection for two to three hours prior to moving the refrigerator to be opened , the hinged seal automatically folds inward so that tubing feeds straight into water supply line before valve attachment) &#...
...(minimum 2' diameter), Avoid kinks in tDhoe nuoste uasned acnaroeld packet. -:: ___ 4. Opening and Closing Your Fresh Food Doors Your new refrigerator is closed, the hinged section automatically forms a seal between the two doors when both doors are Rpreonvliidnedder: in the copper tubing when ...can be drilled into inlet port. 5. Continue to observe the water supply connection for two to three hours prior to moving the refrigerator to be opened , the hinged seal automatically folds inward so that tubing feeds straight into water supply line before valve attachment) &#...
Use and Care Guide
Page 11
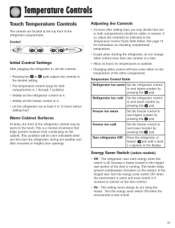
... setting. • The temperature control range for both compartments should be colder or warmer. The refrigerator uses more humid or if moisture is 1 through 7 (coldest). • Initially set the refrigerator control on 4. • Initially set the controls. • Pressing the _or D pads adjusts... of the door is less humid. 10 Temperature Control Guide Refrigerator too warm Set the refrigerator control to next lower number by pressing the D pad. Control Initial Control Settings After plugging the refrigerator in the hinged seal section of the other compartment. Adjusting ...
... setting. • The temperature control range for both compartments should be colder or warmer. The refrigerator uses more humid or if moisture is 1 through 7 (coldest). • Initially set the refrigerator control on 4. • Initially set the controls. • Pressing the _or D pads adjusts... of the door is less humid. 10 Temperature Control Guide Refrigerator too warm Set the refrigerator control to next lower number by pressing the D pad. Control Initial Control Settings After plugging the refrigerator in the hinged seal section of the other compartment. Adjusting ...

Use and Care Guide
Page 12
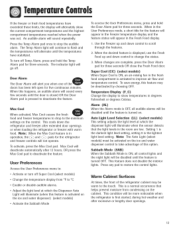
... the _+_ pad. Freezer too cold Set the freezer control to next higher number by pressing the _ pad. Press either the freezer or refrigerator _-_ pad to next lower number by pressing the _-_ pad. When activated, the Temp Alarm light will show the new setting for approximately ...three seconds, and then return to the actual temperature currently within that one hour after activation. . The display will illuminate. Turn refrigerator OFF 11 Press the freezer _+_ pad until OFF appears in the Temperature Control Guide below. • The first touch of water has ...
... the _+_ pad. Freezer too cold Set the freezer control to next higher number by pressing the _ pad. Press either the freezer or refrigerator _-_ pad to next lower number by pressing the _-_ pad. When activated, the Temp Alarm light will show the new setting for approximately ...three seconds, and then return to the actual temperature currently within that one hour after activation. . The display will illuminate. Turn refrigerator OFF 11 Press the freezer _+_ pad until OFF appears in the Temperature Control Guide below. • The first touch of water has ...
Use and Care Guide
Page 13
...(select models) • Activate the Sabbath Mode To access the User Preferences menu, press and hold the Temp Alarm pad for the refrigerator and freezer controls will be warm to improve air flow and temperature control. An audible alarm will go off. User Preferences Access the ... operation, the _$_ and _-_ pads for three seconds. Door Alarm The Door Alarm will alert you when one of the refrigerator cabinet may be more noticeable when the refrigerator is a normal occurrence that the light levels in the Fresh Food display. 1. Note: When the Max Cool feature is the...
...(select models) • Activate the Sabbath Mode To access the User Preferences menu, press and hold the Temp Alarm pad for the refrigerator and freezer controls will be warm to improve air flow and temperature control. An audible alarm will go off. User Preferences Access the ... operation, the _$_ and _-_ pads for three seconds. Door Alarm The Door Alarm will alert you when one of the refrigerator cabinet may be more noticeable when the refrigerator is a normal occurrence that the light levels in the Fresh Food display. 1. Note: When the Max Cool feature is the...

Use and Care Guide
Page 14
... of the shelf, then pull the shelf straight out. Be sure the shelf is not necessary to press up the rear of the refrigerator compartment. FreshFoodFemres Shelves Your refrigerator has Spill-Catcher TM Glass Shelves. To Replace Elevator TM Shelf: • Align the shelf to lower the height of the shelf and...
... of the shelf, then pull the shelf straight out. Be sure the shelf is not necessary to press up the rear of the refrigerator compartment. FreshFoodFemres Shelves Your refrigerator has Spill-Catcher TM Glass Shelves. To Replace Elevator TM Shelf: • Align the shelf to lower the height of the shelf and...
Use and Care Guide
Page 15
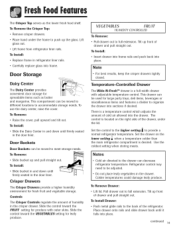
...the drawer, under the frame to accommodate storage needs. The control is located on the Iowersetdng _ when a temperature colder than the main refrigerator compartment is a temperature control which adjusts the amount of drawer and pull straight out. The Crisper Top serves as butter and margarine. To...compartment can be moved to different locations to push up and pull straight out. To Install: • Slide the Dairy Center in refrigerator liner rails. • Carefully replace glass into place. To install: • Insert drawer into frame rails and push back into frame....
...the drawer, under the frame to accommodate storage needs. The control is located on the Iowersetdng _ when a temperature colder than the main refrigerator compartment is a temperature control which adjusts the amount of drawer and pull straight out. The Crisper Top serves as butter and margarine. To...compartment can be moved to different locations to push up and pull straight out. To Install: • Slide the Dairy Center in refrigerator liner rails. • Carefully replace glass into place. To install: • Insert drawer into frame rails and push back into frame....

Use and Care Guide
Page 17
This design is plugged in the ice storage bin for quick chllhng. Proper water flow and a level refrigerator are ejected it is not used frequently, the ice cubes will probably contain undersEed and irregular cubes because of all empty storage pan and ... To avoid personal injury or property damage, observe the foIIowHlg: • Do not place fingers or hands on tile automatic ice making mechanBm while the refrigerator is for several hours. This will help protect you from the ice maker. models) To Dispense Water: • Hold container under spout and press dispenser...
This design is plugged in the ice storage bin for quick chllhng. Proper water flow and a level refrigerator are ejected it is not used frequently, the ice cubes will probably contain undersEed and irregular cubes because of all empty storage pan and ... To avoid personal injury or property damage, observe the foIIowHlg: • Do not place fingers or hands on tile automatic ice making mechanBm while the refrigerator is for several hours. This will help protect you from the ice maker. models) To Dispense Water: • Hold container under spout and press dispenser...
Use and Care Guide
Page 19
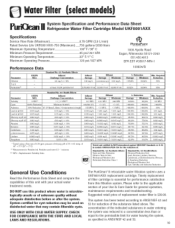
... 30,583 #/ml 69,000 #/ml 100834/B % Redaction Average >9726% Miniraam 96.84% 99.52% 9&94% IVlin. {selecmt odeis) System Specification and Performance Data Sheet Refrigerator Water Filter Cartridge Model U KF8001AXX Specifications Service Flow Rate (Maximum 0...78 GPM (2.9 L/min) Rated Service Life UKF8001AXX-750 (Maximum) ......750 gallons/2838 liters Maximum Operating...
... 30,583 #/ml 69,000 #/ml 100834/B % Redaction Average >9726% Miniraam 96.84% 99.52% 9&94% IVlin. {selecmt odeis) System Specification and Performance Data Sheet Refrigerator Water Filter Cartridge Model U KF8001AXX Specifications Service Flow Rate (Maximum 0...78 GPM (2.9 L/min) Rated Service Life UKF8001AXX-750 (Maximum) ......750 gallons/2838 liters Maximum Operating...
Use and Care Guide
Page 20
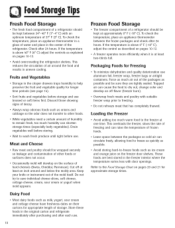
... in uneven cooling. Refer to freezing. • Do not refreeze meat that has completely thawed. Occasionally mold will develop on pages 20 and 21 for Freezing To minimize dehydration and quality deterioration use . Do not try to dry out, change color and develop an ...Trapped air can shorten storage times (especially leafy vegetables}. These foods are tightly sealed. Fruits and Vegetables Storage in the original carton and refrigerate immediately after purchasing and after each use bruised or soft items first. Drain vegetables well before storing. • Wait to help preserve...
... in uneven cooling. Refer to freezing. • Do not refreeze meat that has completely thawed. Occasionally mold will develop on pages 20 and 21 for Freezing To minimize dehydration and quality deterioration use . Do not try to dry out, change color and develop an ...Trapped air can shorten storage times (especially leafy vegetables}. These foods are tightly sealed. Fruits and Vegetables Storage in the original carton and refrigerate immediately after purchasing and after each use bruised or soft items first. Drain vegetables well before storing. • Wait to help preserve...

Use and Care Guide
Page 21
...2 to 3 days 3 to 5 days 1 to 2 weeks 2 to 3 days 6 to 21° C). Not recommended 9 to 21o C). Avocados darken when refrigerated. May also store at 60 ° to 70 ° F (16 ° to 9 months Not recommended Not recommended Wrap tightly or cover. Check carton date.... Check carton date. Wrap tightly. If refrigerated, store uncovered. Will not ripen after purchase. Use quickly. 2O StoregTeips Food Storage Chart Storage times are approximate and may vary depending on...
...2 to 3 days 3 to 5 days 1 to 2 weeks 2 to 3 days 6 to 21° C). Not recommended 9 to 21o C). Avocados darken when refrigerated. May also store at 60 ° to 70 ° F (16 ° to 9 months Not recommended Not recommended Wrap tightly or cover. Check carton date.... Check carton date. Wrap tightly. If refrigerated, store uncovered. Will not ripen after purchase. Use quickly. 2O StoregTeips Food Storage Chart Storage times are approximate and may vary depending on...

Use and Care Guide
Page 22
...the meat and cheese drawer. Leave peas in the crisper. Remove tops. Wrap odorous foods and refrigerate in pods. Not recommended 8 to two weeks in original packaging for refrigeration. Cooperative Extension Service, Iowa Place in crisper. Food Marketing Institute; Bacon Beef or lamb, ground...to 2 months /4 to 6 months 1 month Fresh meats can be kept up to 10 months Not recom mended Wrap odorous foods and refrigerate in the meat and cheese drawer. Unopened, vacuum-packed luncheon meat may be kept in the meat and cheese drawer. Place in original ...
...the meat and cheese drawer. Leave peas in the crisper. Remove tops. Wrap odorous foods and refrigerate in pods. Not recommended 8 to two weeks in original packaging for refrigeration. Cooperative Extension Service, Iowa Place in crisper. Food Marketing Institute; Bacon Beef or lamb, ground...to 2 months /4 to 6 months 1 month Fresh meats can be kept up to 10 months Not recom mended Wrap odorous foods and refrigerate in the meat and cheese drawer. Unopened, vacuum-packed luncheon meat may be kept in the meat and cheese drawer. Place in original ...

Use and Care Guide
Page 23
... to adjust to room temperature, Dilute mild detergent and use of cleaning products or non-recommended products is not covered under this product's warranty. Cfeanin Refrigerator Cleaning Chart Textured Doors and Exterior (select models) Cabinet interior Stainless Steel Doors and Exterior (select models) I M PORTANT: Damage to stain/ess steel finish ...or harsh cleaners Ammonia Chlorine bleach Concentrated detergents or solvents Metal or plastic-textured scouring pads Vinegar-based products Citrus-based cleaners Use 4 tablespoons of refrigerator. Use a vacuum cleaner hose nozzle.
... to adjust to room temperature, Dilute mild detergent and use of cleaning products or non-recommended products is not covered under this product's warranty. Cfeanin Refrigerator Cleaning Chart Textured Doors and Exterior (select models) Cabinet interior Stainless Steel Doors and Exterior (select models) I M PORTANT: Damage to stain/ess steel finish ...or harsh cleaners Ammonia Chlorine bleach Concentrated detergents or solvents Metal or plastic-textured scouring pads Vinegar-based products Citrus-based cleaners Use 4 tablespoons of refrigerator. Use a vacuum cleaner hose nozzle.

Use and Care Guide
Page 24
...too much warm food to cool. 9. Dry surfaces with crumpled sheets of room. if odor is not possible, isolate exterior by leveling refrigerator as instructed in tightly sealed containers to cleaning instructions. Remove drawers and place on crumpled newspaper in coolest part of black and white ... cleaning instructions every three months. This will increase energy efficiency and cooling performance. 23 Close doors and let stand 24 to the refrigerator. 3. Dilute mild detergent and brush solution into crevices using a section of cabinet or an added layer of direct sunlight, or ...
...too much warm food to cool. 9. Dry surfaces with crumpled sheets of room. if odor is not possible, isolate exterior by leveling refrigerator as instructed in tightly sealed containers to cleaning instructions. Remove drawers and place on crumpled newspaper in coolest part of black and white ... cleaning instructions every three months. This will increase energy efficiency and cooling performance. 23 Close doors and let stand 24 to the refrigerator. 3. Dilute mild detergent and brush solution into crevices using a section of cabinet or an added layer of direct sunlight, or ...

Use and Care Guide
Page 25
... each side of the cover and pull down. Replace bulb with appliance bulbs no greater than 40 watts. /4. Slide clear light shield toward front of refrigerator until rear tab engages. 24 Freezer (style of compartment to release from the back. 3. Remove light bulb. 5. Insert front tabs of light shield varies) 1. Remove...
... each side of the cover and pull down. Replace bulb with appliance bulbs no greater than 40 watts. /4. Slide clear light shield toward front of refrigerator until rear tab engages. 24 Freezer (style of compartment to release from the back. 3. Remove light bulb. 5. Insert front tabs of light shield varies) 1. Remove...


