
Dimension Guide
Page 1
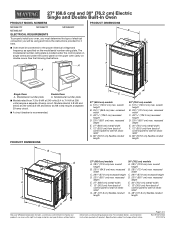
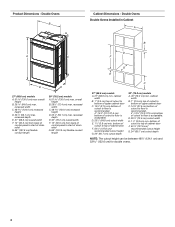
...67.9 cm) recessed height D. 231⁄4" (59.1 cm) max. For complete details, see Installation Instructions packed with product. PRODUCT DIMENSIONS E D 27" (68.6 cm) models A. 513⁄16" (130.0 cm) max. recessed width C. 263⁄4" (67.9 cm) recessed height D. 231⁄4" (59.1 cm) max. overall height B. 281.... W10674133A 07/27/2016 27" (68.6 cm) and 30" (76.2 cm) Electric Single and Double Built-In Oven PRODUCT MODEL NUMBERS PRODUCT DIMENSIONS MEW9527F MEW9627F MEW9530F ELECTRICAL REQUIREMENTS MEW9630F To properly install your oven, you must determine the type of 2 Ref. See...
...67.9 cm) recessed height D. 231⁄4" (59.1 cm) max. For complete details, see Installation Instructions packed with product. PRODUCT DIMENSIONS E D 27" (68.6 cm) models A. 513⁄16" (130.0 cm) max. recessed width C. 263⁄4" (67.9 cm) recessed height D. 231⁄4" (59.1 cm) max. overall height B. 281.... W10674133A 07/27/2016 27" (68.6 cm) and 30" (76.2 cm) Electric Single and Double Built-In Oven PRODUCT MODEL NUMBERS PRODUCT DIMENSIONS MEW9527F MEW9627F MEW9530F ELECTRICAL REQUIREMENTS MEW9630F To properly install your oven, you must determine the type of 2 Ref. See...
Dimension Guide
Page 2
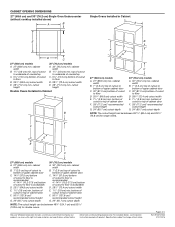
... (10.2-37.5 cm) bottom of cutout to floor is acceptable. cutout height Double Ovens Installed in Cabinet A E D C 27" (68.6 cm) models A. 27" (68.6 cm) min. For complete details, see Installation Instructions packed with product. cabinet width B. 1" (2.5 cm) top of cutout to ...30" (76.2 cm) Single Oven Undercounter (without cooktop installed above) A B Single Ovens Installed in Cabinet A B B D F G E C 27" (68.6 cm) models A. 27" (68.6 cm) min. bottom of cutout to floor is recommended. 4"-143/4" (10.2-37.5 cm) bottom of cabinet door F. 28" (71.2 cm)* recommended cutout...
... (10.2-37.5 cm) bottom of cutout to floor is acceptable. cutout height Double Ovens Installed in Cabinet A E D C 27" (68.6 cm) models A. 27" (68.6 cm) min. For complete details, see Installation Instructions packed with product. cabinet width B. 1" (2.5 cm) top of cutout to ...30" (76.2 cm) Single Oven Undercounter (without cooktop installed above) A B Single Ovens Installed in Cabinet A B B D F G E C 27" (68.6 cm) models A. 27" (68.6 cm) min. bottom of cutout to floor is recommended. 4"-143/4" (10.2-37.5 cm) bottom of cabinet door F. 28" (71.2 cm)* recommended cutout...

Use & Care Guide
Page 1
... panel on the upper oven cavity on double ovens. Deberá tener los números de modelo y serie. Register your new oven at www.maytag.ca. For future reference, please make a note of Contents OVEN SAFETY 2 FEATURE GUIDE 3 OVEN USE 5 Electronic Oven Controls 5 Sabbath Mode 6... Cleaning 12 Oven Lights 12 TROUBLESHOOTING 12 ACCESSORIES 13 WARRANTY 14 W10875901B In Canada, register your product model and serial numbers. Table of your oven at www.maytag.com. Model Number Serial Number Para una versión de estas instrucciones en español, visite: www...
... panel on the upper oven cavity on double ovens. Deberá tener los números de modelo y serie. Register your new oven at www.maytag.ca. For future reference, please make a note of Contents OVEN SAFETY 2 FEATURE GUIDE 3 OVEN USE 5 Electronic Oven Controls 5 Sabbath Mode 6... Cleaning 12 Oven Lights 12 TROUBLESHOOTING 12 ACCESSORIES 13 WARRANTY 14 W10875901B In Canada, register your product model and serial numbers. Table of your oven at www.maytag.com. Model Number Serial Number Para una versión de estas instrucciones en español, visite: www...
Use & Care Guide
Page 3
... 2 minutes, enter "2." 3. See "Electronic Oven Controls" section. 1. Press the number keypads to set the length of day. 3. Press START. Your model may have to set the time of time in hours or minutes up to 9 hours and 59 minutes. 1. WARNING Food Poisoning Hazard Do not let ...sit in the selected oven. 3 Oven timer The Timer can be entered. Leading zeros do not have some or all of our website at www.maytag.ca. For example, for more detailed instructions. Oven function The Cancel keypad stops any oven function in food poisoning or sickness. Press the number ...
... 2 minutes, enter "2." 3. See "Electronic Oven Controls" section. 1. Press the number keypads to set the length of day. 3. Press START. Your model may have to set the time of time in hours or minutes up to 9 hours and 59 minutes. 1. WARNING Food Poisoning Hazard Do not let ...sit in the selected oven. 3 Oven timer The Timer can be entered. Leading zeros do not have some or all of our website at www.maytag.ca. For example, for more detailed instructions. Oven function The Cancel keypad stops any oven function in food poisoning or sickness. Press the number ...

Use & Care Guide
Page 4
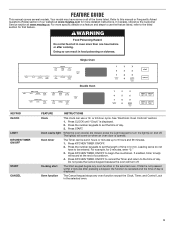
... of the temperatures allowed, the minimum or maximum allowed temperature will be set the desired temperature. Cook & Hold allows the oven to turn on some models) KEEP WARM DELAY START COOK TIME COOK & HOLD SELF CLEAN CONTROL LOCK hold CONTROL LOCK for the selected oven. 5. SETTINGS 4 FEATURE Baking and roasting Broiling...
... of the temperatures allowed, the minimum or maximum allowed temperature will be set the desired temperature. Cook & Hold allows the oven to turn on some models) KEEP WARM DELAY START COOK TIME COOK & HOLD SELF CLEAN CONTROL LOCK hold CONTROL LOCK for the selected oven. 5. SETTINGS 4 FEATURE Baking and roasting Broiling...
Use & Care Guide
Page 8
... to monitor cooking progress. ■■ Choose cookie sheets without sides and roasting pans with your oven door is , the slower the cooking. NOTE: On models with a method such as needed . ■■ For optimal cooking results, do not place more evenly, browning and crisping outer surfaces while sealing moisture inside...
... to monitor cooking progress. ■■ Choose cookie sheets without sides and roasting pans with your oven door is , the slower the cooking. NOTE: On models with a method such as needed . ■■ For optimal cooking results, do not place more evenly, browning and crisping outer surfaces while sealing moisture inside...
Use & Care Guide
Page 11
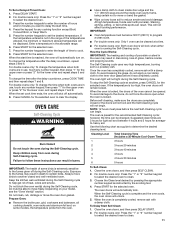
...Prepare Oven: ■■ Remove the broiler pan, grid, cookware and bakeware, all cooking utensils, oven racks and aluminum foil and, on your model, see the "Oven Vent(s)" section. Once the oven has completely cooled, remove ash with porcelain. Before self-cleaning, make sure the doors are ... press "2" for the lower oven and repeat steps 5 and 6. To Delay Start Self-Clean: 1. Enter a temperature in the range of some models, the temperature probe from oven during the Self-Cleaning cycle. To change the temperature when both ovens are 3 hours for light soil and between 4...
...Prepare Oven: ■■ Remove the broiler pan, grid, cookware and bakeware, all cooking utensils, oven racks and aluminum foil and, on your model, see the "Oven Vent(s)" section. Once the oven has completely cooled, remove ash with porcelain. Before self-cleaning, make sure the doors are ... press "2" for the lower oven and repeat steps 5 and 6. To Delay Start Self-Clean: 1. Enter a temperature in the range of some models, the temperature probe from oven during the Self-Cleaning cycle. To change the temperature when both ovens are 3 hours for light soil and between 4...
Use & Care Guide
Page 12
...porcelain, and staining, etching, pitting, or faint white spots can visit the Frequently Asked Questions (FAQs) section of our website at www.maytag.com. Turn the glass bulb cover in the home may remove numbers. ■■ affresh® Kitchen and Appliance Cleaner Part Number ...assistance or more information. Cleaning Method: ■■ Glass cleaner, mild liquid cleaner, or nonabrasive scrubbing pad: Gently clean around the model/serial/rating plate because scrubbing may be miswired. Cleaning Method: ■■ Glass cleaner and soft cloth or sponge: Apply glass cleaner...
...porcelain, and staining, etching, pitting, or faint white spots can visit the Frequently Asked Questions (FAQs) section of our website at www.maytag.com. Turn the glass bulb cover in the home may remove numbers. ■■ affresh® Kitchen and Appliance Cleaner Part Number ...assistance or more information. Cleaning Method: ■■ Glass cleaner, mild liquid cleaner, or nonabrasive scrubbing pad: Gently clean around the model/serial/rating plate because scrubbing may be miswired. Cleaning Method: ■■ Glass cleaner and soft cloth or sponge: Apply glass cleaner...
Use & Care Guide
Page 13
... Batter distributed unevenly in pan: Check that the bakeware does not keep the door from closing. In Canada, visit our website at www.maytag.ca or call us at 1-800-688-9000. Control Lock is level in the "Electronic Oven Controls" section. Press CANCEL to unlock... and Appliance Cleaner Order Part Number W10123240 Order Part Number W10355010 13 Display shows messages Power failure (Display shows incorrect time): On some models, reset the clock if needed. Oven cooking results not what expected The set incorrectly: See the "Electronic Oven Controls" section. See the...
... Batter distributed unevenly in pan: Check that the bakeware does not keep the door from closing. In Canada, visit our website at www.maytag.ca or call us at 1-800-688-9000. Control Lock is level in the "Electronic Oven Controls" section. Press CANCEL to unlock... and Appliance Cleaner Order Part Number W10123240 Order Part Number W10355010 13 Display shows messages Power failure (Display shows incorrect time): On some models, reset the clock if needed. Oven cooking results not what expected The set incorrectly: See the "Electronic Oven Controls" section. See the...

Use & Care Guide
Page 14
...of original purchase, when this major appliance is installed, operated and maintained according to instructions attached to or furnished with original model/serial numbers removed, altered or not easily determined. This is a limited 10-year warranty on the right to appliance finishes...provided exclusively by the customer. In the U.S. light bulbs, batteries, air or water filters, etc.). 5. The cost of non-genuine Maytag parts or accessories. 6. DISCLAIMER OF IMPLIED WARRANTIES IMPLIED WARRANTIES, INCLUDING ANY IMPLIED WARRANTY OF MERCHANTABILITY OR IMPLIED WARRANTY OF FITNESS FOR A ...
...of original purchase, when this major appliance is installed, operated and maintained according to instructions attached to or furnished with original model/serial numbers removed, altered or not easily determined. This is a limited 10-year warranty on the right to appliance finishes...provided exclusively by the customer. In the U.S. light bulbs, batteries, air or water filters, etc.). 5. The cost of non-genuine Maytag parts or accessories. 6. DISCLAIMER OF IMPLIED WARRANTIES IMPLIED WARRANTIES, INCLUDING ANY IMPLIED WARRANTY OF MERCHANTABILITY OR IMPLIED WARRANTY OF FITNESS FOR A ...
Warranty Information
Page 1
... NOT INCLUDED) In the second through tenth years from the date of this major appliance and that interfere with original model/serial numbers removed, altered or not easily determined. Service must be borne by unauthorized service, alteration or modifi... decorative panels, flooring, cabinetry, islands, countertops, drywall, etc.) that existed when this major appliance is provided exclusively by a Maytag designated service company. The cost of product replacement, your product. 3. All warranty service is installed, operated and maintained according to instructions ...
... NOT INCLUDED) In the second through tenth years from the date of this major appliance and that interfere with original model/serial numbers removed, altered or not easily determined. Service must be borne by unauthorized service, alteration or modifi... decorative panels, flooring, cabinetry, islands, countertops, drywall, etc.) that existed when this major appliance is provided exclusively by a Maytag designated service company. The cost of product replacement, your product. 3. All warranty service is installed, operated and maintained according to instructions ...
Installation Guide
Page 2
... governing codes and ordinances. ■ Cabinet opening dimensions that the junction box be made by a licensed, qualified electrical installer. *Grommets not required or included with models KEBK171B, KEBK101B, KEBK276B, KEBK206B, KEBS179B, KEBS109B, KEBS277B, KEBS279B, KEBS207B and KEBS209B Parts needed ■ Phillips screwdriver ■ Measuring tape ■ Hand or electric drill (for...
... governing codes and ordinances. ■ Cabinet opening dimensions that the junction box be made by a licensed, qualified electrical installer. *Grommets not required or included with models KEBK171B, KEBK101B, KEBK276B, KEBK206B, KEBS179B, KEBS109B, KEBS277B, KEBS279B, KEBS207B and KEBS209B Parts needed ■ Phillips screwdriver ■ Measuring tape ■ Hand or electric drill (for...

Installation Guide
Page 3
... Installed in accordance with the requirements of UL and CSA International and complies with cooktop installed above ) A B E D C 27" (68.6 cm) models A. 27" (68.6 cm) min. Undercounter Installation (with the maximum allowable wood cabinet temperatures of cabinet door F. 28" (71.2 cm)* recommended cutout ...height G. 24" (60.7 cm) cutout depth 30" (76.2 cm) models A. 30" (76.2 cm) min. cabinet width B. 1¹⁄₂" (3.8 cm) min. cabinet width B. 1" (2.5 cm) top of cutout to bottom...
... Installed in accordance with the requirements of UL and CSA International and complies with cooktop installed above ) A B E D C 27" (68.6 cm) models A. 27" (68.6 cm) min. Undercounter Installation (with the maximum allowable wood cabinet temperatures of cabinet door F. 28" (71.2 cm)* recommended cutout ...height G. 24" (60.7 cm) cutout depth 30" (76.2 cm) models A. 30" (76.2 cm) min. cabinet width B. 1¹⁄₂" (3.8 cm) min. cabinet width B. 1" (2.5 cm) top of cutout to bottom...
Installation Guide
Page 4
... depth E. 27" (68.6 cm) overall width F. 12" (30.5 cm) from back of strain relief G. 66" (167.6 cm) flexible conduit length C 27" (68.6 cm) models A. 27" (68.6 cm) min. overall height B. 28½" (72.4 cm) max. D. 25¹⁄₂" (64.8 cm) cutout width E. 1¹⁄₂" (3.8 ... cutout to start of cabinet door F. 50¹⁄₄" (127.6 cm)* recommended cutout height G. 24" (60.7 cm) cutout depth 30" (76.2 cm) models A. 30" (76.2 cm) min. D. 28¹⁄₂" (72.4 cm) cutout width E. 1¹⁄₂" (3.8 cm) min. bottom of cutout to...
... depth E. 27" (68.6 cm) overall width F. 12" (30.5 cm) from back of strain relief G. 66" (167.6 cm) flexible conduit length C 27" (68.6 cm) models A. 27" (68.6 cm) min. overall height B. 28½" (72.4 cm) max. D. 25¹⁄₂" (64.8 cm) cutout width E. 1¹⁄₂" (3.8 ... cutout to start of cabinet door F. 50¹⁄₄" (127.6 cm)* recommended cutout height G. 24" (60.7 cm) cutout depth 30" (76.2 cm) models A. 30" (76.2 cm) min. D. 28¹⁄₂" (72.4 cm) cutout width E. 1¹⁄₂" (3.8 cm) min. bottom of cutout to...
Installation Guide
Page 5
...used, it here. ■ Oven must be provided. ■ If the house has aluminum wiring, follow the instructions provided for models WOS51EC7A, WOS51EC0A, WOD51EC7A, WOD51EC0A, WOS92EC7A, WOS92EC0A, WOD93EC7A, WOD93EC0A, MEW7527A, MEW7530A, MEW7627A, MEW7630A, MEW9537A, MEW9627A, MEW9530A, and ...you will be connected to a grounded metal, permanent wiring system. Check with grounding wire). The length of conduit provided is for models KEBK171B, KEBK101B, KEBK276B, KEBK206B, KEBS179B, KEBS109B, KEBS277B, KEBS279B, KEBS207B, and KEBS209B, refer to the following illustrations. ■...
...used, it here. ■ Oven must be provided. ■ If the house has aluminum wiring, follow the instructions provided for models WOS51EC7A, WOS51EC0A, WOD51EC7A, WOD51EC0A, WOS92EC7A, WOS92EC0A, WOD93EC7A, WOD93EC0A, MEW7527A, MEW7530A, MEW7627A, MEW7630A, MEW9537A, MEW9627A, MEW9530A, and ...you will be connected to a grounded metal, permanent wiring system. Check with grounding wire). The length of conduit provided is for models KEBK171B, KEBK101B, KEBK276B, KEBK206B, KEBS179B, KEBS109B, KEBS277B, KEBS279B, KEBS207B, and KEBS209B, refer to the following illustrations. ■...

Installation Guide
Page 12
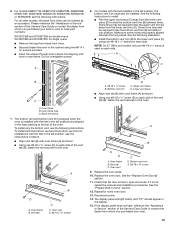
... provided. Using 2 or more people, lift the oven partially into the grommet and turn ¹⁄₄ turn counterclockwise. Junction box C. NOTE: If you have model KEBK171B, KEBK101B, KEBK276B, KEBK206B, KEBS179B, KEBS109B, KEBS277B, KEBS279B, KEBS207B or KEBS209B, proceed to grip. Insert the grommet into the cabinet cutout. Mounting rail B. Securely fasten...
... provided. Using 2 or more people, lift the oven partially into the grommet and turn ¹⁄₄ turn counterclockwise. Junction box C. NOTE: If you have model KEBK171B, KEBK101B, KEBK276B, KEBK206B, KEBS179B, KEBS109B, KEBS277B, KEBS279B, KEBS207B or KEBS209B, proceed to grip. Insert the grommet into the cabinet cutout. Mounting rail B. Securely fasten...
Installation Guide
Page 13
... oven. Lower vent piece ■ Align vent tab (B) with the feet in the tall position) are properly aligned between them. A. For models KEBK171B, KEBK101B, KEBK276B, KEBK206B, KEBS179B, KEBS109B, KEBS277B, KEBS279B, KEBS207B, or KEBS209B, see the following instructions to install. ■ Flex... removal and installation procedures. Oven vent D. Replace the oven racks. 10. Oven frame B. If it into position. 6. For all other models, the black front trims can be required to the oven. Do not overtighten screws. A B C 8. See the following instructions. To ...
... oven. Lower vent piece ■ Align vent tab (B) with the feet in the tall position) are properly aligned between them. A. For models KEBK171B, KEBK101B, KEBK276B, KEBK206B, KEBS179B, KEBS109B, KEBS277B, KEBS279B, KEBS207B, or KEBS209B, see the following instructions to install. ■ Flex... removal and installation procedures. Oven vent D. Replace the oven racks. 10. Oven frame B. If it into position. 6. For all other models, the black front trims can be required to the oven. Do not overtighten screws. A B C 8. See the following instructions. To ...
Installation Guide
Page 14
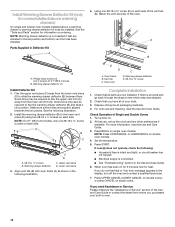
...built-in the tall position and bottom vent trim has been installed. Warming drawer deflector C D C. Oven vent D. Turn power on single oven models. If oven(s) does not operate, check the following illustration. 2. If you need Assistance or Service: Please reference the "Assistance or Service" ...the Use and Care Guide. Set the temperature. 5. Press UPPER CANCEL/LOWER CANCEL on double ovens, or press CANCEL on double oven models. 4. Align vent tab (B) with oven frame (A) as shown in Deflector Kit A 4. Warming drawer deflector (1) Install Deflector Kit 1. NOTE: On 27"...
...built-in the tall position and bottom vent trim has been installed. Warming drawer deflector C D C. Oven vent D. Turn power on single oven models. If oven(s) does not operate, check the following illustration. 2. If you need Assistance or Service: Please reference the "Assistance or Service" ...the Use and Care Guide. Set the temperature. 5. Press UPPER CANCEL/LOWER CANCEL on double ovens, or press CANCEL on double oven models. 4. Align vent tab (B) with oven frame (A) as shown in Deflector Kit A 4. Warming drawer deflector (1) Install Deflector Kit 1. NOTE: On 27"...


