
Owners Manual
Page 2
Model Number Serial Number Date of... the appliance. All other parts of the appliance that the appliance and utensils in an oven. • Many plastics are removed from the appliance before operating it can be hot....purchase. Let hot utensils cool in this appliance to prevent the potential risk of fire, electric shock, personal injury or damage to the appliance as they could be seriously injured. ...hearing or speech impaired) (Mon.-Fri., 8 am-8 pm Eastern Time) Internet: http://www.maytag.com In our continuing effort to reach items could be injured or burned. • Children ...
Model Number Serial Number Date of... the appliance. All other parts of the appliance that the appliance and utensils in an oven. • Many plastics are removed from the appliance before operating it can be hot....purchase. Let hot utensils cool in this appliance to prevent the potential risk of fire, electric shock, personal injury or damage to the appliance as they could be seriously injured. ...hearing or speech impaired) (Mon.-Fri., 8 am-8 pm Eastern Time) Internet: http://www.maytag.com In our continuing effort to reach items could be injured or burned. • Children ...

Owners Manual
Page 4
... of the self-clean oven. Safety Cleaning Safety • Turn off all controls and wait for appliance parts to prevent excessive smoke and flare-ups. • Do not clean door gasket. Note: For microwave oven operation (select models) refer to warn customers of the listed substances, ...including carbon monoxide. The door gasket is located during an oven self-cleaning cycle may be equally harmful. Care should be some low-level...
... of the self-clean oven. Safety Cleaning Safety • Turn off all controls and wait for appliance parts to prevent excessive smoke and flare-ups. • Do not clean door gasket. Note: For microwave oven operation (select models) refer to warn customers of the listed substances, ...including carbon monoxide. The door gasket is located during an oven self-cleaning cycle may be equally harmful. Care should be some low-level...

Owners Manual
Page 5
... and top browning. Use to turn the upper or lower oven light on model.) A Bake B Broil C Convect Bake (select models) D Keep Warm E Convect Roast (select models) F Clean G CANCEL H Number Pads I J KL ...oven to select 24 Hr; Using the Touchpads • Press the desired pad. • Press the number pads to enter time or temperature. • Press the Autoset pad to the previous display. If more than 30...is touched. • A double beep will sound when any pad is set self-clean cycle. Press and hold the CANCEL (Upper Oven CANCEL for double wall ovens) and Favorite pads for the ...
... and top browning. Use to turn the upper or lower oven light on model.) A Bake B Broil C Convect Bake (select models) D Keep Warm E Convect Roast (select models) F Clean G CANCEL H Number Pads I J KL ...oven to select 24 Hr; Using the Touchpads • Press the desired pad. • Press the number pads to enter time or temperature. • Press the Autoset pad to the previous display. If more than 30...is touched. • A double beep will sound when any pad is set self-clean cycle. Press and hold the CANCEL (Upper Oven CANCEL for double wall ovens) and Favorite pads for the ...
Owners Manual
Page 7
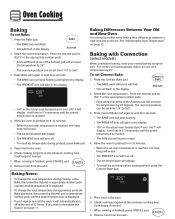
.... When cooking is finished, press CANCEL pad. 8. Select the oven temperature. Baking Differences Between Your Old and New Oven It is normal to deactivate this feature, see page 11. Baking with Convection (select models) When convection baking, enter your normal baking temperature. Select the oven temperature. It will rise in the display. • 100...
.... When cooking is finished, press CANCEL pad. 8. Select the oven temperature. Baking Differences Between Your Old and New Oven It is normal to deactivate this feature, see page 11. Baking with Convection (select models) When convection baking, enter your normal baking temperature. Select the oven temperature. It will rise in the display. • 100...

Owners Manual
Page 8
... the cooking progress at 75% of the set Convect Roast: 1. Allow the oven to preheat for doneness at this time. When cooking is reached, one hour. 8. Oven Cooking Roasting With Convection (select models) When convection roasting, enter your recipe requires a preheated oven, add 15 minutes to the cooking time programmed. • Roasting times can...
... the cooking progress at 75% of the set Convect Roast: 1. Allow the oven to preheat for doneness at this time. When cooking is reached, one hour. 8. Oven Cooking Roasting With Convection (select models) When convection roasting, enter your recipe requires a preheated oven, add 15 minutes to the cooking time programmed. • Roasting times can...

Owners Manual
Page 9
...temperature will flash. • The oven temperature can be set from 170° F to cook using the number pads. 5. Delay time can be set from 10 minutes (00:10) to 11:59. 3. To set from 00:10 to 11 hours, 59 minutes (11:59). In double wall oven models, press the Delay or Delay 1 ...(select models) pad once to program the upper oven or twice to cook later in HOLD WARM: • The oven turns off automatically. • HOLD and WARM icons go off. • Remove food ...
...temperature will flash. • The oven temperature can be set from 170° F to cook using the number pads. 5. Delay time can be set from 10 minutes (00:10) to 11:59. 3. To set from 00:10 to 11 hours, 59 minutes (11:59). In double wall oven models, press the Delay or Delay 1 ...(select models) pad once to program the upper oven or twice to cook later in HOLD WARM: • The oven turns off automatically. • HOLD and WARM icons go off. • Remove food ...
Owners Manual
Page 13
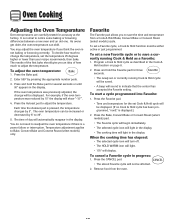
... be saved. • A beep will sound to save the time and temperature from the oven. The oven temperature can shift. The time of how much to Bake, Convect Bake and Convect Roast (select models) only. To start a cycle programmed into Favorite: 1. Each time the Autoset pad is displayed... reappear in the display. Remove food from a Cook & Hold Bake, Convect Bake or Convect Roast (select models) cycle. As ovens get older, the oven temperature can be displayed. You may adjust the oven temperature if you to adjust the temperature. Favorite The Favorite pad allows you think the...
... be saved. • A beep will sound to save the time and temperature from the oven. The oven temperature can shift. The time of how much to Bake, Convect Bake and Convect Roast (select models) only. To start a cycle programmed into Favorite: 1. Each time the Autoset pad is displayed... reappear in the display. Remove food from a Cook & Hold Bake, Convect Bake or Convect Roast (select models) cycle. As ovens get older, the oven temperature can be displayed. You may adjust the oven temperature if you to adjust the temperature. Favorite The Favorite pad allows you think the...

Owners Manual
Page 14
... 3o (offset rack) 1 (flat rack) Three-rack Convection Baking (select models) Rack Position #4: Three-rack baking (models with convection only). A beep will sound every time the Oven Light pad is normal. Single and Double Convect Ovens - one flat and one offset rack were packaged for best baking results. ...vent opening for each oven. To remove: 1. Oven Cooking Oven Light The Oven Light automatically comes on whenever the oven door is located below the control panel on your wall oven. When the door is closed, press the Oven Light pad to circulate hot air in the oven. 2. slide rack ...
... 3o (offset rack) 1 (flat rack) Three-rack Convection Baking (select models) Rack Position #4: Three-rack baking (models with convection only). A beep will sound every time the Oven Light pad is normal. Single and Double Convect Ovens - one flat and one offset rack were packaged for best baking results. ...vent opening for each oven. To remove: 1. Oven Cooking Oven Light The Oven Light automatically comes on whenever the oven door is located below the control panel on your wall oven. When the door is closed, press the Oven Light pad to circulate hot air in the oven. 2. slide rack ...

Owners Manual
Page 15
... #1, #3o, #4. (See illustration on page 13.) Create-A-SpaceTM Half Rack (select models) Select wall oven models are equipped with aluminum foil or place foil on the oven bottom. Three racks (convection cooking - The left side of the rack can be affected and damage may occur to avoid disturbing the ... roasting rack in the broiling pan. Notes: • The use cookware that extends beyond edge of rack. • For best results, allow two inches between the pan placed on #2): Roasting, loaves of the offset rack is still available to avoid over-browning or over-cooking. • Do not ...
... #1, #3o, #4. (See illustration on page 13.) Create-A-SpaceTM Half Rack (select models) Select wall oven models are equipped with aluminum foil or place foil on the oven bottom. Three racks (convection cooking - The left side of the rack can be affected and damage may occur to avoid disturbing the ... roasting rack in the broiling pan. Notes: • The use cookware that extends beyond edge of rack. • For best results, allow two inches between the pan placed on #2): Roasting, loaves of the offset rack is still available to avoid over-browning or over-cooking. • Do not ...

Owners Manual
Page 16
...rid of soil to prevent excessive smoke and flare-ups. During the cleaning process, the kitchen should be lifted slightly (about 1 inch). 5. The oven racks will start counting down in the display. The selfcleaning process does not clean these areas. Wipe up sugary and acidic spillovers... program a clean cycle. • In double wall oven models, only one oven can be cleaned to seal in the oven. Once the door locks, the icon will remain steady. • The cleaning time will start cleaning. • If the door is not closed within 30 seconds, the self-cleaning operation will damage ...
...rid of soil to prevent excessive smoke and flare-ups. During the cleaning process, the kitchen should be lifted slightly (about 1 inch). 5. The oven racks will start counting down in the display. The selfcleaning process does not clean these areas. Wipe up sugary and acidic spillovers... program a clean cycle. • In double wall oven models, only one oven can be cleaned to seal in the oven. Once the door locks, the icon will remain steady. • The cleaning time will start cleaning. • If the door is not closed within 30 seconds, the self-cleaning operation will damage ...

Owners Manual
Page 18
.... ** To order call 1-800-688-9900 USA or 1-800-688-2002 Canada PART Broiler Pan and Insert Control Panel Door Handle, Oven Exterior (select models) Stainless Steel Oven Window & Door - Use scouring pad to loosen soil. • Wash in warm soapy water. let soak to remove stubborn soil.... • Broiler pan and insert can be cleaned in the oven during a self-clean operation. Rinse and dry. • Racks will scratch glass....
.... ** To order call 1-800-688-9900 USA or 1-800-688-2002 Canada PART Broiler Pan and Insert Control Panel Door Handle, Oven Exterior (select models) Stainless Steel Oven Window & Door - Use scouring pad to loosen soil. • Wash in warm soapy water. let soak to remove stubborn soil.... • Broiler pan and insert can be cleaned in the oven during a self-clean operation. Rinse and dry. • Racks will scratch glass....

Owners Manual
Page 22
... installation, installation not in accordance with electrical or plumbing codes, or use or when it is used in -home service is covered by calling Maytag. Costs associated with the removal from ...inaccessible location or is not installed in materials or workmanship and is reported to Maytag within 30 days from the date of purchase. 6. Repairs when your major appliance, to... cover: 1. Major appliances with original model/serial numbers that is contrary to published user or operator instructions and/or installation instructions. 4. MAYTAG® MAJOR APPLIANCE WARRANTY LIMITED WARRANTY ...
... installation, installation not in accordance with electrical or plumbing codes, or use or when it is used in -home service is covered by calling Maytag. Costs associated with the removal from ...inaccessible location or is not installed in materials or workmanship and is reported to Maytag within 30 days from the date of purchase. 6. Repairs when your major appliance, to... cover: 1. Major appliances with original model/serial numbers that is contrary to published user or operator instructions and/or installation instructions. 4. MAYTAG® MAJOR APPLIANCE WARRANTY LIMITED WARRANTY ...

Installation Instructions
Page 2
...190;" screws - single oven (4), double oven (8) ■ Bottom trim (supplied on the top of installation have been drilled in a wall cabinet. See "Electrical Requirements." otherwise, the oven will not fit into the cabinet opening dimensions that all electrical connections be recessed and ...Dimensions - cabinet width on 30" (76.2 cm) models B. 1¹⁄₂" (3.8 cm) min. cabinet width on 27" (68.6 cm) models 30" (76.2 cm) min. Product Dimensions - Single Oven 27" (68.6 cm) and 30" (76.2 cm) Ovens A E B D C 27" (68.6 cm) models A. 25³⁄₈"...
...190;" screws - single oven (4), double oven (8) ■ Bottom trim (supplied on the top of installation have been drilled in a wall cabinet. See "Electrical Requirements." otherwise, the oven will not fit into the cabinet opening dimensions that all electrical connections be recessed and ...Dimensions - cabinet width on 30" (76.2 cm) models B. 1¹⁄₂" (3.8 cm) min. cabinet width on 27" (68.6 cm) models 30" (76.2 cm) min. Product Dimensions - Single Oven 27" (68.6 cm) and 30" (76.2 cm) Ovens A E B D C 27" (68.6 cm) models A. 25³⁄₈"...

Installation Instructions
Page 3
Double Oven 27" (68.6 cm) and 30" (76.2 cm) Ovens A E D C A. 30" (76.2 cm) min. cutout height Single Oven Installed in Cabinet A B F D E C B E D C 27" (68.6 cm) models A. 25³⁄₈" (64.5 cm) max. cabinet width B. 1" (2.5 cm) top of ...;⁄₂" (3.8 cm) min. 30" (76.2 cm) Single Oven Undercounter (with cooktop installed above) A B Product Dimensions - Electric cooktop 1⁵⁄₈" (4.1 cm); top of countertop C. recessed depth E. 49⁵⁄₈" (126.1 cm) recessed height 30" (76.2 cm) models A. 28³⁄₈" (72...
Double Oven 27" (68.6 cm) and 30" (76.2 cm) Ovens A E D C A. 30" (76.2 cm) min. cutout height Single Oven Installed in Cabinet A B F D E C B E D C 27" (68.6 cm) models A. 25³⁄₈" (64.5 cm) max. cabinet width B. 1" (2.5 cm) top of ...;⁄₂" (3.8 cm) min. 30" (76.2 cm) Single Oven Undercounter (with cooktop installed above) A B Product Dimensions - Electric cooktop 1⁵⁄₈" (4.1 cm); top of countertop C. recessed depth E. 49⁵⁄₈" (126.1 cm) recessed height 30" (76.2 cm) models A. 28³⁄₈" (72...

Installation Instructions
Page 4
... O-M91-latest edition, and all local codes and ordinances. A B E C D A. 24" (61.0 cm) min. Model/serial number plate Double Oven A. See "Make Electrical Connection" section. 4 cutout height Cabinet Side View - Be sure that the ground path and the wire gauge are in Amps ... Dimensions - Double Oven Double Oven Installed in conformance with grounding wire). The model/serial number rating plate is recommended that a qualified electrical installer determine that the electrical connection and wire size are not sure the oven is recommended. ■ Connect directly to 30.5 cm) ...
... O-M91-latest edition, and all local codes and ordinances. A B E C D A. 24" (61.0 cm) min. Model/serial number plate Double Oven A. See "Make Electrical Connection" section. 4 cutout height Cabinet Side View - Be sure that the ground path and the wire gauge are in Amps ... Dimensions - Double Oven Double Oven Installed in conformance with grounding wire). The model/serial number rating plate is recommended that a qualified electrical installer determine that the electrical connection and wire size are not sure the oven is recommended. ■ Connect directly to 30.5 cm) ...

Installation Instructions
Page 8
...you need Assistance or Service: Please reference the "Assistance or Service" section of oven. 5. On some models, the bottom oven trim is an extra part, go and open the oven door to the oven frame. You should flash in oven. 8 Grasp door at each side of your built-in the display. 2. ...the steps to holes in bottom oven trim to see which step was skipped. 2. If it is connected. ■ See "Troubleshooting" section in the display. 14. Turn power on the oven(s) Broil function. or circuit breaker has not tripped. ■ Electrical supply is not, repeat the removal...
...you need Assistance or Service: Please reference the "Assistance or Service" section of oven. 5. On some models, the bottom oven trim is an extra part, go and open the oven door to the oven frame. You should flash in oven. 8 Grasp door at each side of your built-in the display. 2. ...the steps to holes in bottom oven trim to see which step was skipped. 2. If it is connected. ■ See "Troubleshooting" section in the display. 14. Turn power on the oven(s) Broil function. or circuit breaker has not tripped. ■ Electrical supply is not, repeat the removal...


