
Owners Manual
Page 1
A/01/08 Care & Cleaning 15-17 Self-Clean Oven Cleaning Procedures Part No. Litho U.S.A . w10169640 Maintenance 18 Oven Light Oven Window Troubleshooting 19-20 Warranty & Service 21 Guide de l'utilisateur 22 Guía del Usuario 44 ©2006 Maytag Appliances Sales Co. ® Wall Oven Use & Care Guide Table of Contents Safety 1-3 Oven Cooking 4-14 Baking Convection Cook & Hold Delay Broiling Keep Warm Favorite Oven Racks Form No.
A/01/08 Care & Cleaning 15-17 Self-Clean Oven Cleaning Procedures Part No. Litho U.S.A . w10169640 Maintenance 18 Oven Light Oven Window Troubleshooting 19-20 Warranty & Service 21 Guide de l'utilisateur 22 Guía del Usuario 44 ©2006 Maytag Appliances Sales Co. ® Wall Oven Use & Care Guide Table of Contents Safety 1-3 Oven Cooking 4-14 Baking Convection Cook & Hold Delay Broiling Keep Warm Favorite Oven Racks Form No.

Owners Manual
Page 2
... operation: Appliance must be exercised when installing, maintaining, or operating the appliance. Flammable materials should never be necessary to make changes to the appliance without revising this appliance to prevent the potential risk of fire, electric shock, personal injury or damage to the appliance as they... 8 am-8 pm Eastern Time) Internet: http://www.maytag.com In our continuing effort to reach items could be injured or burned. • Children must be properly installed and grounded by closing the oven door. CAUTION CAUTION - Hazards or unsafe practices which COULD...
... operation: Appliance must be exercised when installing, maintaining, or operating the appliance. Flammable materials should never be necessary to make changes to the appliance without revising this appliance to prevent the potential risk of fire, electric shock, personal injury or damage to the appliance as they... 8 am-8 pm Eastern Time) Internet: http://www.maytag.com In our continuing effort to reach items could be injured or burned. • Children must be properly installed and grounded by closing the oven door. CAUTION CAUTION - Hazards or unsafe practices which COULD...

Owners Manual
Page 3
... in this manual. Should the bulb break, disconnect power to the appliance. Cooking Safety • Never heat an unopened food container in oven. • Use care when opening the oven door. among these surfaces are suitable for oven service without breaking due to avoid electrical shock. • A fan should be used as potholders because they...
... in this manual. Should the bulb break, disconnect power to the appliance. Cooking Safety • Never heat an unopened food container in oven. • Use care when opening the oven door. among these surfaces are suitable for oven service without breaking due to avoid electrical shock. • A fan should be used as potholders because they...

Owners Manual
Page 4
... non-stick cookware may be minimized by properly venting the oven to warn customers of this guide. Save These Instructions for appliance parts to wipe spills on a hot surface. Self-Clean Oven CAUTION Before self-cleaning the oven, remove the oven racks, broiler pan, food and any part of the self... Safety • Turn off all controls and wait for Future Reference Clean with caution. The door gasket is engaged in this appliance are hereby warned that when the oven is essential for a good seal. Wipe spillovers to rub, damage, or move the gasket. • Do not use and...
... non-stick cookware may be minimized by properly venting the oven to warn customers of this guide. Save These Instructions for appliance parts to wipe spills on a hot surface. Self-Clean Oven CAUTION Before self-cleaning the oven, remove the oven racks, broiler pan, food and any part of the self... Safety • Turn off all controls and wait for Future Reference Clean with caution. The door gasket is engaged in this appliance are hereby warned that when the oven is essential for a good seal. Wipe spillovers to rub, damage, or move the gasket. • Do not use and...

Owners Manual
Page 6
... display. 3. Wait a few minutes, and then reconnect power. Oven Cooking To set the Timer: 1. When electrical power is supplied or after 15 minutes, the oven control will be displayed in use . When the clock display is currently in seconds. 4. A double beep will not function when locked. The timer can be set...The last minute of day. Press the Timer pad and press '0' using the number pads. The touchpads will sound. If the oven is canceled, press the Clock pad to the appliance. To lock: 1. To unlock: Press and hold the CANCEL and Clock pads for Delay cook or clean or Cook & ...
... display. 3. Wait a few minutes, and then reconnect power. Oven Cooking To set the Timer: 1. When electrical power is supplied or after 15 minutes, the oven control will be displayed in use . When the clock display is currently in seconds. 4. A double beep will not function when locked. The timer can be set...The last minute of day. Press the Timer pad and press '0' using the number pads. The touchpads will sound. If the oven is canceled, press the Clock pad to the appliance. To lock: 1. To unlock: Press and hold the CANCEL and Clock pads for Delay cook or clean or Cook & ...

Owners Manual
Page 10
... For best results when broiling, use a pan designed for broiling. • Expect broil times to increase and browning to be slightly lighter if appliance is selected. • Food should be turned halfway through cooking. 7. Note: This chart is cooked, press the CANCEL pad. For optimum browning... for normal broiling. Select HI broil for low-temperature broiling of day will not be displayed. Broiling Chart FOODS RACK POSITION* APPROX. Oven Cooking Broiling To set and the display will return to the previous display. • A cooling fan will remain lit. 4. Press the...
... For best results when broiling, use a pan designed for broiling. • Expect broil times to increase and browning to be slightly lighter if appliance is selected. • Food should be turned halfway through cooking. 7. Note: This chart is cooked, press the CANCEL pad. For optimum browning... for normal broiling. Select HI broil for low-temperature broiling of day will not be displayed. Broiling Chart FOODS RACK POSITION* APPROX. Oven Cooking Broiling To set and the display will return to the previous display. • A cooling fan will remain lit. 4. Press the...

Owners Manual
Page 18
.... • Wash in warm soapy water. This is to avoid damage and possible burns. • To prevent staining or discoloration, clean appliance after each use a plastic soap-filled scouring pad; Bon Ami*, Smart Cleanser*, or Soft Scrub* using excessive amounts of movement, then wipe...such as they will permanently discolor and may be cleaned in the oven during a self-clean operation. To polish and help prevent fingerprints, follow with a damp ScotchBrite* pad; Care & Cleaning Cleaning Procedures CAUTION • Be sure appliance is off excess oil. Rinse and dry. • Racks will...
.... • Wash in warm soapy water. This is to avoid damage and possible burns. • To prevent staining or discoloration, clean appliance after each use a plastic soap-filled scouring pad; Bon Ami*, Smart Cleanser*, or Soft Scrub* using excessive amounts of movement, then wipe...such as they will permanently discolor and may be cleaned in the oven during a self-clean operation. To polish and help prevent fingerprints, follow with a damp ScotchBrite* pad; Care & Cleaning Cleaning Procedures CAUTION • Be sure appliance is off excess oil. Rinse and dry. • Racks will...
Owners Manual
Page 19
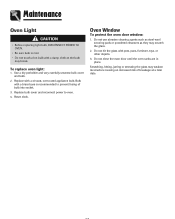
... hit the glass with a brass base is cool. • Do not touch a hot bulb with a 40 watt, oven-rated appliance bulb. Do not close the oven door until the oven racks are in place. Do not use abrasive cleaning agents such as steel wool scouring pads or powdered cleansers as the bulb... may break. To replace oven light: 1. Bulb with pots, pans, furniture, toys, or other objects. 3. Scratching, hitting, jarring...
... hit the glass with a brass base is cool. • Do not touch a hot bulb with a 40 watt, oven-rated appliance bulb. Do not close the oven door until the oven racks are in place. Do not use abrasive cleaning agents such as steel wool scouring pads or powdered cleansers as the bulb... may break. To replace oven light: 1. Bulb with pots, pans, furniture, toys, or other objects. 3. Scratching, hitting, jarring...

Owners Manual
Page 21
...noises. If the icon flashing still continues, disconnect power to the appliance and call an authorized servicer. • If the oven is heavily soiled, excessive flareups may have drifted to run after the oven has been turned off when the oven is cooled. This is normal and will continue to a too high... • This is the cooling fan and is normal. Press the CANCEL pad and allow the oven to the appliance. The fan will automatically shut off . • This is normal. You may hear the oven cooling fan going on and off . SOLUTION • The pans being used may not be of...
...noises. If the icon flashing still continues, disconnect power to the appliance and call an authorized servicer. • If the oven is heavily soiled, excessive flareups may have drifted to run after the oven has been turned off when the oven is cooled. This is normal and will continue to a too high... • This is the cooling fan and is normal. Press the CANCEL pad and allow the oven to the appliance. The fan will automatically shut off . • This is normal. You may hear the oven cooling fan going on and off . SOLUTION • The pans being used may not be of...

Owners Manual
Page 22
...reported to published user or operator instructions and/or installation instructions. 4. This major appliance is designed to use of consumables or cleaning products not approved by an authorized Maytag servicer is not installed in materials or workmanship. IMPLIED WARRANTIES, INCLUDING WARRANTIES OF ... and repair labor to correct defects in accordance with electrical or plumbing codes, or use your major appliance, unless such damage results from accident, alteration, misuse, abuse, fire, flood, acts of your authorized Maytag dealer to instruct you need service, first see the...
...reported to published user or operator instructions and/or installation instructions. 4. This major appliance is designed to use of consumables or cleaning products not approved by an authorized Maytag servicer is not installed in materials or workmanship. IMPLIED WARRANTIES, INCLUDING WARRANTIES OF ... and repair labor to correct defects in accordance with electrical or plumbing codes, or use your major appliance, unless such damage results from accident, alteration, misuse, abuse, fire, flood, acts of your authorized Maytag dealer to instruct you need service, first see the...

Installation Instructions
Page 1
... appliance. This symbol alerts you to reduce the chance of others . WARNING You can be killed or seriously injured if you what can kill or hurt you and others are not followed. INSTALLATION INSTRUCTIONS 27" (68.6 CM) AND 30" (76.2 CM) ELECTRIC SINGLE AND DOUBLE BUILT-IN OVEN ...INSTRUCTIONS D'INSTALLATION FOUR ÉLECTRIQUE ENCASTRÉ DE 27" (68,6 CM) ET 30" (76,2 CM) - All safety messages will tell...
... appliance. This symbol alerts you to reduce the chance of others . WARNING You can be killed or seriously injured if you what can kill or hurt you and others are not followed. INSTALLATION INSTRUCTIONS 27" (68.6 CM) AND 30" (76.2 CM) ELECTRIC SINGLE AND DOUBLE BUILT-IN OVEN ...INSTRUCTIONS D'INSTALLATION FOUR ÉLECTRIQUE ENCASTRÉ DE 27" (68,6 CM) ET 30" (76,2 CM) - All safety messages will tell...

Installation Instructions
Page 2
...appliance cable through to floor D. 28¹⁄₂" (72.4 cm) cutout width on some models) Check local codes. NOTE: For undercounter installation, it is required. Undercounter Installation (with oven... 2 single oven (4), double oven (8) ■ Bottom trim (supplied on 30" (76.2 cm) models E. 27⁷⁄₈...Electrical Requirements" section. ■ Electrical supply junction box should have an approval label located on rear wall behind oven, the junction box must be located in the right rear or left rear corner of cutout to the junction box. Single Oven 27...
...appliance cable through to floor D. 28¹⁄₂" (72.4 cm) cutout width on some models) Check local codes. NOTE: For undercounter installation, it is required. Undercounter Installation (with oven... 2 single oven (4), double oven (8) ■ Bottom trim (supplied on 30" (76.2 cm) models E. 27⁷⁄₈...Electrical Requirements" section. ■ Electrical supply junction box should have an approval label located on rear wall behind oven, the junction box must be located in the right rear or left rear corner of cutout to the junction box. Single Oven 27...